
Cole & Sekiya: Surgical Techniques of the Shoulder, Elbow and Knee in Sports Medicine, 1st ed.
Copyright ©
2008 Saunders, An Imprint of Elsevier
CHAPTER 2 – Knot-Tying and Suture-Passing Techniques
Adam M. Smith, MD
Indications for less invasive shoulder surgery continue to expand for the treatment of rotator cuff disease, impingement, labral tears, biceps injuries, and glenohumeral instability. [2] [3] [8] [12] [13] Techniques are constantly refined for even more difficult procedures, such as capsular release, acromioclavicular instability, and subscapularis tendon repair. Diagnoses that were considered challenging in the past, such as superior biceps–labral complex injuries, are now routinely treated through an all-arthroscopic approach. Shoulder instability can be assessed dynamically under direct visualization to better delineate the bony, labral, or capsular injuries, which can then be treated in the same setting.
Less invasive surgery results in minimal tissue damage, thus allowing earlier return to functional activities, although even with modern techniques a return to prior activity levels cannot be guaranteed. This development has been mostly driven by a combination of factors, including patients’ desire for more cosmetic procedures, decreased postoperative pain and morbidity, and outpatient surgery. Innovation by surgeons to accommodate these needs has been enthusiastically backed by the medical device industry.
Initial reports on arthroscopic treatment of shoulder injuries demonstrated inferior results in comparison to open procedures. However, with the development of specialized instruments, improved implants, and new techniques simplifying suture management, more recent studies have suggested at least equivalent outcomes. With rotator cuff, superior labral, and Bankart repair now routine arthroscopic procedures, orthopedic surgeons must have a full understanding of several approaches to tissue fixation and suture management, including a good command of suture passage and arthroscopic knot tying to facilitate minimally invasive techniques.
The improvement of suture anchors during the last several years has allowed the continued advancement of all-arthroscopic procedures. Various metal, bioabsorbable, and synthetic anchors are available from several manufacturers. Whereas numerous anchor designs are currently on the market, we believe that the following characteristics are particularly important in choosing an anchor for arthroscopic shoulder surgery.[14] The anchor eyelet should allow the sutures to slide easily and not fray; many designs now incorporate suture eyelets instead of drill holes through the anchor to achieve these goals. Furthermore, we prefer anchors that are preloaded with two multibraided polyester sutures and designed to allow sliding of the second suture even after the first one has been tied. Choosing an anchor that meets these characteristics will allow a more secure and rapid repair with multiple points of suture to anchor fixation.
Anchors have become a mainstay of fixation in shoulder surgery, even with certain open procedures; however, poor bone quality may make the use of anchors difficult and ideally should be noted preoperatively to allow planning for different methods of fixation, such as bone tunnels and augmentation devices. Absorbable or metal anchors can generally be used interchangeably. Whereas caution should be taken to ensure that all anchors are well seated below the level of any articular surfaces, metal anchors around the shoulder can be problematic.[9] Particularly, care must be taken with the insertion of metal anchors into the glenoid, such as with a superior labral anterior-posterior (SLAP) or Bankart repair, as loosening can cause severe articular cartilage damage.
Although there are many suture options, the choice should be based on the type of tissue being repaired and suture characteristics. Monofilament and braided sutures have different indications for use based on their sliding and resorption characteristics (
Fig. 2-1
).
|
|
|
|
Figure 2-1 |
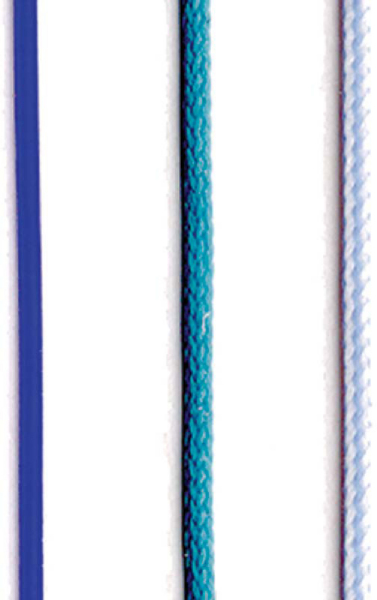
Modern multibraided polyester sutures have been a key advance in arthroscopic techniques, allowing the repair to be carried out in a more reliable fashion with less risk of suture breakage. FiberWire (Arthrex, Inc., Naples, Fla), Orthocord (DePuy-Mitek, Norwood, Mass), and Ultrabraid (Smith & Nephew, Inc., Memphis, Tenn) are newer types of braided nonabsorbable polyester sutures. These No. 2 size multibraided sutures have demonstrated performance similar to that of the larger diameter No. 5 Ethibond polyester suture.
These sutures are, generally, very strong and resist breaking or fraying with the repeated abrasion of instrument tying through cannulas and stretch minimally. Whereas these sutures do not slide as easily as the conventional Ethibond (Ethicon, Inc., Somerville, NJ) suture, which has a polybutylate coating, their strength characteristics are better suited for point fixation to an anchor.
Monofilament polydioxanone (PDS; Ethicon, Inc., Somerville, NJ) is an absorbable suture that is easily passed through most suture-passing devices.[15] We generally use PDS for capsular plication or rotator interval stitches. PDS loses strength rapidly and maintains only 50% of its initial strength at 4 weeks, which makes it less desirable for rotator cuff or labral repair. PDS suture is also stiffer than braided suture and, in our experience, is more difficult to tie with more frequent suture breakage.
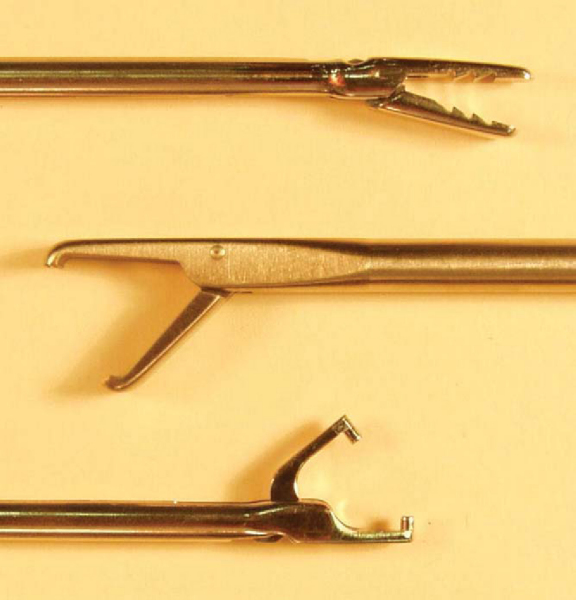
There are many ways to pass suture through tissue. Suture relay and direct suture-grasping techniques using various penetrating devices are effective approaches. The goal of suture passing is the precise placement of sutures to maximize secure tissue fixation and to minimize iatrogenic tissue injury. We advise familiarity with both methods to decrease frustration and operative times, as one technique alone might not always be appropriate for any given pathologic process. Familiarity with the multitude of available suture devices is helpful for efficient arthroscopic repair (
Fig. 2-2
).
|
|
|
|
Figure 2-2 |
Exposure and visualization are key to any successful surgery. In arthroscopic shoulder surgery, suture management is vastly complicated by inadequate removal of soft tissues. In our experience and observation, the failure to perform an adequate bursectomy before beginning an all-arthroscopic rotator cuff repair is the most common reason for conversion to an open procedure.[1] Care should be taken to resect the bursae laterally, anteriorly, and posteriorly to fully visualize and characterize the tear. This will also facilitate portal placement and maximize visualization and access for repair of the tear.
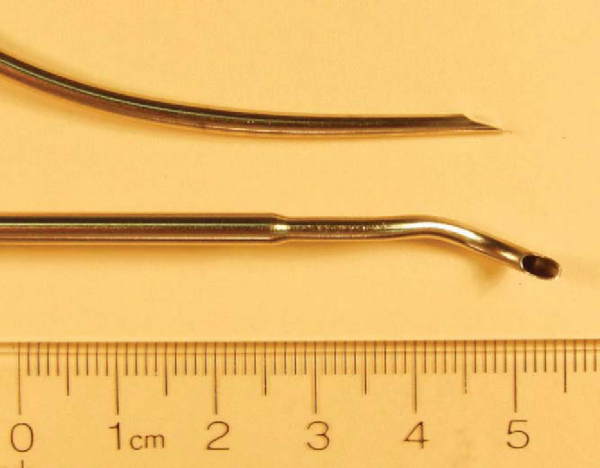
Suture relay has been the “workhorse” of arthroscopists from its inception. A cannulated large-bore needle device is passed through the soft tissue in need of repair (
Fig. 2-3
). A suture lasso such as a nitinol loop is then advanced through the needle and retrieved through a different working portal. The suture end that is to be shuttled through the tissue is retrieved through the same portal. Care should be taken not to entangle the suture that is to be passed with the remaining sutures. This can be avoided by grasping the lasso and the suture in one pass, retrieving them together through the same working portal. We strongly recommend the use of clear plastic cannulas in passing sutures to avoid soft tissue interposition in the suture. Clear cannulas can also be helpful when sutures become entangled within the cannula itself. The suture end is then passed through the lasso. Only 10 cm of suture or less should be passed to minimize kinking of the suture or lasso when the lasso is retrieved. The nitinol loop is then retracted through the original portal, retrieving the attached suture limb; this process is repeated until all sutures are retrieved. Suture lasso devices are available from several manufacturers with straight, curved, and corkscrew tips to facilitate suture passage.
|
|
|
|
Figure 2-3 |
Alternatively, devices that pass a monofilament, such as a No. 1 polydioxanone (PDS) or polypropylene (Prolene) suture, can provide a cost-effective alternative to commercially available disposable devices and shuttles. Suture hooks (Linvatec, Largo, Fla) with variable angled tips (i.e., 45-degree right and left) are reusable devices that readily advance a monofilament suture through tissue. The monofilament is then tied around the definitive suture limb by a simple half-hitch and then used to pull the suture through the tissue. When the knot-suture combination reaches the tissue junction, it is helpful to gently tug the monofilament to transfer energy to the level of the knot-suture junction to avoid overloading the monofilament proximally. It is also helpful to shuttle one suture limb at a time from within a cannula to prevent entanglement.
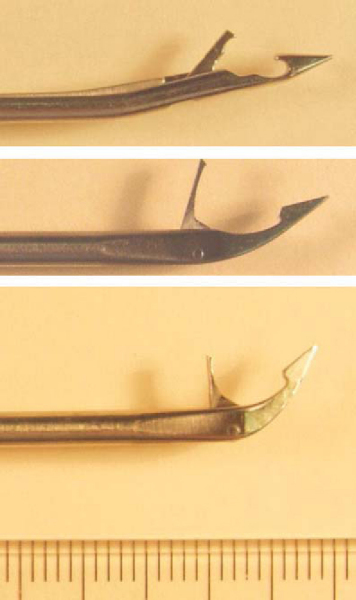
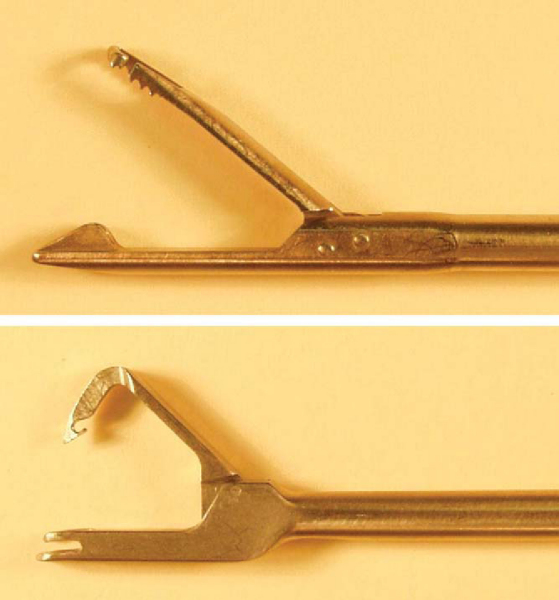
Tissue-penetrating devices are useful in larger spaces with more robust tissue (
Fig. 2-4
). These devices have sharp, pointed ends and are used to grasp or to pass suture directly through tissue. Penetrators can be used in either a retrograde or antegrade fashion to push or to pull suture through tissue and are available with straight and angled tips. Particular care should be taken with these instruments to avoid iatrogenic injury to cartilage or more delicate labral tissue. Obtaining an ideal angle for suture passage can be difficult, and accessory portals should be made if needed to improve instrument orientation.
|
|
|
|
Figure 2-4 |
Antegrade Suture-Passing Devices
More recently, devices have been developed that offer single-step antegrade suture passage and retrieval with the same instrument (
Fig. 2-5
). The various designs share one common function: to pass suture directly through the tissue and retrieve the limb through the same portal. Convenience, cost-effectiveness, and tissue quality are deciding factors in use of passive penetrators.
|
|
|
|
Figure 2-5 |
A multitude of knots have been described, but there are two basic types of knots: sliding-locking and nonsliding. Sliding-locking knots can be used only when the suture slides easily through the anchor and the tissue; nonsliding knots may also be used when the suture does not slide easily. Whereas there are benefits to each knot type, we recommend having a thorough understanding of both nonsliding knots and at least one sliding knot. [4] [5] [6] [7] The importance of knot security for limiting knot slippage cannot be overstated; only 3 mm of knot slippage or stretch constitutes failed tissue fixation. This section discusses and demonstrates some of the basic knot-tying techniques and principles (
Box 2-1
).
Nonsliding knots are relatively simple and are composed of simple repeated half-hitches on alternating posts, providing excellent suture fixation.[1]
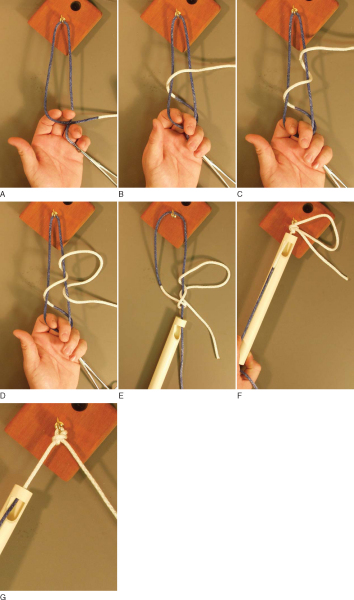
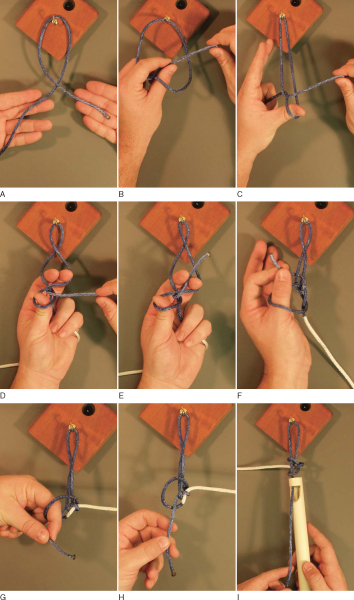
Sliding knots have a wide range of complexity, depending on whether the knot “locks” to resist slippage. A sliding-locking knot is used whenever possible in our practice. The Samsung Medical Center (SMC) knot [10] [11] is one of the most reliable sliding-locking knots, allowing minimal knot slippage (
Fig. 2-6
); the Weston knot (
Fig. 2-7
), another reliable knot we routinely use in our practice, allows a secure knot that slides easily.[16]
|
|
|
|
Figure 2-6 |
|
|
|
|
Figure 2-7 |
| SUTURE-PASSING PEARLS | ||||||||||||||||||
|
| SUTURE-TYING PEARLS | ||||||||||||||||||||||||
|
Advances in arthroscopic instruments and techniques have allowed surgeons to perform significantly more complex procedures. Careful planning, preparation, and patience are necessary when the transition is made to arthroscopic techniques. The surgeon must be able to visualize the structures and understand the basic principles of suture passing and knot tying before all-arthroscopic techniques should be considered.
1.
Altchek DW, Warren RF, Wickiewicz TL, et al: Arthroscopic acromioplasty: technique and results.
J Bone Joint Surg Am 1990; 72:1198-1207.
2.
Burkhart SS: Arthroscopic repair of massive rotator cuff tears: concept of margin convergence.
Tech Shoulder Elbow Surg 2000; 1:232-239.
3.
Burkhart SS, Morgan CD, Kibler WB: The disabled throwing shoulder: spectrum of pathology. Part II: evaluation and treatment of SLAP lesions in throwers.
Arthroscopy 2003; 19:531-539.
4.
Burkhart SS, Wirth MA, Simonich M, et al: Knot security in simple sliding knots and its relationship to rotator cuff repair: how secure must the knot be?.
Arthroscopy 2000; 16:202-207.
5.
Burkhart SS, Wirth MA, Simonick M, et al: Loop security as a determinant of tissue fixation security.
Arthroscopy 1998; 14:773-776.
6.
Chan KC, Burkhart SS: How to switch posts without rethreading when tying half-hitches.
Arthroscopy 1999; 15:444-450.
7.
Chan KC, Burkhart SS, Thiagarajan P, et al: Optimization of stacked half-hitch knots for arthroscopic surgery.
Arthroscopy 2001; 17:752-759.
8.
Geiger DF, Hurley JA, Tovey JA, et al: Results of arthroscopic versus open Bankart suture repair.
Clin Orthop 1997; 337:111-117.
9.
Kaar TK, Schenck Jr RC, Wirth MA, Rockwood Jr CA: Complications of metallic suture anchors in shoulder surgery: a report of 8 cases.
Arthroscopy 2001; 17:31-37.
10.
Kim SH, Ha KI: The SMC knot—a new slipknot with locking mechanism.
Arthroscopy 2000; 16:563-565.
11.
Kim SH, Ha KI, Kim JS: Significance of the internal locking mechanism for loop security enhancement in the arthroscopic knot.
Arthroscopy 2001; 17:850-855.
12.
Lo IK, Burkhart SS: Current concepts in arthroscopic rotator cuff repair.
Am J Sports Med 2003; 31:308-324.
13.
Nam EK, Snyder SJ: The diagnosis and treatment of superior labrum, anterior and posterior (SLAP) lesions.
Am J Sports Med 2003; 31:798-810.
14.
Ritchie PK, McCarty EC: Metal and plastic suture anchors for rotator cuff repair.
Oper Tech Sports Med 2004; 12:215-220.
15.
Trimbos JB, Booster M, Peters AA: Mechanical knot performance of a new generation polydioxanon suture (PDS-2).
Acta Obstet Gynecol Scand 1991; 70:157-159.
16.
Weston PV: A new clinch knot.
Obstet Gynecol 1991; 78:144-147.