
Appendix A
Musculoskeletal Radiography
Tudor Hughes
When ordering radiographic studies, it is important to
know which is the most appropriate study to answer the questions at
hand. To this end, it is necessary to know which images are obtained
when a certain series is requested, and the advantages of each series
and projection. Although all centers will have slightly different
series, what follows is a general guideline.
As a general rule, CT is a useful adjunct for
intraarticular fracture preoperative planning in larger joints where the
fractured bone is to be repaired rather than replaced, or complex areas
such as the carpal or tarsal regions. Although CT does involve a
significant dose of ionizing radiation, this is of most concern
centrally rather than peripherally. A full x-ray series of the pelvis or
lumbar spine can give a higher radiation dose and less useful
information than coned down CT of the area of interest.
US is an ideal inexpensive way of assessing superficial
soft tissues for both trauma and masses. It has the distinct advantage
of being dynamic, imaging the patient in real time as they move, and
also being interactive with the patient, assessing their points of pain.
soft tissues for both trauma and masses. It has the distinct advantage
of being dynamic, imaging the patient in real time as they move, and
also being interactive with the patient, assessing their points of pain.
MRI is a useful method for assessing the soft tissues for
injury or mass, and the bones for occult injuries and bone marrow
changes.
injury or mass, and the bones for occult injuries and bone marrow
changes.
Upper Extremities
Fingers
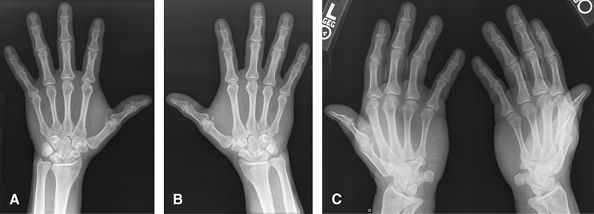
For 2nd–5th digits. Specifically to look at 1 finger for
trauma, foreign body, or localized mass. A marker should be applied,
particularly on the lateral projection. Consider US for radiolucent
foreign body. Consider MRI or US for mass or tendon lesion/injury.
trauma, foreign body, or localized mass. A marker should be applied,
particularly on the lateral projection. Consider US for radiolucent
foreign body. Consider MRI or US for mass or tendon lesion/injury.
 |
|
Figure 1 (A) PA hand. (B) Oblique of fingers. (C, D) Lateral of fingers.
|
Thumb
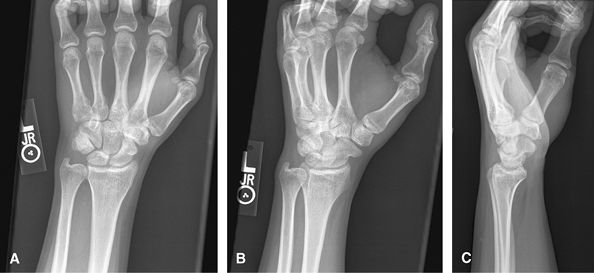
Specifically to look at the thumb for trauma, foreign
body or localized mass. Good for ulnar collateral ligament avulsion. A
marker should be applied. Consider US for radiolucent foreign body.
Consider MRI or US for mass, UCL injury (without or with Stener lesion)
or tendon lesion/injury. Stress views are no longer encouraged for acute
UCL injury for fear of converting to a Stener lesion but maybe useful
later on to assess stability.
P.630
Musculoskeletal Radiography
 |
|
Figure 2 (A) PA hand. (B) PA thumb. (C) Lateral thumb.
|
Hand
Routine
This includes an off axis view of the wrist but should
not be used to assess wrist alignment. Good overview for hand pain. May
need additional wrist views if pain is proximal or difficult to
localize. Important to have fingers spread on lateral view so that all
volar plates are well visualized. MRI or US may be useful adjuncts to
look at adjacent soft tissues.
 |
|
Figure 3 (A) PA of hand. (B) Oblique of hand. (C) Lateral of hand.
|
Hand
Arthritis Survey
Some centers prefer pronated obliques over supinated ball
catcher (Norgaard) obliques. Both of these are good for overall
assessment of arthritis, individual erosions, soft tissue swelling, and
distribution. MRI or US are useful adjuncts to assess the soft tissues,
for synovitis joint fluid and are said to be more sensitive for
erosions.
catcher (Norgaard) obliques. Both of these are good for overall
assessment of arthritis, individual erosions, soft tissue swelling, and
distribution. MRI or US are useful adjuncts to assess the soft tissues,
for synovitis joint fluid and are said to be more sensitive for
erosions.
 |
|
Figure 4 (A, B) PA of each hand. (C) AP Norgaard projection (Ball catcher’s position).
|
P.631
Wrist
Nontrauma, Infection
For typical wrist pain evaluations including arthritis or
mass. Good for carpal alignment. US: good for soft tissue masses,
tendon pathology. CT scan may be a useful adjunct to assess for occult
scaphoid fractures and for healing, as well as other occult injuries
such as hook of hamate fracture. CT is often used in the preoperative
workup of intraarticular distal radial fractures. MRI is good for occult
fractures, Kienböck’s, AVN of lunate or scaphoid, triangular
fibrocartilage tears, or intercarpal ligament injuries.
 |
|
Figure 5 (A) PA wrist. (B) Ulnar oblique wrist. (C) Lateral wrist.
|
Trauma
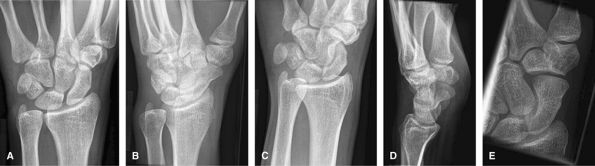
Additional scaphoid views include oblique and ulnar
deviation with cranial angulation. These are good to assess for most
aspects of trauma including fracture, subluxation, or dislocation. Of
note, the lateral view can only be used to assess alignment when the
volar aspect of the pisiform projects between the scaphoid and capitate.
MRI is a useful adjunct to assess for occult injury, intercarpal
ligament injury, triangular fibrocartilage complex injury, mass, or
synovitis.
 |
|
Figure 6 (A) PA wrist. (B) Ulnar oblique wrist. (C) Radial oblique wrist. (D) Lateral wrist. (E) Navicular view.
|
Additional Views
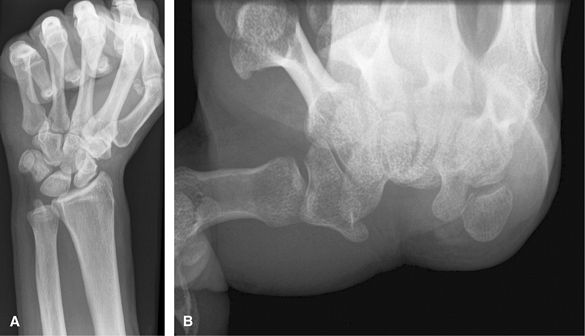
Clenched fist views taken AP are useful for occult cases
of scapholunate ligament disruption. Clenching the fist pushes the
carpal bones apart. Carpal tunnel view is good for looking for hook of
hamate, trapezial ridge fractures, or carpal tunnel syndrome
posttrauma/wrist fracture. CT is another good way to assess for occult
carpal fractures. MRI without or with intraarticular dilute Gadolinium
is good to assess for internal derangement.
P.632
 |
|
Figure 7 (A) Clenched fist. (B) Carpal tunnel views.
|
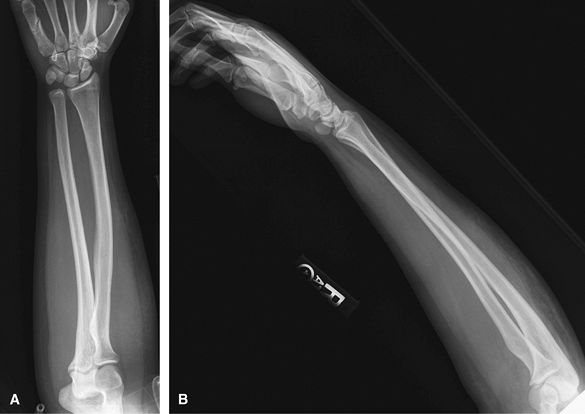
Forearm
Good for trauma, mass, foreign body,
cellulitis/osteomyelitis, or abscess. It is important that the elbow
rotates through 90 degrees between the AP and lateral so that 2
identical views of the ulna are not obtained. Consider US or MRI to
assess for mass or soft tissue injury.
cellulitis/osteomyelitis, or abscess. It is important that the elbow
rotates through 90 degrees between the AP and lateral so that 2
identical views of the ulna are not obtained. Consider US or MRI to
assess for mass or soft tissue injury.
 |
|
Figure 8 (A) AP forearm. (B) Lateral forearm.
|
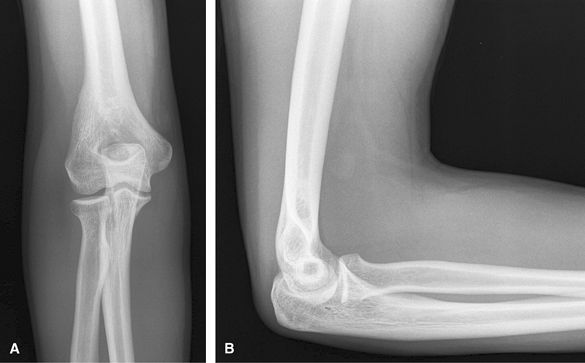
Elbow
Nontrauma
Chronic injuries, arthritis, foreign bodies, and
infection. Lateral is good for effusion and olecranon bursitis. AP is
good for epicondylar enthesopathy and osteophytes. Consider US or MRI
for soft tissue mass.
infection. Lateral is good for effusion and olecranon bursitis. AP is
good for epicondylar enthesopathy and osteophytes. Consider US or MRI
for soft tissue mass.
P.633
 |
|
Figure 9 (A) AP elbow. (B) Lateral elbow.
|
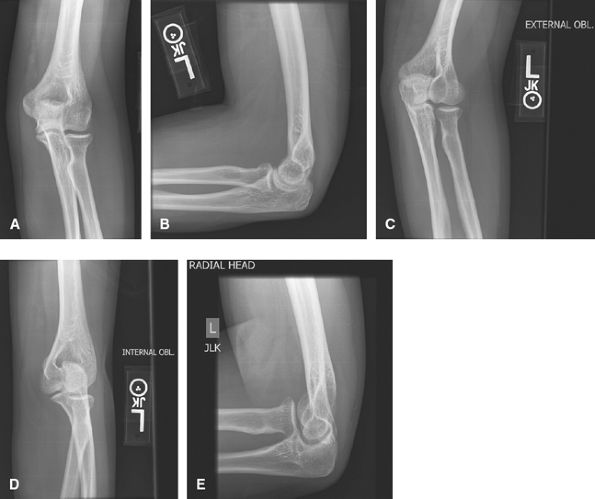
Trauma
Good to assess for otherwise occult radial head
fractures. Often AP, lateral, and radial head are enough for trauma. US
or MRI can assess for ligamentous or tendon injuries.
fractures. Often AP, lateral, and radial head are enough for trauma. US
or MRI can assess for ligamentous or tendon injuries.
 |
|
Figure 10 (A) AP. (B) Lateral. (C) Lateral (external or radial) oblique. (D) Medial (internal or ulnar) oblique. (E) Radial head view.
|
P.634
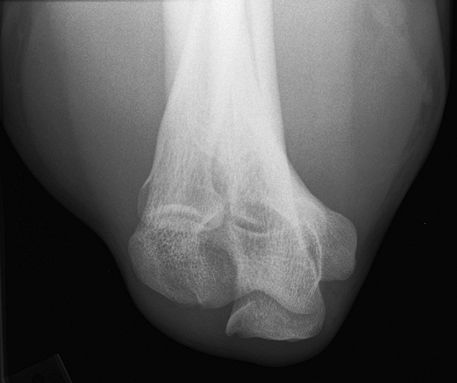
Additional Views
Good to assess for radio opaque causes of cubital tunnel
syndrome, such as osteophytes. Consider US or MRI for further assessment
of cubital tunnel.
syndrome, such as osteophytes. Consider US or MRI for further assessment
of cubital tunnel.
 |
|
Figure 11 Cubital tunnel view.
|
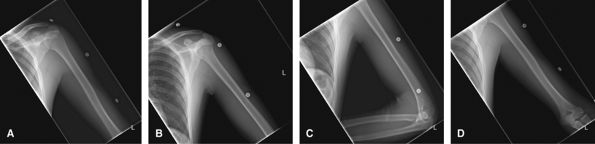
Humerus
To assess for trauma, infection, mass, or foreign body.
Both the shoulder and elbow should be included on the study in both
projections, but they should not be over interpreted on such limited
views.
Both the shoulder and elbow should be included on the study in both
projections, but they should not be over interpreted on such limited
views.
 |
|
Figure 12 (A) AP to include shoulder joint. (B) Lateral to include shoulder joint. (C) AP to include elbow joint. (D) Lateral to include elbow joint.
|
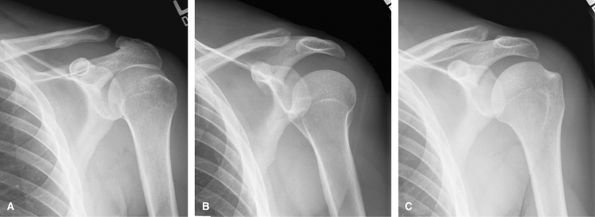
Shoulder
Nontrauma, Chronic Pain
Shoulder series vary widely between institutions. Good to
assess for location of hydroxyapatite, osteoarthrosis, and other
degenerative changes. US or MRI is best to assess for rotator cuff
tears. If a rotator cuff tear is seen on plain films by reduced
acromiohumeral distance, then MRI is better than US to show the degree
of retraction and atrophy, if the patient is a candidate for repair. MRI
is best for glenoid labral pathology for which an MRI arthrogram will
give additional information. CT is useful in the preoperative planning
of shoulder arthroplasty to assess for bone stock and any
intra-articular glenoid fracture.
P.635
 |
|
Figure 13 (A) AP neutral. (B) AP internal rotation. (C) AP external rotation.
|
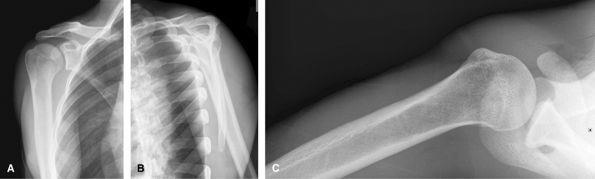
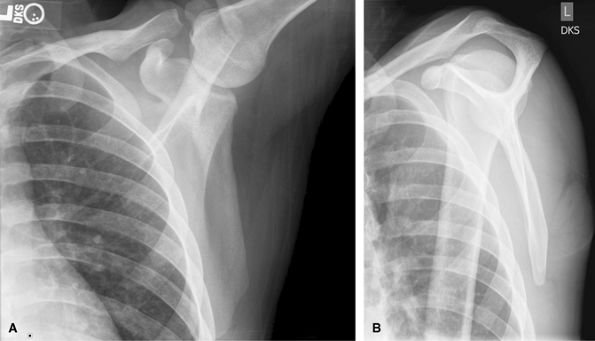
Trauma, Acute Injuries
To evaluate for humeral neck/tuberosity fractures and
shoulder dislocations. CT is useful to assess for Hill Sachs lesions and
bony Bankart. MRI can be difficult to interpret acutely due to blood
tracking into the rotator cuff from tuberosity fractures. Subacutely,
MRI may be useful to assess for accompanying internal derangement.
shoulder dislocations. CT is useful to assess for Hill Sachs lesions and
bony Bankart. MRI can be difficult to interpret acutely due to blood
tracking into the rotator cuff from tuberosity fractures. Subacutely,
MRI may be useful to assess for accompanying internal derangement.
 |
|
Figure 14 (A) AP scapula,- neutral rotation. (B) Lateral “Y” view. (C) Axillary view, as tolerated by patient.
|
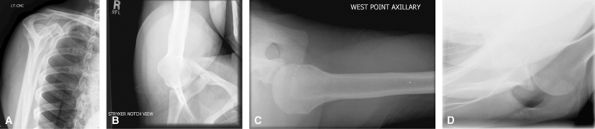
Additional Views
Outlet view is good to look at subacromial space to
assess for causes of external shoulder subacromial impingement. It can
also be used to localize calcium in the rotator cuff. Stryker notch view
is good for Hill Sachs lesions, but most are seen on neutral rotation
AP shoulder. Westpoint view is good for detecting bony Bankart lesions,
but consider CT. Velpeau view can be a useful adjunct to assess for
dislocation in a patient who cannot raise their arm.
 |
|
Figure 15 (A) Supraspinatus view (outlet, Bigliani method). (B) Westpoint. (C) Stryker. (D) Velpeau.
|
P.636
Scapula
Good for trauma, scapulothoracic syndrome. Consider CT
for trauma workup to assess for glenoid involvement. MRI can assess for
scapulothoracic friction syndromes.
for trauma workup to assess for glenoid involvement. MRI can assess for
scapulothoracic friction syndromes.
 |
|
Figure 16 (A) AP scapula. (B) Lateral scapula.
|
Acromioclavicular Joints
These are routinely assessed on AP shoulder views. Views
without and with weights to look for occult type 1 separations usually
do not alter management but can make the diagnosis. May be useful in
legal cases. Consider MRI to assess for deltotrapezial disruption in
type 3 or higher injuries.
without and with weights to look for occult type 1 separations usually
do not alter management but can make the diagnosis. May be useful in
legal cases. Consider MRI to assess for deltotrapezial disruption in
type 3 or higher injuries.
 |
|
Figure 17 (A) AP without weights. (B) AP with weights.
|
Clavicles
Good for clavicle fractures. Medial clavicle fractures
can be difficult to see. Consider CT for possible medial clavicle
fractures.
can be difficult to see. Consider CT for possible medial clavicle
fractures.
 |
|
Figure 18 (A) AP, 0-degree tube angle. (B) AP, 10-degree cephalad angle.
|
P.637
Lower Extremities
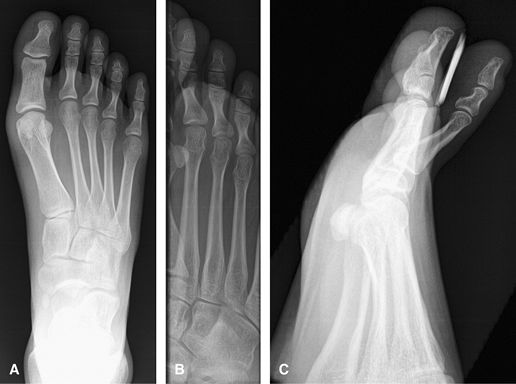
Toes
For 1st–5th digits. Specifically to look at 1 toe for
trauma, foreign body or localized mass. Socks off. A marker should be
applied. The lateral view should have the affected toe lifted or
depressed clear of the others. Consider US for radiolucent foreign body.
Consider MRI or US for mass or tendon lesion/injury.
trauma, foreign body or localized mass. Socks off. A marker should be
applied. The lateral view should have the affected toe lifted or
depressed clear of the others. Consider US for radiolucent foreign body.
Consider MRI or US for mass or tendon lesion/injury.
 |
|
Figure 19 (A) AP foot. (B) Medial oblique of affected toe(s). (C) Lateral of toe(s).
|
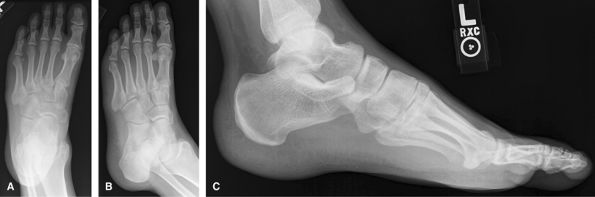
Foot
Perform all 3 views for trauma and nontrauma cases. A
limited 2-view foot is discouraged. Weight-bearing to assess foot
alignment. Non–weight-bearing if painful to stand or looking for a
foreign body or mass. Non–weight-bearing if ulcer and looking for
osteomyelitis. Always remove socks!
limited 2-view foot is discouraged. Weight-bearing to assess foot
alignment. Non–weight-bearing if painful to stand or looking for a
foreign body or mass. Non–weight-bearing if ulcer and looking for
osteomyelitis. Always remove socks!
Consider US for Morton’s neuroma or plantar fasciitis, or
superficial mass. CT is good for full assessment of Lisfranc injuries.
MRI good for occult fracture or mass.
superficial mass. CT is good for full assessment of Lisfranc injuries.
MRI good for occult fracture or mass.
 |
|
Figure 20 (A) AP (dorsoplantar). (B) Medial oblique. (C) Lateral (mediolateral projection).
|
P.638
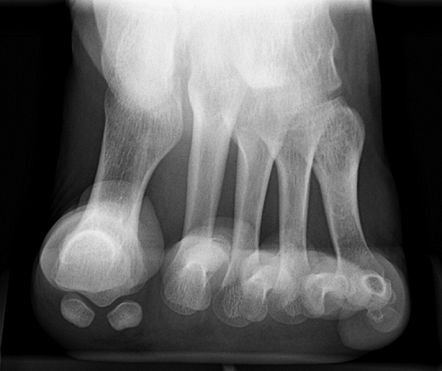
Sesamoid View
Good to look at sesamoid alignment with metatarsal head
in hallux valgus, to assess metatarsal sesamoid osteoarthrosis or to
look for fracture of sesamoid.
in hallux valgus, to assess metatarsal sesamoid osteoarthrosis or to
look for fracture of sesamoid.
 |
|
Figure 21 Sesamoid projection.
|
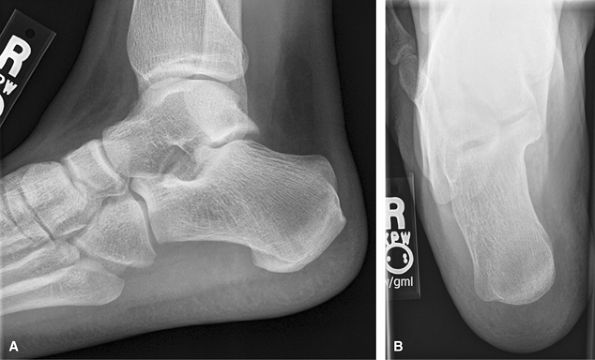
OS Calcis
Weight-bearing for alignment or non–weight-bearing for
mass or if too painful to stand. Good for trauma and heel alignment.
This should be the preferred study for heal pain rather than a foot
series. The posterior subtalar joint and middle subtalar facet are often
well visualized on the axial or Harris Beath view. Consider CT for full
preoperative assessment of calcaneal fractures.
 |
|
Figure 22 (A) Lateral calcaneus mediolateral projection. (B) PA axial plantodorsal.
|
P.639
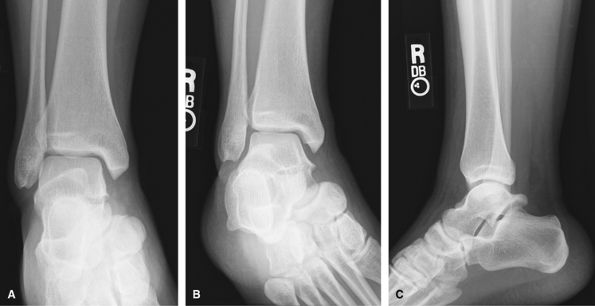
Ankle
Weight-bearing if alignment being assessed, or non–weight-bearing if trauma, or looking for mass.
Ideal for all acute ankle injuries. The base of 5th
metatarsal should be included in case the ankle pain originates from
here. For heel pain, use heel or calcaneal projections. US is useful to
assess tendon injuries. CT is good for complex hind foot fractures. MRI
is good to assess the tendons and ligaments for masses and occult
fractures.
metatarsal should be included in case the ankle pain originates from
here. For heel pain, use heel or calcaneal projections. US is useful to
assess tendon injuries. CT is good for complex hind foot fractures. MRI
is good to assess the tendons and ligaments for masses and occult
fractures.
 |
|
Figure 23 (A) AP ankle. (B) Mortise ankle. (C) Mediolateral lateral.
|
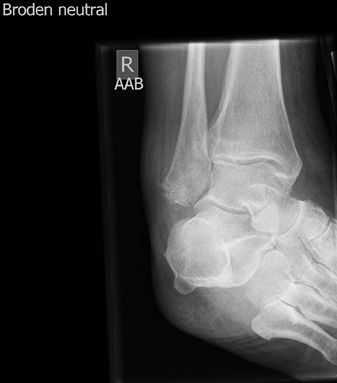
Posterior Subtalar Joint
The Broden view is a useful adjunct view to look at the
posterior subtalar joint to assess for intraarticular fractures and
arthritis.
posterior subtalar joint to assess for intraarticular fractures and
arthritis.
 |
|
Figure 24 Broden view of posterior subtalar joint.
|
P.640
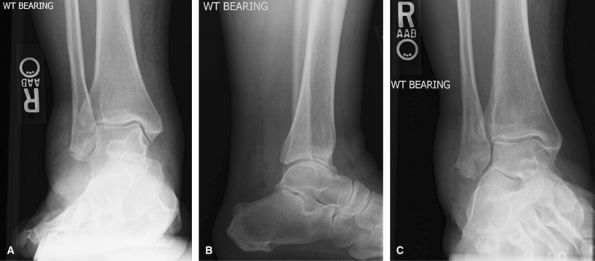
Weight-Bearing Views of the Ankle
Weight-bearing views are useful to eliminate the effects
of a large joint effusion from widening or straightening the ankle
mortise.
of a large joint effusion from widening or straightening the ankle
mortise.
 |
|
Figure 25 (A) AP weight-bearing ankle. (B) Mortise weight-bearing ankle. (C) Mediolateral lateral weight-bearing ankle.
|
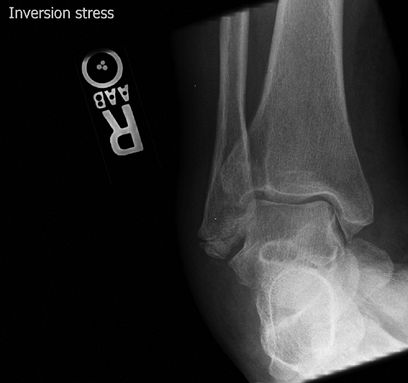
Stress Views of the Ankle
These give more functional information than MRI about
ligamentous laxity and are useful in planning treatment for unstable
ankles. It is important to have the other side for comparison.
ligamentous laxity and are useful in planning treatment for unstable
ankles. It is important to have the other side for comparison.
 |
|
Figure 26 AP ankle with varus stress.
|
P.641
Tibia/Fibula
This should include both the ankle and knee joints. The
ankle and knee should not be over interpreted on these off axis views.
Good for trauma, foreign body, mass, cellulitis. For stress fractures,
consider MRI or bone scan.
ankle and knee should not be over interpreted on these off axis views.
Good for trauma, foreign body, mass, cellulitis. For stress fractures,
consider MRI or bone scan.
 |
|
Figure 27 (A) AP. (B) Mediolateral lateral.
|
Knee
Nontrauma, Chronic Injury
Good for initial arthritis assessment. MRI is useful to
assess for internal derangement but is of less value when there is
obvious osteoarthrosis on radiographs.
assess for internal derangement but is of less value when there is
obvious osteoarthrosis on radiographs.
 |
|
Figure 28 (A) AP. (B) Mediolateral lateral.
|
P.642
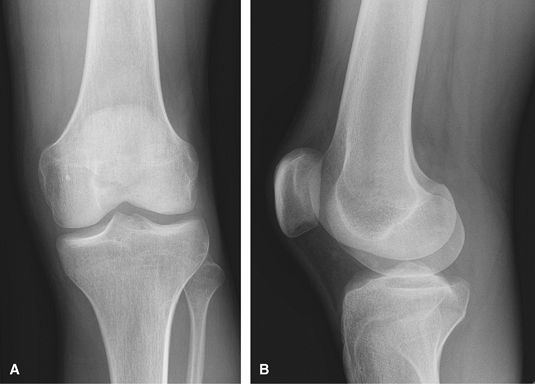
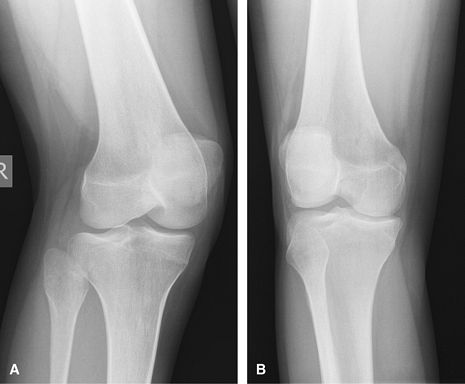
Trauma, Acute Injury
Shoot through lateral added to assess for a
lipohemarthrosis, if present a fracture must be sought. CT is a useful
adjunct to assess for occult tibial plateau fractures and to plan
surgery with fractures seen on radiographs. MRI being used increasingly
to assess accompanying soft tissue injuries in cases of tibial plateau
fractures.
lipohemarthrosis, if present a fracture must be sought. CT is a useful
adjunct to assess for occult tibial plateau fractures and to plan
surgery with fractures seen on radiographs. MRI being used increasingly
to assess accompanying soft tissue injuries in cases of tibial plateau
fractures.
 |
|
Figure 29 (A) AP. (B) Mediolateral lateral. (C) Lateromedial crosstable lateral.
|
Additional Views
Rosenberg view. This
weight-bearing posteroanterior view with flexion is useful to show both
the intercondylar notch and the joint space formed by the more posterior
femoral condyle.
weight-bearing posteroanterior view with flexion is useful to show both
the intercondylar notch and the joint space formed by the more posterior
femoral condyle.
 |
|
Figure 30 Rosenberg view.
|
P.643
Oblique views. Traditionally used to assess for occult tibial plateau fractures, still useful but now often replaced by CT or MRI.
 |
|
Figure 31 (A) Medial oblique. (B) Lateral oblique.
|
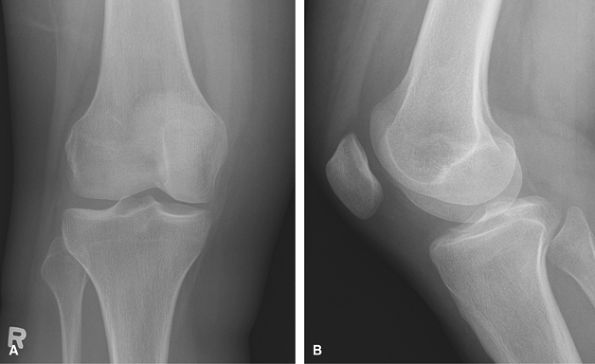
Patella. Initially a routine knee is performed in cases of trauma.
 |
|
Figure 32 (A) PA knee. (B) Mediolateral lateral.
|
P.644
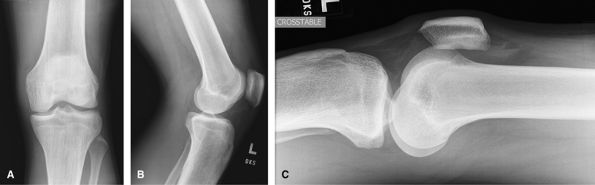
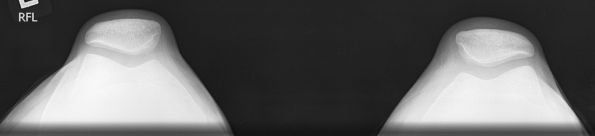
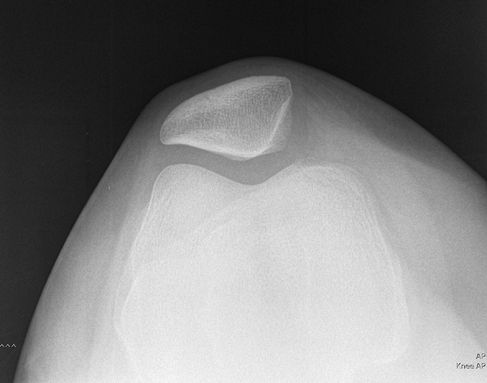
Additional Views
Merchants view is good to assess patella alignment in
cases of subluxation, dislocation, or tracking problems. These are taken
at 30 degrees of flexion, the angle at which the patella is most
unstable. It is taken caudal cranial and includes both knees. The
Sunrise axial projection is taken kneeling of just the affected the
knee.
cases of subluxation, dislocation, or tracking problems. These are taken
at 30 degrees of flexion, the angle at which the patella is most
unstable. It is taken caudal cranial and includes both knees. The
Sunrise axial projection is taken kneeling of just the affected the
knee.
 |
|
Figure 33 Merchants (bilateral patellar view).
|
 |
|
Figure 34 Axial projection (unilateral sunrise method).
|
Femur
Acute Injury, Trauma
Views of the femur should include both the hip and knee.
The trauma series has a crosstable lateral of both the hip and knee so
that the patient does not have to move.
The trauma series has a crosstable lateral of both the hip and knee so
that the patient does not have to move.
P.645
 |
|
Figure 35 (A) AP proximal. (B) AP distal. (C) X-table lateral femur to include knee joint. (D) Inferosuperior lateral to include proximal femur and hip joint for unilateral injury.
|
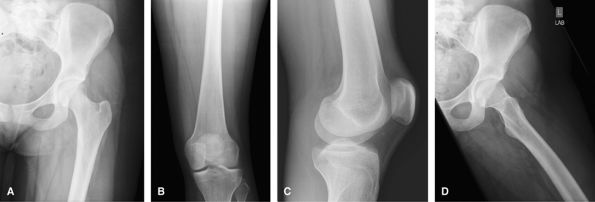
Nonacute Injury
The views include both the hip and the knee, but the hip
is a frog lateral and the knee a rolled mediolateral. For soft tissue
mass, consider MRI.
is a frog lateral and the knee a rolled mediolateral. For soft tissue
mass, consider MRI.
 |
|
Figure 36 (A) AP to include hip and proximal femur. (B) AP to include knee and distal femur. (C) Mediolateral lateral to include knee. (D) Lateral frog-leg hip.
|
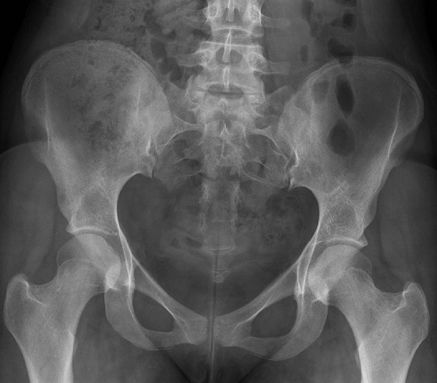
Pelvis
Include Both Hips on Image
Good initial screening test for acute trauma. Good for
ill defined pain or metastatic search. Consider CT for full assessment
of pelvic trauma.
ill defined pain or metastatic search. Consider CT for full assessment
of pelvic trauma.
P.646
 |
|
Figure 37 AP pelvis.
|
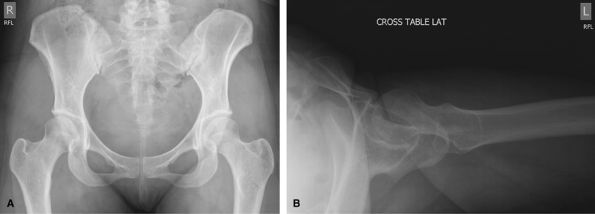
Hips
Trauma, Acute Injury. AP pelvis and a crosstable lateral to assess for hip pain localized to the 1 side of the pelvis/hip.
 |
|
Figure 38 (A) AP pelvis. (B) Inferosuperior lateral to include proximal femur and hip joint for unilateral injury.
|
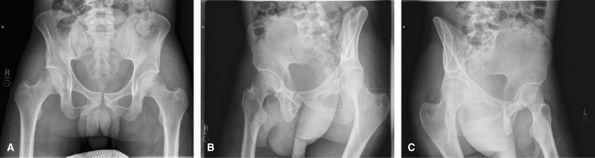
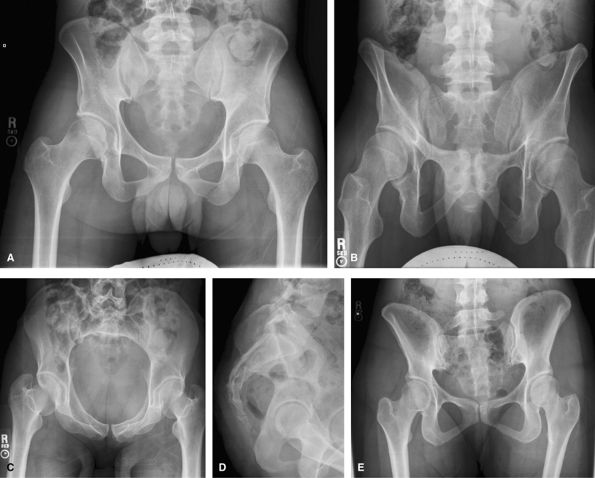
Nontrauma, Chronic Injury.
The crosstable lateral is replaced by a frog lateral. The frog leg can
be bilateral or unilateral depending on the pain. MRI is an excellent
way to assess hip pain if the radiographs show only minimal abnormality.
MRI arthrogram can give useful additional information about the labrum.
The crosstable lateral is replaced by a frog lateral. The frog leg can
be bilateral or unilateral depending on the pain. MRI is an excellent
way to assess hip pain if the radiographs show only minimal abnormality.
MRI arthrogram can give useful additional information about the labrum.
P.647
 |
|
Figure 39 (A) AP pelvis. (B) Bilateral frog leg. (C) or Frog-leg lateral of affected hip.
|
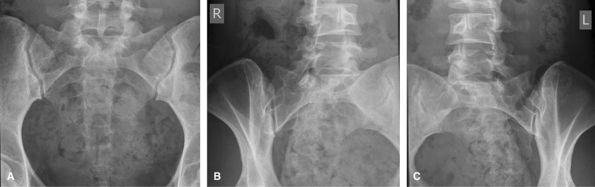
Sacroiliac Joints
Good initial screening test for sacroiliitis. MRI is more sensitive and saves radiation to the gonads.
 |
|
Figure 40 (A) AP pelvis. (B) AP oblique of right sacroiliac joint. (C) AP oblique of left sacroiliac joint.
|
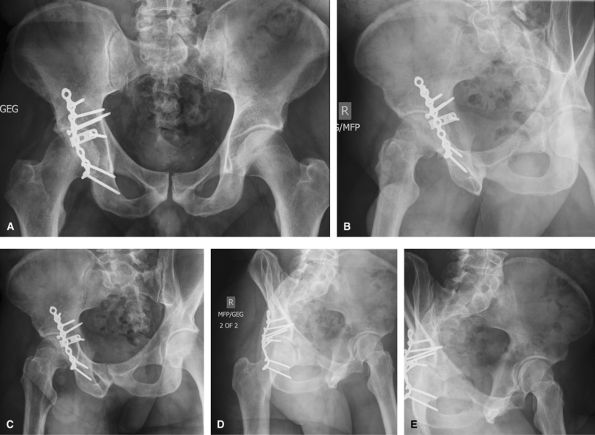
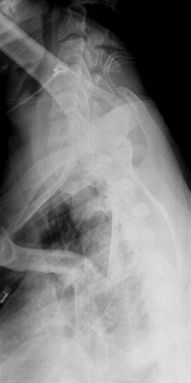
Acetabulum (Judet Views)
Good for assessing acetabular fractures, but now usually
replaced by oblique images of whole pelvis. Requires 4 images: 2 RPO and
2 LPO images, collimated to affected side only.
replaced by oblique images of whole pelvis. Requires 4 images: 2 RPO and
2 LPO images, collimated to affected side only.
 |
|
Figure 41 (A) AP pelvis. (B) Right posterior oblique (RPO) CR on up-side. (C) Right posterior oblique (RPO) CR on down-side. (D) Left posterior oblique (LPO) CR on up-side. (E) Left posterior oblique (LPO) CR on down-side.
|
P.648
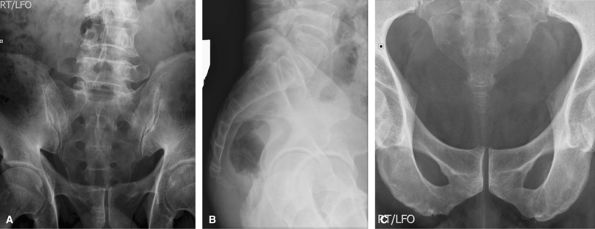
Oblique Pelvis
Also good for assessing fractures about the acetabular.
CT is good for the initial assessment, but when there is a need to
follow up fractures, oblique views are usually used.
CT is good for the initial assessment, but when there is a need to
follow up fractures, oblique views are usually used.
 |
|
Figure 42 (A) AP pelvis. (B) Right posterior oblique (RPO). (C) Left posterior oblique (LPO).
|
Inlet/Outlet
Good to assess for pelvic fractures involving the pubic
rami and sacrum. CT is good for the initial assessment, but when there
is a need to follow up fractures at these locations, inlet and outlet
views are usually used.
rami and sacrum. CT is good for the initial assessment, but when there
is a need to follow up fractures at these locations, inlet and outlet
views are usually used.
 |
|
Figure 43 (A) AP pelvis. (B) AP axial outlet view. (C) AP axial inlet view.
|
P.649
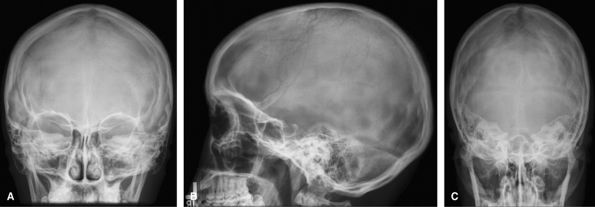
Vertebral Column
Not used very often because most indications for a skull
radiograph are better served by a CT. Can still be used to assess shunt
continuity.
radiograph are better served by a CT. Can still be used to assess shunt
continuity.
 |
|
Figure 44 (A) PA skull. (B) Lateral skull. (C) Townes view.
|
P.650
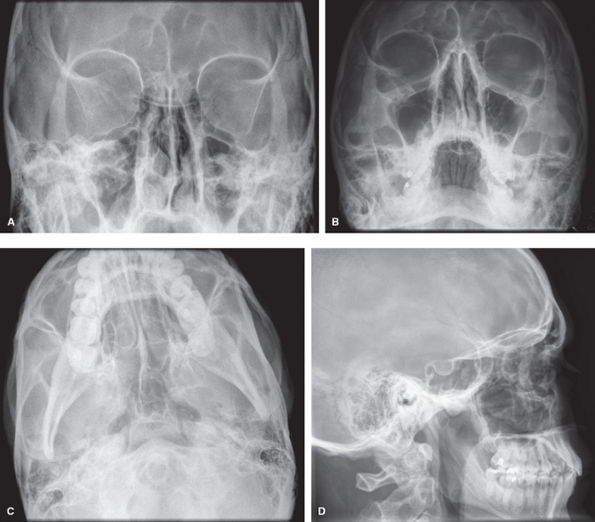
Face
Good initial screening test for facial trauma. If found, these will usually be followed up with CT to show the full extent.
 |
|
Figure 45 (A) Occipitofrontal. (B) Occipitomental. (C) Occipitomental with 30-degree cranial angulation. (D) Lateral face.
|
P.651
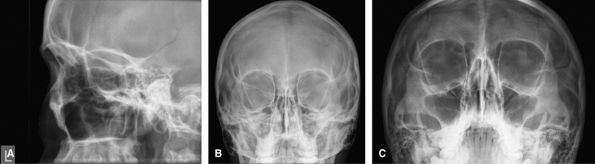
Orbits
Useful to look for any destructive bony lesion about the orbit. Replaced by CT when available.
 |
|
Figure 46 (A) Lateral face. (B) Occipitofacial. (C) Occipitomental.
|
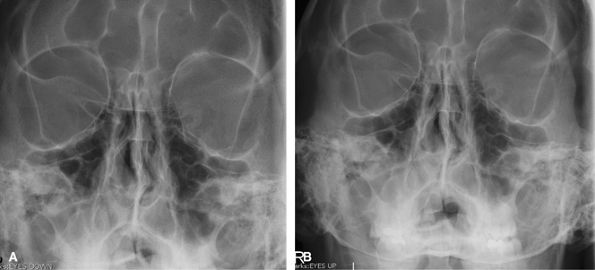
Eyes
Only indication would be to look for foreign body within
the eye, usually prior to MRI. By looking up and down, it is possible to
see if the body moves with the eye.
the eye, usually prior to MRI. By looking up and down, it is possible to
see if the body moves with the eye.
 |
|
Figure 47 (A) Occipitofacial looking up. (B) Occipitofacial looking down.
|
Mandible
The 1st investigation to look for mandible trauma, but
also used to look for disease related to the teeth and their sockets. CT
is a useful adjunct for mandibular trauma. The oblique views show the
labeled side as the inferiorly.
also used to look for disease related to the teeth and their sockets. CT
is a useful adjunct for mandibular trauma. The oblique views show the
labeled side as the inferiorly.
 |
|
Figure 48 (A) Occipitofacial. (B) AP axial. (C) Left inferosuperior oblique. (D) Right inferosuperior oblique.
|
P.652
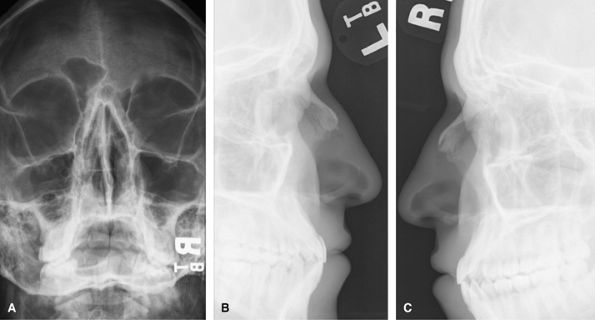
Nasal Bone
Used to assess for nasal trauma. Can also be used to show
the septum in cases of nasal septal destruction, but would usually be
replaced by CT for the latter. Many advocate not radiographing the nose
for 7–10 days until the swelling has subsided, and then only if the
patient is unhappy with the appearance. Bilateral lateral views are
probably overdoing things.
 |
|
Figure 49 (A) Coned down occipitofacial. (B) Left lateral soft tissue exposure. (C) Right lateral soft tissue exposure.
|
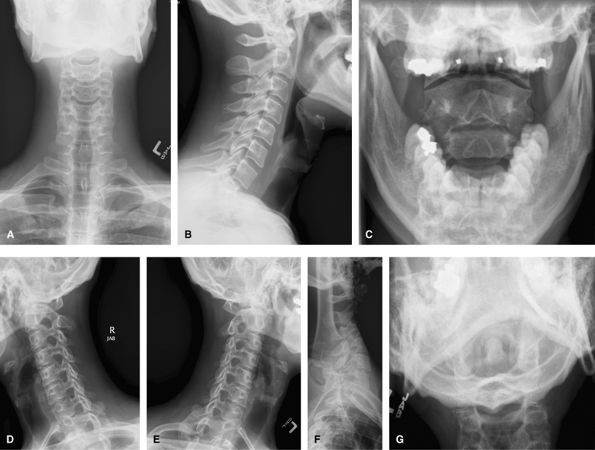
Cervical Spine
Complete
Include a swimmer’s view if C7–T1 junction is not well
visualized on the lateral view, and a Fuch’s view if the odontoid is
suboptimal. Such a full series is rarely used and would be replaced by
CT for acute trauma and CT or MRI for chronic pain/radiculopathy.
Oblique views such as these would be difficult in the trauma setting and
would be done as trauma obliques with the patient supine and the beam
angled obliquely. They can be useful to show the posterior elements,
particularly at the cervicothoracic junction where it may otherwise be
difficult.
 |
|
Figure 50 (A) AP. (B) Lateral. (C) AP odontoid (open mouth). (D) Right anterior oblique (wrongly labeled). (E) Left anterior oblique. (F) Swimmer’s view to visualize C7–T1. (G) Fuch’s view.
|
P.653
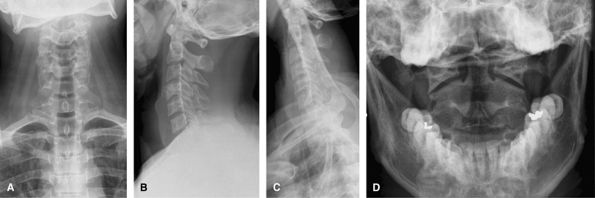
Limited
A more reasonable series for acute trauma. Follow-up or chronic pain would usually emphasize the area of interest.
 |
|
Figure 51 (A) AP. (B) Lateral. (C) AP odontoid (open mouth). (D) Swimmer’s view
|
P.654
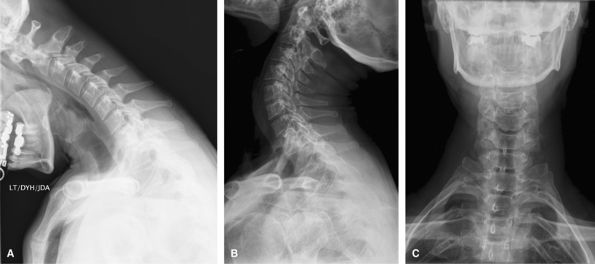
Flex-ext Series
The best way to assess for cervical stability. They
cannot be obtained acutely after trauma when there will likely be spasm
but should be delayed 10 days.
cannot be obtained acutely after trauma when there will likely be spasm
but should be delayed 10 days.
 |
|
Figure 52 (A) Flexion lateral. (B) Extension lateral.
|
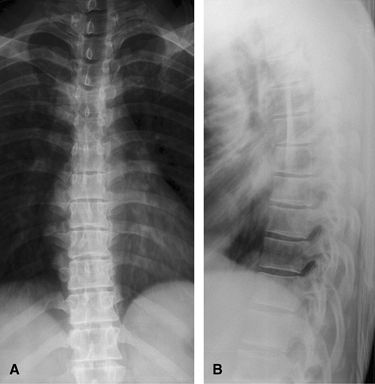
Thoracic Spine
Good initial assessment of pain and trauma. The lateral
view may need to be augmented by a swimmer’s view to show the
cervicothoracic junction.
view may need to be augmented by a swimmer’s view to show the
cervicothoracic junction.
 |
|
Figure 53 (A) AP thoracic spine. (B) Lateral thoracic spine.
|
P.655
Additional Views
The lateral view may need to be augmented by a swimmer’s
view to show the cervicothoracic junction. CT is used to characterize
any fractures seen and MRI in cases of long tract signs.
view to show the cervicothoracic junction. CT is used to characterize
any fractures seen and MRI in cases of long tract signs.
 |
|
Figure 54 Swimmer’s view of cervicothoracic junction.
|
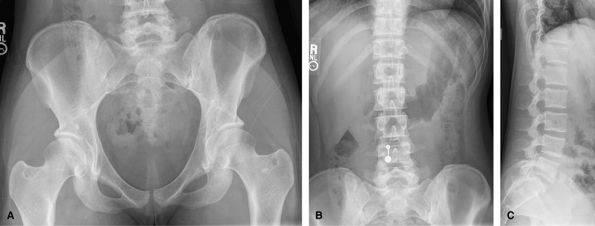
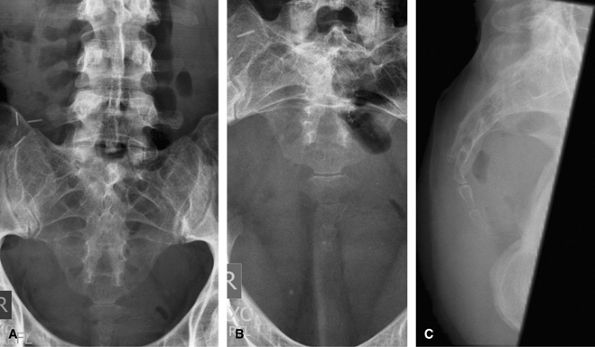
Lumbar Spine
Routine Imaging
The images vary from center to center. Some will include
an AP pelvis, others just AP and lateral lumbar spine. Good to assess
for acute trauma, alignment, spondylolysis, and spondylolisthesis. CT is
usually performed if trauma is seen on the radiographs. MRI is useful
in cases of radiculopathy.
an AP pelvis, others just AP and lateral lumbar spine. Good to assess
for acute trauma, alignment, spondylolysis, and spondylolisthesis. CT is
usually performed if trauma is seen on the radiographs. MRI is useful
in cases of radiculopathy.
 |
|
Figure 55 (A) AP pelvis. (B) AP lumbar spine. (C) Lateral lumbar spine.
|
P.656
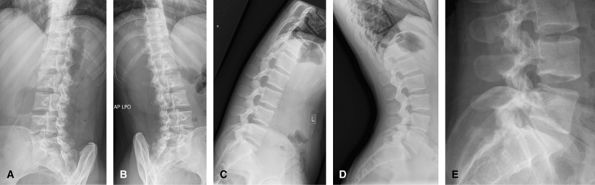
Additional Views
For follow-up flex-ext exams, a neutral lateral is not
needed. These extra images start to incur a large radiation dose for
little extra information and are not encouraged. Oblique views allow
visualization of the facet joints, and can show pars defects, although
these are often better seen on the lateral view. The flexion extension
views are to look for instability in the preoperative planning of
possible spinal fusion, or the postoperative assessment of fusion. The
coned-down lateral view of the lumbosacral junction is useful since
often this region is obliqued on the lateral lumbar spine.
 |
|
Figure 56 (A) Right posterior oblique lumbar spine. (B) Left posterior oblique lumbar spine. (C) Flexion lateral lumbar spine. (D) Extension lateral lumbar spine. (E) L5–S1 lateral.
|
Sacrum
Often difficult to see even with good radiographs due to
bowel gas and feces. Not usually imaged separately from the pelvis in
trauma. Can be used to look for lesions affecting the sacral plexus.
bowel gas and feces. Not usually imaged separately from the pelvis in
trauma. Can be used to look for lesions affecting the sacral plexus.
 |
|
Figure 57 (A) AP cranial. (B) Lateral. (C) AP caudal.
|
P.657
Coccyx
Used in cases of coccydynia. The coccyx has a wide
variety of shapes and angles and is often inconclusive for the radiation
dose used.
variety of shapes and angles and is often inconclusive for the radiation
dose used.
 |
|
Figure 58 (A) AP. (B) AP caudal. (C) Lateral.
|
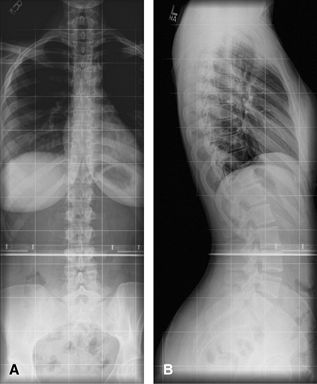
Scoliosis Series
Used to measure the Cobb angle and look for progression. Also used to look for underlying congenital vertebral anomaly.
 |
|
Figure 59 (A) PA taken weight-bearing. (B) Lateral taken weight-bearing.
|
P.658
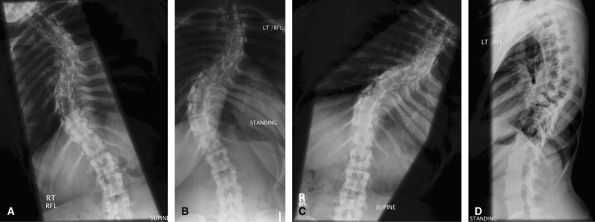
Additional Views
Views taken erect, leaning to the left and to the right
are useful to look for mobile and fixed segments of scoliosis in
planning surgery.
are useful to look for mobile and fixed segments of scoliosis in
planning surgery.
 |
|
Figure 60 (A) AP best bend right. (B) AP erect. (C) AP best bend left.
|
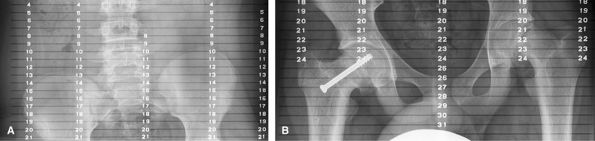
Miscellaneous Bone Studies
Used to measure leg length. Coned-down views are taken of
the iliac crests, hips, knees, and ankles with a ruler behind the
patient. The beam being centered on each area of interest will reduce
artifact due to parallax.
the iliac crests, hips, knees, and ankles with a ruler behind the
patient. The beam being centered on each area of interest will reduce
artifact due to parallax.
 |
|
Figure 61 (A) AP wing of pelvis. (B) AP hip joint.
|
P.659
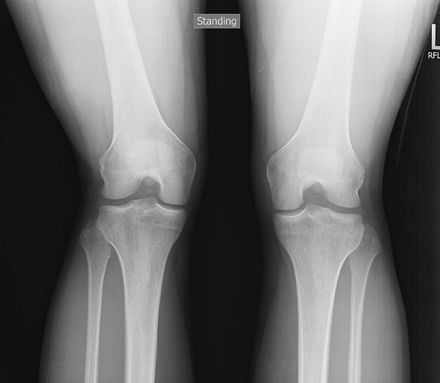
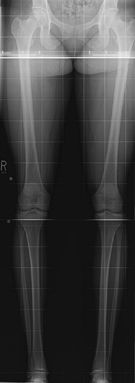
Leg Alignment—Include Joints from Hip to Ankle
Patient upright, equal weight in each foot. Both leg
alignment and leg length can be assessed on this study if
weight-bearing. The weight-bearing line passes from the middle of the
femoral head to the middle to the tibial plafond and should pass between
the tibial eminences. This determines varus or valgus deformity at the
knees. Used for pre- and postoperative assessment of total knee
arthroplasty.
 |
|
Figure 62 AP both legs.
|
Arthritis Joint Survey
This could include up to; AP/lateral C-spine, AP/lateral
T-spine, AP/lateral L-spine, AP bilateral shoulders, AP/lateral
bilateral Knees, AP pelvis, AP, oblique and lateral bilateral hands (to
include wrists), AP/lateral bilateral ankles (include heel on lateral
views), AP/oblique bilateral feet. Since this would be a large radiation
dose, it is often better to tailor this to the regions of pain.
Metastatic Bone Survey
This varies from one center to another and could include
from 5–30 images. The most important areas to image are the axial
skeleton and the proximal appendicular skeleton. A full survey would
include: left lateral skull, AP/lateral, C-spine, AP/lateral L-spine,
AP/lateral bilateral humerus (to include shoulders), AP/lateral
bilateral forearms, AP ribs, bilaterally, A AP/lateral T-spine, AP
pelvis, AP/lateral bilateral femurs, AP/lateral bilateral tibia/fibulas.
P.660
Bony Thorax
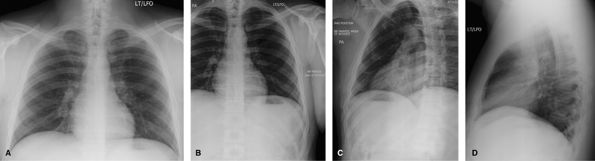
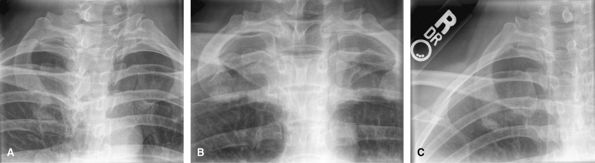
For most acute rib injuries, the protocol is a PA erect
chest exam to evaluate for pneumothorax. Only patients with pathological
fractures or patients who have undergone a bone scan should be imaged
for rib fractures. Legal cases may also require documentation of
fracture. It is important to have a “bb” at the site of pain and for the
technologist to annotate if the bb is anterior or posterior.
 |
|
Figure 63 PA chest only. If history is acute rib injury.
|
 |
|
Figure 64 Post bone scan or pathological fractures. (A) AP or PA ribs—dependent on site of injury. (B, C) Affected side closest to Bucky oblique ribs.
|
P.661
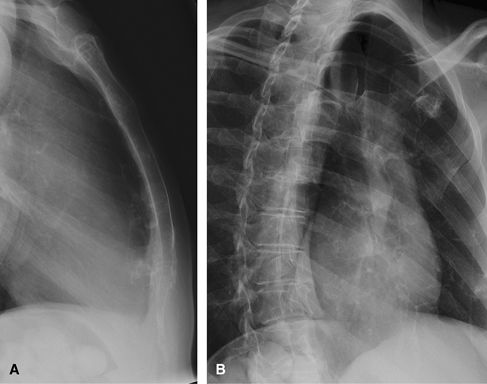
Sternum
Even on good radiographs, visualization of the sternum is limited. The study of choice is CT.
 |
|
Figure 65 (A) Lateral. (B) Right anterior oblique.
|

P.663
Appendix B: Office Rehabilitation
Sean McKeowen
The home exercise programs included within this text have
been designed to allow the practitioner a means to enable a patient to
begin a basic exercise program. The programs consist of a brief
introduction of the condition, common causes, signs and symptoms,
treatment, and a stretching and strengthening exercise routine with
progression. The programs are intended for those patients whose
conditions could be managed in this way. For moderate to severe cases,
as well as chronic conditions, a referral to a physical therapist is
warranted.
Hamstring Strain
What are Hamstring Strains?
A hamstring strain is an injury to the muscles located in
the back of the thigh. The injury can consist of a slight tearing of
the muscle fibers (1st degree) or a moderate tearing (2nd degree), or be
serious enough to cause a complete tear of the muscle (3rd degree).
the back of the thigh. The injury can consist of a slight tearing of
the muscle fibers (1st degree) or a moderate tearing (2nd degree), or be
serious enough to cause a complete tear of the muscle (3rd degree).
Common Causes
Many factors can cause this type of injury: Lack of
flexibility, lack of appropriate warm-up and stretching, jumping,
fatigue, running mechanics (overstriding, missed step, quick moves),
imbalances between the quadriceps and hamstring muscle groups, and/or
inadequate rehabilitation following previous injury to this muscle
group, causing repetitive trauma.
Signs and Symptoms
Pain and tenderness are felt most commonly in the
mid-belly of the muscle. Minor tears involve a smaller area; larger
tears would be more widespread. Bruising and swelling at the site of the
injury, as well as down the leg even days afterward, can occur.
Stiffness with inability to fully extend the knee is associated with the
injury. There is weakness of the leg, and walking may be difficult.
Treatment
Initially, rest, ice, compression, and elevation above
the heart (RICE) treatment is applied for ∼2–3 days following the
injury. Icing is performed for 15–20 min, 2–3 times during the day. For
moderate to severe strains, your physician may prescribe physical
therapy for modalities (US, soft tissue massage, electrical
stimulation), evaluation of weakened/tight muscles, gait analysis, and
exercise progression. Crutches should be used if walking is painful.
Once walking can be performed without a limp, crutches should be
discontinued. Stretching and strengthening exercises, used to promote
range of motion and strength, are initiated progressively within 3–4
days following injury. Elastic thigh wraps or sleeves can be used for
extra support and warmth to the muscles upon returning to sport
participation.
Stretching
Guidelines for performance and progression of stretching exercises are as follows and/or as prescribed by your physician:
-
Keep the stretch to a comfortable level. (Do not force the stretch or cause excessive pain.)
-
Do not hold your breath while stretching.
-
Hold each stretch for ∼30 sec.
-
Repeat each stretch 3–6 times.
Strengthening
Guidelines for performance and progression of strengthening exercises are as follows and/or as prescribed by your physician:
-
Do not hold your breath while you lift.
-
Stay below the level of pain.
-
Do 2–3 sets of 10–15 repetitions 2–4 times
a week. Once you can complete 3 sets of 15 repetitions easily, increase
the weight, reduce the repetitions to 10, and build back up to 15.
Home Exercise Program
This program is designed to allow you to start with basic
exercises. If you should have any questions or difficulties, refer back
to your physician.
exercises. If you should have any questions or difficulties, refer back
to your physician.
Stretching Exercises
Guidelines: Stretch 3–6 times, holding 30 sec.
A variety of hamstring stretches are given. Not all have to be performed.
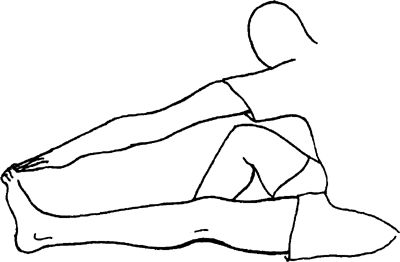
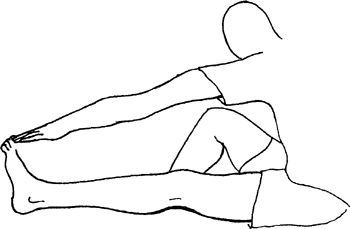
Seated Hamstring Stretch
While seated on the floor or table, extend the injured
leg straightforward and bend the opposite leg at the knee into a figure
“4” position. Bend forward from the hip over the extended leg with head
up. Keep the back and the knee of the injured leg straight. Do not round
your back.
leg straightforward and bend the opposite leg at the knee into a figure
“4” position. Bend forward from the hip over the extended leg with head
up. Keep the back and the knee of the injured leg straight. Do not round
your back.
 |
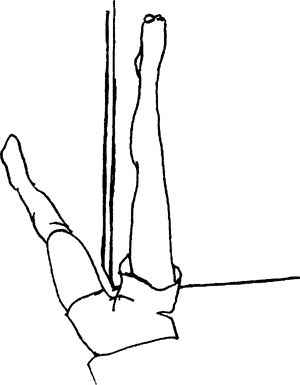
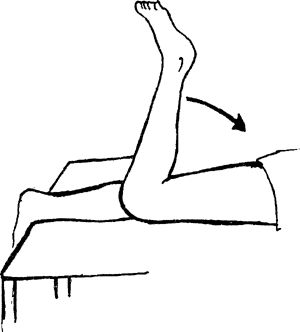
Hamstring Doorway Stretch
Lying on the ground, raise the heel of the injured leg
onto the doorframe or wall and extend the opposite leg through the
doorway. Keep the back and the knee of the injured leg straight. Move
closer to the wall to help increase the stretch. Hands can be used to
help keep the knee from bending. Keep the upper body and neck relaxed.
onto the doorframe or wall and extend the opposite leg through the
doorway. Keep the back and the knee of the injured leg straight. Move
closer to the wall to help increase the stretch. Hands can be used to
help keep the knee from bending. Keep the upper body and neck relaxed.
 |
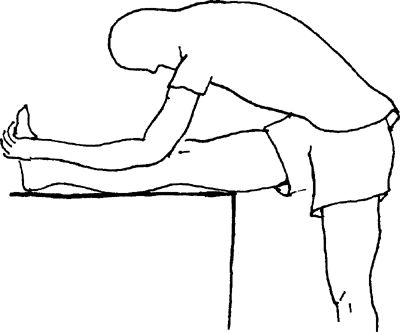
Standing Hamstring Stretch
Place the heel of the injured leg on a bench or stool.
Lean forward from the hip over the extended leg. Keep the back and knee
of the injured leg straight. Do not round your back
Lean forward from the hip over the extended leg. Keep the back and knee
of the injured leg straight. Do not round your back
 |
P.664
Strengthening Exercises
Guidelines: Start with 3 sets
of 10 repetitions, if able (fewer, if unable); progress to 3 sets of 15
repetitions. Once this is accomplished easily, reduce the repetitions
to 3 sets of 10 and increase the weight intensity.
of 10 repetitions, if able (fewer, if unable); progress to 3 sets of 15
repetitions. Once this is accomplished easily, reduce the repetitions
to 3 sets of 10 and increase the weight intensity.
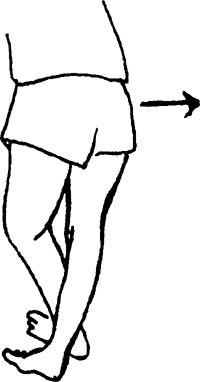
Standing Hamstring Curls
Support yourself with a chair or counter in front of you.
Bend the injured leg at the knee while keeping the thigh pointed
straight down. You can begin with no weight and then progress to ankle
weights.
Bend the injured leg at the knee while keeping the thigh pointed
straight down. You can begin with no weight and then progress to ankle
weights.
 |
Prone Hamstring Curls
Lying on your stomach, bend the knee of the injured leg
toward your buttocks. You can begin with no weight and then progress to
ankle weights.
toward your buttocks. You can begin with no weight and then progress to
ankle weights.
 |
Clam Shell Exercises
Lie on side with knees bent, feet together. Lift knee
upward. Lower and repeat. Exercise lying one side. Keep your back
straight and hips slightly rotated forward.
upward. Lower and repeat. Exercise lying one side. Keep your back
straight and hips slightly rotated forward.
Special instructions: Make sure you keep your hips rolled
forward. Lift knee upward. Progress 2..3..4..5 sec as tolerated.
Perform 1 set of 20 repetitions, 1 a day. Hold exercise for 1 sec.
forward. Lift knee upward. Progress 2..3..4..5 sec as tolerated.
Perform 1 set of 20 repetitions, 1 a day. Hold exercise for 1 sec.
 |
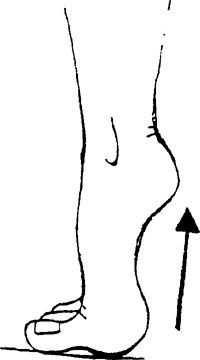
Bilateral Heel Raises
Stand with your feet shoulder-width apart. Raise the
heels off the ground onto the balls of the feet. Fingertips can be
placed on a counter for light balance.
heels off the ground onto the balls of the feet. Fingertips can be
placed on a counter for light balance.
 |
Bicycling
Begin cycling at an easy pace, with progression of speed, resistance, and time.
Jogging, Running, Sprinting (Straight Lines)
Start easy jogging in straight lines first. Progress speed and distances gradually as tolerated.
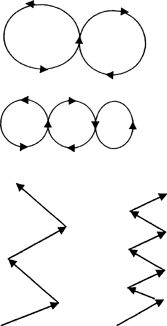
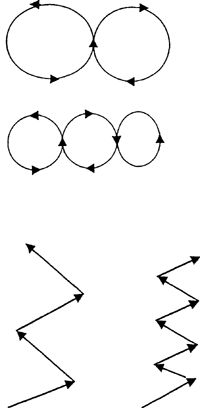
Jogging, Running, Sprinting (Figure 8s and Zig-Zag Patterns)
Jog slowly, making a pattern of large figure 8s, and
progress to smaller and smaller patterns with increasing speed. Jog in
zig-zag patterns with large cuts 1st and then progress to sharper cuts
with increasing speed as tolerated.
progress to smaller and smaller patterns with increasing speed. Jog in
zig-zag patterns with large cuts 1st and then progress to sharper cuts
with increasing speed as tolerated.
 |
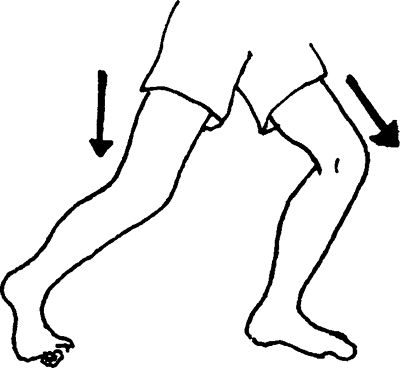
Hopping/Jumping (Front, Back, Side to Side)
Begin by hopping with both feet up and down and progress
to front, back, and side-to-side movements. Further progression is
achieved by hopping in these same patterns with the affected leg only.
Advance to jumping with these same criteria.
to front, back, and side-to-side movements. Further progression is
achieved by hopping in these same patterns with the affected leg only.
Advance to jumping with these same criteria.
Patella Femoral Pain Syndrome
What is Patella Femoral Pain Syndrome?
Patella femoral pain syndrome is pain localized to the
kneecap (patella). The patella is encased within the quadriceps tendon,
which is attached to the tibia (shin bone) by way of the patellar
tendon. The patella slides back and forth in between grooves located at
the end of the femur (thigh bone). Normally, there is a relatively small
angle created by the line of the quadriceps muscle pull from the hip,
the center of the kneecap, and the insertion of the tendon into the shin
bone. If there is malalignment present and repeated motion in this
area, the undersurface of the kneecap can become irritated and inflamed
and, eventually, can wear out (chondromalacia). Weakness of the hip
muscles can contribute to altered mechanics of the knee especially if a
malalignment is present. The important factor with this condition is to
determine the cause.
Common Causes
Many causes have been attributed to this condition:
-
Pronation of the feet (a rolling inward of
the feet, with a flattening of the arch), which causes the knees to
bend inward (knock-knee) -
Anatomic variance such as wide hips,
knock-knees, and/or a lateral placement of the insertion of the patellar
tendon onto the shin bone, which increases the angle of muscle pull and
then draws the patella toward the outside of the knee -
Anatomic variance in the size and shape of the patella and/or femoral grooves
-
Weakness or fatigue of the quadriceps and hamstrings
-
Poor mechanics
-
Decreased flexibility
-
Overuse in activities such as running, jumping, cycling, and walking
-
Tightness in the lateral knee structures
-
Weakness of hip muscles (primarily gluteus maximus and gluteus medius) which may change forces on the knee
-
Assessment of hip muscles is important (glut max, glut medius)
-
Quadricep dominant squatting
P.665
Signs and Symptoms
There is pain about the patella, with possible swelling,
depending on how much the knee is used. Grinding may be felt or heard
with knee movements. Pain occurs with walking, running, and prolonged
sitting. Eccentric contractions, such as squatting and walking down
stairs or hills, are usually aggravating factors.
depending on how much the knee is used. Grinding may be felt or heard
with knee movements. Pain occurs with walking, running, and prolonged
sitting. Eccentric contractions, such as squatting and walking down
stairs or hills, are usually aggravating factors.
Treatment
Initially helpful is rest and ice 2–3 times per day for
15–20 min. Wait 60 min between icing. Icing is beneficial as long as the
inflammatory condition continues. Ice can be applied after activity
and/or rehabilitation to help decrease pain and muscle spasm.
Anti-inflammatory drugs are sometimes prescribed. Stretching and
strengthening exercises, used to promote range of motion and strength,
are initiated when pain is decreased. Physical therapy can be prescribed
by your physician to help with evaluation of weakened and/or tight
muscles, gait analysis, application of modalities in moderate to severe
cases (US and electrical stimulation), and overall progression of
exercises. Knee bracing or patellar taping can be beneficial when
attempting to strengthen the knee. If the condition has progressed to
severe chondromalacia, surgery may be necessary. Surgical anatomic
correction is sometimes performed as well.
Stretching
Guidelines for performance or progression of stretching exercises are as follows and/or as prescribed by your physician:
-
Keep the stretch to a comfortable level. (Do not force the stretch or cause excessive pain.)
-
Do not hold your breath while stretching.
-
Hold each stretch for ∼30 sec.
-
Repeat each stretch 3–6 times.
Strengthening
Guidelines for performance or progression of strengthening exercises are as follows and/or as prescribed by your physician:
-
Do not hold your breath while you lift.
-
Stay below the level of pain.
-
Do 2–3 sets of 10–15 repetitions 2–4 times
a week. Once you can complete 3 sets of 15 repetitions easily, increase
the weight, reduce the repetitions to 10, and build back up to 15.
Home Exercise Program
This program is designed to allow you to start with basic
exercises. If you should have any questions or difficulties, refer back
to your physician.
exercises. If you should have any questions or difficulties, refer back
to your physician.
Stretching Exercises
Guidelines: Stretch 3–6 times, holding 30 sec.
Seated Hamstring Stretch
While seated on the floor or table, extend the injured
leg straight forward and bend the opposite leg at the knee into a figure
“4” position. Bend forward from the hip over the extended leg, with
your head up. Keep the back and the knee of the injured leg straight. Do
not round back
leg straight forward and bend the opposite leg at the knee into a figure
“4” position. Bend forward from the hip over the extended leg, with
your head up. Keep the back and the knee of the injured leg straight. Do
not round back
 |
Iliotibial Band Stretch
Stand with the involved leg crossed in back of the
opposite leg. Slowly lean upper body toward the “good” leg by bending at
the waist. You can lean into a wall or balance by lightly touching a
chair. Stretch should be felt at the side of the hip facing the wall and
down the outer thigh.
opposite leg. Slowly lean upper body toward the “good” leg by bending at
the waist. You can lean into a wall or balance by lightly touching a
chair. Stretch should be felt at the side of the hip facing the wall and
down the outer thigh.
 |
Quadriceps Stretch
Stand in back of a chair for assistance with balance.
Hold the top of the foot of the involved leg with the hand of the same
side. Slowly bend the knee backward toward the buttocks.
Hold the top of the foot of the involved leg with the hand of the same
side. Slowly bend the knee backward toward the buttocks.
 |
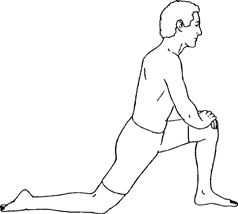
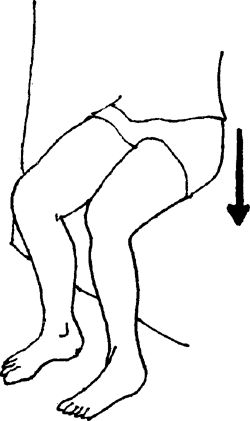
Hip Flexor Stretch
Kneeling on involved knee, slowly push pelvis down while
arching back until stretch is felt in front of hip. Hold 10 sec, repeat
5–10 times per set. Do 1 set per session. Do 1–2 sessions per day.
arching back until stretch is felt in front of hip. Hold 10 sec, repeat
5–10 times per set. Do 1 set per session. Do 1–2 sessions per day.
 |
Strengthening Exercises
Guidelines: Start with 3 sets
of 10 repetitions if able (less if unable); progress to 3 sets of 15.
Once this is accomplished easily, reduce repetitions to 3 sets of 10 and
increase the weight intensity.
of 10 repetitions if able (less if unable); progress to 3 sets of 15.
Once this is accomplished easily, reduce repetitions to 3 sets of 10 and
increase the weight intensity.
Quadriceps Set (Quad Set)
Place a small, rolled-up towel under the involved knee.
Slowly tighten the top thigh muscle while pushing the back of the knee
into the towel. The kneecap can be seen to move upward. Stay within
pain-free range as you attempt to progress to a full contraction with a
fully extended leg. Hold the contraction 6–8 sec and repeat 10 times.
Slowly tighten the top thigh muscle while pushing the back of the knee
into the towel. The kneecap can be seen to move upward. Stay within
pain-free range as you attempt to progress to a full contraction with a
fully extended leg. Hold the contraction 6–8 sec and repeat 10 times.
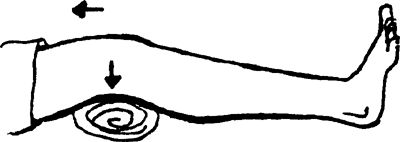 |
Towel Squeeze
Long sit on a table, with legs extended and a towel roll
placed above the knees and between the thighs. Squeeze the towel roll by
bringing your thighs together and digging your heels into the table.
The feet are in a V position. Hold the contraction for 6–8 sec and
repeat 10 times.
placed above the knees and between the thighs. Squeeze the towel roll by
bringing your thighs together and digging your heels into the table.
The feet are in a V position. Hold the contraction for 6–8 sec and
repeat 10 times.
P.666
 |
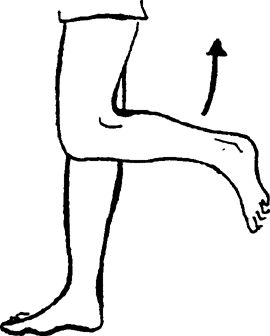
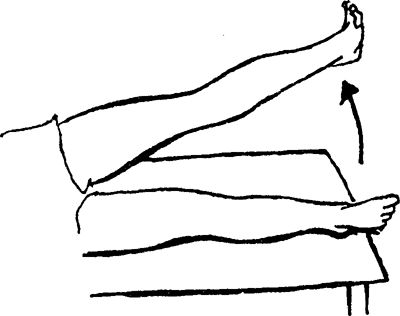
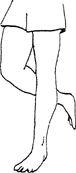
Straight-Leg Raises
Straight-leg raises can be performed once you can maintain a quad set with little to no discomfort.
-
Hip Flexion: Lying on your back, bend the
uninvolved knee so that the foot is on the table. Perform a quad set
with the injured leg, and then lift the leg up to the level of the
opposite knee.![images]()
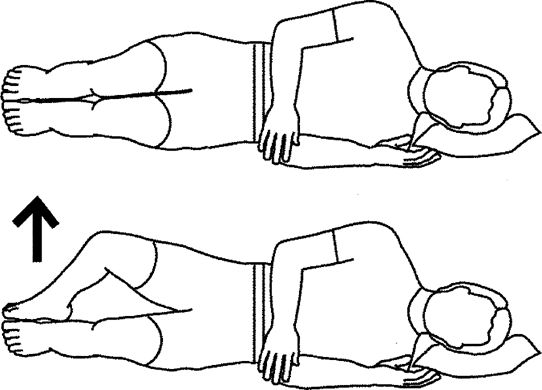
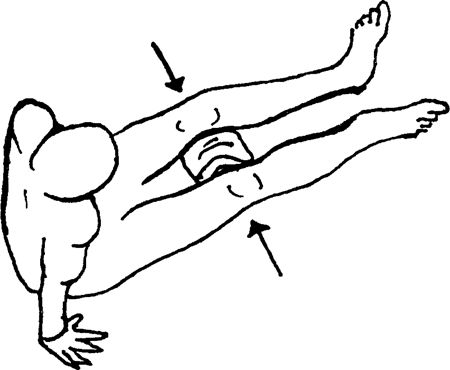
-
Hip Abduction: Lying on the uninvolved
side, perform a quad set and then raise the leg to a 30-degree angle.
You can bend the bottom knee for balance (not shown in illustration).

 |
Clam Shell Exercises
Lie on side with knees bent, feet together. Lift knee
upward. Lower and repeat. Exercise lying one side. Keep your back
straight and hips slightly rotated forward.
upward. Lower and repeat. Exercise lying one side. Keep your back
straight and hips slightly rotated forward.
Special instructions: Make sure you keep your hips rolled
forward. Lift knee upward. Progress 2..3..4..5 sec as tolerated.
Perform 1 set of 20 repetitions, once a day. Hold exercise for 1 sec.
forward. Lift knee upward. Progress 2..3..4..5 sec as tolerated.
Perform 1 set of 20 repetitions, once a day. Hold exercise for 1 sec.
 |
Prone Leg Extension
Lift leg 6–8 inches from the floor, keeping knee locked.
Lower and the repeat with left leg, Continue alternating legs. Repeat
10–20 times per set. Do 1 set per session. Do 1 session per day.
Lower and the repeat with left leg, Continue alternating legs. Repeat
10–20 times per set. Do 1 set per session. Do 1 session per day.
 |
Proprioceptive Training
Assume a standing position, with feet a shoulder-width
apart. Stand on the affected ankle, as tolerated, working up to 30 sec
with your eyes open. Progress to balancing for 30 sec with your eyes
closed. Repeat 3–5 times. Can be done 2–3 times per day. Have stance
knee slightly bent.
apart. Stand on the affected ankle, as tolerated, working up to 30 sec
with your eyes open. Progress to balancing for 30 sec with your eyes
closed. Repeat 3–5 times. Can be done 2–3 times per day. Have stance
knee slightly bent.
 |
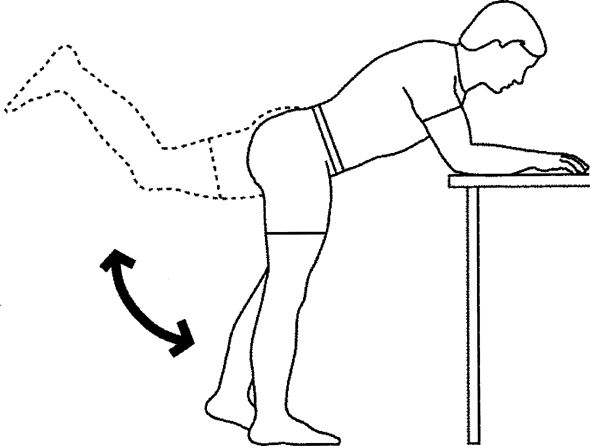
Donkey Kick
Lean over table, bending at hips, stand on uninvolved leg
with knee slightly bent. Bend knee on non–stance leg, Lift leg up and
backward as shown. Return to start and repeat. Repeat opposite side.
Perform 1 set of 20 repetitions, once a day. Hold for 2 sec.
with knee slightly bent. Bend knee on non–stance leg, Lift leg up and
backward as shown. Return to start and repeat. Repeat opposite side.
Perform 1 set of 20 repetitions, once a day. Hold for 2 sec.
 |
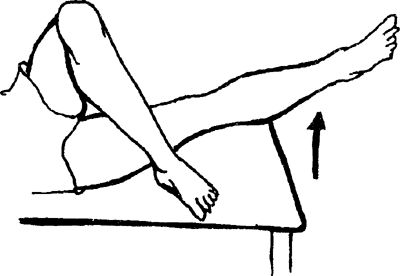
Hip Adduction
Lying on the involved side, take the opposite leg, bend
the knee, and place the foot on the table in front of you. With the
involved leg straight, perform a quad set and lift the leg 4–6 inches.
the knee, and place the foot on the table in front of you. With the
involved leg straight, perform a quad set and lift the leg 4–6 inches.
 |
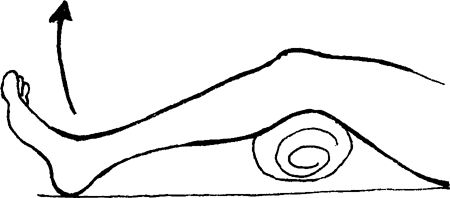
Hip Extension
Lying flat on your stomach, with both legs straight,
perform a quad set with the involved leg and lift the leg 4–6 inches.
The back should not arch or rotate with this exercise. A small,
rolled-up towel could be used under the involved thigh to help prevent
compression of the kneecap on the table.
perform a quad set with the involved leg and lift the leg 4–6 inches.
The back should not arch or rotate with this exercise. A small,
rolled-up towel could be used under the involved thigh to help prevent
compression of the kneecap on the table.
 |
Short-Arc Knee Extension
Long sit on a table. Place a rolled-up towel under the
involved Leg, allowing the knee to flex to 15 degrees (small bend).
Slowly straighten the knee toward full knee extension. Progress to a
larger towel roll by increasing the angle of knee bend.
involved Leg, allowing the knee to flex to 15 degrees (small bend).
Slowly straighten the knee toward full knee extension. Progress to a
larger towel roll by increasing the angle of knee bend.
 |
P.667
Prone Hamstring Curls
Lying on your stomach, bend the knee of the injured leg
toward your buttocks. You can begin with no weight and then progress to
ankle weights.
toward your buttocks. You can begin with no weight and then progress to
ankle weights.
 |
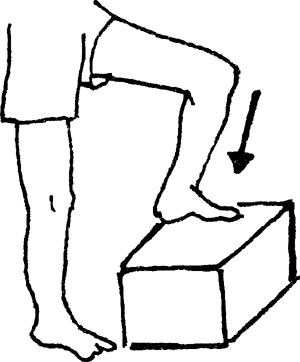
Step Ups
Begin with a 2-inch step. Step up with the involved leg,
followed by the good leg. Step down with the good leg, followed by the
injured leg. Progress to larger steps, such as 4 inches and then 6
inches. Progression is made only as symptoms allow. No pain should be
felt when performing this exercise. Perform 1 set of 10 repetitions (or
fewer, if unable). Progress to 3 sets of 10, followed by an increase in
the height of the step, whereby repetitions are again decreased to one
set.
 |
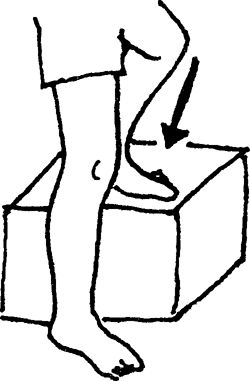
Lateral Step Up
This is a progression of the forward step up. Place the
involved leg laterally on a 2-inch step and the uninjured leg on the
floor beside it. Raise the toes of the uninjured leg so that the heel of
this leg is its only contact with the floor. Raise your body to the
level of the step by extending the involved leg. Slowly lower your body
by bending the knee of the involved leg so that the heel of the good leg
contacts the floor once again. Do not allow the hip to drop to reach
the floor. Progress to larger steps, such as 4 inches and then 6 inches.
No pain should be allowed with this exercise. Perform 1 set of 10
repetitions (or fewer, if unable). Progress to 3 sets of 10, followed by
an increase in the height of the step, whereby repetitions are again
decreased to one set. Do not let the knee go past the toes.
 |
Wall Slides
Stand with your back against a wall and your feet a
shoulder-width apart. Slowly squat by sliding down the wall. Progress
the squat from ¼–1/2 as symptoms allow Perform 1 set of 10 repetitions,
progressing to 3 sets of 10–15 repetitions. Further strength progression
can be achieved by holding progressive weights in your hands. Make sure
the knees do not go past the toes.
 |
Placing elastic band around your knees and keeping knees apart during the squat exercise can enhance this exercise
Leg Press
Leg press machines can be utilized, limiting the amount
of knee motion to pain-free ranges and then progressing to the full
range.
of knee motion to pain-free ranges and then progressing to the full
range.
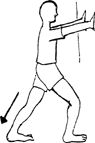
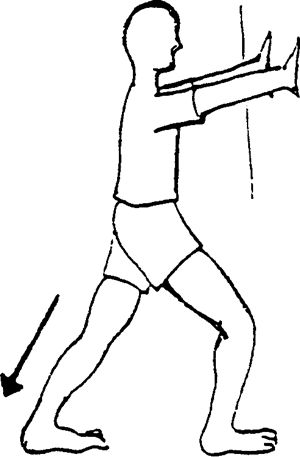
Lunges
Start with a step forward with the involved leg and
slowly bend at the knee to a minimal degree, then return to a standing
position. Progress this exercise by increasing the degree of knee bend
and by utilizing progressive hand weights or bars. Perform 1 set of 10
repetitions, progressing to 3 sets of 10–15. Be sure the knee does not
pass front of toes.
 |
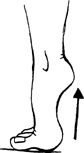
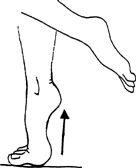
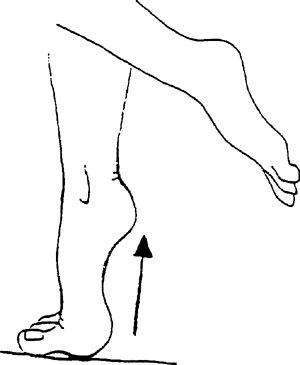
Bilateral Heel Raises
Stand with your feet a shoulder-width apart. Raise your
heels off the ground and roll your weight onto the balls of your feet.
Fingertips can be placed on a counter for light balance. To continue to
improve strength, progress to standing heel raises on weight machines.
heels off the ground and roll your weight onto the balls of your feet.
Fingertips can be placed on a counter for light balance. To continue to
improve strength, progress to standing heel raises on weight machines.
 |
Bicycling
Begin cycling at an easy pace, with progression of speed, resistance, and time.
Jogging, Running, Sprinting (Straight Lines)
Start with a walk/jog walk pattern to gradually increase
force. Start easy jogging in straight lines first. Progress speed and
distances gradually.
force. Start easy jogging in straight lines first. Progress speed and
distances gradually.
Jogging, Running, Sprinting (Figure 8s and Zig-Zag Patterns)
Jog slowly, making a pattern of large figure 8s, and
progress to smaller and smaller patterns with increasing speed. Jog in
zig-zag patterns with large cuts first and then progress to sharper cuts
with increasing speed.
progress to smaller and smaller patterns with increasing speed. Jog in
zig-zag patterns with large cuts first and then progress to sharper cuts
with increasing speed.
 |
P.668
Hopping/Jumping (Front, Back, Side to Side)
Begin by hopping with both feet up and down and progress
to front, back, and side-to-side movements. Further progression is
achieved by hopping in these same patterns with the affected leg only.
Advance to jumping with these same criteria.
to front, back, and side-to-side movements. Further progression is
achieved by hopping in these same patterns with the affected leg only.
Advance to jumping with these same criteria.
Ankle Sprains
What is an Ankle Sprain?
An ankle sprain is a tear of the ligaments that help to
support the ankle joint. The injury can be minimal, involving
microscopic tears, or can completely rupture the supporting structures.
The most common type of ankle sprain is termed inversion and involves the ligaments on the outside of the joint.
support the ankle joint. The injury can be minimal, involving
microscopic tears, or can completely rupture the supporting structures.
The most common type of ankle sprain is termed inversion and involves the ligaments on the outside of the joint.
Common Causes
An ankle sprain occurs when the foot is taken beyond its
normal range of motion. This can happen when the foot lands on an uneven
surface and the pressure of a person’s body weight is forced onto the
outside of the foot. An inversion sprain involves the foot turning
inward. The foot also can turn outwardly and injure the inside of the
ankle, causing an eversion type of sprain.
Signs and Symptoms
Pain, swelling, and/or bruising along either the inside or the outside of the ankle joint
Treatment
Initially, rest, ice, compression, and elevation above
the heart (RICE) treatment is used for ∼2–3 days following the injury.
Icing is performed for 15–20 min 2–3 times during the day. One hour
breaks between icing if done more often. Anti-inflammatory medications
may be used to help decrease pain and swelling. Early weight bearing to
pain tolerance should be conducted and can be assisted by the use of
crutches. When walking can be performed without a limp, use of crutches
should be discontinued. Stretching and strengthening exercises, used to
promote range of motion and strength, are then initiated. Physical
therapy may be prescribed by your physician to help with application of
modalities (whirlpool, US, electrical stimulation, soft tissue massage),
gait analysis, retaining balance abilities, evaluation of ankle range
of motion, along with assessment of weak muscles and overall exercise
progression. Ankle taping or braces could be used to help with
prevention of further episodes but should not be used as a substitute
for exercises.
Stretching
Guidelines for performance and progression of stretching exercises are as follows and/or as prescribed by your physician:
-
Keep the stretch to a comfortable level. (Do not force the stretch or cause excessive pain.)
-
Do not hold your breath while stretching.
-
Hold each stretch for ∼30 sec.
-
Repeat each stretch 3–6 times.
Strengthening
Guidelines for performance and progression of strengthening exercises are as follows and/or as prescribed by your physician:
-
Do not hold your breath while you lift.
-
Stay below the level of pain.
-
Do 2–3 sets of 10–15 repetitions 2–4 times
a week. Once you can easily complete 3 sets of 15 repetitions, increase
the weight, reduce the repetitions to 10, and build back up to 15.
Home Exercise Program
This program is designed to allow you to start with basic
exercises. If you should have any questions or difficulties, refer back
to your physician.
exercises. If you should have any questions or difficulties, refer back
to your physician.
Stretching Exercises
Guidelines: Stretch 3–6 times, holding 30 sec.
Ankle Pumps (To Reduce Swelling)
Elevate your foot higher than heart level. Move the ankle
up and down 30 times. Rest a minute and then repeat 4–5 times. Ice the
ankle at the same time.
up and down 30 times. Rest a minute and then repeat 4–5 times. Ice the
ankle at the same time.
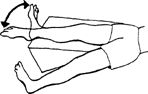 |
Towel Stretch (Achilles)
Assume a seated position, with legs extended. Place a
towel around your foot and hold the ends with both hands. Pull back on
the towel, bringing your foot toward you.
towel around your foot and hold the ends with both hands. Pull back on
the towel, bringing your foot toward you.
 |
Achilles Stretch
Stand, leaning onto a wall, with the involved foot placed
further back than the other foot. Lunge forward onto your uninjured
foot while keeping the knee straight and the heel of involved leg on the
ground. Stretch is felt in calf. Stretches gastrocnemius muscle.
further back than the other foot. Lunge forward onto your uninjured
foot while keeping the knee straight and the heel of involved leg on the
ground. Stretch is felt in calf. Stretches gastrocnemius muscle.
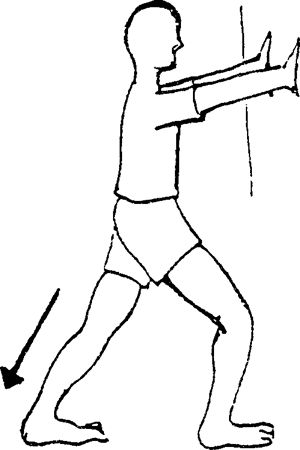 |
Bent-Knee Stretch
Same as for the Achilles stretch, but the involved leg is
bent at the knee. Stretch is felt in the calf. Stretches the soleus and
other deep calf muscles.
bent at the knee. Stretch is felt in the calf. Stretches the soleus and
other deep calf muscles.
 |

Strengthening Exercises–Beginning Phase
Guidelines: Start with 3 sets
of 10 repetitions, if able (fewer, if unable); progress to 3 sets of
15. When this is accomplished easily, reduce the repetitions to 3 sets
of 10 and increase the weight.
of 10 repetitions, if able (fewer, if unable); progress to 3 sets of
15. When this is accomplished easily, reduce the repetitions to 3 sets
of 10 and increase the weight.
Towel Crunches
Assume a seated position. Place a towel on the floor (not
on a carpet). Place the involved foot on top of the towel and curl your
toes, gathering the towel underneath and toward you. Repeat 10 times,
advance to 3 sets of 10–15 repetitions, and then add weight to the
towel. Begin again with fewer repetitions, advancing to 3 sets of 10–15
repetitions.
on a carpet). Place the involved foot on top of the towel and curl your
toes, gathering the towel underneath and toward you. Repeat 10 times,
advance to 3 sets of 10–15 repetitions, and then add weight to the
towel. Begin again with fewer repetitions, advancing to 3 sets of 10–15
repetitions.
 |
Ankle Alphabet
Using involved ankle and foot only, trace the letters of
the alphabet. Perform from A to Z. Repeat 1–2 times per set. Do 1 set
per session
the alphabet. Perform from A to Z. Repeat 1–2 times per set. Do 1 set
per session
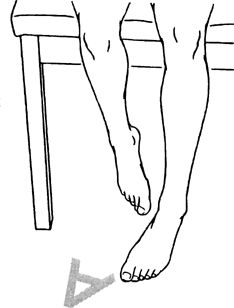 |
P.669
Isometric Inversion/Eversion
Assume a seated position. Place the inside of your foot
against an immovable object (eg, a table leg) and push against it. Then
repeat the same exercise with the outside of your foot against the
object. Hold the contraction for 6–8 sec and repeat 10 times.
against an immovable object (eg, a table leg) and push against it. Then
repeat the same exercise with the outside of your foot against the
object. Hold the contraction for 6–8 sec and repeat 10 times.
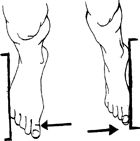 |
Marble Pick-Up
Assume a seated position. Place several marbles on the
floor and attempt to pick them up by curling your toes around them. Once
a marble is lifted, turn the foot and place the marble back down on the
floor a foot or so away. Repeat for total of 30 repetitions.
floor and attempt to pick them up by curling your toes around them. Once
a marble is lifted, turn the foot and place the marble back down on the
floor a foot or so away. Repeat for total of 30 repetitions.
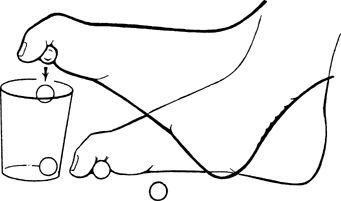 |
Weight Shifts
Stand with your feet a shoulder-width apart. Your hands
are placed on a counter or table to help support the weight of your
body. Lean your body weight over to the affected ankle and shift your
weight back and forth between the 2 legs. Progress until full weight is
placed on the affected ankle. Hold for 10–30 sec; repeat 3–6 times.
are placed on a counter or table to help support the weight of your
body. Lean your body weight over to the affected ankle and shift your
weight back and forth between the 2 legs. Progress until full weight is
placed on the affected ankle. Hold for 10–30 sec; repeat 3–6 times.
Strengthening Exercises–Middle Phase
Single-Leg Balance (Eyes Open/Closed)
Assume a standing position, with feet a shoulder-width
apart. Stand on the affected ankle, as tolerated, working up to 30 sec
with your eyes open. Progress to balancing for 30 sec with your eyes
closed. Repeat 3–5 times. Can be done 2–3 times per day. Have stance
knee slightly bent
apart. Stand on the affected ankle, as tolerated, working up to 30 sec
with your eyes open. Progress to balancing for 30 sec with your eyes
closed. Repeat 3–5 times. Can be done 2–3 times per day. Have stance
knee slightly bent
 |
Thera-Band Exercises
With the use of a Thera-Band, wrap one end of the band
onto an immovable object and the other end around the mid-foot. Avoid
hip movement.
onto an immovable object and the other end around the mid-foot. Avoid
hip movement.
-
Ankle movement is toward you.
![images]()
-
Ankle movement is toward the little toe side.
![images]()
-
Ankle movement is toward the big toe side.
![images]()
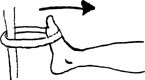
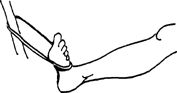

Start with 1 set of 10 repetitions, progressing to 3 sets
of 10–15 repetitions. When you can achieve this easily, advance the
color of the Thera-Band and begin again with 3 sets of 10–15
repetitions.
of 10–15 repetitions. When you can achieve this easily, advance the
color of the Thera-Band and begin again with 3 sets of 10–15
repetitions.

Strengthening Exercises–Final Phase
Heel Raise (Single Leg)
Raise the heel of the affected ankle up and down.
Fingertips can be placed on a counter for light balance. You can
progress to weight machines, performing the same actions with added
weight intensity.
Fingertips can be placed on a counter for light balance. You can
progress to weight machines, performing the same actions with added
weight intensity.
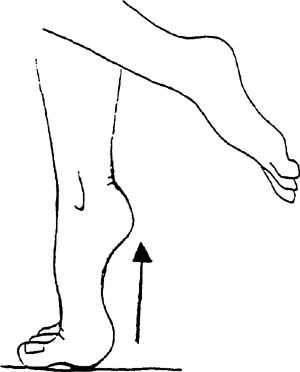 |
Single Leg Stance with Clock Reach
Stand on leg, bending opposite leg as shown. Visualize a
clock where 12:00 is in front of you. With the right arm reach to 12:00.
Then reach to 3:00, 6:00, and 9:00. Maintain balance throughout the
activity. Repeat sets standing on opposite leg and reaching with left
arm, Perform 1 set of 5 min, once a day. Hold exercise for 30 sec.
clock where 12:00 is in front of you. With the right arm reach to 12:00.
Then reach to 3:00, 6:00, and 9:00. Maintain balance throughout the
activity. Repeat sets standing on opposite leg and reaching with left
arm, Perform 1 set of 5 min, once a day. Hold exercise for 30 sec.
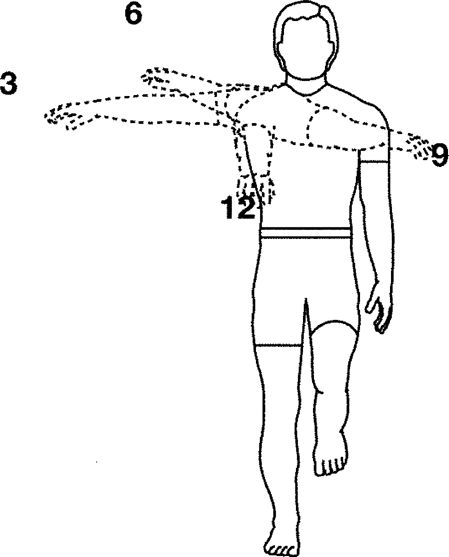 |
Hopping (Front, Back, Side to Side)
Begin by hopping with both feet up and down and progress
to front, back, and side-to-side movements. Further progression is
achieved by hopping in these same patterns with the affected ankle only.
Work on soft landing and good shock absorption.
to front, back, and side-to-side movements. Further progression is
achieved by hopping in these same patterns with the affected ankle only.
Work on soft landing and good shock absorption.
Jogging, Running, Sprinting (Straight Lines)
Start with walk/jog/walk pattern and gradually increase
force. Start easy jogging in straight lines first. Progress speed and
distances gradually.
force. Start easy jogging in straight lines first. Progress speed and
distances gradually.
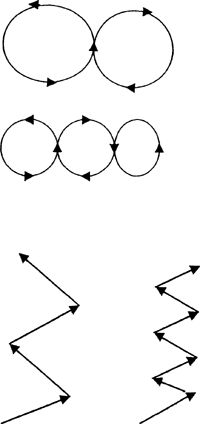
P.670
Shin Splints (Medial Tibial Stress Syndrome)
What are Shin Splints?
The term shin splints has
been a “wastebasket” term used to describe pain about the lower leg.
More recently, it has been used to identify pain occurring about the
front or medial side of the lower leg. The term medial tibial stress syndrome, or MTSS,
is now being used frequently. The condition itself may be an
inflammation of either muscle or bone involving the tibia or shinbone.
The involved muscles include the posterior tibialis, flexor hallucis
longus, and flexor digitorum longus. Your physician must differentiate
this condition from stress fractures or compartment syndromes.
Common Causes
-
Overuse, especially at the start of sport seasons, from excessive running or jumping
-
Pronated feet (an inward turning of the foot, which causes stretching of the involved muscles)
-
Fallen arches
-
Types of training surfaces (softer ground may allow for increased foot pronation)
-
Shoes with broken-down medial borders
-
Running on slanted surfaces along roads
-
Weakness in the involved muscle groups
Signs and Symptoms
Pain can be felt when touching the area just behind the
shinbone from above the medial ankle bone and extending upward by more
than half way. Pain can be produced with walking and/or running.
shinbone from above the medial ankle bone and extending upward by more
than half way. Pain can be produced with walking and/or running.
Treatment
Initially, rest and ice 2–3 time per day for 15–20 min is
helpful. Icing is beneficial as long as the inflammatory condition
continues. Ice can be applied after activity and/or rehabilitation to
help decrease pain and muscle spasm. Anti-inflammatory medications are
used to help decrease pain and swelling. Crutches may need to be used if
walking causes pain. Training can continue in the pool or by cycling as
long as no pain is felt. Orthotics (a shoe inset used to help correct
foot malalignments) may be prescribed if pronation cannot be corrected
with strengthening. Supportive taping of the lower leg is of benefit.
Physical therapy may be prescribed by your physician to help with
application of modalities (US and/or electrical stimulation), gait
analysis, evaluation of weak or tight muscles, and overall exercise
progression in moderate to severe cases.
Stretching
Guidelines for performance or progression of stretching exercises are as follows and/or as prescribed by your physician:
-
Keep the stretch to a comfortable level. (Do not force the stretch or cause excessive pain.)
-
Do not hold your breath while stretching.
-
Hold each stretch for ∼30 sec.
-
Repeat each stretch 3–6 times.
Strenghtening
Guidelines for performance or progression of strengthening exercises are as follows and/or as prescribed by your physician:
-
Do not hold your breath while you lift.
-
Stay below the level of pain.
-
Do 2–3 sets of 10–15 repetitions 2–4 times
a week. When you can complete 3 sets of 15 repetitions easily, increase
the weight, reduce the repetitions to 10, and build back up to 15.
Home Exercise Program
This program is designed to allow you to start with basic
exercises. If you should have any questions or difficulties, refer back
to your physician.
exercises. If you should have any questions or difficulties, refer back
to your physician.
Stretching Exercises
Guidelines: Stretch 3–6 times, holding for 30 sec.
Achilles Stretch
Stand, leaning onto a wall, with involved foot placed
further back than the other foot. Lunge forward onto the uninjured foot
while keeping the knee straight and the heel of the involved leg on the
ground. Stretch is felt in calf. Stretches the gastrocnemius muscle.
further back than the other foot. Lunge forward onto the uninjured foot
while keeping the knee straight and the heel of the involved leg on the
ground. Stretch is felt in calf. Stretches the gastrocnemius muscle.
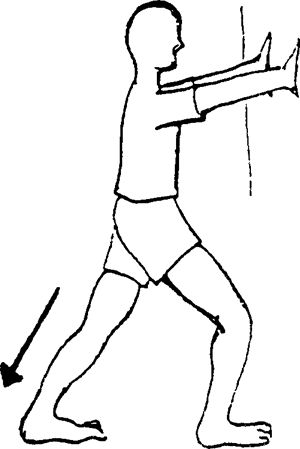 |
Bent-Knee Stretch
Same as for the Achilles stretch, but the involved leg is
bent at the knee. Stretch is felt in the calf. Stretches the soleus and
deep flexor muscles.
bent at the knee. Stretch is felt in the calf. Stretches the soleus and
deep flexor muscles.
 |
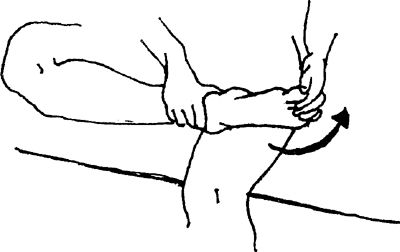
Strengthening Exercises
Guidelines: Start with 3 sets
of 10, if able (fewer, if unable); progress to 3 sets of 15
repetitions. When this is accomplished easily, reduce the repetitions to
3 sets of 10 and increase the weight.
of 10, if able (fewer, if unable); progress to 3 sets of 15
repetitions. When this is accomplished easily, reduce the repetitions to
3 sets of 10 and increase the weight.
Towel Crunches
Assume a seated position. Place a towel on the floor (not
on a carpet). Place your foot on top of the towel and curl your toes,
gathering the towel underneath and toward you.
on a carpet). Place your foot on top of the towel and curl your toes,
gathering the towel underneath and toward you.
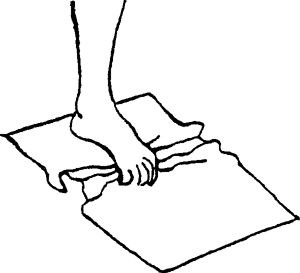 |
Marble Pick-Up
Assume a seated position. Place several marbles on the
floor and attempt to pick up them up by curling your toes around them.
Once a marble is lifted, turn your foot and place back down on the floor
a foot or so away. Repeat for a total of 30 repetitions.
floor and attempt to pick up them up by curling your toes around them.
Once a marble is lifted, turn your foot and place back down on the floor
a foot or so away. Repeat for a total of 30 repetitions.
Heel Walking
Walk on your heels, starting with short distances, such as 10–15 feet, progressing to 50 feet.
Thera-Band Exercises
With the use of Thera-Band, wrap one end of the band onto
an immovable object and the other end around your mid-foot. Avoid hip
movement.
an immovable object and the other end around your mid-foot. Avoid hip
movement.
-
Ankle movement is toward you.
![images]()
-
Ankle movement is toward the little toe side.
![images]()
-
Ankle movement is toward the big toe side.
![images]()

P.671


Start with 1 set of 10 repetitions, progressing to 3 sets
of 10–15 repetitions. Once you can achieve this, advance the color of
the Thera-Band and begin again toward 3 sets of 10–15 repetitions.
of 10–15 repetitions. Once you can achieve this, advance the color of
the Thera-Band and begin again toward 3 sets of 10–15 repetitions.
Bilateral Heel Raises
Stand with your feet shoulder-width apart. Raise your
heels off the ground and roll your weight onto the balls of your feet.
Fingertips can be placed on a counter for light balance. You can
progress to weight machines, performing same action, with increasing
weight intensity.
heels off the ground and roll your weight onto the balls of your feet.
Fingertips can be placed on a counter for light balance. You can
progress to weight machines, performing same action, with increasing
weight intensity.
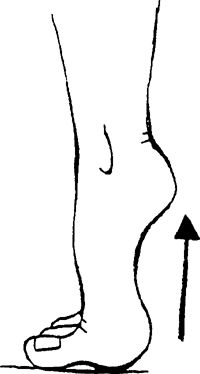 |
Heel Raise (Single Leg)
Raise the heel of the affected ankle up and down.
Fingertips can be placed on a counter for light balance. You can
progress to weight machines, performing the same actions for added
weight intensity.
Fingertips can be placed on a counter for light balance. You can
progress to weight machines, performing the same actions for added
weight intensity.
 |
Hopping (Front, Back, Side to Side)
Begin by hopping with both feet up and down and progress
to front, back, and side-to-side movements. Further progression is
achieved by hopping in same patterns with the affected ankle only.
to front, back, and side-to-side movements. Further progression is
achieved by hopping in same patterns with the affected ankle only.
Jogging, Running, Sprinting (Straight Lines)
Start with walk/jog/walk pattern. Start easy jogging in straight lines first. Progress speed and distances gradually.
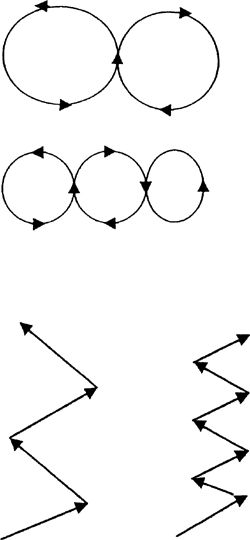
Plantar Fasciitis (Heel Spur Syndrome)
What is Plantar Fasciitis?
The plantar fascia is a broad band of connective tissue
that runs from the calcaneus (heel bone) to the heads of the metatarsal
bones in the foot. Its purpose is to provide arch support. This tissue
can become inflamed, causing pain to this area.
that runs from the calcaneus (heel bone) to the heads of the metatarsal
bones in the foot. Its purpose is to provide arch support. This tissue
can become inflamed, causing pain to this area.
Common Causes
-
Tight Achilles tendon
-
Overuse, especially at the start of sport seasons, from excessive running or jumping
-
Pronated feet (an inward turning of the foot, which causes stretching of the involved muscles
-
Fallen arches
-
Types of training surfaces (softer ground may allow for increased foot pronation)
-
Shoes with broken-down medial borders
-
Weakness in the involved muscle groups
Signs and Symptoms
Pain is primarily located along the front part of the
heel where the connective tissue becomes narrow. Touching this area may
produce pain, and it could extend along the tissue into the arch. Upon
awakening, the 1st steps may be very painful to perform due to the
stretch being placed on the tissue. Extending the toes upward also
causes pain in this area.
Treatment
Initially, rest, medication, and ice 2–3 times per day
for 15–20 min are helpful. Icing is beneficial as long as the
inflammatory condition continues. Ice massage to this area is very
beneficial. It can be applied after activity and/or rehabilitation to
help decrease pain. Anti-inflammatory medications are used to help
decrease pain and swelling. Sometimes, cortisone injections are
administered. Stretching and strengthening exercises, used to promote
range of motion and strength, are initiated when pain is decreased.
Taping the arch is helpful. Proper footwear is a necessity, and the use
of orthotics (a shoe insert used to correct foot malalignments) may be
necessary. Physical therapy may be prescribed by your physician to help
with evaluation of weakened and/or tight muscles, gait analysis,
application of modalities in moderate to severe cases (US, soft tissue
massage, and electrical stimulation), and overall progression of
exercises.
Stretching
Guidelines for performance or progression of stretching exercises are as follows and/or as prescribed by your physician:
-
Keep the stretch to a comfortable level. (Do not force the stretch or cause excessive pain.)
-
Do not hold your breath while stretching.
-
Hold each stretch for ∼30 sec.
-
Repeat each stretch 3–6 times.
Strengthening
Guidelines for performance or progression of strengthening exercises are as follows and/or as prescribed by your physician:
-
Do not hold your breath while you lift.
-
Stay below the level of pain.
-
Do 2–3 sets of 10–15 repetitions 2–4 times
a week. Once you can complete 3 sets of 15 repetitions easily, increase
the weight, reduce the repetitions to 10, and build back up to 15.
Home Exercise Program
This program is designed to allow you to start with basic
exercises. If you should have any difficulties, refer back to your
physician.
exercises. If you should have any difficulties, refer back to your
physician.
Stretching Exercises
Guidelines: Stretch 3–6 times, holding for 30 sec.
Achilles Stretch
Stand, leaning onto a wall with the involved foot placed
further back than the other foot. Lunge forward onto the good foot while
keeping the knee straight and the heel of the involved leg on the
ground. Stretch is felt in the calf.
further back than the other foot. Lunge forward onto the good foot while
keeping the knee straight and the heel of the involved leg on the
ground. Stretch is felt in the calf.
 |
P.672
Bent-Knee Stretch
Same as for Achilles stretch, but the involved leg is bent at the knee. Stretch is felt in the calf.
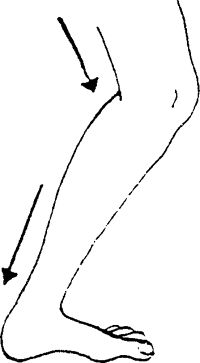 |
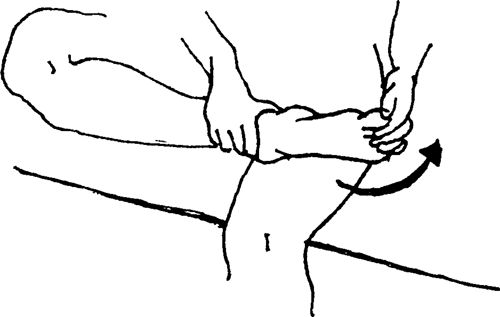
Strengthening Exercises
Guidelines: Start with 3 sets
of 10 repetitions, if able (fewer, if unable); progress to 3 sets of
15. Once this is accomplished easily, reduce the repetitions to 3 sets
of 10 and increase the weight intensity.
of 10 repetitions, if able (fewer, if unable); progress to 3 sets of
15. Once this is accomplished easily, reduce the repetitions to 3 sets
of 10 and increase the weight intensity.
Towel Crunches
Assume a seated position. Place a towel on the floor (not
on a carpet). Place your foot on top of the towel and curl your toes,
gathering the towel underneath and toward you.
on a carpet). Place your foot on top of the towel and curl your toes,
gathering the towel underneath and toward you.
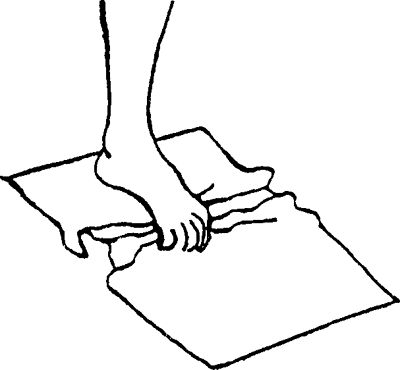 |
Marble Pick-Up
Assume a seated position. Place several marbles on the
floor and attempt to pick them up by curling your toes around them. Once
a marble is lifted, turn your foot and place the marble back down on
the floor a foot or so away. Repeat for total of 30 repetitions.
floor and attempt to pick them up by curling your toes around them. Once
a marble is lifted, turn your foot and place the marble back down on
the floor a foot or so away. Repeat for total of 30 repetitions.
Thera-Band Exercises
With the use of Thera-Band, wrap one end of the band onto
an immovable object and the other end around your mid-foot. Avoid hip
movement.
an immovable object and the other end around your mid-foot. Avoid hip
movement.
-
Ankle movement is toward you.
![images]()
-
Ankle movement is toward the little toe side.
![images]()
-
Ankle movement is toward the big toe side.
![images]()

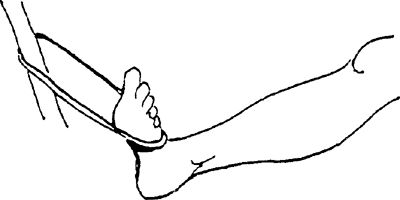

Start with 1 set of 10 repetitions, progressing to 3 sets
of 10–15. Once you can achieve this, advance the color of the
Thera-Band and begin again toward 3 sets of 10–15 repetitions.
of 10–15. Once you can achieve this, advance the color of the
Thera-Band and begin again toward 3 sets of 10–15 repetitions.
Bilateral Heel Raises
Stand with your feet shoulder-width apart. Raise your
heels off the ground and roll your weight onto the balls of your feet.
Fingertips can be placed on a counter for light balance. You can
progress to weight machines, performing same action with increasing
weight intensity.
heels off the ground and roll your weight onto the balls of your feet.
Fingertips can be placed on a counter for light balance. You can
progress to weight machines, performing same action with increasing
weight intensity.
 |
Heel Raise (Single Leg)
Raise the heel of the affected ankle up and down.
Fingertips can be placed on a counter for light balance. You can
progress to weight machines, performing same actions for added weight
intensity.
Fingertips can be placed on a counter for light balance. You can
progress to weight machines, performing same actions for added weight
intensity.
 |
Hopping (Front, Back, Side to Side)
Begin by hopping with both feet up and down and progress
to front, back, and side-to-side movements. Further progression is
achieved by hopping in same patterns with the affected ankle only.
to front, back, and side-to-side movements. Further progression is
achieved by hopping in same patterns with the affected ankle only.
Jogging, Running, Sprinting (Straight Lines)
Start with walk/jog/walk pattern. Start easy jogging in straight lines first. Progress speed and distances gradually.
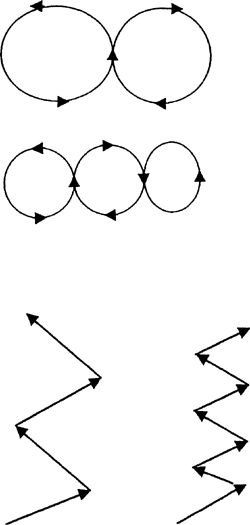
Rotator Cuff Tendinitis
What is Rotator Cuff Tendinitis?
The rotator cuff is comprised of a group of 4 muscles
that surround the front, top, and back of the shoulder. The purpose of
these muscles is to rotate the shoulder inward or outward. During
elevation of the shoulder, these muscles help to keep the major shoulder
bone, the humerus, in the socket. Directly above the superior rotator cuff muscle is a sac called a bursa, which contains a fluid substance, used to decrease friction
P.673
between this muscle and the end of the collarbone. Rotator cuff
tendinitis is an inflammation of the tendons, which occurs most commonly
to the superior tendon, called the supraspinous. An inflammation of the bursa (bursitis) can occur as well.
Common Causes
The following are common causes of tendinitis:
-
Overuse (excessive overhead activities)
-
Weakness or fatigue of the rotator cuff muscles
-
Improper mechanics (throwing, swimming, serving)
-
Lack of flexibility
-
Poor posture, usually consisting of rounded shoulders
Signs and Symptoms
Pain or aching about the front and side of the shoulder.
The pain can extend down the outside of the shoulder midway to the
elbow. Pain usually increases as one elevates the shoulder into overhead
positions.
The pain can extend down the outside of the shoulder midway to the
elbow. Pain usually increases as one elevates the shoulder into overhead
positions.
Treatment
Initially, rest, medication, and ice 2–3 times per day
for 15–20 min are helpful. Icing is beneficial as long as the
inflammatory condition continues. It can be applied after activity
and/or rehabilitation to help decrease pain and muscle spasm.
Anti-inflammatory medications are used to help decrease pain and
swelling. Sometimes, cortisone injections are administered. Stretching
and strengthening exercises, used to promote range of motion and
strength, are then initiated when pain is decreased. For moderate to
severe cases, your physician may prescribe physical therapy for
modalities (US, iontophoresis, soft tissue massage, electrical
stimulation), evaluation of weak/tight muscles, posture analysis, and
exercise progression.
Stretching
Guidelines for performance or progression of stretching exercises are as follows and/or as prescribed by your physician:
-
Keep the stretch to a comfortable level. (Do not force the stretch or cause excessive pain.)
-
Do not hold your breath while stretching.
-
Hold each stretch for ∼30 sec.
-
Repeat each stretch 3–6 times.
-
Repeat 2–3 times per day.
Strengthening
Guidelines for performance or progression of strengthening exercises are as follows and/or as prescribed by your physician:
-
Do not hold your breath while you lift.
-
Stay below the level of pain.
-
Do 2–3 sets of 10–15 repetitions 2–4 times
a week. Once you can complete 3 sets of 15 repetitions easily, increase
the weight, reduce the repetitions to 10, and build back up to 15.
Home Exercise Program
This program is designed to allow you to start with basic
exercises. If you should have any questions or difficulties, refer back
to your physician.
exercises. If you should have any questions or difficulties, refer back
to your physician.
Stretching Exercises
Guidelines: Stretch 3–6 times, holding for 30 sec.
Posterior Capsule Stretch
Pull the involved arm across your chest, positioning your hand under the opposite shoulder.
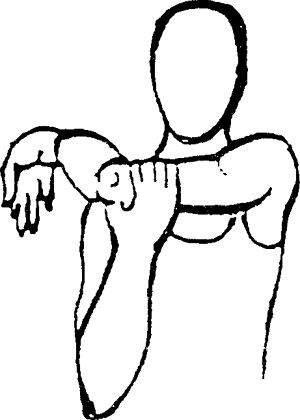 |
Towel Stretch (Internal Rotation)
This is performed with a towel. Place the uninvolved hand
behind your head and the involved hand behind your back while grasping a
towel with both hands. Gently pull the towel up toward the ceiling.
behind your head and the involved hand behind your back while grasping a
towel with both hands. Gently pull the towel up toward the ceiling.
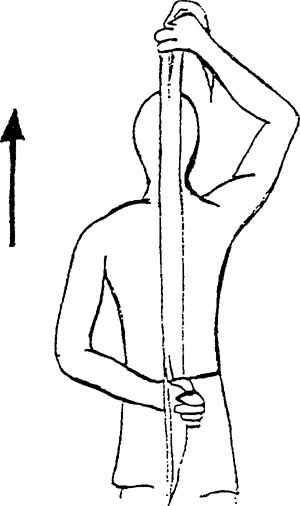 |
Shoulder External Rotation
Lie on back with elbows bent to 90 degrees, holding stick
in front of you. Using a stick for assistance, rotate your _____ hand
and forearm out away from your body. Do not allow your upper arm to move
away from your body. Hold 10 sec. Do 10 repetitions, 1–3 times per day.
in front of you. Using a stick for assistance, rotate your _____ hand
and forearm out away from your body. Do not allow your upper arm to move
away from your body. Hold 10 sec. Do 10 repetitions, 1–3 times per day.
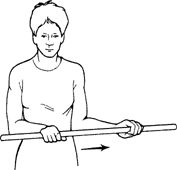 |
Flexion Stretch
While on your back, clasp your hands together, straighten your elbows, and raise your arms up and over your head.
 |
Wand Stretch
Lie on back holding wand. Raise arm over head. Hold 10
sec. Repeat 10 times per set. Do 1 set per session. Do 1–3 sessions per
day.
sec. Repeat 10 times per set. Do 1 set per session. Do 1–3 sessions per
day.
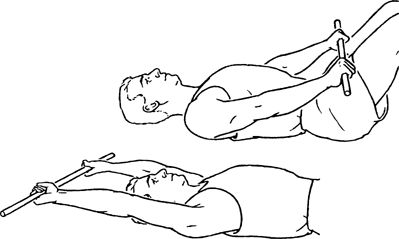 |
Extension Stretch
When standing, clasp your hands behind your back and gently raise your arms up toward the ceiling.
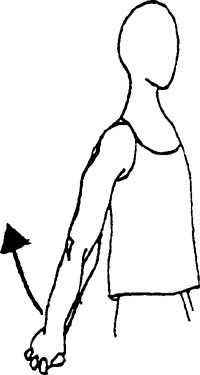 |
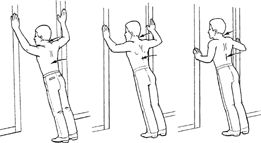
Strengthening Exercises
Guidelines: Start with 3 sets
of 10 repetitions, if able (fewer, if unable); progress to 3 sets of 15
repetitions. Once this is accomplished easily, reduce the repetitions
to 3 sets of 10 and increase the weight intensity. Use slow controlled
movements.
of 10 repetitions, if able (fewer, if unable); progress to 3 sets of 15
repetitions. Once this is accomplished easily, reduce the repetitions
to 3 sets of 10 and increase the weight intensity. Use slow controlled
movements.
External Rotation
Lie on the uninvolved side, with involved elbow flexed
and held against the side of the body. Bring your hand up toward the
ceiling. Hand should only raise a little above the horizontal. Add hand
weights to progress the exercise.
and held against the side of the body. Bring your hand up toward the
ceiling. Hand should only raise a little above the horizontal. Add hand
weights to progress the exercise.
P.674
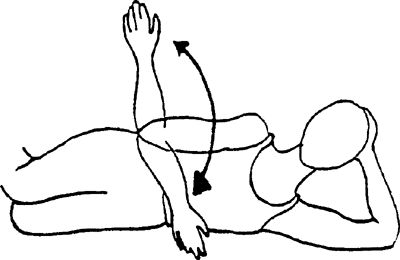 |
Empty Can
While standing, with your arm extended and the thumb
pointed down toward the floor, bring your arm up to 90 degrees or below
the pain level. The arm is positioned at a 30-degree angle from the side
of the body. Progress up to a 5-lb limit with this exercise. Make sure
your hand does not go higher than your shoulder.
pointed down toward the floor, bring your arm up to 90 degrees or below
the pain level. The arm is positioned at a 30-degree angle from the side
of the body. Progress up to a 5-lb limit with this exercise. Make sure
your hand does not go higher than your shoulder.
 |
Shoulder Flexion
While standing, raise the involved hand, with the elbow
straight toward the ceiling, to shoulder level. Your thumb should be
pointed toward the ceiling.
straight toward the ceiling, to shoulder level. Your thumb should be
pointed toward the ceiling.
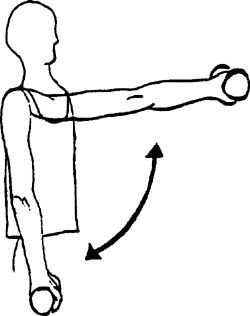 |
Shoulder Abduction
While standing, raise the involved hand, with the elbow straight out away from the body, to just below shoulder level.
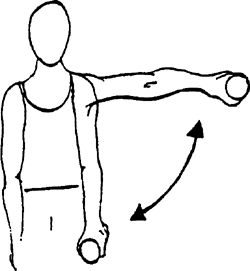 |
Single Row
Lean forward, bending from the trunk, and support your
body with the uninvolved hand on a surface (desk, table). Pull the arm
up by bending the elbow toward the ceiling until motion is stopped.
body with the uninvolved hand on a surface (desk, table). Pull the arm
up by bending the elbow toward the ceiling until motion is stopped.
 |
Isometric External Rotation
Using wall to provide resistance and keeping art at side,
press back of hand into pillow using light to moderate pressure. Hold
1–3 sec. Repeat 15–20 times per set. Do 1 set per session. Do 1–2
sessions per day.
press back of hand into pillow using light to moderate pressure. Hold
1–3 sec. Repeat 15–20 times per set. Do 1 set per session. Do 1–2
sessions per day.
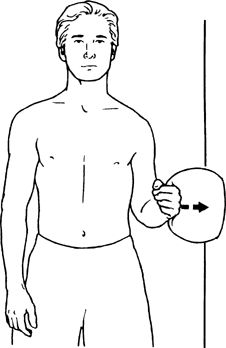 |
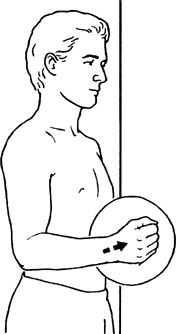
Epicondylitis
What is Epicondylitis?
Epicondylitis is an inflammatory condition involving the
tendons and muscles where they originate along the inside and outside of
the elbow. Tennis elbow is a term commonly
referred to when the condition occurs on the outside or lateral aspect
of the elbow. Lateral epicondylitis occurs more frequently than medial
epicondylitis.
tendons and muscles where they originate along the inside and outside of
the elbow. Tennis elbow is a term commonly
referred to when the condition occurs on the outside or lateral aspect
of the elbow. Lateral epicondylitis occurs more frequently than medial
epicondylitis.
Common Causes
Activities that involve forceful and/or continuous wrist
motions or a large amount of stabilization applied by the wrist such as
playing racquet sports, swimming, swinging a golf club, throwing,
playing tennis, using a computer keyboard, or playing piano.
motions or a large amount of stabilization applied by the wrist such as
playing racquet sports, swimming, swinging a golf club, throwing,
playing tennis, using a computer keyboard, or playing piano.
Signs and Symptoms
-
Pain and tenderness along either the inside or the outside of the elbow, extending into the same side of the forearm.
-
Difficulty gripping without pain; decreased wrist strength
-
Tightness/stiffness when stretching elbow and wrist
Treatment
Initially, rest, medication, and ice 2–3 times per day
for 15–20 min are helpful. Icing is beneficial as long as the
inflammatory condition continues. Ice can be applied after activity
and/or rehabilitation to help decrease pain and muscle spasm.
Anti-inflammatory medications are used to help decrease pain and
swelling. Sometimes, cortisone injections are administered. Stretching
and strengthening exercises, used to promote range of motion and
strength, are initiated when pain is decreased. A brace worn just below
the elbow joint also can be helpful. Your physician may prescribe
physical therapy for modalities (US, iontophoresis, soft tissue massage,
electrical stimulation), evaluation of weak or tight muscles, posture
analysis, and exercise progression.
Stretching
Guidelines for performance or progression of stretching exercises are as follows and/or as prescribed by your physician:
Strengthening
Guidelines for performance or progression of strengthening exercises are as follows and/or as prescribed by your physician:
-
Do not hold your breath while you lift.
-
Stay below the level of pain.
-
Do 2–3 sets of 10–15 repetitions 2–4 times
a week. Once you can complete 3 sets of 15 repetitions easily, increase
the weight, reduce the repetitions to 10, and build back up to 15.
Home Exercise Program
This program is designed to allow you to start with basic
exercises. If you should have any questions or difficulties, refer back
to your physician.
exercises. If you should have any questions or difficulties, refer back
to your physician.
Stretching Exercises
Guidelines: Stretch 3–6 times, holding for 30 sec.
Wrist Flexion Stretch
Bend the involved wrist down gently by grasping it with
the other hand until a pulling sensation is felt. Keep your elbow
straight.
the other hand until a pulling sensation is felt. Keep your elbow
straight.
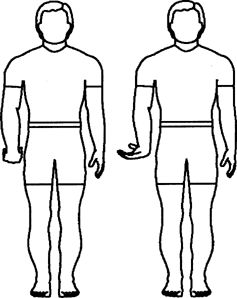 |
Wrist Flexion Stretch (Advanced)
Same as for the wrist flexion stretch, but with the addition of wrist movement toward the side of the little finger.
Wrist Extension Stretch
Bend the involved wrist up gently by grasping it with the
opposite hand until a pulling sensation is felt. Keep your elbow
straight.
opposite hand until a pulling sensation is felt. Keep your elbow
straight.
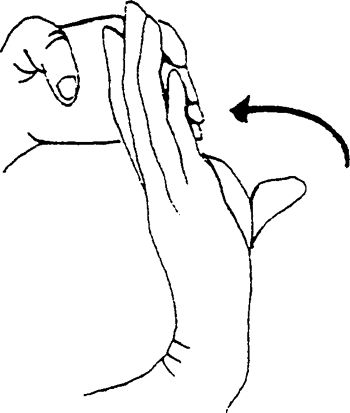 |
Pronator Teres Stretch
Bend elbow and grasp fingers with opposite hand. Bend
wrist backward, keeping fingers straight. Mild stretch. Slowly
straighten arm while keeping fingers straight. Next, pull fingers inward
and cold. Perform 1 set of 10 repetitions, twice a day.
wrist backward, keeping fingers straight. Mild stretch. Slowly
straighten arm while keeping fingers straight. Next, pull fingers inward
and cold. Perform 1 set of 10 repetitions, twice a day.
Do exercises as described unless they cause increased
pain during or after the exercise lasting longer than 10–15 min. Use
heat for stiffness/ache and ice for pain or swelling for at least 10 min
but not longer than 20 min.
pain during or after the exercise lasting longer than 10–15 min. Use
heat for stiffness/ache and ice for pain or swelling for at least 10 min
but not longer than 20 min.
 |
Triceps Stretch
Begin with arm at side. Bend elbow if involved arm. With
other arm slowly list arm overhead, keeping elbow bent. Relax and
repeat. Perform 1 set of 10 repetitions, twice a day. Hold exercise for 5
sec.
other arm slowly list arm overhead, keeping elbow bent. Relax and
repeat. Perform 1 set of 10 repetitions, twice a day. Hold exercise for 5
sec.
Do exercises as described unless they cause increased
pain during or after the exercise lasting longer than 10–15 min. Use
heat for stiffness/ache and ice for pain or swelling for at least 10 min
but not longer than 20 min.
pain during or after the exercise lasting longer than 10–15 min. Use
heat for stiffness/ache and ice for pain or swelling for at least 10 min
but not longer than 20 min.
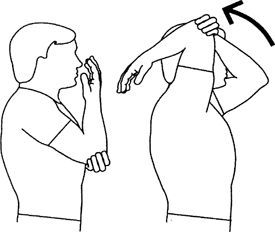 |
Strengthening Exercises
Guidelines: Start with 3 sets
of 10 repetitions, if able (fewer, if unable); progress to 3 sets of 15
repetitions. Once this is accomplished easily, reduce the repetitions
to 3 sets of 10 and increase the weight intensity.
of 10 repetitions, if able (fewer, if unable); progress to 3 sets of 15
repetitions. Once this is accomplished easily, reduce the repetitions
to 3 sets of 10 and increase the weight intensity.
Wrist Extension Curls
With your forearm supported by your leg or a table and your palm facing downward, lift and lower the weight.
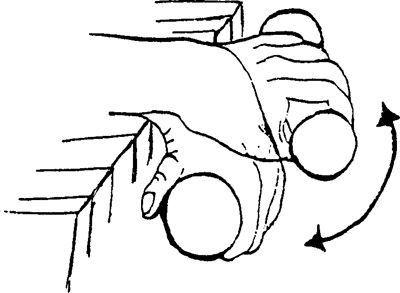 |
Wrist Flexion Curls
With your forearm supported by your leg or a table and your palm facing upward, lift and lower the weight.
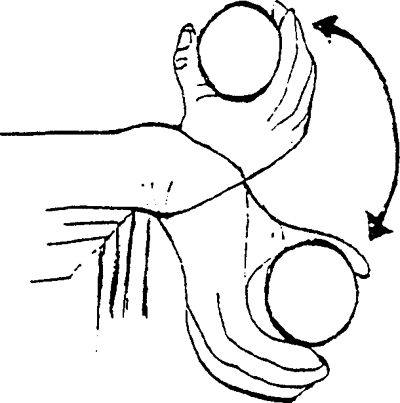 |
P.676
Forearm Pronation/Supination
With your forearm supported by your leg or a table, turn your palm up and then down while holding onto a weight.
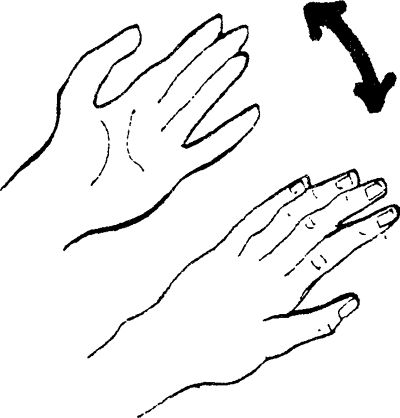 |
Neutral Gripping
With forearm resting on surface, gently squeeze towel. Repeat 15–20 times per set. Do 1 set per session. Do 12 sessions per day.
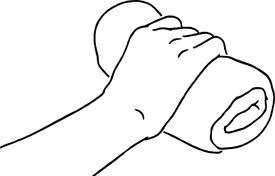 |
Gripping
To start, gently grip a rubber ball, a towel, or putty
and then advance to items with more resistance. Perform 10–30
repetitions, increasing in intensity once you are able to perform 30
repetitions.
and then advance to items with more resistance. Perform 10–30
repetitions, increasing in intensity once you are able to perform 30
repetitions.
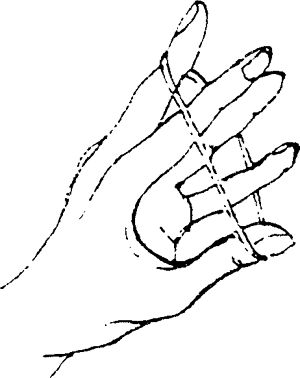
P.677
Appendix C: Joint and Soft Tissue Injection
Kalli Sanchez
Anna P. Quan
Introduction
Joint and soft tissue injections are valuable tools in
the treatment of common musculoskeletal conditions. When other
modalities fail, such as NSAIDs, activity modification, splinting, ice,
heat, and physical therapy, corticosteroid injections can be used to
provide temporary pain relief.
the treatment of common musculoskeletal conditions. When other
modalities fail, such as NSAIDs, activity modification, splinting, ice,
heat, and physical therapy, corticosteroid injections can be used to
provide temporary pain relief.
Indications
Diagnostic:
-
Local anesthetic provides pain relief to
allow a more thorough physical exam (eg, rule out rotator cuff tear
versus weakness secondary to pain) -
Exam of fluids for the diagnosis of
gout/pseudogout (crystal analysis), septic arthritis (elevated WBC
and/or positive gram stain and culture), or trauma (hemarthrosis)
Therapeutic:
-
Decrease pain
-
Increase range of motion
-
Improve quality of life
Conditions:
-
Crystalline arthropathies
-
Osteoarthritis
-
Inflammatory arthritis
-
Bursitis
-
Tendonitis
-
Ganglion cysts
-
Trigger points
-
Nerve entrapments
-
Fasciitis
Contraindications
Absolute:
-
Infection (overlying cellulitis)
-
Lack of informed consent
-
Allergy to injection medications or history of steroid flare
-
Injection into weight bearing tendons such as Achilles and patella due to high risk of rupture
Relative:
-
Brittle or out of control diabetes
-
Coagulopathy (safe in patients with INR <3.5)
-
Previous joint replacement
-
History of avascular necrosis
P.678
Supplies
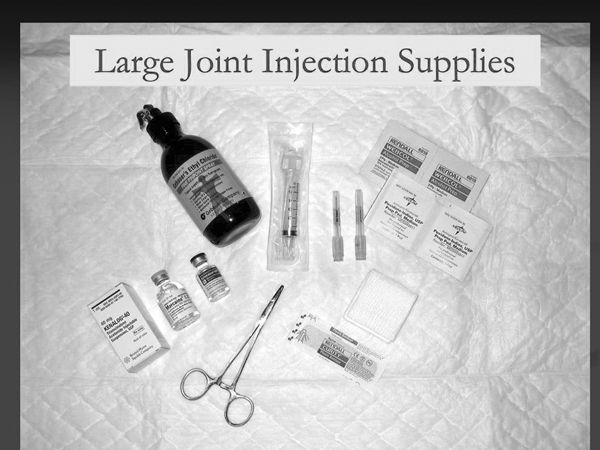 |
-
Nonsterile gloves
-
Syringe: 3–5 cc, larger for aspiration (10, 20, 60 cc)
-
Needle:
-
20 g for drawing up fluid
-
18 g for aspiration
-
Depending on site of injection: 22 g
1.5-in, 25 g 1.5-in, 25 g 5/8- or 1-in 22-gauge 3.5-in spinal needles
occasionally for trochanteric bursa injection
-
-
Betadine swabs
-
Alcohol swabs
-
Gauze
-
Band-Aids
-
Topical vapocoolant spray such as ethyl chloride
-
Hemostat clamp
Topical Anesthetic
-
Topical anesthetic can be used to aid in diagnosis or for temporary pain relief.
-
The choice of anesthetic depends on formulary availability and desired duration of action.
-
In general, lidocaine has a quick onset of
3–5 min with 1–2 hrs duration, and bupivacaine has a 15–20 min onset
with 3–4 hrs duration. -
Bupivacaine or lidocaine with epinephrine
can be used in certain areas for possible prolonged benefit of the
injection but should not be used when injecting digits or smaller
joints.
Corticosteroid
-
Decrease inflammation resulting in decreased pain and swelling
-
Lower soluble steroids have longer duration of action
-
To avoid suppression of hypothalamic-pituitary-adrenal axis, limit to 3–4 injections per year
|
Table 1 Properties of Injectable Corticosteroids
|
||||||||||||||||||||||||||||
|---|---|---|---|---|---|---|---|---|---|---|---|---|---|---|---|---|---|---|---|---|---|---|---|---|---|---|---|---|
|
||||||||||||||||||||||||||||
P.679
|
Table 2 Equivalent Dosages of Injectable Corticosteroids
|
||||||||||||||
|---|---|---|---|---|---|---|---|---|---|---|---|---|---|---|
|
||||||||||||||
Viscosupplementation
-
Sodium hyaluronate is a glycosaminoglycan found in normal joint fluid.
-
In osteoarthritis, the concentration of sodium hyaluronate is lower.
-
Synthetic formulations of sodium hyaluronate are derived from rooster combes.
-
Available products:
-
Hyalgan (Sanofi-Synthelabo)—5 weekly
-
Supartz (Smith and Nephew)—5 weekly
-
Synvisc (Genzyme)—3 weekly
-
-
Lack of good evidence showing efficacy
-
Used for patients failing conservative therapy or when corticosteroids are contraindicated
-
Contraindicated in patients with allergies to avian proteins or eggs
Technique
-
The specific techniques for each joint will be discussed in each joint section.
-
In general, the following techniques should be followed.
-
Identify the anatomic landmarks and mark the entry site with the cap of the needle.
-
Cleanse the area with Betadine and alcohol.
-
Spray ethyl chloride if available to anesthetize the skin for needle entry.
-
Insert the needle to the proper depth for the particular injection.
-
Inject the steroid/analgesic mixture. There should be free flow (without resistance) of the medication.
-
Remove the needle and apply pressure with gauze.
-
Apply a Band-Aid.
-
Complications
-
Major risks of corticosteroid injections
include bleeding, infection, tendon rupture, steroid flare, fat pad or
soft tissue atrophy, and skin depigmentation. -
Steroid flare (crystal synovitis) is treated with rest, ice, NSAIDs and usually resolves spontaneously after 24–36 hrs.
-
The estimated risk of causing septic arthritis is rare, on the order of 0.01%.
Aftercare
-
While the anesthetic is in effect, the
patient will not feel an injury to the joint; therefore, it is
recommended to rest the injected joint for several hours. -
The patient is educated to monitor for signs or symptoms of infection including fever, erythema, warmth, or increasing pain.
-
Ice is an effective modality for pain control following an injection.
-
Activities can generally be resumed after 3–5 days when the cortisone has had a chance to take effect.
Informed Consent
-
Every invasive procedure (including joint aspirations or injections) should include a detailed informed consent.
-
Lawsuits have occurred over complications
to joint injections and, in these situations, having an informed consent
signed and kept with the patient’s medical record is of utmost
importance. -
The informed consent includes
documentation that the patient is competent to make decisions, and that a
discussion of the risks and benefits of a corticosteroid injection have
been reviewed.
Billing/Coding
-
Current Procedural Terminology (CPT) 2009
Codes should be used to accurately assign the proper codes for the
procedures performed. -
ICD9 codes and CPT codes will be listed with each joint or soft tissue injection discussed.
P.680
Bibliography
-
Agur AM, Dalley AF. Grants Atlast of Anatomy, 12th ed. Philadelphia: Lippincott Williams & Wilkins, 2009.
-
Blair B, Rokito AS, Cuomo F, et al. Efficacy of injections of corticosteroids for subacromial impingement syndrome. J Bone Joint Surg Am. 1996;78(11):1685–1689.
-
Buchbinder R, Green S, Youd JM. Corticosteroid injections for shoulder pain. Cochrane Database Syst Rev. 2003;(1): CD004016.
-
Cardone DA, Tallia AF. Diagnostic and therapeutic injection of the elbow region. Am Fam Physician. 2002;66(11):2097–2100.
-
Cardone D, Tallia A. Joint and soft tissue injection. Am Fam Physician 2002;66:283–288, 290.
-
Cardone D, Tallia A. Diagnostic and therapeutic injection of the hip and knee. Am Fam Physician. 2003;67:2147–2152.
-
Esenyel C, Demirhan M, et al. Comparison of four different intra-articular injection sites in the knee: a cadaver study. Knee Surg Sports Trauma Arthrosc. 2007;15(5):573–577.
-
Griffin, Letha Yurko, ed. Essentials of Musculoskeletal Care, 3rd ed. American Academy of Orthopaedic Surgeons, 2005.
-
http://www.orthogastonia.com
-
Jackson DW, Evans N, Thomas B. Accuracy of needle placement into the intra-articular space of the knee. J Bone Joint Surgery Am. 2002;84:1522–1527.
-
Kang MN, Rizio L, Prybicien M, et al. The accuracy of subacromial corticosteroid injections: a comparison of multiple methods. J Shoulder Elbow Surg. 2008;17(1 Suppl):61S–66S.
-
Lievense A, Bierma-Zeinstra S, Schouten B, et al. Prognosis of trochanteric pain in primary care. Br J Gen Pract. 2005;55(512):199–204.
-
Luc M, Pham T, Chagnaud C, et al. Placement of intra-articular injection verified by the backflow technique. Osteoarthritis Cartilage. 2006;14(7):714–716.
-
McNabb JW. A Practical Guide to Joint and Soft Tissue Injection and Aspiration. Philadelphia: Lippincott Williams & Wilkins; 2005.
-
Safran MR, McKeag DB, Van Camp SP. Manual of Sports Medicine. Philadelphia: Lippincott-Raven Publishers; 1998.
-
Saunders S. Injection Techniques in Orthopaedic and Sports Medicine, 2nd ed. Philadelphia: WB Saunders; 2002.
-
Shbeeb MI, O’Duffy JD, Michet CJ, et al.
Evaluation of glucocorticosteroid injection for the treatment of
trochanteric bursitis. J Rheumatol. 1996;23(12):2104–2106. -
Smidt N, vad der Windt DA, Assendelft WJ,
et al. Corticosteroid injections, physiotherapy, or a wait-and-see
policy for lateral epicondylitis: a randomized controlled trial. Lancet. 2002;359(9307):657–662. -
Stephens, Mark B. Beutler, Anthony I. O’Connor. Musculoskeletal Injections: A Review of the Evidence. Am Fam Physician. 2008;78(8):971–976.
-
Tallia A, Cardone D. Diagnostic and therapeutic injection of the wrist and hand region. Am Fam Physician. 2003;67:745–750.
-
Tallia AF, Cardone DA. Diagnostic and therapeutic injection of the shoulder region. Am Fam Physician. 2003;67(6):1271–1278.
-
Tallia A, Cardone D. Diagnostic and therapeutic injection of the ankle and foot. Am Fam Physician. 2003;68:1356–1362.
-
Zuber T. Knee joint aspiration and injection. Am Fam Physician. 2002;66:1497–1500, 1503–1504, 1507, 1511–1512.
Credits: Images from Griffin, Letha Yurko, ed. Essentials of Musculoskeletal Care 3rd Edition. American Academy of Orthopaedic Surgeons, 2005. McNabb, James W. A Practical Guide to Joint and Soft Tissue Injection and Aspiration. 1st ed. Philadelphia: Lippincott Williams & Wilkins, 2005. Agur AM, Dalley AF. Grants Atlas of Anatomy, 12th ed. Philadelphia: Lippincott Williams & Wilkins, 2009.
Trigger Point Injection
Indications
-
Trigger points occur due to focal areas of muscular ischemia, spasm, and inflammation, usually involving the back muscles.
-
There is no evidence indicated injections are beneficial but some patients respond to injections.
-
ICD-9 307.81 Tension headache
-
ICD-9 720.1 Spinal enthesopathy
-
ICD-9 723.1 Cervicalgia
-
ICD-9 729.0 Rheumatism unspecified and fibrositis
-
ICD-9 729.1 Fibromyalgia/fibromyositis and myalgia
-
ICD-9 729.2 Neuralgia, neuritis, and radiculitis
Anatomy
-
The anatomy depends on the location of the trigger point injection.
-
The injection is performed over the tender nodule, which is usually in the muscles surrounding the scapula.
Supplies
-
Gloves
-
Betadine and alcohol swabs
-
3-mL syringe with 25-gauge 5/8–1-in needle
-
1 mL 1% lidocaine
-
1 mL (20 mg) Kenalog or equivalent (optional)
-
Ethyl chloride
-
Gauze
-
Band-Aid
P.681
Technique
-
Palpate the tender nodule and mark with needle cap.
-
Cleanse the skin with Betadine and alcohol.
-
Apply ethyl chloride until skin turns white.
-
Injection site is directly into the nodule
-
A fanning technique can be used to disperse the fluid in various directions, which can be helpful in large nodules.
![images]()
-
Remove needle and apply pressure with gauze, gently massaging material.
-
Apply Band-Aid
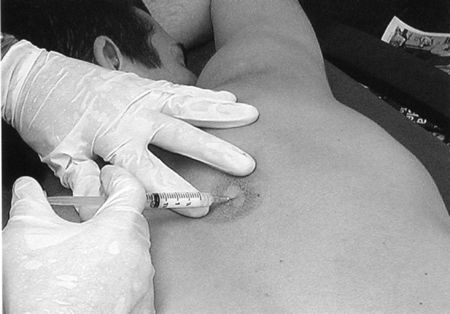
Aftercare
-
Instruct patient that the area may be numb for several hours after the procedure and that pain may be present for several days.
-
Instruct patient that the cortisone usually takes effect within 72 hrs.
-
Instruct patient to return to your office if they develop redness, swelling, or increased pain at the injection site.
CPT Code
-
20552 Injection(s) of trigger point(s) in 1–2 muscle groups
-
20553 Injection(s) of trigger point(s) in 3 or more muscle groups
Subacromial Injection
Indications
-
Subacromial injections are useful for diagnostic and therapeutic purposes.
-
Any condition along the spectrum of
rotator cuff diseases that cause subacromial bursitis may respond to
corticosteroid injection. -
Injections are indicated once conservative
therapy (activity modification, NSAIDS, physical therapy) has failed;
however, in some cases, an injection given prior to PT can allow
patients to perform their therapy better and with less pain. -
Subacromial corticosteroid injection
provides short-term pain relief that is greater than placebo and at
least equal to NSAID therapy – Evidence rating B -
ICD-9:
-
726.10 Rotator cuff syndrome NOS
-
727.61 Nontraumatic complete rupture of rotator cuff
-
840.4 Rotator cuff sprain
-
Anatomy
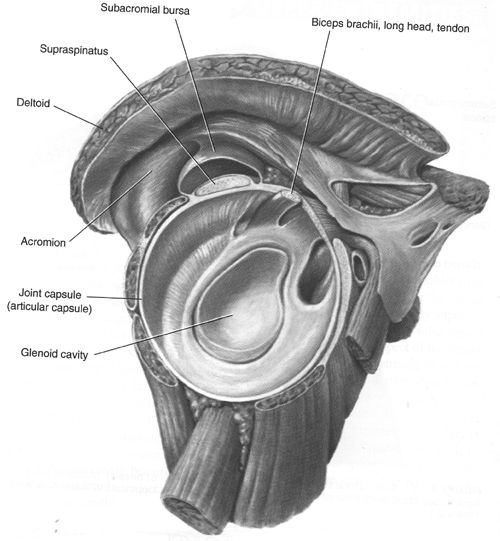
Supplies
-
Gloves
-
Betadine and alcohol swabs
-
5-mL syringe with 22- or 25-gauge 1½-in needle
-
4-mL anesthetic (can combine 2 mL 1% lidocaine and 2 mL 0.25% Marcaine)
-
1 mL (40 mg) Kenalog or equivalent
-
Ethyl chloride
-
Gauze
-
Band-Aid
Technique
-
There are 3 approaches to the subacromial injection: Anterior, lateral, and posterolateral.
-
Given the increased risk of pneumothorax with the anterior approach, we do not recommend this approach.
-
Determine which approach you will use and mark the area with the needle cap.
-
Lateral approach: The lateral edge of the acromion is palpated.
-
Cleanse the skin with Betadine and alcohol.
-
Apply ethyl chloride until the skin turns white.
-
The needle is inserted at the midpoint of
the acromion and angled slightly upwards under the acromion to full
length (up to hub of needle).P.683![images]()
-
Posterolateral approach: The distal,
lateral, and posterior edges of the acromion are palpated and the soft
spot 1 cm below the posterolateral corner is marked.-
Cleanse the skin with Betadine and alcohol
-
Apply ethyl chloride until the skin turns white.
-
The needle is inserted 1 cm inferior to
the posterolateral edge of the acromion. The needle is directed toward
the opposite nipple (coracoid).![images]()
-
Never inject under pressure—steroid injected directly into a tendon may cause tendon rupture.
-
Remove needle and apply pressure with gauze.
-
Apply Band-Aid.
-
Have patient perform Codman exercises or arm swings to disperse the fluid through the bursa.
-
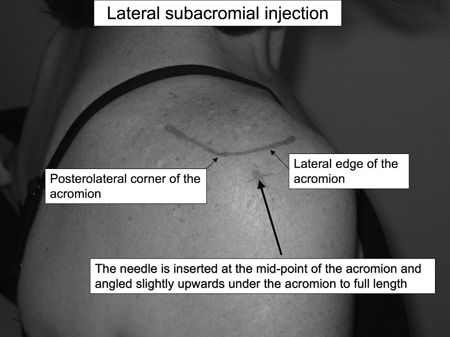
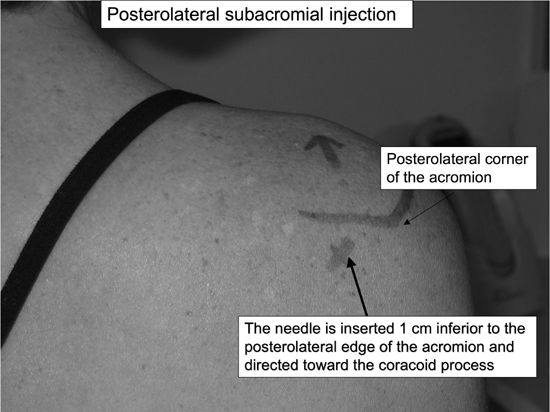
Aftercare
-
Instruct patient that the shoulder may be
numb for several hours after the procedure and that pain may be present
for several days. -
Instruct patient that the cortisone usually takes effect within 72 hr.
-
After 5–7 days, the patient can resume his
regular activity and you should recommend starting ROM and rotator cuff
strengthening exercises. -
Instruct patient to return to your office if they develop redness, swelling, or increased pain at the injection site.
CPT Code
-
20610 Arthrocentesis, aspiration and/or injection; major joint or bursa (eg, shoulder, hip, knee joint, subacromial bursa)
P.684
Glenohumeral Joint Injection
Indications
-
Glenohumeral injections are useful for patients with shoulder pain secondary to osteoarthritis or rheumatoid arthritis.
-
Glenohumeral injections can aid in
improving range of motion with physical therapy for patients with
adhesive capsulitis or frozen shoulder. -
Injections are indicated once conservative therapy (activity modification, NSAIDS, physical therapy) has failed.
-
ICD-9:
-
714.0 Rheumatoid arthritis
-
715.11 Primary osteoarthritis, shoulder
-
715.21 Secondary osteoarthritis, shoulder (rotator cuff arthropathy)
-
726.0 Shoulder adhesive capsulitis
-
Anatomy
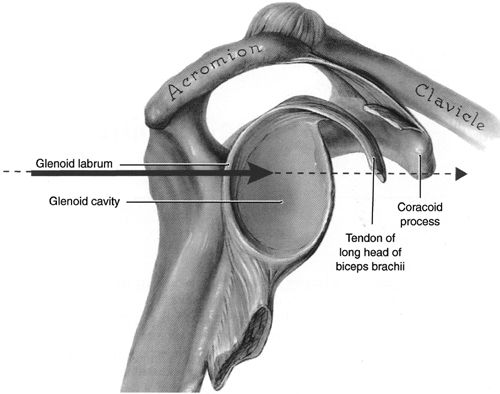
Supplies
-
Gloves
-
Betadine and alcohol swabs
-
3-mL syringe with 22- or 25-gauge 1½-in needle
-
1–2 mL anesthetic
-
1 mL (40 mg) Kenalog or equivalent
-
Ethyl chloride
-
Gauze
-
Band-Aid
Technique
-
The glenohumeral joint can be approached from the anterior or posterior direction.
-
The posterior approach is preferable since both subacromial and glenohumeral injections can be done through one needle stick.
-
Posterior Approach: The distal, lateral,
and posterior edges of the acromion are palpated, and the soft spot 1 cm
below the posterolateral corner is marked with the needle cap,-
Cleanse the skin with Betadine and alcohol.
-
If available, have an assistant distract (pull down) and externally rotate the arm.
-
Apply ethyl chloride until the skin turns white.
-
The needle is inserted just inferior to
the posterolateral edge of the acromion. The needle is directed
anteriorly and may need to be walked into the joint.![images]()
P.685 -
-
Anterior Approach: The head of the humerus is palpated and the joint space determined and marked with the needle cap.
-
Never inject under pressure—steroid injected directly into a tendon may cause tendon rupture.
-
Remove needle and apply pressure with gauze.
-
Apply Band-Aid.
-
Have patient perform Codman exercises or arm swings to disperse the fluid through the glenohumeral joint.
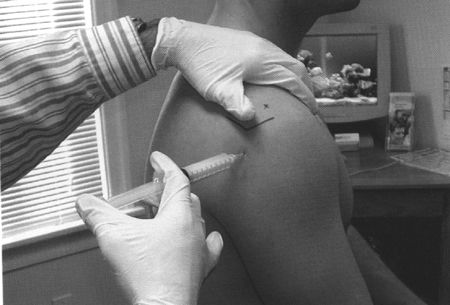
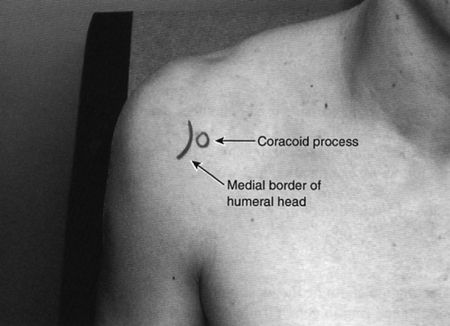
Aftercare
-
Instruct patient that the shoulder may be
numb for several hours after the procedure and that pain may be present
for several days. -
Instruct patient that the cortisone usually takes effect within 72 hr.
-
After 5–7 days, the patient can resume his regular activity,
-
Instruct patient to return to your office if they develop redness, swelling, or increased pain at the injection site.
CPT Code
-
20610 Arthrocentesis, aspiration and/or injection; major joint or bursa (eg, shoulder, hip, knee joint, subacromial bursa)
P.686
Acromioclavicular Joint Injection
Indications
-
AC joint injections are indicated for patients with shoulder pain due to pathology of the AC joint.
-
Injections are indicated once conservative therapy (activity modification, NSAIDS) has failed.
-
ICD-9:
-
719.41 AC joint pain
-
716.91 AC joint arthritis
-
715.91 AC joint osteoarthrosis
-
Anatomy
-
The AC joint can be palpated as a narrow
indentation at the distal end of the clavicle, about one thumb’s width
medial to the lateral edge of the acromion. -
The joint line runs obliquely medially at approximately a 20-degree angle.
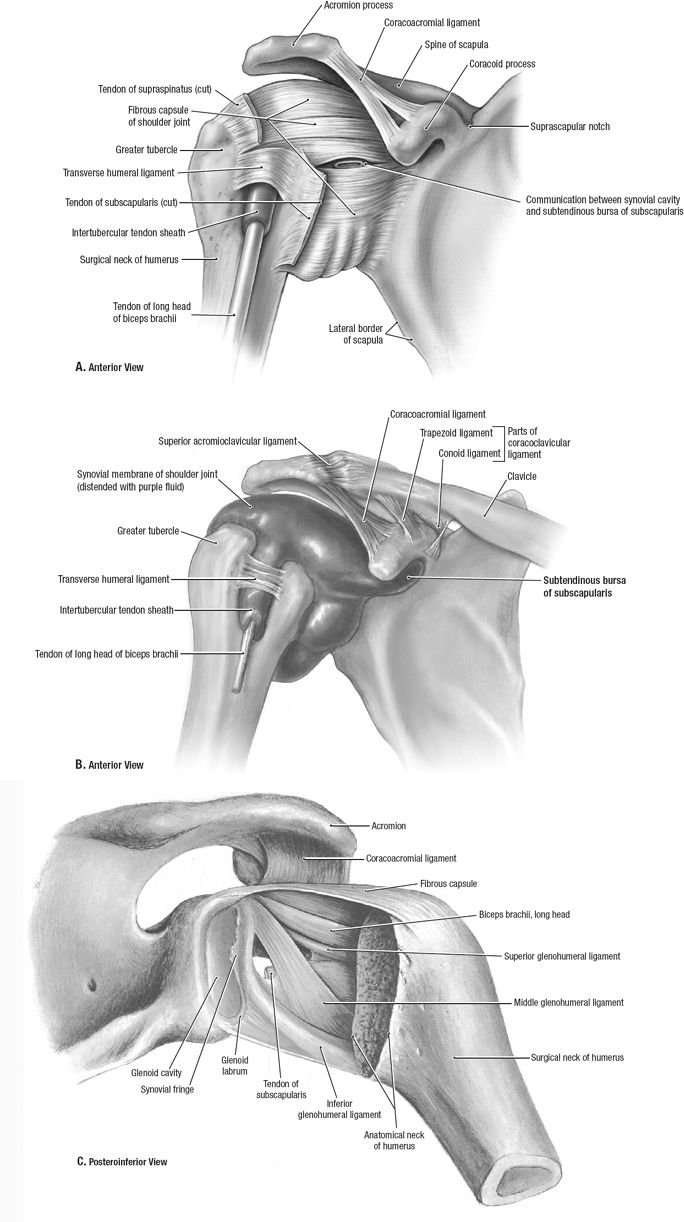 |
P.687
Supplies
-
Gloves
-
Betadine and alcohol swabs
-
3-mL syringe with 25-gauge 5/8–1-in needle
-
0.5 mL 1% lidocaine
-
0.5 mL (20 mg) Kenalog or equivalent
-
Ethyl chloride
-
Gauze
-
Band-Aid
Technique
-
Palpate the depression of the AC joint at the distal clavicle and mark it with the needle cap.
-
Cleanse the skin with Betadine and alcohol.
-
Apply ethyl chloride until skin turns white.
-
Insert the needle at a 15–20-degree angle (needle pointed more medially).
![images]()
-
Viewing the x-rays prior to injection can help determine the exact angle of the AC joint.
-
Inject the fluid into the joint.
-
Remove needle and apply pressure with gauze.
-
Apply Band-Aid.
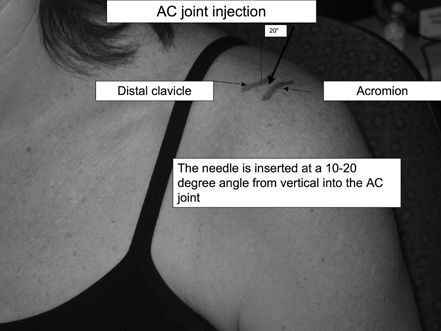
P.688
Aftercare
-
Instruct patient that the shoulder may be
numb for several hours after the procedure and that pain may be present
for several days. -
Instruct patient that the cortisone usually takes effect within 72 hr.
-
Instruct patient to return to your office if they develop redness, swelling, or increased pain at the injection site.
-
Avoid repetitive or heavy overhead lifting.
CPT Code
-
20600 Arthrocentesis, aspiration and/or injection; small joint or bursa
Elbow Joint Injection
Indications
-
Elbow injections are useful for the
treatment of elbow pain due to arthritis either from trauma,
osteoarthritis, or rheumatoid arthritis. -
Injections are indicated once conservative therapy (activity modification, NSAIDS, physical therapy) has failed.
-
ICD-9:
-
729.5 Elbow pain
-
716.92 Elbow arthritis
-
Anatomy
-
The elbow joint is composed of the ulnohumeral, radiocapitellar, and proximal radioulnar joints.
-
The elbow joint can be approached via the triangle formed by the lateral olecranon, head of the radius, and lateral epicondyle.
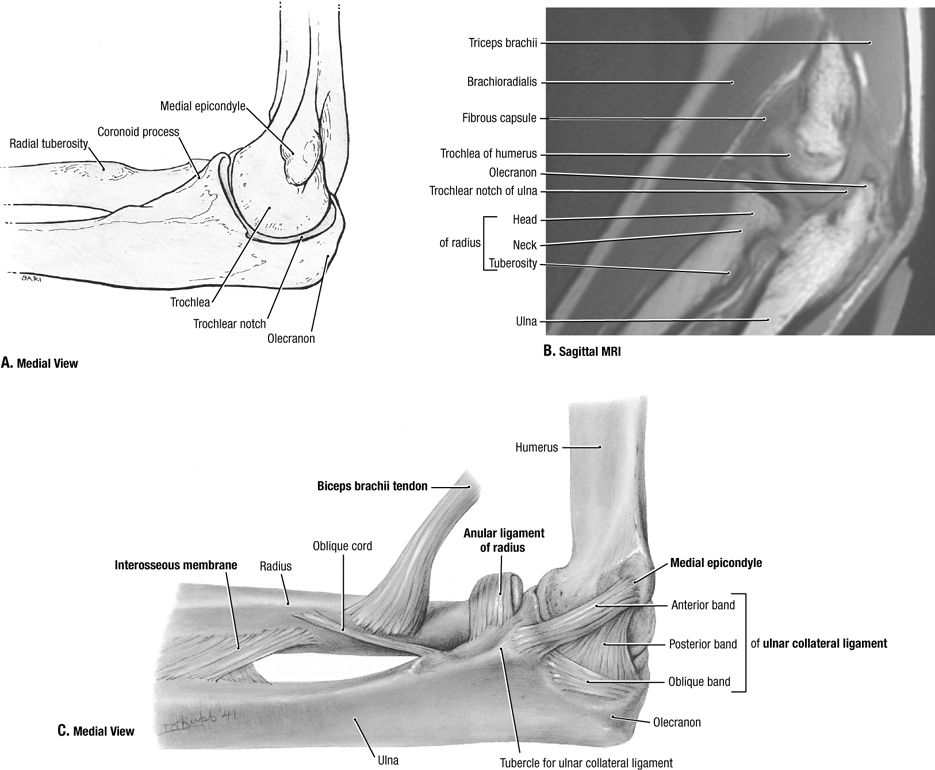 |
P.689
Supplies
-
Gloves
-
Betadine and alcohol swabs
-
3-mL syringe with 25-gauge 1-in needle
-
10–20 mL syringe with 20- or 22-gauge needle if aspirating
-
1 mL 1% lidocaine without epinephrine
-
1 mL (40 mg) Kenalog or equivalent
-
Ethyl chloride
-
Gauze
-
Band-Aid
Technique
-
Place the patient’s arm on the table at a 45-degree angle.
-
Mark the soft depression in the center of
the triangle formed by the lateral olecranon, head of the radius, and
lateral epicondyle with the needle cap. -
Cleanse the skin with Betadine and alcohol.
-
Apply ethyl chloride until the skin turns white.
-
The needle is inserted into the elbow joint between the lateral epicondyle and the radial head.
![images]()
-
If aspirating, remove as much fluid as
possible then stabilize the needle in the joint, twist off the 10-mL
syringe, and place the 3-mL syringe containing cortisone mixture on the
needle. -
Inject the fluid into the joint.
-
Remove needle and apply pressure with gauze.
-
Apply Band-Aid.
-
Instruct the patient to perform flexion/extension range of motion exercises to disperse the fluid within the joint.
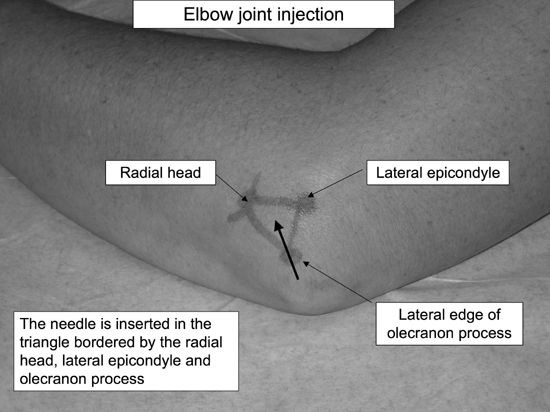
Aftercare
-
Instruct patient that the elbow may be numb for several hours after the procedure and that pain may be present for several days.
-
Instruct patient that the cortisone usually takes effect within 72 hr.
-
After 3–5 days, the patient can resume his regular activity.
-
Instruct patient to return to your office if they develop redness, swelling, or increased pain at the injection site.
CPT Code
-
20605 Arthrocentesis, aspiration and/or injection; intermediate joint or bursa
Epicondylitis Injection
Indications
-
Epicondylitis injections are indicated for the treatment of lateral (tennis elbow) or medial (golfer’s elbow) epicondylitis.
-
Lateral epicondylitis injections are very common in primary care.
-
Injections are indicated once conservative therapy (activity modification, NSAIDS, physical therapy) has failed.
-
Corticosteroid injection reduces
short-term (<6 wks) symptoms from lateral epicondylitis, but physical
therapy is superior to steroid injection after six weeks – Evidence
rating A -
ICD-9:
-
726.32 Lateral epicondylitis
-
726.31 Medial epicondylitis
-
P.690
Anatomy
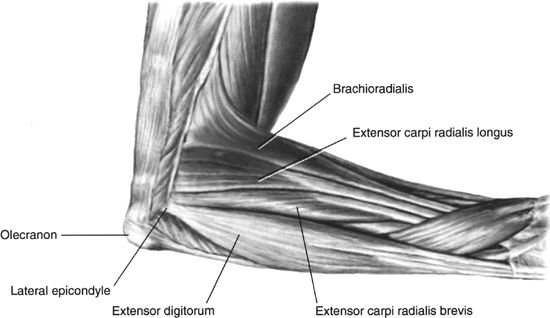
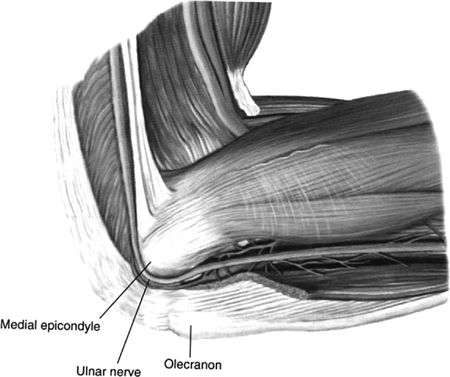
Supplies
Technique
-
Lateral Epicondyle: Place the patient’s arm on the table at a 45-degree angle with the lateral elbow facing up:
-
Palpate the area of most tenderness over the epicondyle and mark this with the cap of the needle.
-
Cleanse the skin with Betadine and alcohol.
-
Apply ethyl chloride until the skin turns white.
-
The needle is inserted down to the bone of the lateral epicondyle.
![images]()
-
Inject the fluid into the area. If there
is resistance of flow, then back the needle slightly out so the hub of
the needle is not against bone and then inject. -
Take care not to inject cortisone while
withdrawing the needle, as this superficial tracking of cortisone can
increase the risk of skin atrophy and depigmentation. -
Remove needle and apply pressure with gauze.
-
Apply Band-Aid
-
-
Medial epicondyle: Place the patient’s arm on the table at a 45-degree angle with the medial elbow facing up:
-
Palpate the area of most tenderness over the epicondyle and mark this with the cap of the needle.
-
Cleanse the skin with Betadine and alcohol.
-
Apply ethyl chloride until the skin turns white.
-
The needle is inserted down to the bone of the medial epicondyle.
![images]()
-
Take care not to inject the ulnar nerve as
it traverses posterior to the medial epicondyle in the cubital tunnel.
If the patient experiences pain or numbness in the ulnar nerve
distribution while the needle is inserted, then back out and reposition
the needle more anteriorly before injecting cortisone. -
Inject the fluid into the area. If there
is resistance of flow, then back the needle slightly out so the hub of
the needle is not against bone and then inject. -
Take care not to inject cortisone while
withdrawing the needle, as this superficial tracking of cortisone can
increase the risk of skin atrophy and depig-mentation -
Remove needle and apply pressure with gauze.
-
Apply Band-Aid.
P.692 -
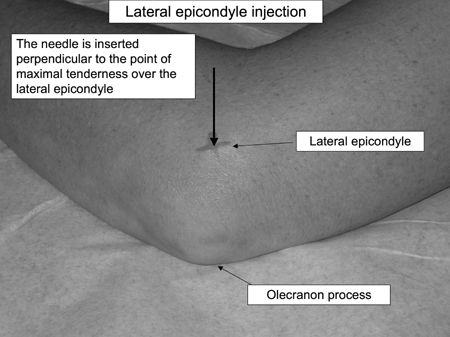
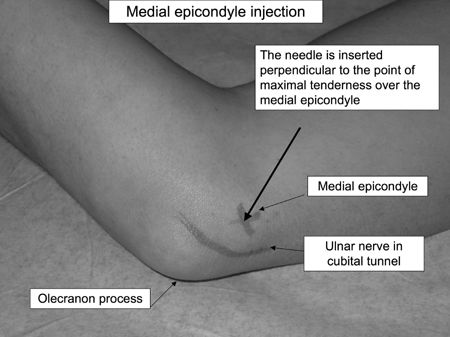
Aftercare
-
Instruct patient that the elbow may be numb for several hours after the procedure and that pain may be present for several days.
-
In addition, anesthetic spreading from the
injection posteriorly may affect the ulnar nerve, and transient ring
and pinky finger numbness may occur. -
Instruct patient that the cortisone usually takes effect within 72 hr.
-
NSAIDS and ice can be used to control postprocedure pain.
-
Consider an elbow extension splint to rest
the elbow and/or wrist splint to avoid wrist flexion/extension for 1–2
wks to allow the injection to take effect. -
The patient should avoid repetitive wrist extension or flexion.
-
Instruct patient to return to your office if they develop redness, swelling, or increased pain at the injection site.
CPT Code
-
20551 Injection(s) of single tendon origin or insertion
Wrist Injection
Indications
-
Wrist injections are useful for the
treatment of wrist pain due to arthritis either from trauma,
osteoarthritis, or rheumatoid arthritis. -
Injections are indicated once conservative therapy (activity modification, NSAIDS, physical therapy) has failed.
-
ICD-9:
-
719.43 Wrist pain
-
716.94 Wrist arthritis
-
715.94 Wrist osteoarthrosis
-
Anatomy
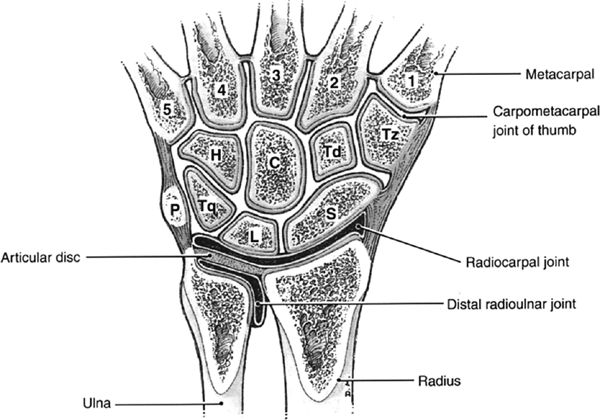
P.693
Supplies
-
Gloves
-
Betadine and alcohol swabs
-
3-mL syringe with 25-gauge 5/8- or 1-in needle
-
10–20 mL syringe with 20- or 22-gauge 5/8- or 1-in needle for aspiration
-
½ mL 1% lidocaine without epinephrine
-
½ mL (20 mg) Kenalog or equivalent
-
Ethyl chloride
-
Gauze
-
Band-Aid
Technique
-
Palpate the depression distal to the distal radius near the scapholunate articulation.
-
Mark this area with the cap of the needle.
-
Cleanse the skin with Betadine and alcohol.
-
Apply ethyl chloride until the skin turns white.
-
The needle is inserted into the wrist joint.
![images]()
-
If aspirating, withdraw fluid with 10–20
mL syringe, then stabilize needle and exchange 3-mL syringe containing
steroid mixture and inject -
If injecting, use 3-mL syringe with 25-gauge 1-in needle and inject fluid into joint.
-
The fluid should flow easily without
resistance. If there is resistance, reposition the needle by either
advancing or withdrawing the needle until the flow of fluid is smooth. -
Remove needle and apply pressure with gauze.
-
Apply Band-Aid.
-
Have patient perform wrist flexion and extension exercises to disperse the fluid through the wrist joint.
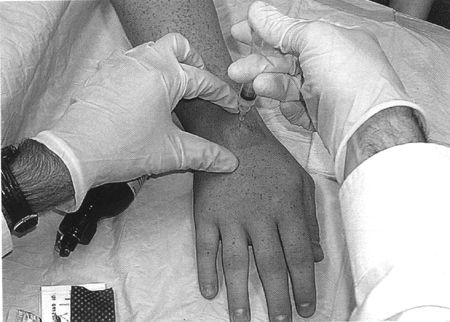
Aftercare
-
Instruct patient that the wrist may be numb for several hours after the procedure and that pain may be present for several days.
-
Instruct patient that the cortisone usually takes effect within 72 hr.
-
After 3 days, the patient can resume his regular activity.
-
Consider use of wrist splint for 1–2 wks after injection.
-
Instruct patient to return to your office if they develop redness, swelling, or increased pain at the injection site.
CPT Code
-
20605 Arthrocentesis, aspiration and/or injection; intermediate joint or bursa
P.694
De Quervain’s Tenosynovitis Injection
Indications
-
de Quervain’s tenosynovitis injections are indicated for the treatment of tenosynovitis over the radial aspect of the wrist.
-
These injections are very common in primary care.
-
Injections are indicated once conservative therapy (activity modification, NSAIDS, occupational therapy, splinting) has failed.
-
ICD-9:
-
727.04 de Quervain’s tenosynovitis
-
Anatomy
-
The dorsal wrist has 6 compartments containing tendons.
-
The 1st dorsal compartment contains the abductor pollicis longus and the extensor pollicis brevis tendons.
-
de Quervain’s tenosynovitis occurs when
the tendon sheath becomes inflamed and thickened, causing pain,
swelling, and occasional triggering.![images]()
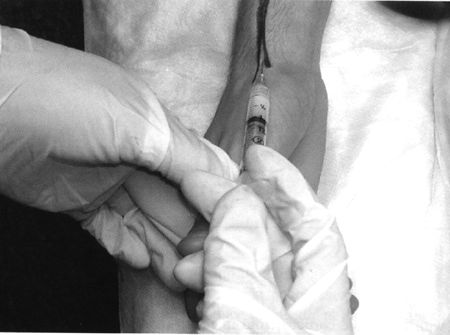
Supplies
-
Gloves
-
Betadine and alcohol swabs
-
3-mL syringe with 25-gauge 5/8- or 1-in needle
-
0.5 mL 1% lidocaine without epinephrine
-
0.5 mL (20 mg) Kenalog or equivalent
-
Ethyl chloride
-
Gauze
-
Band-Aid
Technique
-
Palpate the area of most tenderness over the 1st dorsal compartment and mark this with the needle cap.
-
Cleanse the skin with Betadine and alcohol.
-
Apply ethyl chloride until the skin turns white.
-
The needle is inserted into the tendon
sheath between the abductor pollicis longus and extensor pollicis brevis
tendons at approximately a 30-degree angle.P.695![images]()
-
Inject the fluid into the sheath. If there
is resistance to flow, then the needle is likely in a tendon and should
be backed slightly out until free flow is obtained. -
An elliptical shaped bulge occurs with the injection of the bolus of fluid into the sheath.
-
Take care not to inject cortisone while
withdrawing the needle, since this superficial tracking of cortisone can
increase the risk of skin atrophy and depig-mentation. -
Remove needle and apply pressure with gauze.
-
Gently massage the fluid up and down along the tendon sheath.
-
Apply Band-Aid.
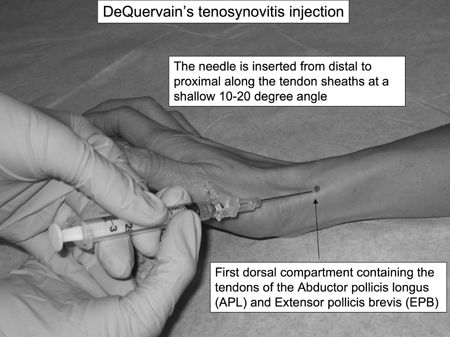
Aftercare
-
Instruct patient that the wrist may be numb for several hours after the procedure and that pain may be present for several days.
-
Instruct patient that the cortisone usually takes effect within 72 hr.
-
NSAIDS and ice can be used to control postprocedure pain.
-
Consider a thumb spica wrist splint to rest the tendons for 1–2 wk to allow the injection to take effect.
-
The patient should avoid repetitive thumb abduction and/or extension.
-
Instruct patient to return to your office if they develop redness, swelling, or increased pain at the injection site.
CPT Code
-
20500 Injection(s); single tendon sheath, or ligament, aponeurosis
1st CMC Joint Injection
Indications
-
1st CMC (thumb) injections are useful for
the treatment of thumb pain due to arthritis either from trauma,
osteoarthritis, or rheumatoid arthritis -
Injections are indicated once conservative therapy (activity modification, NSAIDS, thumb spica splinting) has failed,
-
ICD-9:
-
719.44 Pain of thumb CMC joint
-
716.94 Arthritis of thumb CMC joint
-
715.94 Osteoarthrosis of thumb CMC joint
-
Anatomy
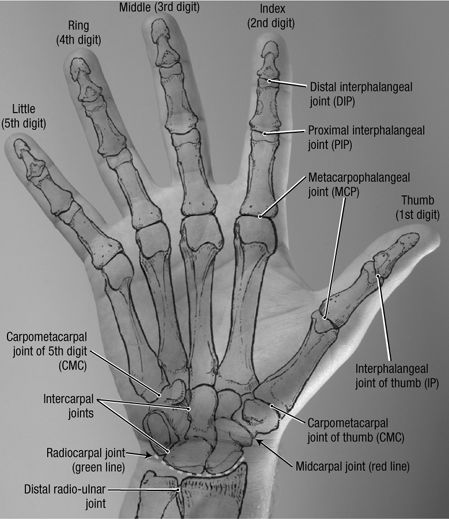
Supplies
-
Gloves
-
Betadine and alcohol swabs
-
3-mL syringe with 25-gauge 1-in needle
-
0.5 mL 1% lidocaine without epinephrine
-
0.5 mL (20 mg) Kenalog or equivalent
-
Ethyl chloride
-
Gauze
-
Band-Aid
Technique
-
Place the patient’s arm on the table palm down.
-
Mark the depression at the base of the 1st metacarpal with needle cap.
-
Cleanse the skin with Betadine ×3 and alcohol.
-
Apply ethyl chloride until the skin turns white.
-
To avoid the radial artery, the needle
should enter toward the ulnar side of the extensor pollicis brevis
tendon. Distraction of the thumb can increase the space to get the
needle into the joint.P.697![images]()
-
Inject the fluid into the joint.
-
Remove needle and apply pressure with gauze.
-
Apply Band-Aid.
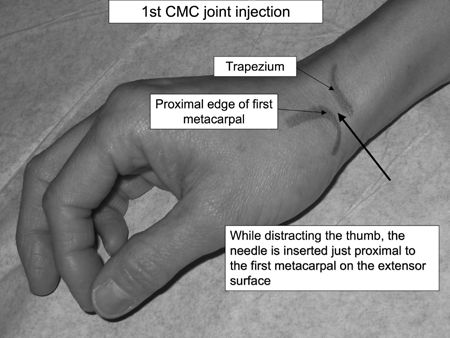
Aftercare
-
Instruct patient that the thumb may be numb for several hours after the procedure and that pain may be present for several days.
-
Instruct patient that the cortisone usually takes effect within 72 hrs.
-
Suggest the patient wear the thumb spica splint for the next 1–2 wks.
-
After 3–5 days, the patient can resume his regular activity.
-
Instruct patient to return to your office if they develop redness, swelling, or increased pain at the injection site.
CPT Code
-
20600 Arthrocentesis, aspiration and/or injection; small joint or bursa
Carpal Tunnel Injection
Indications
-
Carpal tunnel injections are useful for
the treatment of wrist pain due to median nerve compression at the
carpal tunnel either from trauma, overuse, or rheumatoid arthritis. -
Injections are indicated once conservative therapy (activity modification, NSAIDs, splinting, physical therapy) has failed.
-
Local corticosteroid injections for carpal
tunnel syndrome provide greater symptom relief for 1 mo after injection
compared with placebo (NNT = 2) and oral corticosteroids. However,
significant symptom relief after 1 mo has not been demonstrated
following injection (Stephens MB, et al.). -
ICD-9:
-
354.0 Carpal tunnel syndrome
-
Anatomy
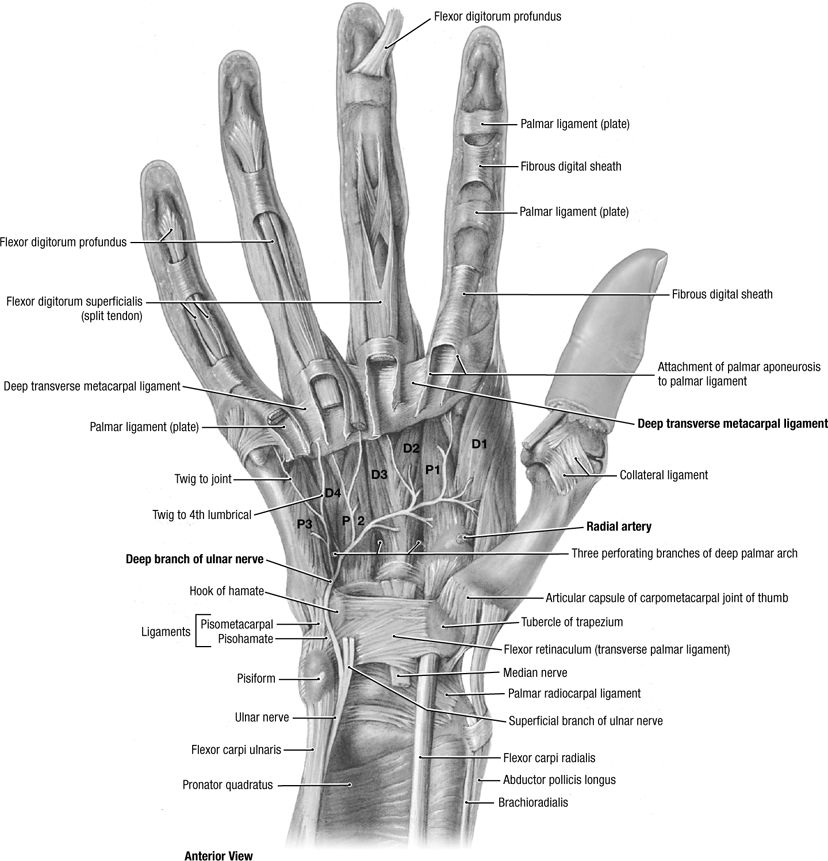
Supplies
-
Gloves
-
Betadine and alcohol swabs
-
3-mL syringe with 25-gauge 1.5-in needle
-
1.5 mL 1% lidocaine without epinephrine
-
0.5 mL (20 mg) Kenalog or equivalent
-
Ethyl chloride
-
Gauze
-
Band-Aid
Technique
-
Have the patient lay the hand palm up on the table and make a fist with slight wrist flexion.
-
Observe the tendons of the palmaris longus (10% of the population will not have one) and the flexor carpi radialis.
-
Mark a spot with the needle cap 4 cm proximal to the distal palmar crease between the 2 tendons mentioned above.
-
Cleanse the skin with Betadine and alcohol.
-
With the fist clenched and the wrist
slightly flexed the needle is inserted at a shallow angle (∼20 degrees)
along the tendon sheath, aiming toward the ring finger. Have the patient
slowly extend the wrist and fingers noticing the needle advance toward
the carpal tunnel. This indicates proper needle placement.P.699![images]()
-
Ask the patient if they feel any increased pain or numbness. If they do, remove the needle as it may be in the median nerve.
-
DO NOT INJECT INTO THE MEDIAN NERVE.
-
The fluid should flow easily without
resistance. If there is resistance, reposition the needle by repeating
the technique from the beginning. -
Remove needle and apply pressure with gauze.
-
Massage the fluid distally towards the carpal tunnel.
-
Apply Band-Aid.
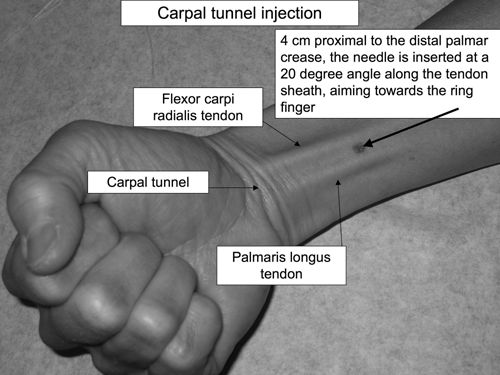
Aftercare
-
Instruct patient that the wrist may be numb for several hours after the procedure and that pain may be present for several days.
-
Instruct patient that the cortisone usually takes effect within 72 hrs.
-
After 3 days, the patient can resume his regular activity.
-
Recommend continued use of wrist splint for 1–2 weeks after injection.
-
Instruct patient to return to your office if they develop redness, swelling, or increased pain at the injection site.
CPT Code
-
20526 Injection, therapeutic, carpal tunnel
Trigger Finger Injection
Indications
-
Trigger fingers occur when a flexor tendon
nodule repetitively gets stuck under the annular pulley on the palmar
aspect of the finger. -
Injections are indicated once conservative therapy (activity modification, splinting, NSAIDs) has failed.
-
ICD-9 727.03
Anatomy

P.700
Supplies
-
Gloves
-
Betadine and alcohol swabs
-
3-mL syringe with 25-gauge 5/8–1-in needle
-
0.5 mL 1% lidocaine
-
0.5 mL (20 mg) Kenalog or equivalent
-
Ethyl chloride
-
Gauze
-
Band-Aid
Technique
-
Palpate the tender nodule on the palm of the hand and mark with needle cap.
-
Cleanse the skin with Betadine and alcohol.
-
Apply ethyl chloride until skin turns white.
-
Injection site is either directly into the nodule or at the proximal interphalangeal digital crease.
![images]()
-
Insert needle at a 45-degree angle—when
you feel rubbery resistance, you are at the level of the tendon. Back
needle out slowly until it is no longer in tendon and the fluid flows
easily within the tendon sheath. -
Never inject under pressure—steroid injected directly into a tendon may cause tendon rupture.
-
Remove needle and apply pressure with gauze, gently massaging material along tendon.
-
Apply Band-Aid.
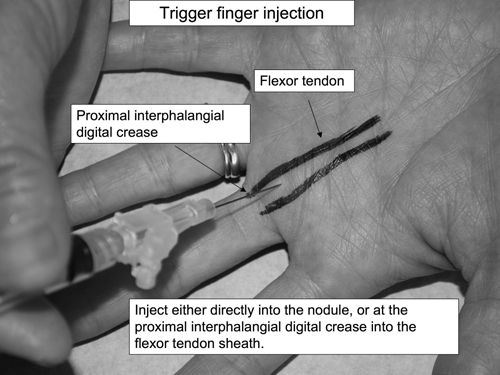
Aftercare
-
Instruct patient that the finger may be
numb for several hours after the procedure and that pain may be present
for several days. -
Instruct patient that the cortisone usually takes effect within 72 hrs.
-
The use of a finger splint after an injection for 1–2 wks can increase the efficacy of the injection.
-
After 3 days, start extension exercises—hold finger in extension 10 sec × 10 times for 1 set. Complete 3 sets/day.
-
Instruct patient to return to your office if they develop redness, swelling, or increased pain at the injection site
-
Avoid repetitive gripping, or use padded gloves for any vibrating tools (ie, jackhammers).
CPT Code
-
20550 – Injection(s); single tendon sheath, or ligament, aponeurosis (eg, plantar “fascia”)
Ganglion Cyst Injection
Indications
-
Most ganglion cysts resolve spontaneously.
-
Aspiration and corticosteroid injection
can be considered for ganglion cysts if patients complain of symptoms
such as pain, limited range of motion, paresthesias, or aesthetic
considerations. -
Aspiration and steroid injection is effective without recurrence in 27–67% of cases
-
ICD-9:
-
727.41 Ganglion cyst of joint
-
727.42 Ganglion cyst of tendon sheath
-
727.43 Ganglion cyst, unspecified
-
P.701
Anatomy
-
Ganglion cysts are the most common soft tissue tumors of the hand and wrist, more commonly in women (3:1).
-
These thick mucin filled cysts may arise from trauma or repetitive irritation
-
Ganglion cysts are often connected to an
underlying ligament or joint, primarily at the scapholunate joint
(60–70%), and next most frequently at the volar wrist (20–25%), and
thirdly at the palmar flexor tendon sheath (10–12%).![images]()
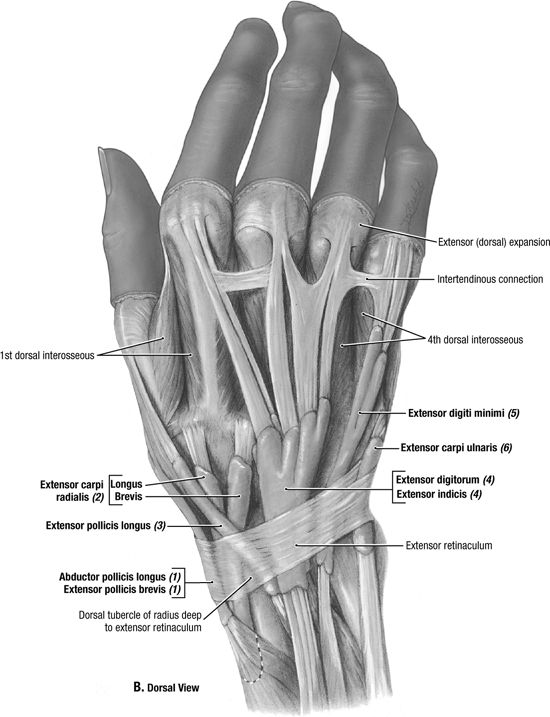
P.702
Supplies
-
Gloves
-
Betadine and alcohol swabs
-
5–10 mL syringe with 18–22-gauge 1-in needle if aspirating (thick fluid)
-
3-mL syringe with 22-gauge 1-in needle if injecting
-
1 mL 1% lidocaine without epinephrine
-
0.5 mL 40 mg/mL (20 mg) Kenalog or equivalent
-
Ethyl chloride
-
Gauze
-
Band-Aid
Technique
-
Position the patient in sitting position with his/her arm on the table with the ganglion cyst facing upward.
-
Clean the skin with Betadine × 3 and alcohol.
-
Apply ethyl chloride until the skin turns white.
-
Aspirate using the 18-gauge needle—the thick mucoid cyst contents may be difficult to aspirate, and may actually be more effectively milked out of the puncture site.
![images]()
-
Aspirate 1st, then stabilize the needle
position with a hemostat, change to the syringe with the
steroid/lidocaine mixture—then inject. -
Remove needle and apply pressure with gauze.
-
Band-Aid

P.703
Aftercare
-
Apply pressure dressing.
-
Instruct patient to return to your office if they develop redness, swelling, or increased pain at the injection site.
-
Ganglion cyst recurrence is common, and may indicate the need for surgical ganglionectomy if symptoms are severe.
CPT Code
-
20612 Aspiration and/or injection of ganglion cyst(s) any location
Trochanteric Bursa Injection
Indications
-
Corticosteroid injection is an accepted
treatment for acute or chronic trochanteric bursitis caused by chronic
pressure, limping, leg length discrepancies, acute trauma, hip surgery,
or repetitive trauma, such as from iliotibial band friction. -
Injections are indicated if pain persists
despite conservative therapy, including avoiding direct pressure and
repetitive trauma, ice, NSAIDs, and stretching of the iliotibial band,
tensor fascia lata, external hip rotators, hip flexors, and quadriceps. -
A randomized controlled trial showed prolonged benefit from early corticosteroid injection for trochanteric bursitis
-
Another RCT showed the relative risk of
recovery at 5 yr was 2.7 for patients with corticosteroid injection,
with the conclusion that steroid injection may help prevent chronic
bursitis pain. -
ICD-9:
-
726.5 Trochanteric bursitis
-
Anatomy
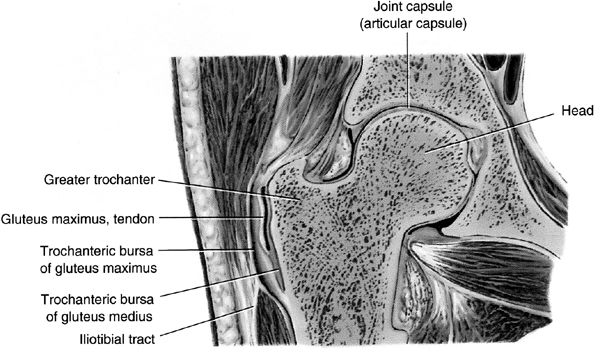
Supplies
-
Gloves
-
Betadine and alcohol swabs
-
6 mL syringe with 22-gauge 1.5–2 in needle for thin patients
-
22-gauge 3.5-in spinal needle may be needed for heavier patients
-
5 mL 1% lidocaine without epinephrine or 0.25% Marcaine
-
1 mL 40 mg/mL (20 mg) Kenalog or equivalent
-
Ethyl chloride
-
Gauze
-
Band-Aid
P.704
Technique
-
Lay the patient in lateral recumbent position, with the affected side up.
-
Flex the patient’s hip at 50 degrees, and flex the knees 60–90 degrees.
-
Palpate the greater trochanteric process
and identify the point of maximal tenderness, which usually corresponds
well to the most superficial point of bony prominence. Mark this area
with the needle cap. -
Clean the skin with Betadine × 3 and alcohol.
-
Apply ethyl chloride until the skin turns white.
-
Aim the needle perpendicular to the skin directly down to the tender point on the trochanteric bony prominence.
-
Advance the needle until the tip reaches bone level.
-
Withdraw the needle 2–3 mm to remain within the trochanteric bursa.
![images]()
-
For acute bursitis, the 5–6 cc of corticosteroid and lidocaine can be directly injected into the bursa.
-
For chronic bursitis, a clockwise
peppering motion may help break up scar tissue—each time, the needle
should reach the level of bone, then withdraw 2–3 mm. -
Crepitus can often be felt at the needle tip if chronic scarring/bursitis/tendonitis is present.
-
Remove needle and apply pressure with gauze.
-
Band-Aid
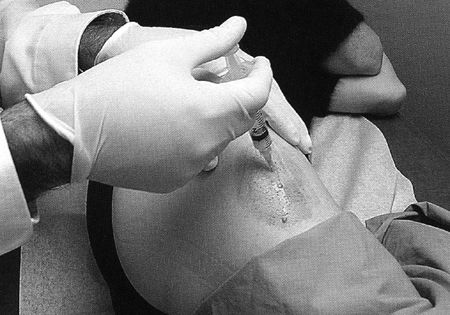
Aftercare
-
Relief from steroid anti-inflammatory effect may take 2–3 days after injection.
-
Avoid direct pressure or trauma to the trochanteric bursa.
-
Rest 3 days, then restart stretches of the iliotibial band, hip flexors, and extensors.
-
Instruct patient to return to your office if they develop redness, swelling, or increased pain at the injection site.
-
Injection can be repeated in 6–12 wks if pain relief was <50%.
CPT Code
-
20610 Arthrocentesis, aspiration and/or injection; major joint or bursa
Olecranon Bursa Injection
Indications
-
Olecranon bursa aspiration is useful for
the relief of swelling in acute bursitis and for the diagnosis of gouty
bursitis or infectious bursitis (most often Staphylococcus aureus). Olecranon bursa steroid injections are useful for the treatment of chronic bursitis. -
Most acute traumatic olecranon bursitis episodes are self-limited.
-
Injections are indicated once conservative
therapy (rest, ice, compression with elbow sleeve, elevation, avoidance
of direct pressure, NSAIDs) has failed. -
ICD-9:
-
729.5 Elbow pain
-
726.33 Olecranon bursitis
-
P.705
Anatomy
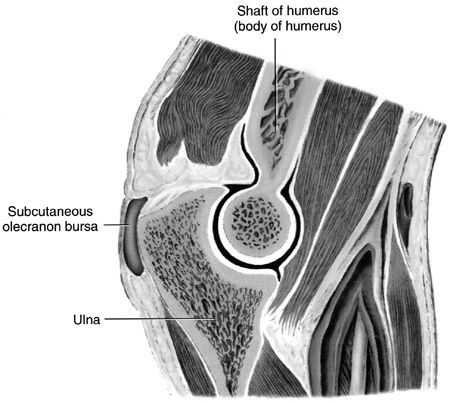
Supplies
-
Gloves
-
Betadine and alcohol swabs
-
3-mL syringe with 25-gauge 1-in needle if injecting
-
5–10 mL syringe with 18–22-gauge needle if aspirating (thick fluid)
-
1 mL 1% lidocaine without epinephrine
-
0.5 mL 40 mg/mL (20 mg) Kenalog or equivalent
-
Ethyl chloride
-
Gauze
-
Band-Aid
Technique
-
Place the patient’s arm on the table at maximal elbow flexion to accentuate the swelling.
-
Palpate over the olecranon bursa for fluctuance.
-
Clean the skin with Betadine × 3 and alcohol.
-
Apply ethyl chloride until the skin turns white.
-
Aim the needle directly at the olecranon bursa.
-
Aspirate bursal fluid until the bursa is flat.P.706
![images]()
-
If infection has been ruled out, inject steroid/lidocaine into bursa.
-
Remove needle and apply pressure with gauze.
-
Band-Aid
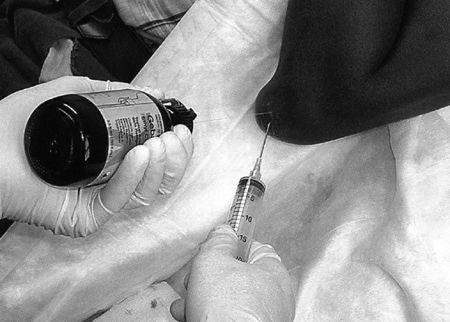
Aftercare
-
A compressive neoprene elbow sleeve may help prevent fluid reaccumulation.
-
Avoid direct pressure or trauma to the elbow.
-
For recalcitrant olecranon bursitis, consider a posterior splint or elbow pads for 1–2 wks after the steroid injection.
-
Instruct patient to return to your office if they develop redness, swelling, or increased pain at the injection site.
CPT Code
-
20605 Arthrocentesis, aspiration and/or injection; intermediate joint or bursa
Prepatellar Bursa Injection
Indications
-
Acute trauma, repetitive pressure, or rarely infection can cause inflammation and swelling in the prepatellar bursa.
-
Prepatellar aspiration may be performed to relieve acute pressure and swelling.
-
Corticosteroid injection is a second line
therapy for chronic prepatellar bursitis after the failure of
conservative therapy, including avoidance of direct pressure, rest, ice,
and NSAIDs. -
ICD-9:
-
726.65 Prepatellar bursitis
-
Anatomy
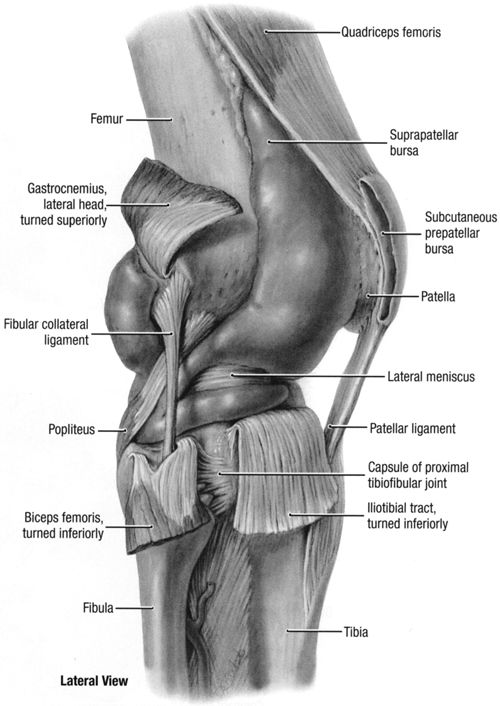
Supplies
-
Gloves
-
Betadine and alcohol swabs
-
5 mL syringe with 22-gauge 1-in needle if injecting
-
5–10 mL syringe with 18–22-gauge 1-in needle if aspirating (thick fluid)
-
2 mL 1% lidocaine without epinephrine (optional)
-
0.5 mL 40 mg/mL (20 mg) Kenalog or equivalent (optional)
-
Ethyl chloride
-
Gauze
-
Band-Aid
P.708
Technique
-
Position the patient in supine position with the knee flexed at 30 degrees on a pillow.
-
Position the affected leg with patella facing upward.
-
Clean the skin with Betadine × 3 and alcohol.
-
Apply ethyl chloride until the skin turns white.
-
The prepatellar bursitis should be clearly visible.
-
Aspirate by approaching from the side of the visible prepatellar swelling.
![images]()
-
Aspirate 1st, then stabilize the needle
position with a hemostat while changing to the syringe with the
steroid/lidocaine mixture—then inject. -
Remove needle and apply pressure with gauze.
-
Band-Aid

Aftercare
-
Apply pressure dressing.
-
Rest 3 days.
-
Continue the RICE conservative therapy.
-
Instruct patient to return to your office if they develop redness, swelling, or increased pain at the injection site.
CPT Code
-
20605 Arthrocentesis, aspiration and/or injection; intermediate joint or bursa
Pes Anserine Bursa Injection
Indications
-
Trauma or repetitive friction over the anserine bursa can cause inflammation that worsens with knee flexion or rotation.
-
Corticosteroid injections may be
considered early in the course of treatment for anserine bursitis, along
with the conservative therapy of NSAIDs, rest, ice, and stretching -
ICD-9:
-
726.61 Pes anserine bursitis
-
Anatomy
-
The pes anserine bursa lies between the
conjoined tendon of the sartorius, gracilis, and semitendinosus muscles
and the tibial insertion of the medial collateral ligament. -
Diagnosis is made by tenderness to
palpation over the anserine bursa, ∼2 cm below the medial joint line at
the proximal medial tibia. -
Swelling is not usually visible with anserine bursitis.P.709
![images]()
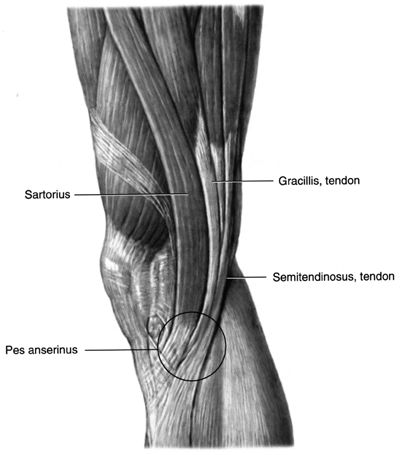
Supplies
-
Gloves
-
Betadine and alcohol swabs
-
3-mL syringe with 25-gauge 1-in needle
-
2 mL 1% lidocaine without epinephrine
-
0.5 mL 40 mg/mL (20 mg) Kenalog or equivalent
-
Ethyl chloride
-
Gauze
-
Band-Aid
Technique
-
Lay the patient in supine position.
-
Position the affected leg with the medial joint line accessible.
-
Identify the anserine bursa 1–2 cm below the middle of the medial joint line.
-
The point of maximal tenderness along the
medial tibial plateau often serves to identify the ideal injection
site—mark this site with the needle cap. -
Clean the skin with Betadine × 3 and alcohol.
-
Apply ethyl chloride until the skin turns white.
-
Insert the needle perpendicular to the skin.
-
Advance the needle to the level of bone to find the bursal space between the conjoined tendons and the tibia.
-
Withdraw 2–3 mm to inject the steroid/lidocaine mixture into the bursa.P.710
![images]()
-
Remove needle and apply pressure with gauze.
-
Band-Aid
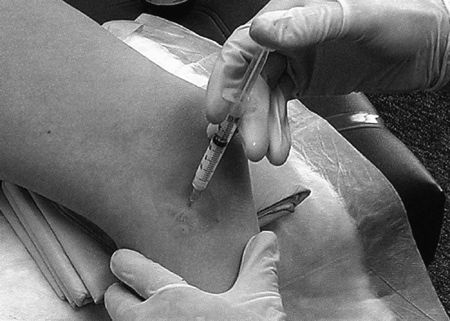
Aftercare
-
Rest 3 days, then resume stretching exercises.
-
A physical therapy referral to develop a
stretching plan for the knee adductors and quadriceps, especially the
vastus medialis, may help prevent recurrence -
Sleeping with a cushion between the knees may help decrease direct pressure on the anserine bursa.
-
Instruct patient to return to your office if they develop redness, swelling, or increased pain at the injection site.
CPT Code
-
20551 Injection of a single tendon origin or insertion
Knee Joint Injection
Indications
-
Knee joint aspiration is useful for the
diagnosis of knee effusions (ie, to diagnose crystalline disease,
hemarthrosis, or rule out infection) and for the reduction of pain and
pressure from effusions. -
Corticosteroid injection to the knee is
indicated for the treatment of osteoarthritis, crystalline disease, or
synovitis in rheumatoid arthritis. -
Hyaluronic acid viscosupplementation injections are FDA approved for osteoarthritis.
-
Injections are indicated for pain relief
if pain continues despite conservative therapy (activity modification,
NSAIDs, physical therapy). -
ICD-9:
-
719.46 Knee pain
-
716.96 Knee arthritis or arthropathy
-
715.16 Knee osteoarthrosis, primary
-
715.26 Knee osteoarthrosis, secondary
-
Anatomy
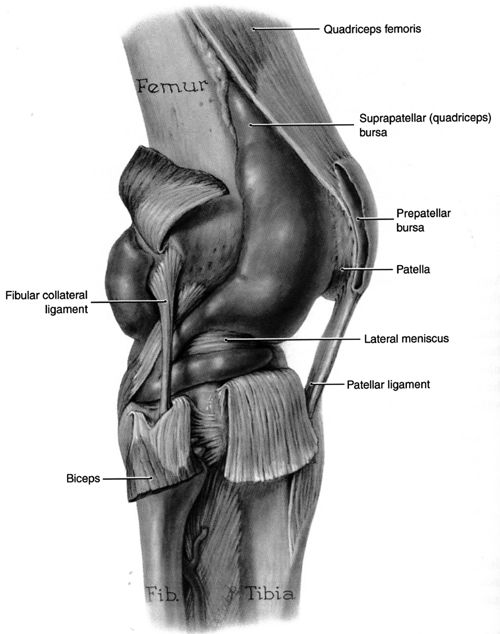
Supplies
-
Gloves
-
Betadine and alcohol swabs
-
20–60 mL syringe with 18–22-gauge 1.5-in needle for aspirating
-
10 mL syringe with 22-gauge 1.5-in needle for injecting
-
5–7 mL 1% lidocaine without epinephrine and or 0.25% Marcaine
-
1 mL (40 mg) Kenalog or equivalent
-
Ethyl chloride
-
Gauze
-
Band-Aid
Technique
-
The knee joint can be aspirated or
injected from multiple approaches, including the anterior medial or
lateral approach with the knee flexed to 90 degrees, or a superior or
midpatellar approach with the knee in extension. -
For the anterior approach, the patient is
seated with the knee flexed at 90 degrees. The needle is inserted in the
“soft spot” demarcated by the patella, patellar tendon, tibial plateau,
and distal femoral condyle. The needle angle is parallel to the floor
and aimed slightly posterior.P.712![images]()
-
The anterior approach has the advantage of
less bony discomfort but had a success rate of 70–75% in a trial
comparing knee injection techniques -
For the medial or lateral midpatellar
approach, the patient is prone with the knee either in full extension,
which gives the most patellar mobility, or slightly flexed at 5 degrees
with a rolled towel supporting underneath. The needle is advanced
parallel to the floor directed straight towards the patellar midpole. -
The lateral midpatellar approach had a
higher success rate of 93% in the same study and may be a more reliable
access to the knee joint in larger patients.![images]()
-
For the superior approach, draw lines from
the superior and lateral borders of the patella—at the intersection of
these lines, insert the needle at a 45-degree angle directed toward the
middle of the patellaP.713![images]()
-
Cleanse the skin with Betadine × 3 and alcohol.
-
Apply ethyl chloride for superficial numbing.
-
Inject the fluid into the joint—there should be minimal resistance.
-
Remove needle and apply pressure with gauze.
-
Apply Band-Aid.
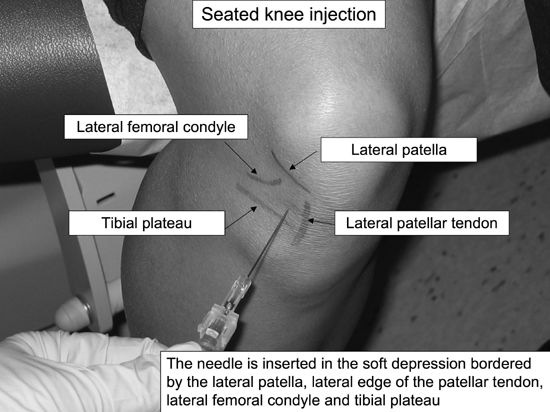
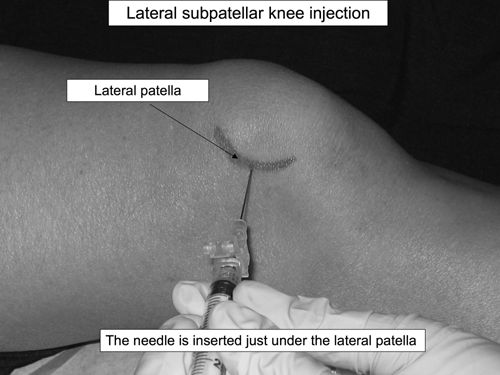
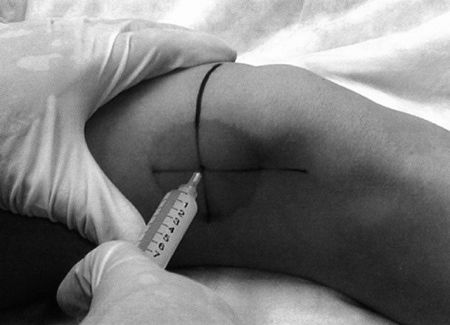
Aftercare
-
Lidocaine lasts 4–6 hrs; Marcaine can last up to 12 hrs.
-
However, steroid effect may take 2–3 days to decrease inflammation.
-
After 3–5 days, the patient can resume his regular activity and advance as tolerated.
-
Instruct patient to return to your office if they develop redness, swelling, or increased pain at the injection site.
-
Recommend continued isometric quadriceps strengthening, low-impact exercise, and weight loss.
-
Repeat injection can be done after 3 mos
if the steroid injection afforded adequate pain relief—average duration
of effect for joint steroid injections is 4 wks.
CPT Code
-
20605 Arthrocentesis, aspiration and/or injection; intermediate joint or bursa
Ankle Joint Injection
Indications
-
Ankle aspiration is useful for the diagnosis of ankle effusions (ie, to diagnose crystalline disease or rule out infection).
-
Corticosteroid injection to the ankle is
indicated for the treatment of ankle arthritis, crystalline disease, or
synovitis in rheumatoid arthritis. -
Injections are indicated once conservative therapy (activity modification, NSAIDs, physical therapy) has failed.
-
ICD-9:
-
719.47 Ankle pain
-
716.97 Ankle arthritis
-
715.97 Ankle osteoarthrosis
-
Anatomy
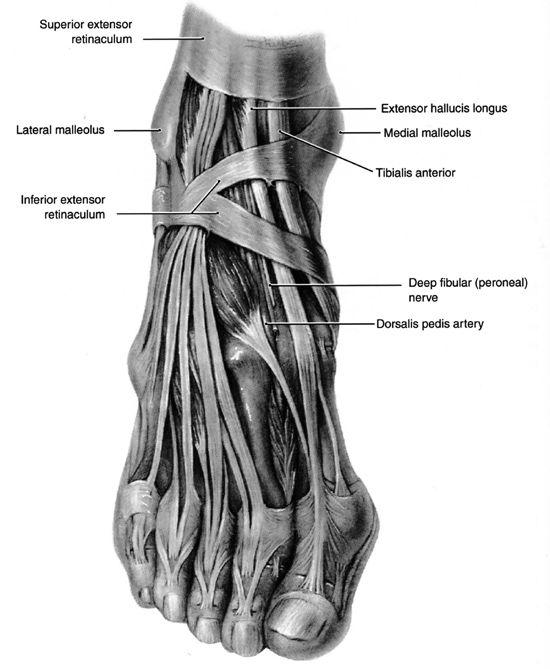
Supplies
-
Gloves
-
Betadine and alcohol swabs
-
10–20 mL syringe with 20 or 22-gauge 1.5-in needle for aspirating
-
5–10 mL syringe with 25-gauge 1.5-in needle for injecting
-
1 mL 1% lidocaine without epinephrine
-
0.5 mL (20 mg) Kenalog or equivalent
-
Ethyl chloride
-
Gauze
-
Band-Aid
Technique
-
The patient can be in a sitting or supine position.
-
Medial approach: Identify the soft spot
between the anterior tip of the medial malleolus and the medial edge of
the tibialis anterior tendon:-
Palpate down to feel the talo-tibial joint line—mark this site with the needle cap.
-
Cleanse the skin with Betadine × 3 and alcohol.
-
Apply ethyl chloride for superficial numbing.
-
Advance the needle in a posterolateral direction and inject.
-
Having an assistant apply mild eversion/plantarflexion pressure may help to open the joint.
-
Remove needle and apply pressure with gauze.
-
Apply Band-Aid.
![images]()
P.715 -
-
Lateral approach: Identify the triangular depression between the lateral tibia, fibula, and the talus:
-
Palpate down to feel the talo-tibial joint line—mark this site with the needle cap.
-
Cleanse the skin with Betadine × 3 and alcohol.
-
Apply ethyl chloride for superficial numbing.
-
Advance the needle in a posteromedial direction and inject.
-
Remove needle and apply pressure with gauze.
-
Apply Band-Aid.
-
If aspirating remove as much fluid as
possible then stabilize the needle in the joint with a hemostat, and
change to the syringe containing the steroid/lidocaine mixture.![images]()
-
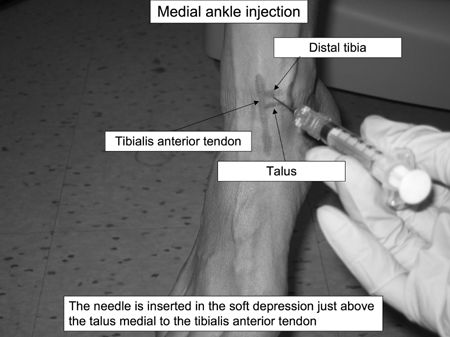
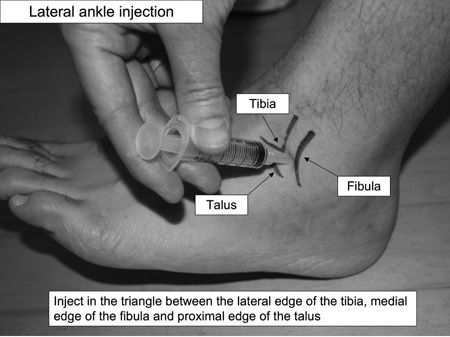
P.716
Aftercare
-
Lidocaine lasts 4–6 hrs; Marcaine can last up to 12 hrs.
-
However, steroid effect may take 2–3 days to decrease inflammation.
-
After 3–5 days, the patient can resume his regular activity.
-
If pain is improved, start ankle rehabilitation with range of motion exercises, strengthening band flexion/extension exercises.
-
Instruct patient to return to your office if they develop redness, swelling, or increased pain at the injection site.
-
Repeat injection can be done after 3 mos
if the steroid injection afforded adequate pain relief—average duration
of effect for joint steroid injections is 4 wks.
CPT Code
-
20605 Arthrocentesis, aspiration and/or injection; intermediate joint or bursa
Plantar Fasciitis Injection
Indications
-
Excessive stretching and repetitive trauma
can lead to microtears of the plantar fascia from its insertion on the
calcaneous. These microtears can lead to chronic inflammation and pain
at the calcaneal insertion or along the entire plantar fascia. -
Conservative treatment includes stretching, arch-supporting orthotics, heel pads, NSAIDs, and nighttime plantar fascia splints.
-
Corticosteroid injection is a 2nd-line
therapy after the failure of conservative therapy, given the higher risk
of complications, including fat pad atrophy and rupture of the plantar
fascia. -
ICD-9:
-
728.71 Plantar fasciitis
-
Anatomy
-
The plantar fascia supports the medial
longitudinal arch of the foot and stretches between the base of the
phalanges and the medial tuberosity of the calcaneous. -
The plantar fascia lies deep to the fat layer of the heel.
-
On physical exam, the plantar fascia insertion point on the calcaneous is usually markedly tender to palpation.
![images]()
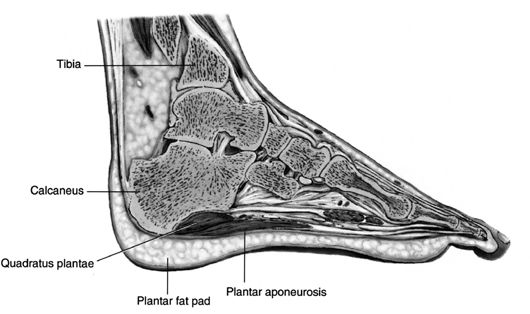
Supplies
-
Gloves
-
Betadine and alcohol swabs
-
3-mL syringe with 25-gauge 1.5-in needle for injection
-
2 mL 1% lidocaine without epinephrine
-
0.5 mL 40 mg/mL (20 mg) Kenalog or equivalent
-
Ethyl chloride
-
Gauze
-
Band-Aid
P.717
Technique
-
Position the patient in the lateral recumbent position with the painful side down.
-
Position the affected foot medial side up.
-
Palpate the maximal point of tenderness at
the plantar fascia insertion on the calcaneus, usually in the middle of
the heel—this gives the injection target depth along the width of the
heel. -
Find the medial edge of the calcaneous and mark with needle cap—this marks the injection point along the length of the foot.
-
Clean the skin with Betadine × 3 and alcohol.
-
Apply ethyl chloride until the skin turns white.
-
Inject 90 degrees perpendicular to the medial foot, aiming just below the calcaneal edge in order to avoid the heel fat pad.
-
If the calcaneous is reached with the
needle tip, walk the needle off the bony edge, then down to the depth of
the point of maximal tenderness. -
Inject the steroid/lidocaine mixture.
-
Remove needle and apply pressure with gauze.
-
Apply Band-Aid
![images]()
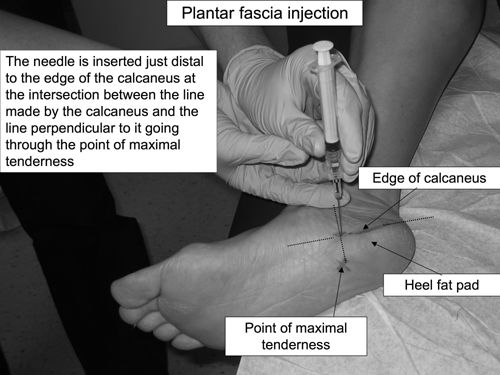
Aftercare
-
Apply pressure dressing.
-
Rest 3 days.
-
Continue the RICE conservative therapy and consistent plantar fascia stretching.
-
Instruct patient to return to your office if they develop redness, swelling, or increased pain at the injection site.
CPT Code
-
20550 Injection(s); single tendon sheath, or ligament, aponeurosis
Morton’s Neuroma Injection
Indications
-
Morton’s neuroma results from irritation
of the interdigital nerve in the foot from repetitive compressive
trauma, such as compression from tight or high-heeled shoes. -
Injections are indicated once conservative
therapy (shoes with a wider metatarsal box, metatarsal pads, orthotic
arch supports, NSAIDs) has failed. -
ICD-9:
-
355.6 Morton’s neuroma
-
Anatomy
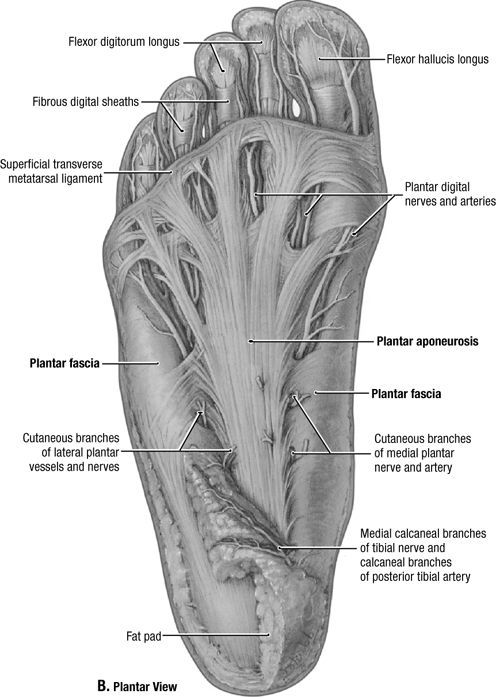
Supplies
-
Gloves
-
Betadine and alcohol swabs
-
3-mL syringe with 25-gauge 1–1.5-in needle
-
1 mL 1% lidocaine without epinephrine
-
0.5 mL (20 mg) Kenalog or equivalent
-
Ethyl chloride
-
Gauze
-
Band-Aid
Technique
-
Lay the patient in a supine position with a bent knee and the foot flat upon the table.
-
Identify the point of maximal tenderness between the metatarsal heads on the dorsal foot—mark entry site with needle cap.
-
Cleanse the skin with Betadine and alcohol.
-
Apply ethyl chloride for superficial numbing.
-
Advance the needle at a 45-degree angle
proximally towards the point of maximal tenderness or nodule—aim toward
the heel and stop at the level of the interdigital fullness. -
Do not inject at the level of the plantar fat pad to avoid fat pad atrophy.
-
Remove needle and apply pressure with gauze.
-
Apply Band-Aid.P.719
![images]()
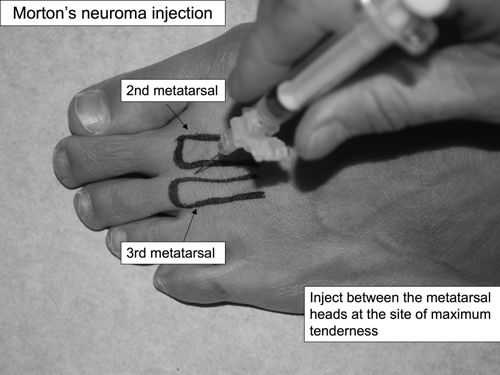
Aftercare
-
Lidocaine lasts 4–6 hours; Marcaine can last up to 12 hrs.
-
However, steroid effect may take 2–3 days to decrease inflammation.
-
Advise continued proper footwear, metatarsal pads, and orthotics.
-
Instruct patient to return to your office if they develop redness, swelling, or increased pain at the injection site.
-
Repeat injection can be done after 3 mos
if the steroid injection afforded adequate pain relief—average duration
of effect for joint steroid injections is 4 wks.
CPT Code
-
64450 Injection, nerve block, therapeutic, other peripheral nerve or branch
1st MTP Injection
Indications
-
Aspiration of the 1st metatarsal phalangeal joint is useful in the diagnosis of gout and pseudogout.
-
Therapeutic steroid injection can be a
useful adjunct therapy for 1st MTP osteoarthritis, rheumatoid arthritis,
or crystal arthropathies. -
ICD-9:
-
719.47 Pain of first MTP joint
-
716.97 Arthritis of first MTP joint
-
715.97 Osteoarthrosis of first MTP joint
-
274.0 Acute gouty arthritis
-
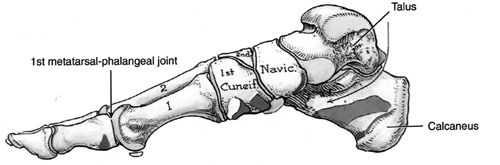
P.720
Supplies
-
Gloves
-
Betadine and alcohol swabs
-
3-mL syringe with 25-gauge 5/8–1-in needle
-
1 mL 1% lidocaine without epinephrine
-
0.5 mL (20 mg) Kenalog or equivalent
-
Ethyl chloride
-
Gauze
-
Band-Aid
Technique
-
Lay the patient in a supine position with a bent knee and the foot flat upon the table.
-
Flex and extend the 1st MTP joint to identify the joint line and mark with needle cap.
-
Cleanse the skin with Betadine and alcohol.
-
Apply ethyl chloride for superficial numbing.
-
Distal traction may help open the joint space.
-
Aim the needle distally toward the toe and enter at a 60-degree angle to match the joint slope.
-
The joint lies fairly superficially, and the injection solution should flow freely within the joint.
-
Remove needle and apply pressure with gauze.
-
Apply Band-Aid.
![images]()
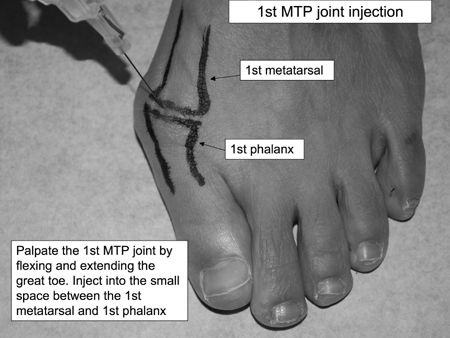
Aftercare
-
Lidocaine lasts 4–6 hrs; Marcaine can last up to 12 hrs.
-
However, steroid effect may take 2–3 days to decrease inflammation
-
Advise continued proper footwear and arch supports for proper walking mechanics.
-
Instruct patient to return to your office if they develop redness, swelling, or increased pain at the injection site.
-
Repeat injection can be done after 3 mos
if the steroid injection afforded adequate pain relief—average duration
of effect for joint steroid injections is 4 wks.
CPT Code
-
20600 Arthrocentesis, aspiration and/or injection; small joint or bursa