
– JOINT RECONSTRUCTION, ARTHRITIS, AND ARTHROPLASTY > Lower
Extremity > CHAPTER 106 – FAILED HIP ARTHROPLASTY: REVISION AND
ARTHRODESIS
Division of Orthopaedic Surgery, University of California, San
Francisco School of Medicine, San Francisco, California and University
Medical Center, Fresno, California.
procedures yet developed. It provides millions of people with freedom
of mobility and preserves their independence. Originally intended for
the elderly, low-demand user with significant arthritis, hip
arthroplasty has been so successful that it is now used in increasingly
younger, more active patients. In the appropriate patient, total hip
arthroplasty can now be considered at any time after skeletal maturity
and has largely supplanted other options, such as hip fusion, as a form
of treatment acceptable to the majority of patients. With older
patients living longer and arthroplasty being performed in younger
patients, the need for revision arthroplasty has dramatically increased.
Revision arthroplasty ranges from simply exchanging the polyethylene
liner of a cup to major pelvic reconstruction. It demands more of the
surgeon and of the hospital. The key to successful revision surgery is
preparation for multiple possibilities and clear plans as to what to do
for each possible eventuality.
 |
|
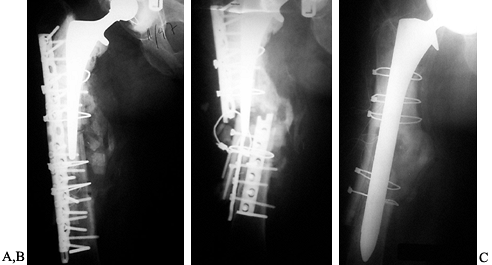
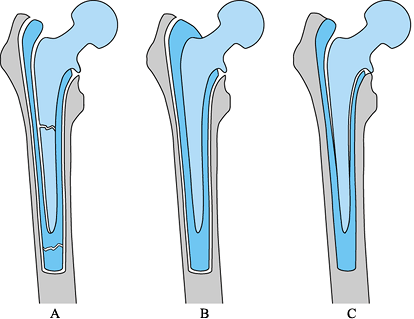
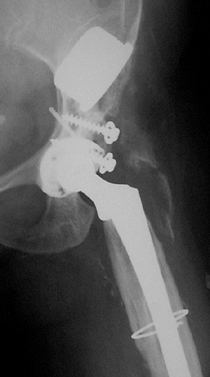
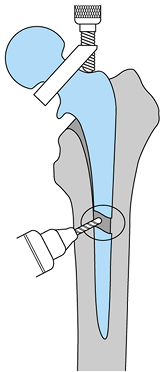
Figure 106.1. A: Periprosthetic fracture treated with plates and strut grafts. B: Refractures with weight bearing. C: Revised with a fully coated component acting as intramedullary fixation reinforced with strut grafts.
|
patients, this factor may not present a problem, because they will not
outlive their prosthesis. It is, however, a problem in younger
patients. Of the many causes of failure, including aseptic loosening,
component failure, infection, and femoral fracture, the most common is
aseptic loosening, which accounts for more than 80% of all failures (73).
generation of particle debris, to which the body responds with an
inflammatory reaction resulting in focal or linear osteolysis (Fig. 106.2).
Particles may originate from several sites, principally at the
articulation of the head with the liner, with backside wear of the
liner on the shell, at any modular junction or at the prosthesis cement
interface (Fig. 106.3).
 |
|
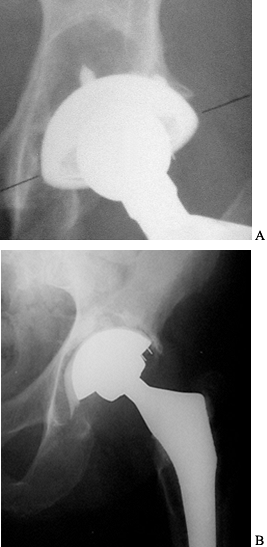
Figure 106.2. A: Focal osteolysis in the supracetabular region. Cup remains stable. B: Linear osteolysis leading to an unstable cup.
|
 |
|
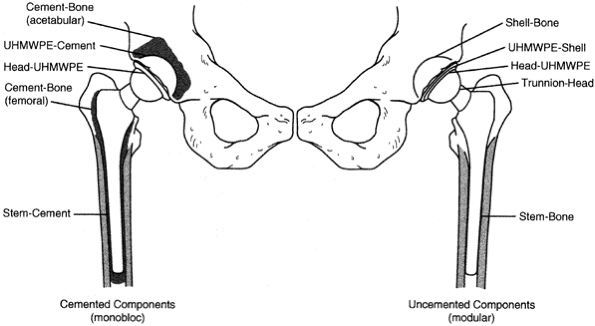
Figure 106.3.
Multiple interfaces acting as potential particle generators in total hip replacement. UHMWPE, ultra high molecular weight polyethelene. |
which is the limiting factor in implant longevity. The presence of
microscopic polyethylene particles in the joint fluid initiates a
macrophage response that leads to the release of lytic enzymes that can
cause bone destruction and loosening of the prosthesis (64,89).
The joint fluid may conduct particles to bone where they incite lysis.
All periprosthetic areas accessible to joint fluid are vulnerable, and
this area is defined as the “effective joint space” (89).
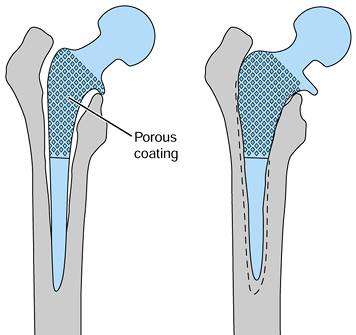
protecting portions of the arthroplasty, by prosthetic design and
surgical technique. An example of this is the use of porous coating.
Some of the early uncemented, proximally porous-coated components had
noncircumferential coating. This allowed joint fluid access to the
distal portion of the stem, causing osteolysis (7).
Modern components have circumferential porous coatings proximally to
promote bone ingrowth that acts as a relative seal against the passage
of joint fluid distally and thus decreases the effective joint space.
Acetabular components are similarly designed with fewer screw holes to
diminish access to the supra-acetabular region. This design may
decrease the size and number of osteolytic lesions. Decreasing the
effective joint space is more difficult with cemented designs.
have major effects on the longevity of the implant. In one prosthesis,
laser etching was used to write on the stem, and this led to stem
fractures in the area of the etching (109). Review of previous failures has built consensus in
the design of modern prostheses as compared with those available 20 years ago. Catastrophic failures are rare.
alloys or titanium, and acetabular components are made principally of
titanium. Titanium heads, which were widely used until they were shown
to be a poor bearing material, have been supplanted by cobalt chrome or
ceramic. A major goal in hip prosthesis design is better durability of
polyethylene. Previous attempts at improving the durability of
polyethylene have included carbon fiber reinforcement and higher
crystallinity forms of polyethylene such as Hylamer (DePuy, Dupont),
both of which have met with little success (34). Alternative bearing surfaces of ceramic and metal on metal are under investigation.
the use of preoperative antibiotic prophylaxis. The use of laminar air
flow and body exhaust suits may reduce the risk of infection but has
not been proven (29,57,93). The current rate of infection is 0.5% to 2% in primaries and 2% to 4% in revisions (2,29,32,87).
packing (first-generation techniques) have demonstrated failure rates
as high as 40% at 10 years and as low as 7% at 20 years (91,101).
Second-generation techniques, with a medullary plug, lavage of the
intramedullary canal, and retrograde cement delivery, have demonstrated
failure rates as low as 7% at 15 years (72).
Third-generation techniques with porosity reduction of the cement and
pressurization may provide further improvement. Cemented acetabular
fixation has not been improved comparably. First-generation techniques
for cemented cups have had failure rates up to 30% at 10 years, and
second-generation techniques have had failure rates of 44% at 14 years (43,72).
and acetabular sides, although the length of follow-up is generally
less than that of cemented components. The Anatomic Medullary Locking
(AML, DePuy, Warsaw, Indiana) stem has the longest follow-up, with a
1.5% loosening at 11 years (66). Uncemented
acetabuli have shown some excellent intermediate results, with revision
rates as low as 1.4% at 10 years; however, long-term results remain to
be seen (51).
not constitute an indication for surgery by itself. Loose, symptomatic
components should be revised if the patient
can
tolerate the surgery medically. Asymptomatic patients may require
surgery if osteolysis is progressive. Because osteolysis is usually
asymptomatic until component stability is compromised, routine
follow-up evaluation is appropriate. Osteolytic lesions can be bone
grafted with an exchange of the acetabular liner and femoral head at an
early stage (65) (Fig. 106.4). Limited surgery becomes less feasible as the lesion enlarges.
 |
|
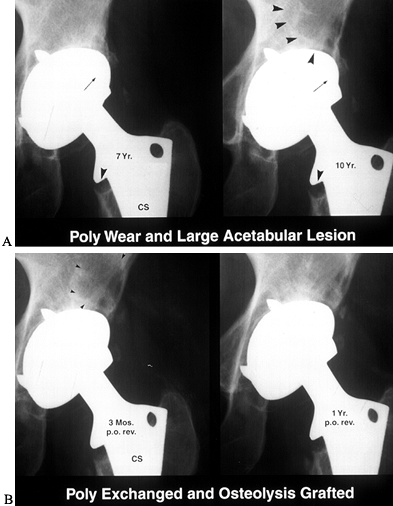
Figure 106.4. A: Polyethylene wear leading to large supra-acetabular lesion. Note asymmetric position of the head in the cup. B: Cup is stable; therefore, retained and osteolytic lesion grafted with good results.
|
surgical treatment, usually to remove components. In North America,
most infected arthroplasties are treated by a staged exchange (29,58).
The first stage involves removal of the components with or without
placement of an antibiotic spacer, accompanied by intravenous and oral
antibiotic therapy. Depending on the microorganism and the patient’s
response to the treatment, reimplantation can be performed 6 to 12
weeks later (58). Some infections, such as
those caused by virulent gram-negative bacteria, cannot be treated by
this protocol, and the patient may require a Girdlestone excisional
arthroplasty (29). Some patients may not be fit
enough to tolerate two operative procedures, and single-stage revision
with antiobiotic impregnated cement should be considered.
most difficult type of revision surgery. The many causes of dislocation
include component malposition, neuromuscular problems, and lack of
patient compliance. Malposition of the acetabular or femoral components
is the most common cause (47,69).
The offending malposition may be apparent only at surgical revision. A
malpositioned component may require revision despite being well fixed.
If the acetabulum is the culprit, then alternatives to removal include
liners with peripheral buildups. These buildups, or lips, come in
varying thicknesses and can be rotated in the area of instability. If
the femoral component is malpositioned, there are fewer options. One
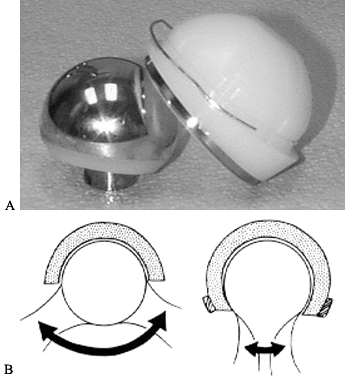
solution is a constrained acetabular liner. A constrained liner has
polyethylene that extends past the midpoint, or maximal circumference
of the femoral head (Fig. 106.5). The femoral
head must be forced into the polyethylene to reduce the hip and then a
locking ring locks the head in place. This design decreases hip motion
and increases the stress necessary to dislocate the hip. However, the
strain that occurs when this device prevents dislocation is transferred
to the component bone interface and may lead to early loosening.
Another concern is a higher rate of wear. The use of these devices
should be limited to situations without other good alternatives (35).
 |
|
Figure 106.5. A: Bipolar constrained liner, which is inserted into a metal-backed shell. B:
Motion is decreased with a constrained design, and stress at interfaces is increased. (Reprinted from Cameron HH. Modified Cups. The Orthopedic Clinics of North America 1998;28:277, with permission.) |
changing femoral heads to increase the neck length. There is a limit to
the leg lengthening that the patient will accept, especially when the
problem is an inadequate offset of the stem.
the abductors. A trochanteric nonunion can be treated with reattachment
and fixation. If the problem is a short abductor lever arm, a
trochanteric advancement can increase the muscle tension. If the
problem is purely neurologic, there are few solutions and a constrained
cup may be needed.
the location of the fracture and the bone quality, and how these
factors affect component stability. Fractures distal to the prosthesis
may not affect fixation and can be treated with conventional open
reduction and internal fixation (ORIF). Fractures that affect component
fixation can sometimes be treated with ORIF or may require revision of
the component. This procedure is covered in Chapter 20 and elsewhere (111).
Details of the history can vary, and not all patients have pain.
Osteolysis of periprosthetic bone before mechanical loosening of a
component can be completely asymptomatic.
and the temporal quality should be determined. Thigh or knee pain is
most commonly associated with the femoral component, and pain in the
groin or the buttock with the acetabular component. Pain that shoots
down into the calf is rarely associated with the hip, and spinal or
other pathology may be the cause. Simple muscle strains or bursitis can
cause thigh pain. Groin pain may be secondary to muscle strain or
possibly to hernias.
the pain start? Is the pain present all the time? If not, when does it
occur? Patients in whom the pain never improved following primary
arthroplasty should be suspected of being infected. This is also true
for patients who have pain at rest and at night. Mechanical loosening
commonly presents with start-up pain or pain on activity. For
example, pain in the thigh when rising from a chair is often due to a loose femoral component.
surgery. Question patients about their postoperative course following
the primary arthroplasty. Was there drainage? Did it require
debridement? Did they receive antibiotics for extended periods of time
postoperatively? Question patients for possible recent infections that
may have seeded the prosthesis, such as recent hospital admissions,
surgical procedures, dental procedures, or infection requiring
antibiotics.
impact that the hip problem is having on daily and social activities.
There are several functional scales such as the Harris Hip Score or the
Hospital for Special Surgery Hip rating system that help to determine
the level of the patient’s disability (40,107). These can be useful in measuring improvements in the patient’s status postoperatively.
conditions that increase the risk of surgery, such as a history of
previous thromboembolic disease. Factors that increase the risk of
infection include obesity, smoking, diabetes, steroid use, suppressed
immune status, and malnutrition, which is quite common in the elderly (29,95).
primary surgery. This provides insight into technical difficulties that
were encountered and also describes the type of components implanted
and their sizes. This is especially important to ensure compatibility
when only one component will be revised.
limb-length discrepancy (LLD), if present, and to evaluate abductor
strength. Note the use of walking aids and presence of a limp. Is the
limp antalgic or Trendelenburg (104), or is it
the result of a short limb or another problem? LLDs should be
quantified because they are a frequent cause of patient complaints.
True limb length measured from the anterior superior iliac spine to the
medial malleolus can be compared with the apparent limb length measured
from the umbilicus to the medial malleolus. Any discrepancy between the
two measurements may indicate an oblique pelvis or a fixed flexion
contracture of the hip. Another test for LLD that incorporates the
patient’s perception of his or her limb-length discrepancy is to use
foot blocks of variable sizes. Place the blocks incrementally under the
shorter limb until the patient “feels balanced.” Posteriorly, the S-2
dimples can be examined to verify that the pelvis is level. This can be
confirmed radiographically with a standing anteroposterior (AP) view of
the pelvis. This test may give the most accurate idea of what the
patient would like in terms of leg lengths. However, it is important to
explain to the patient that hip stability is the priority during
surgery and that leg lengths may not be equalized.
test and having the patient abduct the leg against gravity while in the
lateral supine position. Examine the existing incision for signs of
infection and evaluate its usefulness in a revision. Perform a thorough
neurovascular examination, paying careful attention to the peroneal
nerve distribution because it is the most commonly injured in primary
arthroplasty.
rule out infection. Infection can present a diagnostic challenge, and
the workup for infection involves both preoperative and intraoperative
studies.
cell count (WBC), erythrocyte sedimentation rate (ESR), and a
C-reactive protein (CRP). The WBC is rarely useful, and in one study,
only 8 of 52 patients with an infected arthroplasty had an elevated WBC
(12). Neither the ESR nor the CRP is specific to infection, and either can be elevated by inflammatory and neoplastic conditions (15).
However, if patients with inflammatory conditions such as rheumatoid
arthritis or recent operations are excluded, the ESR and CRP become
useful tools, as has been shown in a recent prospective study. This
study demonstrated a sensitivity and specificity of .82 and .85 for the
ESR and .92 and .96 for the CRP (100). However,
if both tests were negative, the probability of infection was found to
be zero, and if both tests were positive, then the probability of
infection was .83. An ESR greater than 30 mm/hr and a CRP greater than
10 mg/L are considered positive (99).
However, more recently, many authors have favored a more limited role
for aspiration owing to varying reports of the sensitivity of this test
(4,37). Aspiration is
not indicated when there is no clinical evidence of infection and when
the ESR and CRP are negative. Aspiration should be used when an
infection is suspected because it can provide confirmation of clinical
suspicions and can identify the infecting organism. Aspiration is also
indicated when the inflammatory markers ESR and CRP give mixed results,
with one being positive and the other being negative, or when an
inflammatory condition such as rheumatoid arthritis is present (100).
revision surgery. Once the pseudocapsule is exposed, aspirate the joint
for fluid. This fluid can be sent for cell count,
Gram’s stain, and both aerobic and anaerobic cultures. Give antibiotics once the joint has been aspirated.
than 50,000 and a neutrophil count of greater than 80% is suggestive of
a bacterial infection (49,52).
However, this test has a poor sensitivity, with a recent study
demonstrating 18 negative results in 28 periprosthetic infections (100).
Similarly, the Gram stain has been shown to be unreliable, with one
study demonstrating a sensitivity of 0 out of 32 infected hips (14).
Intraoperative cultures of tissue and fluid are very accurate, and some
would consider them to be the gold standard for the diagnosis of
infection (77). Postoperative antibiotic
treatment is also dependent on the culture results; therefore, several
samples should be sent to ensure adequate results. The last of the
intraoperative tests is the histologic sample sent for frozen section (27). This has been shown to be a reliable test to differentiate septic from aseptic failure of the hip (28,60,67). Studies with large numbers of infections have shown sensitivity from .80 to .91 and specificity from .94 to .99 (28,60).
The histologic sample that is sent should be from an area of the hip
that shows inflammation. The sample is then examined for the number of
polymorphonuclear neutrophils (PMNs) per high-power field (HPF). More
than 5 PMNs/HPF suggest infection, and more than 10 PMNs/HPF indicate a
probable active infection (28,60,67). The frozen section and cultures are the best of the intraoperative tests to rule out infection.
lateral view of the hip. After the initial evaluation, it may be
necessary to obtain full-length femur x-ray studies or 45° oblique
(Judet) views of the pelvis, which are useful for evaluating the
integrity of the bony columns above the acetabulum. The iliac oblique
view shows the posterior column and the anterior wall, and the
obturator oblique shows the anterior column and posterior wall. These
views are not routinely required but are necessary when there is
evidence of column destruction on the plain films. Radiographic
evaluation of loosening is improved by having previous films for
comparison. Radiographic evidence that differentiates aseptic from
septic loosening is rare; however, some believe that periosteal new
bone formation is pathognomonic of deep infection (29). Endosteal scalloping and rapid progression of lysis can also be suggestive of infection (62).
 |
|
Figure 106.6. Radiographic evaluation of the cemented femoral component. (A) Definitely loosening; (B) probable loosening; (C) possible loosening. See text for details.
|
-
Definite Loosening:
Migration of the component or cement column, fracture or fragmentation
of the cement, fracture or deformation of the component, radiolucency
at the cement-bone interface (Fig. 106.7).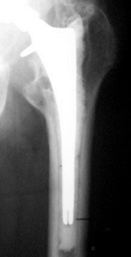 Figure 106.7. Radiograph showing cement fracture, circumferential radiolucency of the cement–bone interface and proximal femoral lysis.
 -
Possible Loosening:
Presence of a radiolucent zone at the cement–bone interface extending
for more than 50% but less than 100% of the periphery of the component,
and less than 50% of the stem circumference.
findings. Several studies have concluded that subsidence of the femoral
component of less than 2 mm does not affect the long-term result and is
not a sign of loosening.
differs slightly because loosening occurs more often at the cement–bone
interface rather than component–cement interface, as with femoral
components. Signs of a loose cemented acetabular component include
-
Radiolucent zone more than 2 mm wide surrounding the entire component.
-
Migration of the cup, which is seen as changes in the horizontal inclination and the version.
 |
|
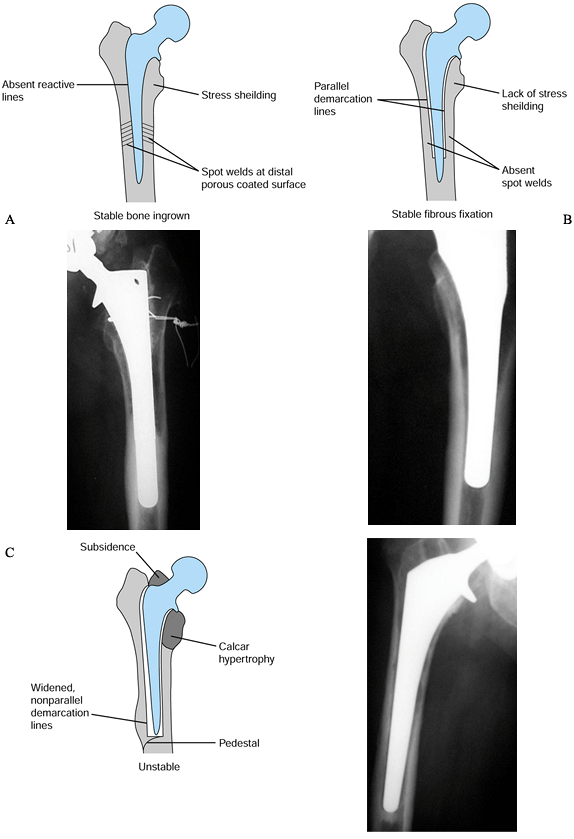
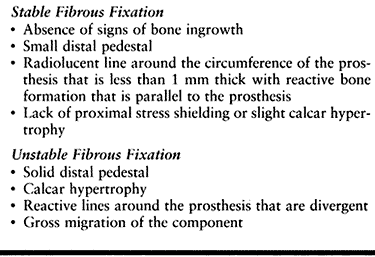
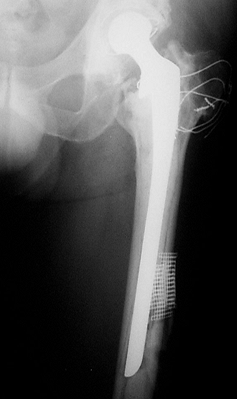
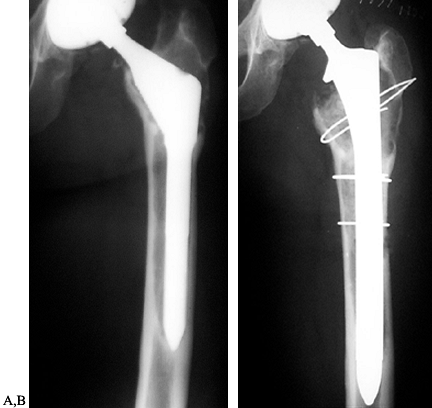
Figure 106.8. Radiographic features of cementless component fixation. Absence of signs of bone ingrowth indicate possible instability: (A) bone ingrown; (B) fibrous stable. (C) fibrous unstable.
|
-
Spot welds that occur at the distal limit of the porous coating
-
Stress shielding of the proximal femur
-
Lack of a distal pedestal
-
Lack of reactive lines around the porous-coated portion of the stem
and their absence suggests that the stem has either stable or unstable
fibrous fixation (Table 106.1).
 |
|
Table 106.1. Signs of Stable and Unstable Fibrous Fixation
|
is loss of bone due to osteolysis and mechanical destruction by loose
components. The remaining bone is sclerotic and fragile in comparison
to when a primary arthroplasty is performed.
between cement and bone due to the lack of interdigitation that is
normally available with a fresh cancellous bed. Bench testing has shown
that the shear strength of the bone cement interface is reduced by 79%
in the revision setting (19). The revision femur frequently has metaphyseal and diaphyseal bone defects that preclude producing a solid cement mantle.
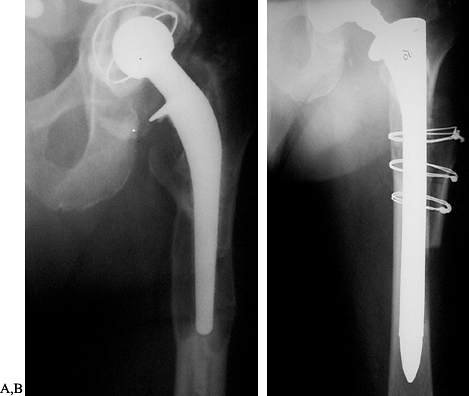
methods of fixation of components: cemented and uncemented. The
majority of early revisions were performed with cement, using
first-generation techniques, but these revisions have demonstrated
failure rates of 12% to 44% (9,44,81,82) (Table 106.2).
More recent studies using second and third-generation cementing
techniques have shown better results, but failure rates still remain
high at 10% to 23% (42,72,86,106) (Table 106.3; Fig. 106.9).
 |
|
Table 106.2. Cemented Femoral Revision with First-Generation Techniques
|
 |
|
Table 106.3. Cemented Femoral Revision with Modern Cementing Techniques
|
 |
|
Figure 106.9. Failure of a cemented revision with a long stem after 4 years.
|
become more common because of the poor results with cemented fixation.
Uncemented components can be proximally or fully porous coated.
Uncemented components require adequate living bone stock to be in
intimate contact with the prosthesis in a mechanically stable setting
so that bone ingrowth can occur. The implant must be rotationally and
axially stable at the time of implantation to maximize the opportunity
for biologic ingrowth.
the metaphysis of the femur; this is the area of the femur that is most
commonly damaged by the primary arthroplasty. The metaphysis of the
femur also shows the greatest amount of anatomic variability among
patients, making it more difficult to achieve stable fixation with
intimate bone contact. Proximally coated revision devices have
demonstrated failure rates from 20% to 50% (5,63,108)
(Table 106.4; Fig. 106.10).
Failure rates of proximally fixed modular devices that can more clearly
fit the metaphysis, such as the S-Rom (J & J, Stanford CT), have
been slightly better but remain high at 10% (10).
 |
|
Table 106.4. Uncemented Femoral Revision with Proximally Porous-Coated Components
|
 |
|
Figure 106.10. A: Failure of a revision using a proximally porous-coated device after 2 years. B: Re-revised with a long-stemmed, fully porous-coated device.
|
fully porous-coated femoral components because they obtain their
fixation in the diaphysis of the femur. The femoral diaphysis is able
to support a prosthesis in the majority of cases because it is usually
less affected by bone defects than the metaphysis. The cylindrical
diaphysis is easier to fill with a component, and revisions with this
technique have results that approach those of primary hip arthroplasty,
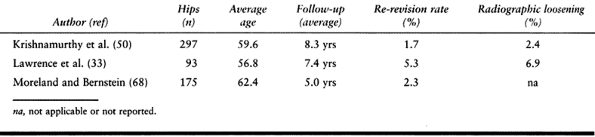
with failure rates from 3% to 7% (50,55,68) (Table 106.5).
 |
|
Table 106.5. Uncemented Femoral Revision with Fully Porous-Coated Components
|
There are two principal disadvantages with this technique: stress
shielding and the difficulty of removing an ingrown, fully coated stem.
Stress shielding is more pronounced in stems greater than 13.5 mm in
diameter and in cobalt chrome stems as compared with titanium (24).
Revision stems are larger than primary stems due to loss of bone and
are frequently greater than 13.5 mm in diameter. Therefore, patients
who have undergone this type of revision surgery are at increased risk
of stress shielding. Although stress shielding associated with the use
of large cobalt chrome stems is
present
on radiographs, it has not presented clinical problems to date.
Patients with significant stress shielding secondary to a large
revision components may require repeat revision in the future, and
management of proximal bone atrophy may become an issue. Removal of an
ingrown fully coated femoral stem is difficult; however, it is rarely
necessary.
 |
|
Figure 106.11. A: Failed primary cemented component with extensive proximal femoral destruction. B: Bypass fixation using a long-stemmed fully porous-coated device obtaining fixation in healthy supportive diaphyseal bone.
|
with “impaction grafting.” This technique claims to restore femoral
bone stock and can be used despite large femoral defects (Fig. 106.12).
The major potential advantage of this technique is the restoration of
femoral bone, which is particularly important in the young patient who
may require future re-revision. Bypass fixation can induce proximal
femoral remodeling and restoration of bone stock, with the advantage of
avoiding bone grafting, which is expensive and includes the risk of
infection. Early results with impaction grafting have been promising,
with good functional and radiographic results. There is some histologic
evidence of bone reconstitution. The current indication for impaction
grafting is a femoral isthmus incapable of providing rotational
stability to a fully porous-coated stem (22,97).
 |
|
Figure 106.12.
Successful reconstruction using impaction grafting. (Reprinted from Duncan CP, Masterson EL. Impaction Allografting with Cement for the Management of Femoral Bone Loss. The Orthopedic Clinics of North America 1998;28:297, with permission.) |
femoral revision. Several studies have shown a 10% to 20% repeat revision rate from as early as 3.6 to 7.4 years (44,46,85) (Table 106.6).
As with cemented femoral revisions, this high failure rate is secondary
to sclerotic and compromised bone that prevent the formation of a good
cement mantle (19). Modern cementing techniques
in acetabular revision have not improved the results. Based on these
results, there is no place for cemented cups in revision surgery except
in conjunction with a cage or allograft.
 |
|
Table 106.6. Cemented Acetabular Revision
|
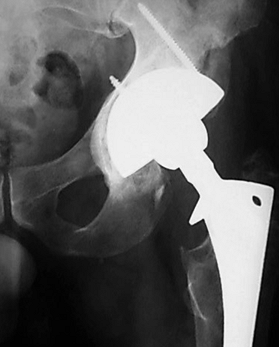
The advent of “jumbo” cups available in sizes up to 80 mm in diameter
has enabled the reconstruction of large defects and reduced the need
for structural grafts (Fig. 106.13). Success
with uncemented cups depends on achieving more than 50% host bone
contact with stable initial fixation. When these criteria cannot be
met, alternatives such as a high hip center, oblong cup, or cages and
allograft must be considered.
 |
|
Table 106.7. Uncemented Acetabular Revision
|
 |
|
Figure 106.13. Revision of a large acetabular defect with a “jumbo” cup. Peripheral screws are used to enhance initial fixation.
|
center have been controversial. They can be used in the presence of
bone loss in the superior acetabulum, where a cup cannot be placed in
the normal position owing to anatomic constraints such as a mismatch
between the acetabular AP and the superoinferior diameters. Host bone
is still available superiorly where the ilium becomes thinner. However,
nonanatomic placement of the cup changes the biomechanics of the hip
significantly and subjects the cup to higher mechanical loads. Several
studies (18,53,84) of this technique have demonstrated failure rates that range from 42% to 72% (Fig. 106.14). Accordingly, the hip center should be as close to anatomic as possible.
 |
|
Figure 106.14.
High hip center was used in the primary arthroplasty for developmental dysplasia of the hip. This failed, was revised, and more normal biomechanics were restored. Offset is not optimal, and the greater trochanter has fractured. |
defect and does not depend on bone graft reconstruction yet preserves
the anatomic center of rotation. Implants are available “off the
shelf,” or they can be custom ordered. These prostheses have shown good
initial results in small groups of patients with short-term follow-up.
One multicenter trial reported 64 cases, with an average follow-up of
44 months with 97% cup retention (11,75).
The chances of long-term fixation should theoretically be good because
there is a large surface available for biologic fixation (Fig. 106.15). This is in contrast to cages and rings that have no or limited potential for biologic fixation.
 |
|
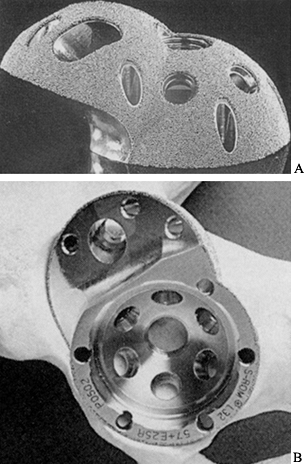
Figure 106.15. A: Oblong cup showing large surface area for potential ingrowth. B: Cup filling large segmental superior defect. Reprinted from Cameron HH. Modified Cups. The Orthopedic Clinics of North America 1998;28:277, with permission.)
|
difficult acetabular reconstructions. These devices have been studied
at short to intermediate duration follow-up, and the patients are few.
The initial results have been encouraging, with failure rates between
0.5% and 12% at 5 years (6,8,70,83).
These devices are used principally to bridge bone defects, as in the
case of acetabular discontinuities, and they must be secured to both
the ilium and the ischium. Cages require solid contact with host bone
or they will fail due to cyclic loading. The long-term results are
unknown, and at present, their use should be restricted to situations
in which an uncemented cup cannot be used (Fig. 106.16).
 |
|
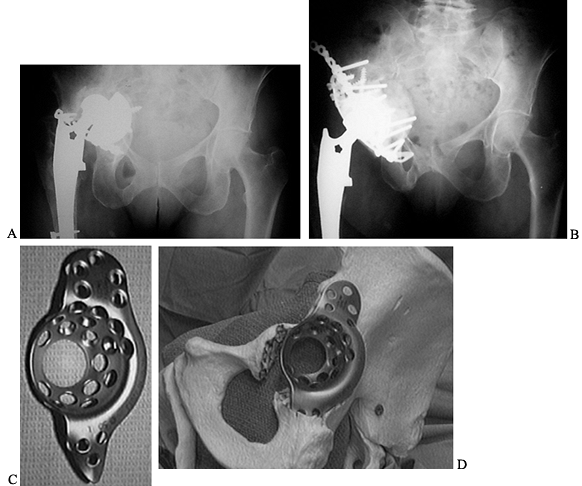
Figure 106.16. A: Paprosky Type 3B defect with extensive loss of host bone and high hip center. B: Reconstruction using a cage and allograft with restoration of anatomic center of rotation. C: Burch–Schneider cage. D: Cage bridging the defect with secure fixation in the ischium and to the ilium.
|
acetabulum have been described. However, the number of patients and
duration of follow-up are small. The technique is not yet widely used.
description and a guide to treatment. Numerous systems assess bone
loss, but none has found widespread acceptance or been validated
independently.
adopted a classification system that divides femoral bone loss into
segmental and cavitary defects (16).
cortical shell of the femur and are divided into partial and complete.
Cavitary defects may be cancellous or cortical, with cancellous defects
being less severe. Erosion of the cortex is by definition a cortical
cavitary defect. Combined defects have both segmental and cavitary bone
loss.
and the level of bone loss. Level 1 is proximal to the bottom of the
lesser trochanter. Level 2 is 10 cm distal to level 1, and level 3 is
everything distal to this. This system provides a fairly accurate
description of the femoral defect but does not incorporate a treatment
plan.
of the femoral diaphysis to support an uncemented, fully porous-coated
prosthesis (3) (Fig. 106.17).
This system is less detailed in its description of the bony defect
present than the AAOS system, yet it is more useful in decision making
for an uncemented femoral revision. By using this classification
system, the appropriate method of treatment can be chosen
preoperatively (Table 106.8).
 |
|
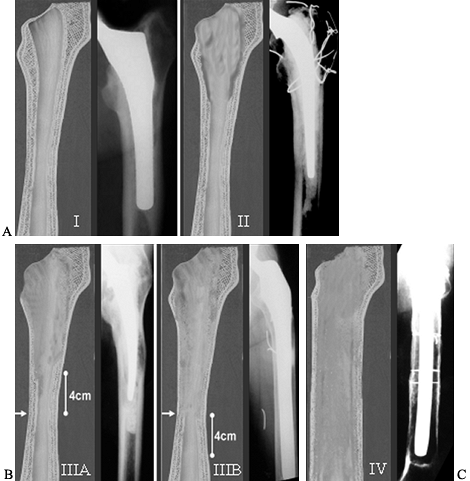
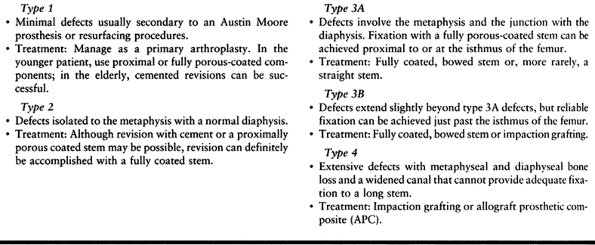
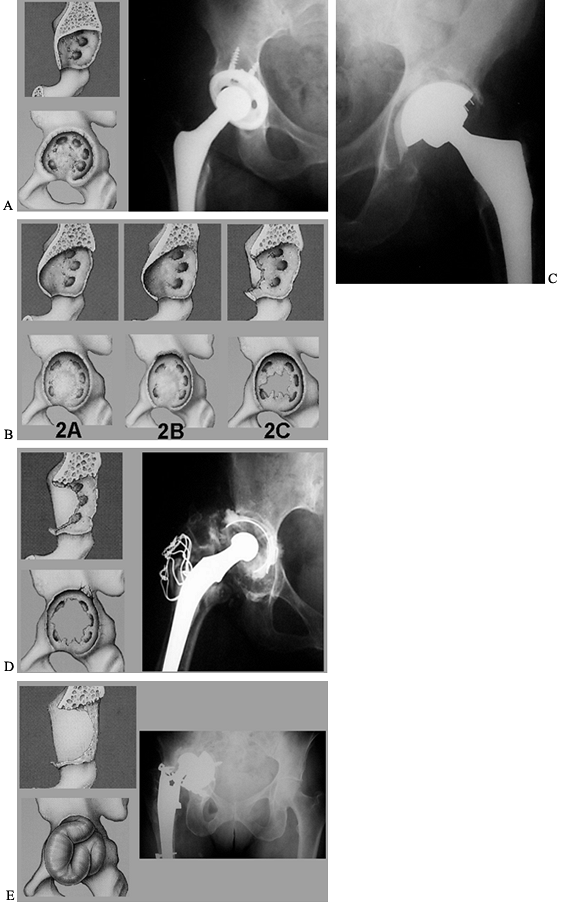
Figure 106.17. Paprosky Femoral Defect Classification. A:
Type 1 defect minimal damage able to support any type of prosthesis. Type 2 defect metaphyseal damage unable to support a proximal porous-coated device. Treat with bypass fixation or possible cemented revision in the elderly. B: Type 3A defect extensive proximal femoral damage diaphyseal fixation is available proximal to the isthmus. Type 3B defect has damage that extends even further and diaphyseal fixation is available only past the isthmus. What appears to be a radiographic type 3B may not be able to support a prosthesis intraoperatively and must then be treated as a type 4. C: Type 4 defect has extensive diaphyseal involvement. It is unable to provide rotational and axial stability to a fully porous-coated device and is treated with impaction grafting or an allograft prosthetic composite. |
 |
|
Table 106.8. Paprosky Femoral Defect Classification System and Treatment Plan
|
through 3A; in types 1 or 2, other options can be used. Type 3B is the
most difficult to evaluate and will require intraoperative evaluation
of the ability of the isthmus to support a fully coated long stem.
Without 4 to 6 cm of intimate bone contact, impaction grafting or an
allograft prosthetic composite (APC) will be required, as in the type 4
femur. If, during preoperative templating, it appears questionable that
the femoral isthmus can support a long fully porous-coated stem, then
you must treat it as a type 3B or type 4 femur and be prepared for
impaction grafting or the use of an APC.
the intraoperative assessment of bone loss (17).
This system divides bone loss into two major types: segmental (type 1)
or cavitary (type 2). A segmental deficiency is loss of bone in the
supporting hemisphere of the acetabulum. These defects involve the rim
of the acetabulum or the medial wall and may compromise the ability of
the acetabulum to provide rigid fixation to an acetabular component.
Cavitary defects involve volumetric loss of bone but are contained
within a shell of bone. These defects rarely affect the ability of the
acetabulum to support a cup. Type 3 defects refer to combined segmental
and cavitary bone loss and are the most common type found in revision
hip surgery. Type 4 defects refer to a pelvic discontinuity and Type 5
to a hip arthrodesis (Fig. 106.18).
 |
|
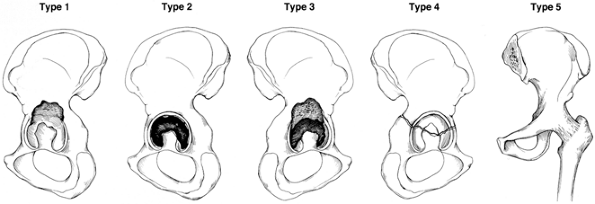
Figure 106.18.
Classification of acetabular defects according to the American Academy of Orthopaedic Surgeons Committee on the Hip: type 1, segmental; type 2, cavitary; type 3, combined segmental and cavitary; type 4, pelvic discontinuity; and type 5, hip fusion. (Reprinted from the Journal of the American Academy of Orthopaedic Surgeons 7:1, with permission.) |
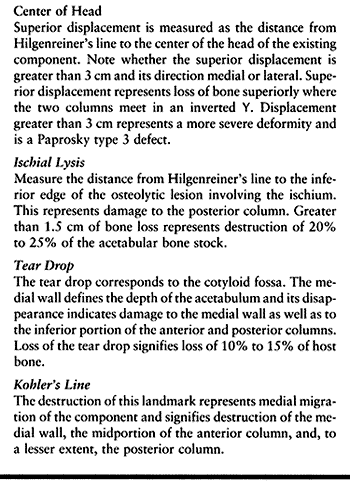
defects is based on preoperative AP radiographs and uses four landmarks
to evaluate bone destruction (Table 106.9). These landmarks allow for preoperative quantification of the defect and treatment planning (79). Two of the four are measurements from a horizontal line tangent to the tops of the obturator foramina (Hilgenreiner’s line) (Fig. 106.19).
The other two radiographic landmarks are Kohler’s line and the
teardrop. Remember to allow for magnification when making measurements.
 |
|
Table 106.9. Paprosky Radiographic Landmarks to Evaluate Bone Destruction
|
 |
|
Figure 106.19. (A) Kohler’s line, (B) teardrop, (C)
superior obturator line (Hilgenreiner’s line), used as a reference to measure superior displacement of the femoral head center and to measure inferiorly the amount of ischial lysis. |
major types with five subtypes by evaluation of these four radiographic
landmarks (Table 106.10; Fig. 106.20).
 |
|
Table 106.10. Paprosky Acetabular Defect Classification System and Treatment
|
 |
|
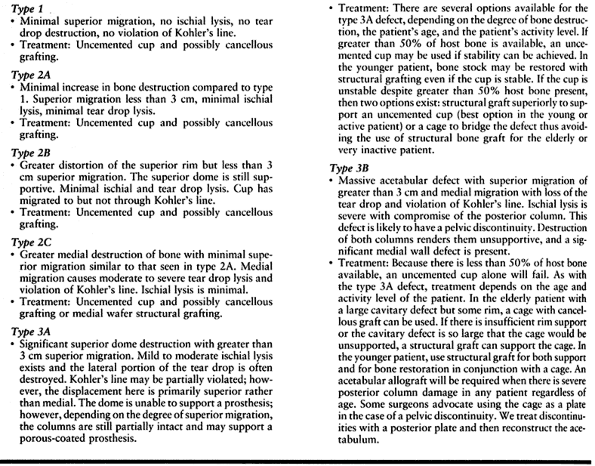
Figure 106.20. Paprosky classification of acetabular defects: (A) type 1, minimal damage; (B)
type 2A–C, increased destruction but greater than 50% host bone available for uncemented cup fixation. Head center has migrated superiorly less than 3 cm; (C) radiograph demonstrating a type 2A defect; (D) type 3A defect, more extensive destruction, with greater than 3 cm superior migration of the head center. (E) type 3B defect, major pelvic destruction with superior and medial migration and greater than 3 cm head center migration, less than 50% host bone available for reconstruction. |
and 2 may have large cavitary defects but can be treated with an
uncemented cup because the defects are contained and the supporting rim
of the acetabulum is largely intact. The type 3 defects include large
cavitary and segmental
defects,
effectively becoming partially uncontained cavitary defects. In this
situation, an uncemented cup depends on sufficient host bone for
stability. This is not always available, necessitating the use of cages
and allografts. In the type 3B acetabulum, the host bone cannot be
relied on and must be supplemented with either cancellous or structural
grafts.
normal biomechanics of the hip as well as possible and to maximize the
patient’s function. The need for preoperative planning must be
emphasized because revision hip surgery is demanding of the surgeon,
the equipment, and the institution. Preparation begins with a clear
understanding of why the hip is being revised and how it will be done.
Often only one component will be revised; therefore, multiple implant
systems are required. The surgeon must be familiar with them. Previous
operative reports are essential to establish the type of component in
place and their sizes. Many older systems were nonmodular, or
replacements are now unavailable. Therefore, the surgeon must be
prepared to remove a well-fixed component or perhaps cement a
polyethylene liner into a metal-backed cup. These decisions should be
considered preoperatively to avoid unfortunate surprises in the
operating room.
 |
|
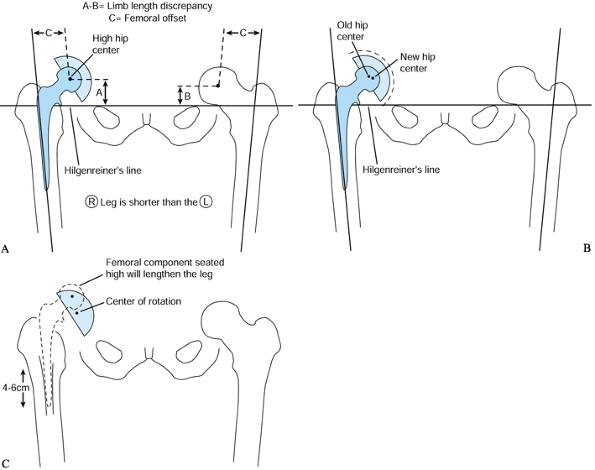
Figure 106.21. A: Determine the limb-length discrepancy (LLD) and offset. B: Template the acetabulum and establish the new center of rotation. C:
Template the femur and position the femoral component so that it restores limb lengths and offset and has durable fixation to host bone. |
-
Use the lesser trochanters, the ischial tuberosities, and greater trochanter as landmarks.
-
Correlate the measured limb length discrepancy (LLD) with the clinically noted LLD.
-
Mark the preoperative center of rotation
(COR). Measure the displacement of this COR from Hilgenreiner’s line.
Using known radiologic landmarks, determine the degree of acetabular
destruction. -
Evaluate the integrity of the columns.
degree of destruction and plan the reconstruction. Any system can be
used, as long as the acetabulum can be visualized in three dimensions.
-
Decide whether an uncemented acetabular
component can be placed using component templates and mark the new COR
on the AP hip radiograph. Look for superior rim support of the
acetabular prosthesis and the integrity of Kohler’s line (Fig. 106.21B). -
Template for alternatives if fixation
with a standard cup is questionable. Decide whether bone graft or cages
may be required. Prepare for pelvic plating in the presence of pelvic
discontinuity. -
Note the COR of the new cup in comparison
to the old COR. This will be the change in leg length contributed by
the acetabular component. If the new COR is higher, the limb will be
shortened and vice versa. Mark the position of the new COR on the AP
hip x-ray film.
femoral bone defects will determine the type of component. Fixation
must be stable to both rotational and axial forces.
Fully porous-coated devices must meet two criteria: (1) templates should show greater than 90% canal fill and (2) 4 cm of undisrupted diaphysis at or before the femoral isthmus (50) (Fig. 106.21C).
-
On the AP radiograph, select a component to satisfy the two requisites noted earlier.
-
Assess and plan to restore offset because this is an important contributor to hip stability.
-
Position the selected femoral component
to make up any LLD that remains after templating the new acetabular
component. If the leg needs to be lengthened further, template the
femur so that the center of the femoral head sits above the planned
acetabular center by the amount of the LLD remaining so when the hip is
reduced, the LLD is eliminated. Likewise, position the femoral
component lower if you want to avoid lengthening the leg. -
Look for potential conflicts of the
prosthesis with the proximal femur and on the lateral radiograph. If a
stem longer than 175 mm (7 inches) is to be used, a conflict with the
anterior cortex may exist in the lateral plane and a curved stem will
be needed.
because its location affects the choice of implant. The location of the
osteotomy is a compromise between enhancing exposure and maintaining
component fixation.
-
Plan the distal extent of the osteotomy
at the most advantageous location to accomplish the necessary task. To
remove cement, this would be at the most distal extent of the cement
mantle. To remove a porous-coated component, this would ideally be at
the junction of the metaphyseal and diaphyseal portion of the stem. An
osteotomy is also indicated when there has been varus remodeling
P.2818
of
the femur caused by a loose femoral component. Varus remodeling
prevents appropriate reaming and placement of the new component. With
varus remodeling present, the osteotomy should ideally end at the apex
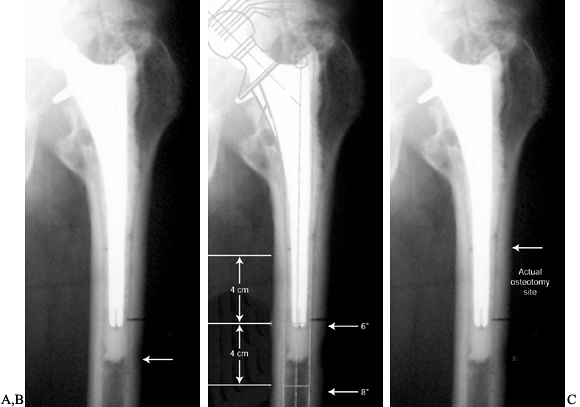
of the varus deformity (Fig. 106.22A).![]() Figure 106.22. A: The arrow indicates the osteotomy site that would maximize access for cement removal. B:
Figure 106.22. A: The arrow indicates the osteotomy site that would maximize access for cement removal. B:
The template shows fixation surfaces for a 150 and 200 mm (6 and 8
inch) component and the 4 cm minimal fixation required for each.
Placement of the osteotomy at the site in A compromises the fixation available. C:
A compromise is made, and the osteotomy is moved more proximally
because the distal cement is not well bonded and should not be
difficult to remove. -
Template the planned revision component
and check to determine whether its fixation will be compromised by the
distal extent of the osteotomy. Fully coated stems require at least 4
to 6 cm of isthmus fit (Fig. 106-22B). -
It is often necessary to shorten the
distal extent of the osteotomy so that component fixation is not
compromised. A compromise between maximizing exposure and maintaining
fixation must be reached (Fig. 106-22C).
exposure than primary surgery. Posterior, lateral, or anterior
approaches can be used. Base selection on previous incisions, the
component to be revised, anticipated degree of difficulty, and the
surgeon’s familiarity with the approach. Surgical approaches are
covered in Chapter 2 and Chapter 3.
It is occasionally necessary to combine two approaches, as with a major
acetabular protrusio when an intrapelvic approach may be needed to
avoid vascular injury.
and allows for plating of the posterior column and structural grafting of the acetabulum.
-
Position the patient in the lateral
decubitus position so that the acetabular component can be oriented
intraoperatively. Secure the pelvis so that there is no motion during
the case. Pad the patient appropriately and insert an indwelling
urinary catheter. -
Take care that the positioning device
used to secure the patient does not interfere with extensions of the
incision either proximally or distally. -
Prep and apply sterile drape so that the
proximal incision can extend almost to the midline of the body and the
distal incision to the knee. -
Use and extend previous incisions when
possible. Do not create parallel incisions that are less than 6 cm
apart or incisions that converge at less than 60°. At times, these
guidelines will have to be ignored. Fortunately, because of superior
vascularity (as compared with the knee), wound problems are rare. -
Incise the fascia latae in the same plane
as the skin incision. Develop a plane between the fascia latae
anteriorly and the underlying vastus lateralis and gluteal muscles.
This is best achieved by attaching two clamps to the fascia and
retracting it anteriorly. Use blunt and sharp dissection to develop
this plane quickly. Repeat the procedure posteriorly. -
Release the gluteus maximus tendon
completely, about 1 cm from its insertion on the posterior aspect of
the femur. This approach decreases the tension placed on the sciatic
nerve and allows for translation of the femur anteriorly. -
Palpate the sciatic nerve but do not routinely expose it.
-
Split the gluteus maximus muscle body proximally for the full length of the incision.
-
Incise the posterior pseudocapsule in
line with neck of the prosthesis until you reach the junction of the
posterior and lateral femur. At this junction, extend the incision
distally. Now the external rotators can be reflected posteriorly as a
full-thickness flap, exposing the joint and the posterior aspect of the
femur. -
Debride the scar.
-
Dislocate the hip and remove a modular
head, if present. Dislocation, if impossible owing to protrusion, can
be achieved with a standard trochanteric osteotomy, a vastus slide, or
an extended trochanteric osteotomy.
often seems daunting in the face of extensive scar and difficult
visualization. However, with patient removal of scar and gradual
retraction of the femur anteriorly, a femoral osteotomy is usually
unnecessary with a posterior approach.
-
Incise the capsule superiorly at the 12
o’clock position. Then dissect subperiosteally along the superior and
anterior edges of the acetabulum. -
Place a Hohmann retractor at the 2
o’clock position at the junction of the superior and the anterior
acetabular rims. Do not place the retractor on the thin portion of the
anterior wall or you risk creating a segmental defect. Alternately, a
Taylor retractor may be placed on the anterior ilium, which is useful
when the anterior wall and column appear fragile. -
Gently lever the retractor anteriorly and
release the capsular tissue bluntly or sharply until the superior and
anterior portions of the acetabulum are exposed. -
Release a tight inferior capsule with
electrocautery because there are vessels in this area. This will
facilitate anterior translation of the femur. -
Place a second retractor into the
obturator fossa after the inferior capsule is released. This retractor
can be used to translate the femur distally and anteriorly. -
Dissection at the posterior aspect of the
acetabulum must be carried out very carefully owing to the proximity of
the sciatic nerve passing over the ischium. It is best to use blunt
dissection as much as possible in this area. Place an Overhill,
self-retaining retractor to hold back the posterior capsule. Hohmann
and Taylor retractors can also be used but may be more risky.
soft tissue so that the bony defects can be completely evaluated. The
medial wall must be cleared of fibrous tissue to assess cavitary and
segmental defects.
achievable by soft-tissue dissection alone. There are bony procedures
that expose the acetabulum and femur. The most useful is the extended
trochanteric osteotomy.
-
Acetabular exposure
-
Removal of femoral components or cement
-
Neutral reaming of varus and valgus femoral remodeling
-
Adjustment of abductor tension
-
Promotion of femoral remodeling
reduces operative time, blood loss, and complications. The extended
trochanteric osteotomy may be regarded as a conservative approach to
revision hip surgery. It allows direct visualization during cement
removal and reduces the incidence of cortical perforation. It allows
controlled access to the femoral canal and facilitates removal of
well-fixed
cemented
and uncemented stems. It allows reaming of the femur parallel to the
canal, which is important when using long-stemmed components or when
there has been varus remodeling of the femur secondary to aseptic
loosening. The osteotomy is useful in the presence of malunions of the
greater trochanter or femur that prevent reaming parallel to the axis
of the medullary canal.
once the femoral component has been removed. This is not always
possible, and the technique is modified slightly with the femoral stem
in place.
-
Position the hip in 0° of flexion with internal rotation of approximately 20°.
-
Create a long bony segment comprising the
lateral third of the femur with minimal stripping of the
musculotendinous sleeve composed of the gluteus medius and minimus
proximally and the vastus lateralis distally (Fig. 106.23A).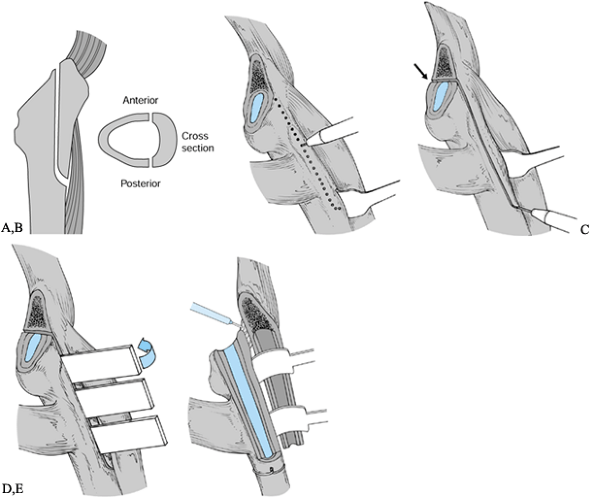 Figure 106.23. A: Outline of extended trochanteric osteotomy in two planes. B: Expose the posterolateral femur, raise the vastus lateralis in a limited area, and mark the cut. C:
Complete the cut with a saw and distally use the pencil burr. If the
femoral component is in place, cut the anterior aspect of the proximal
femur in the area of the arrow, thus creating a fracture plane on the
anterior cortex, which is not exposed. D: Slowly open the osteotomy. E: Release contracted tissue anteriorly before displacing the osteotomized fragment. -
The longitudinal limbs of the osteotomy
are on the anterolateral and posterolateral cortex of the femur,
parallel to the long axis of the femur. The transverse limb of the
osteotomy joins the two longitiudinal limbs and is transverse to the
length of the femur. The goal is to create a coffin lid composed of the
lateral third of the femur. The length of the osteotomy is based on
preoperative templating and is covered in that section of this chapter. -
Expose the femur from the proximal neck
cut to the templated distal extension of the osteotomy, along the
junction of the posterior and lateral femur. Do not elevate the vastus
lateralis for the length of the incision because this approach will
devascularize the planned osteotomy segment. Do not expose the anterior
cortex. -
Reflect the vastus lateralis anteriorly for 2 cm of its length at the distal extent of the osteotomy and retract it.
-
Mark out the planned osteotomy using a
narrow diameter pencil burr. Mark out the longitudinal portion along
the posterolateral femur, then curve it gently onto the lateral cortex
to mark the distal extent of the osteotomy. Curving the transition from
a longitudinal to a distal cut reduces stress risers that could lead to
fracture. Avoid 90° transitions (Fig. 106.23B). -
The anterior cortex does not need to be
exposed except for a small 1 to 2 cm area that can be accessed where
the retractor is retracting the vastus lateralis. In this area, extend
the distal osteotomy from the lateral cortex to the anterolateral
cortex from distal to proximal, marking the anterolateral cortex for 1
to 2 cm. The distal portion of the osteotomy can be completed with the
burr (Fig. 106.23C) -
Complete the posterior longitudinal
portion with an oscillating saw along the lines marked with the burr.
Once the posterior cortical cut is complete, cut the anterior cortex
from inside the femur using the posterior cortical cut as guide going
from back to front. The anterior cortex should be cut at the same depth
as the posterior cortex so that the osteotomy segment has a uniform
depth. -
When the femoral component is still in
place, the anterior femoral cortex cannot be cut directly. Cutting the
anterior cortex for short distances both proximally and distally
creates a controlled fracture and prevents stripping of the vastus
lateralis that would otherwise be necessary to expose this area.
Distally, the cut is marked as previously described, going from lateral
cortex to the anterolateral, using the narrow diameter burr and cutting
the anterior cortex for 1 to 2 cm from distal to proximal. The proximal
femur should be cleared of anterior capsule for 1 to 2 cm distal to the
neck cut. This should be proximal and anterior to the vastus lateralis
origin. Using the pencil burr, the anterior cortex is cut for 1 to 2
cm. Exposure of the proximal anterior femur can be improved by flexing
the femur 30°, and this area can usually be reached with the stem in
place. -
Open the osteotomy slowly with two wide osteotomes. Pay careful attention to the distal aspect for fracture extension (Fig. 106.23D).
-
With the osteotomized segment gently
retracted anteriorly, release the scar along the anterior osteotomy
plane from inside the femur. This scar tissue is most pronounced
proximally. If this scar tissue is not released, the segment may
fracture during retraction. This is a critical step in performing the
osteotomy (Fig. 106.23E). -
A trial reduction of the hip allows for
adjustments of abductor tension or repositioning of the femoral
component. The osteotomy is not closed until the final reduction has
been performed. -
It is often necessary to contour the
inside of the greater trochanter with a barrel-shaped burr before
closure so that it fits over the shoulder of the component. -
Close the osteotomy with two or more cables, depending on the length of the segment.
-
Pass the cables around the femur, deep to the vastus lateralis, and tighten them partially with the hip reduced (Fig. 106.24).
![]() Figure 106.24. Osteotomy closed with cerclage cables passed deep to the vastus lateralis.
Figure 106.24. Osteotomy closed with cerclage cables passed deep to the vastus lateralis. -
Maintain tension on the cables as the hip is taken through a range of motion to check stability.
-
If the reduction is stable then crimp and cut the cable sleeves in final position.
-
Do not be alarmed if the osteotomy does
not reduce with bone-to-bone contact. With greater deformities of the
proximal femur or previous varus stems, anatomic reduction may be
neither possible nor necessary.
the vastus lateralis prevents proximal migration and the gluteus
tendons remain attached, preserving abductor
strength.
An intact muscular sleeve, consisting of the gluteii and vastus
lateralis, are the keys to successful healing. We experienced no
nonunions in 122 cases (3).
The most common complication (10%) has been fracture of the segment,
but this was not clinically significant, and the incidence of this
complication decreases with increased experience. Proximal migration
has been limited to less than 2 mm (3).
that it cannot be used to provide exposure or adjust abductor tension
in the presence of a well-fixed cemented component that is being
removed temporarily, the so-called “tap-in, tap-out” procedure. Its use
in cemented revisions is also limited, although it can function with
impaction grafting.
This approach provides excellent exposure because the trochanter is
detached from the femur and reflected superiorly with the gluteal
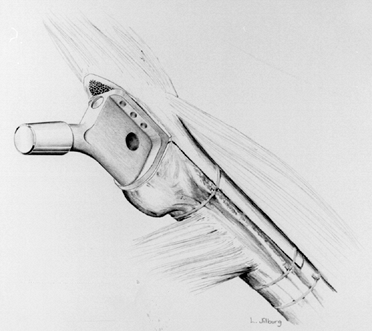
muscles attached (Fig. 106.25A). In revision
surgery the proximal femur is often damaged and the greater trochanter
is compromised by osteolysis. This factor has significant drawbacks in
the reattachment of the trochanter. Healing is usually fibrous, and
fixation of the small proximal segment is difficult, even with the use
of claws and grips.
 |
|
Figure 106.25. A: Sagittal view of the trochanteric osteotomy. B: Sagittal view of the trochanteric slide.
|
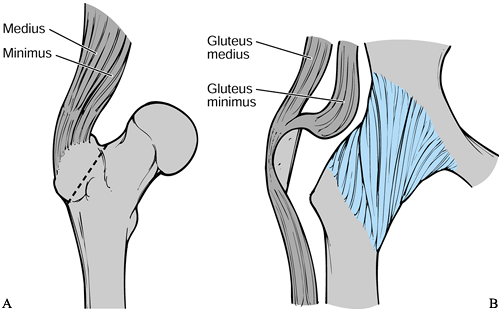
trochanteric slide involves an osteotomy of the anterior trochanteric
bone, which is reflected anteriorly in continuity with the gluteus
medius and vastus lateralis. Make the osteotomy just lateral to the
gluteus minimus insertion, or alternatively, it can be made thicker to
include the gluteus minimus with the fragment. Reattach the slice of
trochanter with cerclage wire around the lesser trochanter and through
the bony fragment. Stability is usually excellent following
reattachment owing to the opposing pulls of the gluteus medius and
vastus lateralis (Fig. 106-25B). The trochanteric slide can improve visualization in the difficult primary arthroplasty as well as the revision. In addition,
the dissection can be extended proximally for exposure of the ilium
with less risk to superior gluteal neurovascular structures as can be
encountered with the modified Hardinge approach (39).
The mobility of the trochanteric fragment has the advantages of
re-establishing abductor tension and facilitating fixation to a
proximal femoral allograft.
their removal may require much equipment and time. Cemented components
are easier to remove than cement, and the most difficult to remove is
the fully porous-coated ingrown stem.
components. Other instruments are used more generally for cement and
component removal. The Moreland (DePuy, Warsaw, IN) hand tools are
useful for the removal of cemented and uncemented components. Other
similar systems (Osteonics, Allendale, New Jersey) provide extraction
devices and multiple hand tools with specific functions such as
splitting cement or drilling into a cement plug (Fig. 106.26).
 |
|
Figure 106.26. Cement splitting tools.
|
Park, FL), Midas Rex (Fort Worth, TX), or the Ultra-Power (Warsaw, IN)
should be available. They are versatile in revision surgery, and
cutting heads with the ability to cut metal should be available in
various shapes and sizes.
modular femoral head must be disengaged from the Morse taper of the
neck. This can usually be accomplished by placing a bone tamp at the
undersurface of the femoral head and striking it sharply with a hammer.
Dedicated instruments are also available from most manufacturers.
Removal of the head facilitates acetabular exposure and should be done
early in the exposure, even if the femoral component is to be retained.
Protect the Morse taper on the femoral neck from scratches with a
sponge from scratches during the surgery.
removed immediately to improve acetabular exposure. An extended
trochanteric osteotomy, if necessary for femoral component removal,
improves acetabular exposure. If acetabular exposure does not seem to
be a problem, there are advantages to leaving the femoral component in
place until later. The femoral neck can be used as a fulcrum to
transpose the femur anteriorly, although this should be done gently.
Also, removal of the femoral component and cement leaves the femur as a
fragile tube that is susceptible to fracture. Finally, removal of the
component and or cement leads to increased bleeding from the canal. If
the femoral component does not interfere with exposure, we leave it in
place during the acetabular revision.
be retained. When exposure is a problem, the cemented femoral component
may be tapped out of the cement mantle, with good results on
replacement. With the femoral component removed, if there is a solid
bond between the cement and bone, then either the same or a new femoral
component can be recemented into place. If a new component is to be
used, the cement mantle will require reshaping proximally and distally
with high-speed burrs. This procedure can be useful with an intact and
well-bonded cement mantle in cases in which cement removal will
compromise the femur, as in a patient with severe osteopenia.
-
Clear the “shoulder” of the prosthesis of
soft tissue or bone that may limit access to the lateral component, or
that may impede removal of the implant. -
Clear the entire proximal femur of
fibrous tissue to view the component–bone or cement–bone interface
around the entire prosthesis. -
Removal is safer once the proximal component can be visualized.
-
Disrupt the interface proximally where
any cement overhanging the shoulder is removed. The greater trochanter
may fracture if this area is not cleared before removal of the
component. -
After the proximal cement is fractured with a thin osteotome, disimpact the prosthesis with an extraction device.
-
A component with a methylmethacrylate
precoating to enhance the cement bond will not be extracted as easily.
In this case, either continue to disrupt the cement mantle using
flexible osteotomes or, more safely, with an extended trochanteric
osteotomy.
to cortical perforation. If the cement is grossly loose, it can often
be removed as a unit by drilling a hole into the center of the distal
cement, tapping threads into the cement, and screwing in an extraction
device to remove the cement. Cement that is well bonded to the
diaphysis is difficult to remove and will require high-speed burrs, a
light to illuminate the canal, and possibly an image intensifier.
method to remove cement. Based on preoperative templating, the
osteotomy should be extended as far distally as possible without
compromising fixation of the revision stem.
-
Split cement that is intact
circumferentially into three or four segments with T- or V-shaped
cement removal chisels. Do this before disrupting the bone–cement
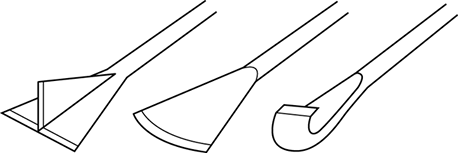
interface (Fig. 106.27). If the cement mantle is not disrupted, the chisels tend to lever against the bone and can lead to femur fracture.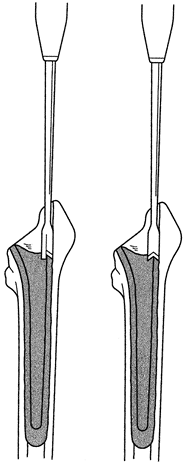 Figure 106.27. Proximal metaphyseal cement can be split with special T- or V-shaped cement removal chisels.
 -
Patiently remove cement from proximal to
distal in 1 to 2 cm segments. The well-bonded distal cement plug will
be difficult to remove. -
If there is space between the plug and bone, a small hook can be passed beyond the plug to then remove it.
-
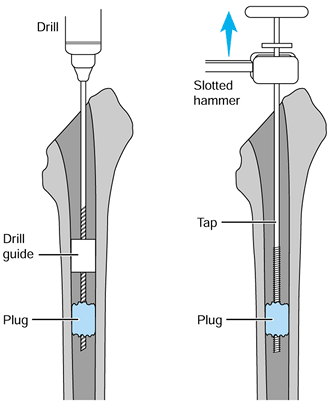
If there is no space, drill into the
distal plug with drill guides that fit tightly into the femoral canal
and centralize the drill bit (Fig. 106.28). Tap
the threads in the hole and screw in a threaded extractor. Try to
remove the cement as a unit only if it does not extend past the isthmus
or is not well bonded. If the unit is solidly bonded, split the cement
through the drill hole and use hooks to remove it piece by piece.![]() Figure 106.28.
Figure 106.28.
Drill guides allow a tap to be placed centrally in the distal cement.
If the cement is not well bonded, it can then be disimpacted.
plugs without an extended trochanteric osteotomy. The osteotomy has
decreased the frequency of perforations and expedited complete cement
removal. Failure to remove small pieces of well-bonded cement can
misdirect reamers and lead to component malposition and femoral
fracture.
with cemented components but are more difficult. The techniques depend
on the extent of the fixation surface; a proximally porous-coated
component can be removed
with
or without an osteotomy using flexible osteotomes, whereas a fully
porous-coated component will require an osteotomy or distal cortical
windows.
fibrous unstable—will influence the ease of removal. A fibrous unstable
component can be removed fairly easily, as shown here:
-
Remove soft tissue and bone from around the shoulder of the prosthesis.
-
Use an axial force to remove the component (Fig. 106.29).
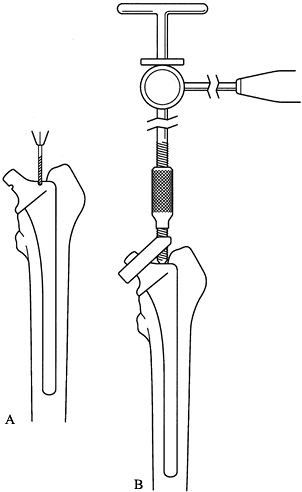 Figure 106.29. A universal extraction device can be used for modular femoral components. A: If they are not already present, special notches must be made on these femoral components by using a carbide bit, and B: attachment of the device to the femoral component can allow for extraction.
 -
If the component shows no signs of moving
after 5 to 10 heavy blows, reassess the situation. Is there a proximal
obstruction? Is the component partially bone ingrown or fibrous stable? -
Do not force the component out because
this can fracture the femur. For components that are proximally coated
and “bone ingrown” or fully coated and “fibrous stable,” start by
disrupting the bone prosthesis bond proximally. -
Establish access to the interface with a
narrow-diameter burr or osteotomes. Establish “straight shot” access to
the lateral aspect of the component by removing any overhanging greater
trochanteric bone. -
Use flexible osteotomes to disrupt the bond around the prosthesis.
-
Use an axial force to extract the component.
porous coated and bone ingrown, proceed with the extended trochanteric
osteotomy or a cortical window. The extended trochanteric osteotomy
provides better access to the proximal portion of the stem and more
direct, straight access to the distal portion with the trephines.
-
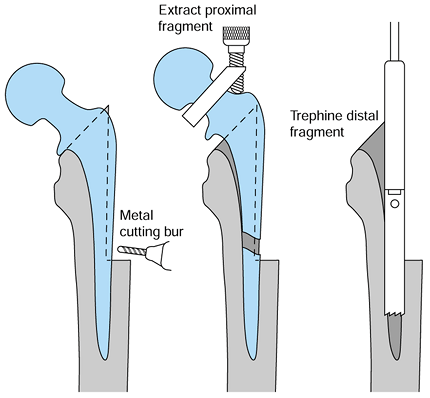
Extend the trochanteric osteotomy distally to the junction of the metaphyseal and diaphyseal stem (Fig. 106.30).
![]() Figure 106.30.
Figure 106.30.
Removal of a well-fixed fully porous-coated component through an
extended trochanteric osteotomy, cutting the stem and using trephines. -
Open the osteotomy by hinging it anteriorly.
-
Cut the stem at the metaphyseal–diaphyseal junction using a metal-cutting, carbide-tip, high-speed, low-torque burr.
-
Disrupt the well-bonded proximal interface with use of a Gigli saw (Fig. 106.31).
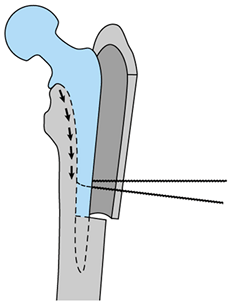 Figure 106.31. Use of a Gigli saw to disrupt the medial interface, which is the most difficult to access.
 -
Drill over the distal cylindrical portion of the stem with trephines.
-
Use a high-speed burr to create a window
in the lateral femoral cortex at the junction of the metaphyseal and
diaphyseal portions of the stem (Fig. 106.32).![]() Figure 106.32. Cortical window at the stem metaphyseal–diaphyseal junction used to cut the stem, which is then removed as in Figure 106.31.
Figure 106.32. Cortical window at the stem metaphyseal–diaphyseal junction used to cut the stem, which is then removed as in Figure 106.31. -
Cut the femoral stem with a metal-cutting burr through this window.
-
Remove the proximal portion of the stem after disrupting the proximal bone prosthesis interface with flexible osteotomes.
-
Drill over the distal portion of the stem with trephines.
pseudomembrane, exposing healthy bone. Classify the defect based on the
intraoperative evaluation and the preoperative templating. This
information is used to decide treatment.
rotational stability in the diaphysis of the femur, bypassing the
metaphyseal bone. This can be achieved if at least 4 cm of undisrupted
diaphysis is available to support the prosthesis and if more than 90%
of the canal can be filled.
-
Remove all cement and neocortex from the canal.
-
Remove any overhanging trochanter or
proximal sources of impingement because reaming must be performed in
neutral alignment. In femurs with varus remodeling, this may not be
possible. Failure to ream neutrally will lead to component malposition
or femoral fracture. -
Perform an extended trochanteric osteotomy if neutral reaming cannot be achieved.
-
The length of reaming depends on the stem
chosen for revision; therefore, at least 4 to 6 cm of undisrupted bone
must be available distal to the osteotomy site. -
Ream no farther than the area required for fixation.
-
Use straight reamers for straight stems and flexible reamers for curved stems.
approximately 175 mm (7 inches) distal to the lesser trochanter.
Therefore, any straight stems longer than 175 mm (7 inches) may impinge
or perforate the anterior cortex of the femur. Long curved stems have a
far lower incidence of anterior cortical perforation than long straight
stems (Fig. 106.33).
 |
|
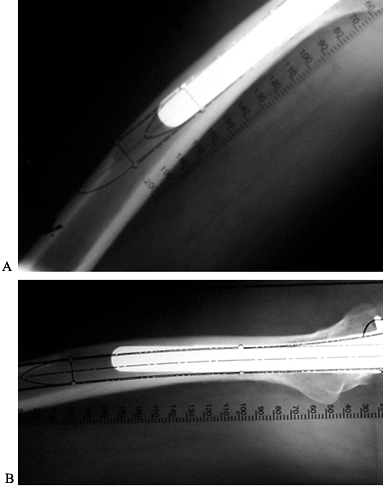
Figure 106.33. A:
A 200 mm (8-inch) straight-stem template shows conflict with the anterior cortex. A shorter stem was inserted, but the anterior cortex was still thinned by reaming. B: A 200 mm (8-inch) bowed-stem template shows a much better fit if a long-stemmed component had been needed. |
-
Sequentially wider reamers are applied
until the cortex is contacted. Keep in mind that the size templated is
usually within one size of the actual component. -
Plan on reaming to 0.5 mm less than the
implant diameter with the Solution (DePuy, Warsaw, IN). This applies to
most fully coated nontapered stems, but this amount should be checked
for each prosthesis. -
A good test of whether the right size has
been chosen is to take a reamer on a T-handle and try to rotate it
manually in the canal. The appropriate size provides rotational
stability. For example, if you have reamed to 16.0 mm, with plans to
implant a 16.5 mm component, use the 16.5 mm reamer on a T-handle to
test for rotational stability. -
If rotational stability is not achieved, continue reaming to the next size.
-
Perform trial implantation before reaming
to the final size. In most systems, the trial broaches are smaller
distally than the planned stem. -
If an osteotomy has been performed,
tighten a cable around the femur, distal to the osteotomy, before
impacting the stem, to decrease the chance of a fracture. -
Measure the prosthesis and femoral canal
with calipers. Do the same for the final reamer so that the true size
differential between reamer and component is known. Owing to
manufacturing and sharpening of the reamers, they may differ from their
stated size by as much as 0.5 mm each, leading to a potential 1 mm
mismatch. -
Insert the component initially by hand,
rotating it back and forth to advance. If more than 5 to 6 cm remains
proud, it will be necessary to ream line to line (Fig. 106-34).![]() Figure 106.34.
Figure 106.34.
Stem is inserted by hand using an impaction device as a pusher and a
reamer through the shoulder of the prosthesis to toggle the component
back and forth to advance it. -
After the component has been advanced
maximally by hand, begin hitting it with the mallet. At this point, it
is crucial to maintain the anteversion as determined by the trial
reduction because once the prosthesis engages in the underreamed distal
zone, it will be very difficult to rotate. -
The prosthesis should advance with each hammer blow, and the distal femur should be watched for fracture.
and fill in the metaphysis. In revision surgeries, this bone is often
sclerotic, fragile, and expanded. A proximally porous-coated device can
be used if the metaphysis has sufficient structural integrity to
provide rotational and
axial
stability. With proximal bone destruction, the metaphyseal portion of
the implant will need to be larger than in a primary. The diaphysis, by
contrast, may be undamaged (Fig. 106.35).
The stem of the larger implant may be too large for the femoral
diaphysis. Extensive medullary canal reaming may be necessary to
accommodate the larger stem.
 |
|
Figure 106.35.
Proximally coated devices that require good fit and fill in the metaphysis for stability must be larger in the revision setting, and this may compromise diaphyseal bone stock. |
-
Assess the proximal femur for its ability to support a proximally porous-coated device.
-
Maintain the integrity of the proximal femur and the greater trochanter. Avoid an extended trochanteric osteotomy.
-
Remove sclerotic bone that may misdirect reamers or broaches.
-
The greater trochanter may interfere with broaches. Therefore, remove impeding bone before broaching.
-
Use reamers to assess the diaphyseal
canal diameter. Then insert a broach that matches the diaphyseal size
and assess this for proximal stability. If it is unstable proximally,
change the version or go to the next size, keeping in mind that you
will have to enlarge the diaphysis to achieve proximal fixation. If it
appears that going up one or two sizes will achieve proximal fixation,
then it may be worthwhile. However, if excess diaphysis is being
removed, it may be better to switch to a fully porous-coated device.
revision and a cemented primary arthroplasty is in the preparation of
the femoral canal. In a primary arthroplasty, there will be healthy
cancellous bed proximally and good diaphyseal bone distally. This will
not be the case in the revision and the femur will have to be prepared
far more thoroughly than in a primary.
-
Remove all previous cement and pseudomembrane.
-
Burr sclerotic bone down to bleeding bone, being careful to avoid perforation.
-
Revisions require more cement than a primary, and two vacuum mixers may be required.
graft to create a new medullary canal into which a component can be
cemented. In creating a new canal, bone graft will be compacted into
the femur forcefully. The integrity of the femur must be restored to
sustain this (22,97).
-
Expose the proximal femur completely and clear it of pseudomembrane.
-
Examine the femur for cavitary and segmental defects.
-
Repair segmental defects to convert them
to contained defects using mesh or strut grafts, or both, that are held
with cerclage wires. -
Cerclage the fragile femur
prophylactically with multiple cables before impacting bone graft
because graft impaction can generate significant hoop stresses. -
Pass a guidewire through the center of a thick distal intramedullary plug.
-
Seat this plug 2 cm distal to any lytic
lesion. It is imperative that the plug is solidly in place and that the
guidewire be neutrally aligned. If necessary, obtain a radiograph at
this point to ensure that the alignment is correct. Perform the bone
packing and trial insertion with a cannulated system to guide the
position of the stem. -
Passing a K-wire transversely through the femur just distal to the plug can prevent distal plug migration.
-
Prepare cancellous chips of 3 to 5 mm in
diameter. Chips that are too small can compromise the fixation by
providing insufficient structural support, allowing stem subsidence (33). -
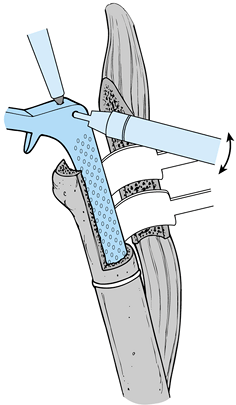
Place the graft into the canal and begin impacting it with the cannulated tamps (Fig. 106.36A).
![]() Figure 106.36. A: Stages of distal impaction of the graft. See text for description. B: Proximal impaction with cannulated tamps and then trials with vigorous impaction of graft proximally. See text for description.
Figure 106.36. A: Stages of distal impaction of the graft. See text for description. B: Proximal impaction with cannulated tamps and then trials with vigorous impaction of graft proximally. See text for description. -
Continue to pack more bone distally to proximally.
-
When most of the canal has been filled,
use the cannulated tamps (one to two sizes smaller than the prosthesis
to be used) to compact bone. -
Pack the bone graft tightly—this is
considered important to a success. When there is a uniform layer of 5
to 6 mm of bone around the new canal, remove the guidewire. -
Introduce cement in a more liquid state
than in primary arthroplasty so that it can penetrate into the bone
graft. Then pressurize it with a cement gun equipped with a proximal
seal. -
The stem used by the developers of this
technique is of a highly polished, collarless, double-tapered design.
It is intended to subside in the cement mantle with time, thus
“engaging” the cement somewhat like a Morse taper (33). -
Keep the patient on protected weight bearing for 8 to 12 weeks postoperatively.
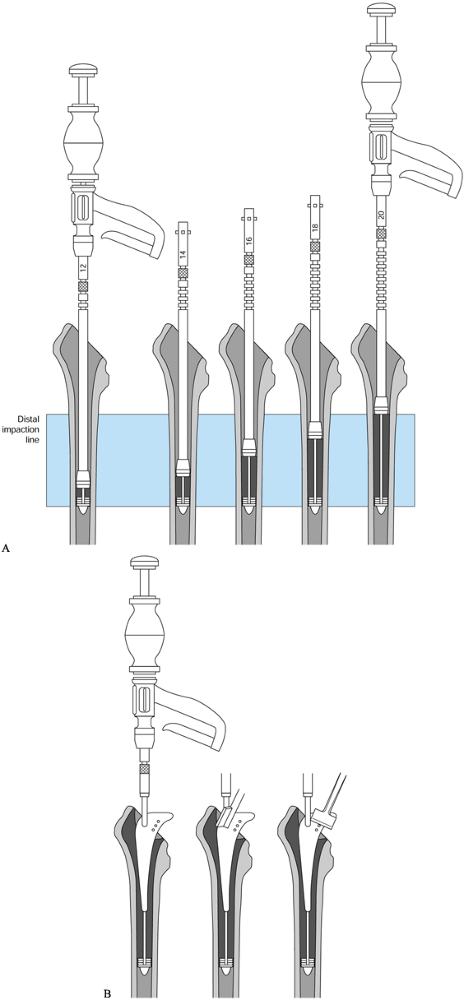
complex and required infrequently, even at institutions that perform
many revisions. Structural allograft is necessary
when the host femur is incapable of stable fixation of a revision component (Fig. 106.37).
Strut grafts can be used when there are small, noncircumferential
segmental defects. A structural allograft will be necessary for
circumferential defects greater than 5 cm in length. Proximal
circumferential segmental defects less than 5 cm long can be treated
with calcar replacing or long-necked components.
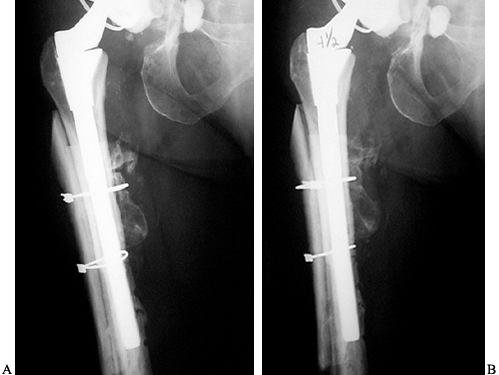 |
|
Figure 106.37. A:
Allograft prosthetic composite. APC performed using modular components with cement distally and uncemented proximally. Junction is reinforced with strut grafts. B: Four and a half years later, the construct is stable. Experience has shown that cementing the proximal portion and uncemented distal fixation gives the best long-term results. |
segment and press fit distally into the host. This may require custom
components because the allograft is often quite narrow, yet the
diaphyseal host femur has a large circumference with thin cortices. The
junction between allograft and host is important (38)
and may be constructed as a butte, step-cut, or side-sleeve junction,
or with the allograft telescoped into the host distally (Fig. 106.38).
There is no consensus as to which type of junction is the best, but the
greater the stability, the greater the chance of graft survival. The
type of junction selected depends principally on the rotational
stability of the prosthesis in the distal femur. A butte joint may
suffice if distal stability is adequate. A step-cut joint can improve
rotational stability but is technically more difficult. The junction
can also be supplemented with strut grafts and plates for additional
stability. Avoid cement intrusion into all junctions.
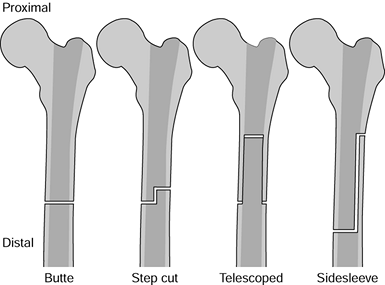 |
|
Figure 106.38. Variety of joints used at the junction of host bone and proximal femoral allograft.
|
-
Split the remaining proximal femur in two in the mediolateral plane, extending this distally to good bone.
-
Preserve the soft tissue attached to the
proximal femur. This bone can be wrapped around the allograft to
preserve muscular attachments. -
Prepare the allograft to accept the
prosthesis that best fits the distal femur without overreaming the
allograft. There may be a mismatch between the allograft and host. A
normal distal press fit may not be possible if the allograft is to be
preserved. -
Avoid screws in the allograft because they lead to fracture.
distally. If the junction between graft and host is above the isthmus,
reliable fixation can be achieved in the isthmus. If the junction is
distal to the isthmus or the femur is a Paprosky type 4, isthmus fit
will not be possible. In this case, the prosthesis will need to be
cemented into the host or fixed with interlocking screws into a custom
implant.
loss of acetabular bone. Well-fixed or even partially fixed components
that are forced out can result in extensive bone loss and may convert a
straightforward reconstruction into a very complex affair. For this
reason, consider retaining a stable metal-backed acetabular component.
Porous-coated acetabular components are associated with areas of focal
osteolysis. This focal osteolysis occurs in noningrown areas where the
joint fluid has access to the supra-acetabular region. If this area is
limited and the osteolysis does not affect the stability of the cup, it
is advisable to retain the cup, apply bone graft to the lesion, and
exchange the polyethylene (65) (Fig. 106.39). Six criteria should be satisfied to retain the cup:
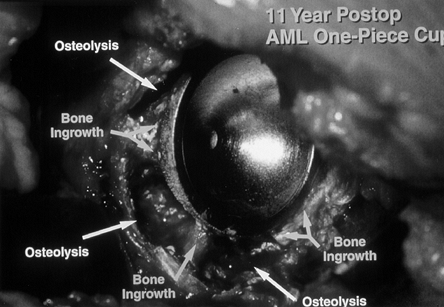 |
|
Figure 106.39. Uncemented cup demonstrating the persistence of areas of bone ingrowth despite extensive osteolysis.
|
-
Cup position must be satisfactory.
-
Socket must be modular.
-
Locking mechanism of the shell must be intact.
-
Metal shell must not be damaged by femoral head penetration.
-
New polyethylene must be at least 8 mm thick.
-
Socket design must have an acceptable track record.
removal. The patient’s age, activity level, and the reason for revision
also should be considered. However, if two or more criteria are not
met, cup removal may be preferable.
destructive. The average revision cup is 10 mm larger than a primary
cup, reflecting loss of bone secondary to loosening and loss of bone
during removal (65). The possibility of cutting
a cup into sections should be considered. Cobalt-chrome cups are more
difficult to cut than titanium cups. Any cup that is sitting directly
on or medial to the teardrop should be sectioned rather than removed
with curved osteotomes (Fig. 106.40). Curved
osteotomes in this situation can damage the anterior column and injure
the intrapelvic structures. We have a low threshold for cutting the
cup, which facilitates removal and minimizes bone loss. When cups are
more lateral, curved osteotomes can safely be used.
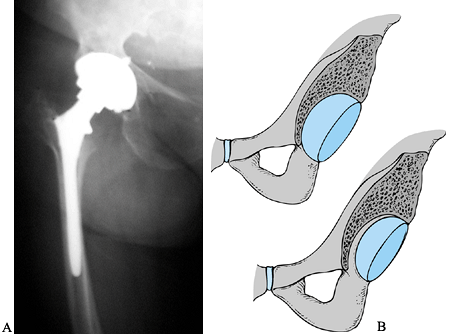 |
|
Figure 106.40. A: Radiograph showing a cup sitting just medial to the teardrop in an osteoporotic patient. B:
The use of an osteotome to remove stable cups that sit on or medial to the teardrop results in potentially disastrous anterior column bone loss and risk to intrapelvic structures. |
differs somewhat, but the basic principle is the same: disruption of
the interface between the component and the bone. Cemented cups usually
have linear rather than focal osteolysis and therefore cannot be bone
grafted. They also have a high loosening rate after 10 years, and
therefore, they should be retained only if the cup is solid and the
patient has a modest life expectancy (43,72).
-
Expose all edges of the component. Remove
modular polyethylene liners and be prepared for locking mechanisms that
may require specialized extraction tools. Removal of the polyethylene
improves visualization and gives access to the medial aspect of the
cup, where there may be screw or insertion handle holes. Check all
screw holes for screws, because some shorter screws may not be visible
on radiographs. -
Establish a plane at the bone–component interface with a high-speed pencil burr (Fig. 106.41).
Develop this plane around the entire perimeter of the cup to a depth of
approximately 1 cm. This is easiest superiorly and posteriorly, and
becomes more difficult anteriorly and inferiorly. With this plane
developed, there is now access to the posterior aspect of the cup.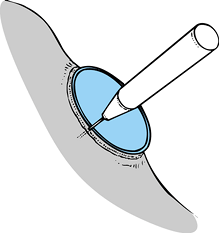 Figure 106.41. Use a pencil burr to develop the interface between prosthesis and bone, allowing access to curved osteotomes.
preoperative planning. If the cup is medial to or directly on the
teardrop, it is advisable to cut the cup and remove it in pieces. Use
of osteotomes in the presence of medial bone deficiency can lead to
major anteromedial bone loss or injury to intrapelvic structures. Use
osteotomes only if there is medial bone present.
-
The interface can be disrupted further
with curved Moreland instruments. Begin by using the short-curved, and
progress to the long-curved, going around the entire perimeter of the
cup (Fig. 106.42A).![]() Figure 106.42. A:
Figure 106.42. A:
The acetabular gouge can be inserted between polyethylene and cement or
between cement and bone. Gentle placement around the edges of the
component and cement can loosen them from the uderlying bone, allowing
removal of the component, cement, or both. B:
The cementless cup extractors and levers can lock into the metal
portion of the cementless acetabular component. A gentle rocking motion
allows extraction of the component. Before levering with these tools,
it is important to loosen the bone–prosthesis interface with curved
acetabular osteotomes. -
Using an acetabular grabber device,
toggle the cup gently to establish areas that are still bonded and
concentrate on disrupting them (Fig. 106.42B). Neither rock the cup forcefully nor pound it out because this method will lead to bone loss.
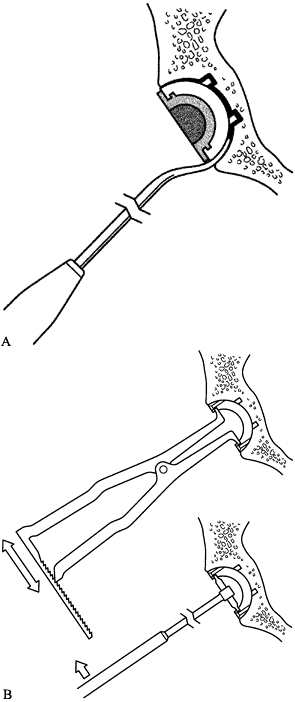
will still need to be cut for safe removal. This is usually because of
fibrous or bony ingrowth on the inferomedial aspect of the cup, which
is least accessible to the pencil burr and the curved osteotomes.
approach to removing it. Section it into two or three pieces under
constant irrigation and protect the soft tissues from metal debris.
Section a metal-backed component as follows:
-
Having gone through the previous steps,
place sponges around the perimeter of the cup to keep metal debris from
contaminating surrounding tissues. -
Use a metal cutting burr under constant irrigation to divide the cup in two halves from anterior to posterior.
-
Try to remove the superior half with careful use of the short, curved osteotomes and an acetabular grabber.
inferior half, which frequently needs to be divided again. We now
proceed directly to a three-limbed Mercedes-type cut, with the top of
the star at the 12 o’clock position (Fig. 106.43).
 |
|
Figure 106.43. Acetabular component cut in three to facilitate removal.
|
-
Drill into the center of the polyethylene
with a large drill (i.e., 6 to 8 mm) and then screw a tap into the
hole. Once securely attached to the cup, apply a slotted hammer to the
tap. If the cup appears solid, disrupt the cement bond and remove the
polyethylene. Cement removal is then fairly easy. Pay attention to
cement plugs. It is occasionally necessary to section the cup, which is
best done with a saw.
carefully assess bony defects. Complete removal of fibrous tissue is
necessary. This is especially important inferiorly where the teardrop,
or cotyloid fossa, should be identified to establish the appropriate
center of rotation. Failure to identify this feature may lead to an
inadvertent high hip center.
-
Examine the peripheral rim for defects,
which may affect cup fixation. The location and size of these defects
affects the ability of the acetabulum to support the cup. -
Assess cavitary defects for size to determine bone graft requirements and to determine if they compromise stability.
-
Pelvic discontinuity can easily be missed
if medial fibrous tissue has not been removed. Most discontinuities
have a deceptive fibrous union and should be tested by attempting to
move the superior acetabulum and assessing whether the pelvis moves as
a unit. The discontinuity usually extends transversely across the
acetabulum from the 3 to 9 o’clock positions.
the intraoperative assessment of bone loss. The need for structural
grafting can usually be predicted with preoperative templating. Have
bone graft in the form of femoral heads, distal femurs, and a
hemipelvis available, especially if there is no bone bank. Femoral
heads are not very useful as structural grafts.
of the acetabulum is compromised and cannot provide rigid cup fixation.
Allograft can be used to restore bone stock in young patients, who may
not require graft for stability. Structural grafts are most commonly
needed for segmental defects located superiorly and posteriorly.
-
Assess the need for a graft by placing a
trial acetabular component after the initial reaming. If the cup is
covered by bone superiorly and posteriorly to its widest diameter, the
cup will likely be stable. Structural grafts will then be needed for
bone stock restoration and not for stability (Fig. 106.44). The planned cup must have greater than 50% host bone contact.![]() Figure 106.44. A trial component wedged into position can help assess the extent of defects and how these defects affect stability.
Figure 106.44. A trial component wedged into position can help assess the extent of defects and how these defects affect stability. -
If there is inadequate posterior or superior coverage, structural grafting will be needed.
-
At least 50% of the cup must be in contact with host bone.
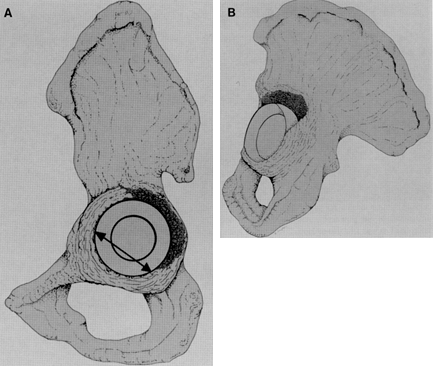
with a structural graft and provisional fixation. A discontinuity
should be plated, and the plate should buttress the structural graft.
One can then implant a prosthetic cup if there is more than 50% contact
with host bone. A cage or cemented cup and allograft will be required
for less than 50% contact with host bone.
femoral heads, whereas larger defects will require distal femurs. Very
large defects or those of the posterosuperior column will require
hemipelvis allografts. As previously discussed, structural grafting can
produce successful results if certain principles are followed (30,31,38,78):
-
Rigid fixation
-
Buttressing of the graft against host bone
-
Alignment of the graft trabeculae along the lines of stress transfer
-
Placement of screws along the lines of stress transfer.
distal femoral allograft, where part of the supracondylar area of the
allograft is preserved, forming the vertical stem of the seven. The
flange that is created is critical to the successful healing of the
allograft and is far more stable than femoral heads (Fig. 106.45).
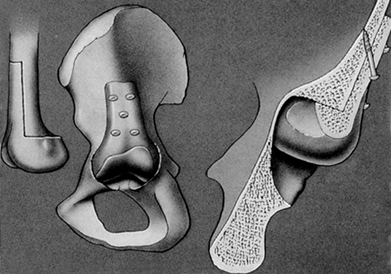 |
|
Figure 106.45. Number 7, or hockey stick, graft is cut from the distal femur.
|
-
Prepare the acetabulum to accept the
graft by using a reamer to create a more hemispherical defect. This
should not be done aggressively, in order to preserve residual bone. -
Use a concave reamer 2 mm larger than
that used to shape the defect on the femoral head or distal femur to
create a matching shape to the defect. -
Position the graft in the acetabular
defect. The supracondylar extension of the “seven” should have intimate
contact with the ilium. -
Secure the graft with screws. Plate a discontinuous posterior column, with the plate spanning the allograft.
only for Paprosky type 3B defects in which there is less than 50% host
bone contact. Host coverage of the prosthesis can be assessed with
trial components or reamers. Hemipelvic allografts are superior to
acetabular allografts because they provide a larger superior flange to
allow for fixation to the host pelvis. Male donors are also preferred
because their acetabuli have larger inner diameters, which allow for
the placement of a larger cage, more cement, and thicker polyethylene.
Unlike the femoral heads and distal femurs, the hemipelvic graft must
be matched to the side of the patient. The goal is to shape the graft
so that it locks into the acetabular defect.
-
Cut the graft from the hemipelvis as shown in Figure 106.46. Leave sufficient bone superiorly to create a large flange that will secure the graft and lock it into place.
![]() Figure 106.46. Allograft pelvic graft: Cut the graft from the pelvis as shown.
Figure 106.46. Allograft pelvic graft: Cut the graft from the pelvis as shown. -
Cut a trough on the medial aspect of the
allograft corresponding to the superior and posterior rim of the
defect. This locks the allograft into the defect. -
Do not thin the graft excessively while
creating a trough or the allograft could be fractured. The trough
should be 1 cm wide and approximately 1 cm deep, depending on the size
of the allograft. -
The medial surface of the allograft must
be shaped to fit the defect. Use the concave reamers on the medial
aspect of the allograft. This reamer should be 2 mm larger than the
reamer used to size and shape the defect. A barrel-shaped burr is
useful to shape the allograft. -
Place the graft in the defect and rotate
it until the best fit is achieved. Detailed shaping of the medial
surface is usually necessary to achieve an ideal fit. -
Secure the graft to the host with screws
through the allograft and into the ilium. A plate along the posterior
column crosses the allograft and extends onto the ilium (Fig. 106.47 and Fig. 106.48).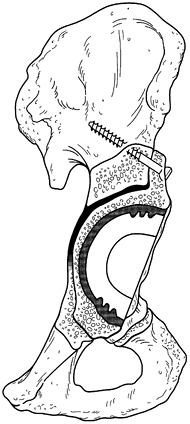 Figure 106.47. Graft is secured with screws directed along the lines of force transmission through the flange.
![]() Figure 106.48. A discontinuity must be fixed internally. The most secure method is with use of a posterior plate.
Figure 106.48. A discontinuity must be fixed internally. The most secure method is with use of a posterior plate.
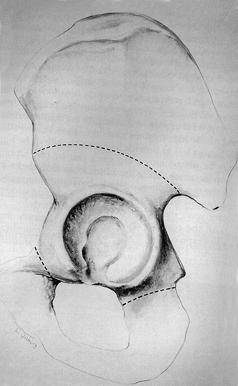
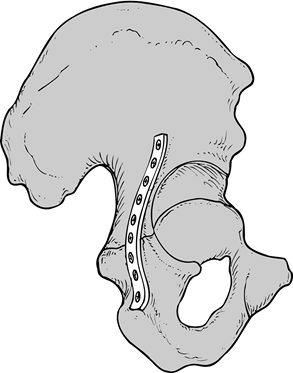
fixation. Discontinuity results from a transverse fracture that extends
from the anterior column through the medial wall and out the posterior
column (Fig. 106.49). It is often associated
with segmental and cavitary bone loss, which may require structural or
cancellous grafting. When required, a graft should be performed before
the plating. This technique is covered elsewhere.
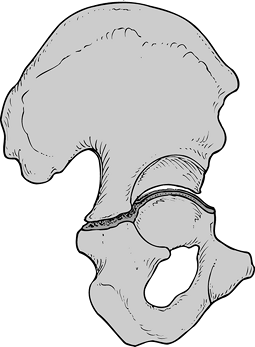 |
|
Figure 106.49. Pelvic discontinuity usually extends from 3 to 9 o’clock.
|
require only posterior column fixation. Although isolated anterior
column deficiencies do not require fixation, isolated posterior column
disruption should be plated owing
to the tremendous stress placed on the posterior column during weight bearing.
-
Expose the ilium superior to the superior
rim, and extend this exposure along the posterior rim onto the ischium.
The exposure must be performed carefully because this is the most
common site of sciatic nerve injury. -
Use the plate templates to obtain a mold
of the area to be plated. Curved pelvic reconstruction plates work best
and are generally eight holes or greater. -
Mold the plate with benders using the
plate template as a guide. Once the plate matches the pelvic anatomy,
secure it with screws (Fig. 106.48). Large
fragment screws are more secure but can be placed with only limited
angulation. Small fragment screws may be oriented with greater freedom,
and in cases of severe deficiency, this will increase the chance of
secure purchase. -
The fracture site must be compressed, as with all fracture fixation.
acetabular revisions can be performed using a metal-backed cup
supplemented with screw fixation. These cups can sometimes be used in
the presence of a discontinuity, often with structural allograft in
conjunction with posterior plating.
superoinferior dimension than in the anteroposterior dimension.
Placement of a hemispherical cup into an oblong defect dictates that
the AP diameter will need to be increased without compromising the rim
integrity. The superior portion of the cup may remain partially
uncovered as a compromise. This is acceptable as long as the cup has at
least 50% contact with host bone. It is important to remember that bone
is sclerotic and more fragile in revision surgery.
usually irregularities in the rim, with areas of protruding bone that
may give a false idea of the cup size. This bone can misdirect the
reaming if you attempt to remove it with progressively larger reamers.
The reamer displaces and destroys good bone.
-
Obtain a rough estimate of the acetabular size using either a reamer or a trial component.
-
Use smaller reamers to ream
irregularities selectively in the rim and in the depth of the cup so
that it more closely matches a hemisphere (Fig. 106.50).![]() Figure 106.50. A:
Figure 106.50. A:
Initial reaming should be done with a reamer much smaller than the
defect. This should be used to ream areas selectively that may
misdirect a larger reamer. B: Using a
reamer that more closely matches the final size will lead to good bone
being lost as you ream away the minor irregularities. -
Once the periphery and depth of the cup
are fairly regular, begin reaming with sequentially larger reamers to
create a true hemisphere. Do not compromise the anterior and posterior
columns in an effort to obtain superior coverage. -
Place a trial component one to two sizes
greater than the last reamer in 40° of horizontal inclination and 20°
of anteversion. This position is optimal but may be unobtainable due to
compromised bone stock. -
Perform a trial reduction, and if
satisfied with the stability, implant the actual component. Mark the
anteversion of the trial acetabular component before removing it. -
Perform necessary cancellous bone grafting. Use the last reamer in reverse to compact the cancellous graft.
-
Check the component size with calipers
and underream by 1 mm. A 2 mm press fit in revisions is sometimes
difficult to obtain owing to the sclerotic nature of the bone. -
Drill screw holes into areas most likely
to provide fixation. The safe zones for screw placement are
posterosuperior and posteroinferior (Fig. 106.51). The most dangerous quadrant is anterosuperior.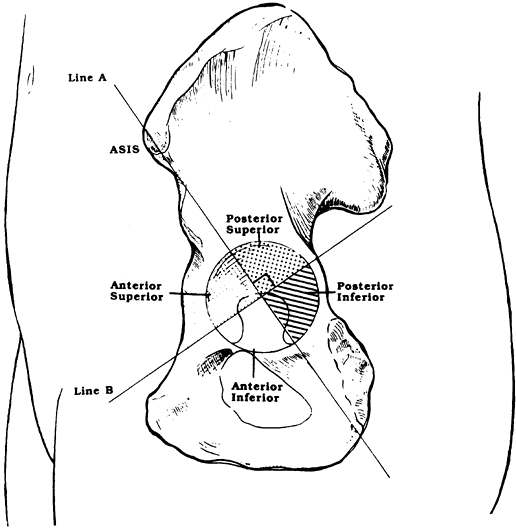 Figure 106.51.
The quadrant system divides the acetabulum, with the safest zones for
screw placement being posterosuperior and posteroinferior. -
Check the position of the cup and if satisfied proceed with screw fixation.
-
Do not tighten any screw fully until all are in place or the cup position can be altered.
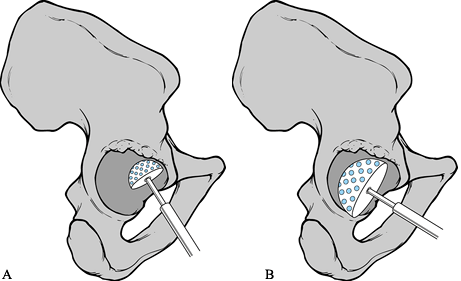
restrict weight bearing to less than 50% of body weight for a minimum
of 6 weeks. Extend this period if there are concerns about the
stability of the construct. If structural graft has been used on the
acetabulum, then extend restricted weight bearing to 12 weeks.
Depending on the type of graft, the type of fixation and the component
used, weight bearing may be restricted up to 1 year although this is
rarely required. Weight bearing is usually restricted for 6 weeks after
cancellous grafting. The extended trochanteric osteotomy does not
change postoperative management.
dislocation. Patients are educated about hip precautions, and these
warnings are reinforced at each follow-up period. Patients are also
placed in a Newport (hip spica-type) brace whenever they are out of bed
(Fig. 106.52). In patients who have
demonstrated instability, the brace is kept on 24 hours a day for a
minimum of 6 weeks. The restricted motion allows for soft-tissue
healing and muscle strengthening, thus reducing the chance of
dislocation. Postoperative management is otherwise comparable to
primary arthroplasty.
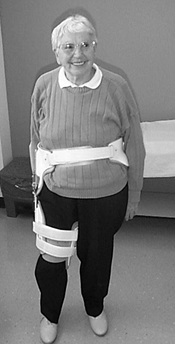 |
|
Figure 106.52. Patient with Newport (hip spica-type) brace to limit range of motion and decrease chance of dislocation.
|
patients routinely losing 1 to 2 L. The use of nonautologous
transfusion can be limited by several methods. Predeposit autologous
blood involves the collection of 1 to 4 units of blood from the patient
before surgery over a period of several weeks. This blood is then
available for tranfusion postoperatively. This technique has reduced
the need for nonautologous blood significantly. One study demonstrated
a need for nonautologous donation in 71% of patients who did not
predeposit and only 8% in those that did (110).
Another preoperative method of reducing nonautologous transfusion is
the use of erythropoeitin. At present, this method is being used on a
restricted basis for orthopedic procedures with several ongoing studies
(26). Goldberg et al. found that in those
patients that did not predonate the use of erythropoetin reduced the
need for nonautologous transfusion from 54% to 17% (36).
and spinal anesthesia have demonstrated lower rates of intraoperative
blood loss than general anesthesia (45,92).
These regional anesthetic techniques should be used whenever possible.
Intraoperatively, blood can be salvaged by washing and anticoagulating
aspirated blood, which can be given back to the patient, decreasing
transfusion requirements. This procedure should be performed routinely
on revision surgeries (105). Postoperative
reinfusion of blood collected in drains also salvages lost blood;
however, this blood is not washed. This blood can be given back to the
patient, although some surgeons have reservations about this technique
due to possible contaminants such as fat.
Injuries occur most commonly from placement of retractors over the
anterior brim of the acetabulum, where the femoral artery is
vulnerable. Injury can also occur during screw placement, with the
greatest danger being anterosuperior, where the external iliac vessels
are at risk, and anteroinferior, where the obturator vessels are at
risk (Fig. 106.51) (48,74).
Screws should ideally be placed in the posterior half of the acetabulum
where there is less risk of vascular injury and the screw fixation is
superior.
This higher rate of injury associated with revision procedures may be
due to several reasons. Direct injury to the nerve is possible from the
use of screws, cerclage cables, or the prolonged use of retractors.
Also, there is more scar tissue, which may tether nerves, predisposing
the nerve to traction injury. Acute limb lengthening of greater than 4
cm has been associated with increased risk of neural injury, with the
peroneal division of the sciatic nerve most at risk (41).
It is important to plan the revision so that the limb lengthening is
limited to 4 cm or less. Hematoma formation can also cause nerve
compression and delayed palsy, and if hematoma is suspected, it should
be decompressed (98).
more than 25 mm (1 inch) beyond normal can lead to back or knee pain
and increase the risk of neurologic injury. At times, lengthening is
required to ensure hip stability. This should be discussed with the
patient preoperatively to avoid dissatisfaction postoperatively.
Careful preoperative planning and patient education can avoid this
problem or diminish its effects.
There is little conformity in the prophylaxis of deep vein thrombosis
(DVT), with some patients receiving chemical or mechanical prophylaxis
and others receiving nothing. In North America, a compression device is
usually combined with heparin, low-molecular-weight heparin, warfarin,
or aspirin. Each seems to provide protection to the patient, but it is
difficult to determine which is the most effective with the fewest side
effects. The incidence of fatal pulmonary embolism after primary total
hip arthroplasty is 0.35% (54,59).
For large DVTs that form above the knee, treatment should consist of
heparinization, followed by 3 to 6 months of warfarin anticoagulation.
Thrombi that form distal to the knee can be left untreated with
clinical and Doppler follow-up after 1 week to assess for progression
(see Chapter 5 and Chapter 7).
The higher rate of dislocation can be attributed to several factors:
integrity of the soft-tissue envelope in the revision setting, altered
abductor attachments, the extensile exposures that are required, and
the occasional need for nonanatomic component positioning. Dislocation
rates have been linked to gender, with women having almost twice as
many dislocations as men. Age, gender, and surgical approach are
significant risk factors that are not unique to the revision setting.
The most common cause of dislocation in both the primary and revision
setting is component malposition, most frequently the acetabular
component. Kahn et al. (47) examined recurrent
dislocation and found that in 50% of patients, it was due to inadequate
anteversion of the acetabulum. The surgeon should also be aware of
impingement of the femoral neck on scar tissue anteriorly or on the cup
posteriorly. This should be evaluated carefully during surgery. The
possibility of impingement is increased when a small diameter femoral
head is used with a larger diameter prosthetic neck. Longer neck length
femoral heads with a collar that fits over the Morse taper are often
required in revisions to obtain stability. The collar may impinge on
the femoral neck. Most dislocations occur in the immediate
postoperative period. If early dislocation can be avoided, the hip
muscles become stronger and a pseudocapsule forms, making dislocation
more difficult. All of our patients who have undergone revision surgery
are braced in a hip spica-type Newport brace that is worn whenever the
patient is out of bed for the first 6 to 8 weeks. The most important
factor in preventing hip dislocation is patient compliance. Patients
must be educated as to safe and unsafe positions and be provided with
any aids such as grabbers that may prevent an unsafe position.
surgery is somewhat higher than in primary arthroplasty owing to the
increased exposure required, especially when the abductors are stripped
from the ilium. Routine prophylaxis with radiotherapy is not required.
Patients who have demonstrated previous heterotopic ossification are
irradiated within 72 hours of surgery with 1 dose of 800 centigrays (80). Indomethacin has been shown to be effective in a once-daily dose for 2 weeks (90).
However, nonsteroidal medications interfere with bone ingrowth, and
therefore, many surgeons hesitate to use them in the presence of
porous-coated components, bone grafts, or osteotomies, although a
specific adverse effect on arthroplasties has not been documented (103).
Most orthopaedic surgeons specializing in either adult reconstructive
surgery or pediatric orthopaedics, even after many years of practice,
may have performed only one or two in their career. The vast majority
of residents completing training have not performed a hip arthrodesis,
let alone having seen one.
arthrodesis of the hip was fairly common because there were few other
alternatives available for severe incapacitating arthritis of the hip.
With the development of total hip arthroplasty in the 1960s, the
indications for arthrodesis of the hip decreased dramatically. Equally
as important, the prevention of severe long-term disabling disease of
the hip has improved substantially because of increased awareness on
the part of primary care physicians and orthopaedic surgeons of
developmental dysplasia of the hip, slipped capital femoral epiphysis,
and infections in the hip. In developed countries, the severe sequela
of these disorders is now being prevented. Equally as important,
treatment for these disorders has improved substantially, thus avoiding
the worst long-term consequences. Other operations
developed
in the last 30 years of the twentieth century, such as
intertrochanteric and periacetabular osteotomies, provide an excellent
alternative for young persons with symptomatic arthritis of the hip
(see Chapter 104).
The development of microvascular surgery and free bone transplant
during this same period of time now provides an alternative for the
treatment of avascular necrosis of the femoral head, as discussed in Chapter 125.
In underdeveloped countries, arthrodesis of the hip is performed more
commonly because the sophisticated procedures discussed in the previous
paragraph are not readily available and the causes of severe disabling
disorders of the hip differ, in that infection and paralytic diseases
such as poliomyelitis are much more common.
armamentarium of the adult and pediatric reconstructive orthopaedic
surgeon. This is because a total hip arthroplasty has not yet proven to
have a sufficient life span in young active people that the procedure
is justified unless the patient is willing to face the uncertainties of
early revision arthroplasty and eventually either a resection
arthroplasty or arthrodesis (14). In spite of
their uncertain future, many patients still elect to undergo total hip
arthroplasty rather than arthrodesis because of their unwillingness to
accept the functional limitations of a fused hip.
Hip arthrodeses can be classified into three main categories:
intra-articular, extra-articular, or combined intra-articular and
extra-articular. Other distinguishing characteristics of hip fusion are
whether or not postoperative immobilization in a spica cast is required
or whether rigid internal fixation that eliminates the need for cast
immobilization is used, whether subtrochanteric osteotomy is performed,
and whether muscle pedicle bone grafts are used. Extra-articular
arthrodeses were developed in the early part of the twentieth century
to treat joint infections such as tuberculosis. This is because the
extra-articular arthrodesis avoided invading the infected area and
arthrodesis of the joint combined with other medical treatment often
resulted in resolution of the infection. Albee (4,5) and Maragliano (33) described the earliest extra-articular arthrodeses in the 1920s, and Brittain (12,13)
introduced his ischiofemoral arthrodesis in the 1940s. Because these
early arthrodeses were performed without internal fixation and used
spica cast immobilization, prolonged periods of immobilization were
required and nonunion was common. Farkas (23)
in 1939 introduced the concept of a subtrochanteric osteotomy below the
hip fusion, which prevented direct transmission of forces to the hip
fusion by movement of the extremity through the long lever arm of the
femur and lower extremity. Abbott and associates (1,2,3)
further refined this technique, introducing the concept of arthrodesis
in wide abduction, followed by secondary subtrochanteric osteotomy to
reposition the limb for difficult cases. Watson-Jones (49,50) introduced the use of internal fixation for arthrodesis of the hip as early as 1938. Charnley (17)
attempted to improve the success rate by centrally displacing the
femoral head into the medial pelvis, combining this procedure with
compression screw fixation in an attempt to increase stability. To
increase the success rate further, Davis (19,20)
used a muscle pedicle bone graft harvested from the anterior ilium to
bridge across the hip joint to facilitate early consolidation. This has
been modified by Ranawat et al. (39) with a
particular goal of avoiding injury to the hip abductor musculature in
order to provide optimal circumstances for eventual conversion of the
arthrodesis to total hip arthroplasty in later life. Truly rigid
fixation was used by Müller (35,36). This procedure was refined by Schneider (42),
who introduced the cobra-head plate and pelvic osteotomy. These items
resulted in one of the most stable arthrodesis constructs available
today, which generally does not require any external immobilization.
Murrell and Fitch (37) have modified this
fusion to preserve the abductors for later conversion to total hip
arthroplasty. The original description by Schneider (42) essentially sacrificed the abductors, precluding successful conversion to a total hip prosthesis. Kostuik and Alexander (29,30)
modified Schneider’s arthrodesis for failed hip arthroplasty in cases
in which there is substantial loss of bone stock by using the
cobra-plate in combination with an anterior plate producing a
double-plate reconstruction. Matta (34) has
advocated an anterior approach using an anterior compression plate to
optimize conditions for conversion to a total hip arthroplasty but
mixed results (11) have not led to its wide
adoption as a technique at this time. Other types of fixation have been
advocated to improve the union rate or avoid injury to the abductors,
including insertion of a compression hip screw across the hip joint
into the pelvis (38), intramedullary nail fixation from the ilium into the femoral shaft (6), and augmentation of internal fixation with iliofemoral external fixation (48).
primary total hip arthroplasty, and it has a more difficult
postoperative course of treatment because of the time required for
consolidation of the arthrodesis. For that reason, arthrodesis is the
procedure of last choice for disabling disease of the hip other than
resection arthroplasty. Be certain that the patient has had a full and
an adequate regimen of nonoperative treatment and that other procedures
that would preserve better function such as osteotomies
above or below the hip joint have been considered and rejected as feasible, or have failed.
person younger than 40 years of age, usually a laborer or individual
who places high demands on her hip, with severe disabling involvement
of one hip, normal health, and no impairment of function in the
thoracolumbosacral spine or ipsilateral knee. The most common
indication is posttraumatic degenerative arthritis, and the second is
the sequelae of septic arthritis. Other indications are avascular
necrosis or cartilage necrosis in the young adult and tuberculosis of
the hip, which is rare in developed countries today. Women are less
likely to accept arthrodesis, but arthrodesis is compatible with sexual
function and vaginal childbirth. The gait pattern of patients with
unilateral hip fusion is characterized by increased compensatory motion
in the lumbar spine and in the ipsilateral knee, decreased gait
velocity, decreased stride length, decreased cadence, and asymmetry of
gait (8,24). Barnhardt and Stiehl (7)
followed six patients who had an arthrodesis at an average age of 30.8
years for an average follow-up of 11.7 years. All patients who were
working at the time of arthrodesis returned to work, but all complained
of low back pain; all had impaired ambulation due to ipsilateral knee
pain; and five of the six believed that their sexual function was
impaired. This points out the importance of a thorough workup of the
spine and both lower extremities to be certain that the joints above
and below the hip fusion are as close to normal as possible. Patients
must be warned as they become older that some low back pain and
ipsilateral knee pain is expected. Incapacitating back pain is the most
common reason for subsequent conversion of an arthrodesis to a total
hip arthroplasty.
impaired function in the lumbosacral spine and ipsilateral knee,
systemic disease such as rheumatoid arthritis or lupus erythematosus,
and active pyogenic infection in the hip. Relative contraindications
are an occupation that requires prolonged sitting and extreme obesity.
Contralateral hip disease is a relative contraindication; however,
total joint arthroplasty on one side and arthrodesis on the other is an
acceptable combination for some patients. Poor bone quality because of
osteoporosis or metabolic bone disease and major bone loss due to
tumors, infection, or revision arthroplasty are associated with a much
higher incidence of nonunion, failure, and disability due to shortening
of the limb.
satisfaction. Most young patients today who are candidates for
unilateral hip arthrodesis are reluctant to accept the procedure
because of the superb short-term results of total hip arthroplasty. It
is important to have patients who have undergone a hip fusion available
who are willing to talk to candidates for fusion because this is the
best way to demonstrate the capability of a hip fusion in activities of
daily living and gain an understanding of its positive and negative
aspects. Sometimes, placing the patient in a removable orthosis with a
locked hip hinge or a pantaloon-type hip spica cast will give him or
her a better feeling for its limitations and whether or not they
receive relief by immobilization.
be certain that the patient meets the indications for the procedure and
has no contraindications as described earlier. Radiographs of the
ipsilateral knee are unnecessary if the patient is asymptomatic and the
examination is normal. Obtaining an AP and lateral radiograph of the
lumbosacral spine is wise, even in asymptomatic patients with a normal
examination to rule out occult spinal conditions that might be
aggravated by a hip fusion. The focus of preoperative planning
otherwise is on the exact technique of fusion to be used. This depends
on the patient’s bone quality, history of previous surgeries (which may
affect the choice of surgical approach), and the condition of the hip
as far as whether its configuration is fairly normal or there is
pre-existing bone loss, shortening, or other considerations that may
require specialized techniques to ensure fusion or regain some leg
length.
position of the arthrodesis, which is important to optimize function
and minimize and delay both the incidence and the severity of
subsequent low back and ipsilateral knee pain. Recommendations for
positioning of the arthrodesis have varied from 20° to 45° of flexion,
10° of adduction to 10° of abduction, and neutral to 20° of external
rotation (9). Benaroch et al. (8)
found in 13 adolescents, who were operated on at an average age of 15.6
years at an average of 6.6 years follow-up, some adduction drift in the
fusion. The lowest incidence of low back pain occurred when their
fusion was between 20° to 25° of flexion, less than 2 cm short, and in
0° of abduction. Based on my personal experience and a consensus of the
literature, I suggest placing the hip in 20° of flexion and neutral
abduction, and placing the foot in the plane of the progression of gait
to match the opposite normal side, which is usually 0° to 10° of
external rotation.
high union rate is achieved by resecting any necrotic bone and ensuring
that well-vascularized bone of the femoral head and acetabulum are in
apposition, maximizing the cancellous bone surfaces in contact, using
rigid internal
fixation, and when necessary, augmenting fusion with an iliac crest bone graft or a vascularized muscle pedicle graft, or both.
young adults and the incidence of subsequent low back pain seems to be
significant, the need for conversion to total hip arthroplasty once the
patient is older than 60 years of age is quite high. For that reason,
use a technique that preserves the function of the hip abductor muscles
as well as other important motors about the hip.
of good quality bone, it should be possible to avoid any external
immobilization. It is wise to have patients use crutches until the
fusion is solid but the lack of an orthosis or spica cast enables them
to rehabilitate quickly and keep unaffected joints and muscles in good
condition.
simple intra-articular fusion technique combined with internal fixation
and postoperative external support with a single spica or mini-spica
cast (14,38).
-
Position the patient on a fracture table, placing the foot in the foot holder on the traction device for the table.
-
Expose the hip joint through a standard Watson-Jones approach (see Chapter 3). Detach the anterior third of the gluteus medius insertion into the greater trochanter to facilitate exposure of the hip.
-
Next, externally rotate the hip and flex
it to place the capsule on stretch and to relax the femoral nerve and
vessels to keep them away from the operative field. Detach the
reflected head of the rectus femoris from the joint capsule and
separate the psoas from the capsule, if necessary. Place Hohmann
retractors superiorly and inferiorly around the capsule to facilitate
exposure. -
Incise the anterior capsule in line with
the femoral neck, and then perform a sufficiently large anterior
capsulectomy that dislocation of the hip anteriorly is possible. -
Have a nonsterile assistant remove the
foot from the foot holder and place the leg into a figure-of-four
position, which facilitates dislocation of the hip. Complete
capsulectomy is sometimes required to mobilize the femoral head and to
obtain access to the acetabulum. -
Holding the femoral head out of the way,
totally debride the acetabulum down to bleeding cancellous bone. Begin
with sharp long curets to remove the cartilage and soft tissue and then
ream the acetabulum with a debris retaining reamer (Fig. 106.53).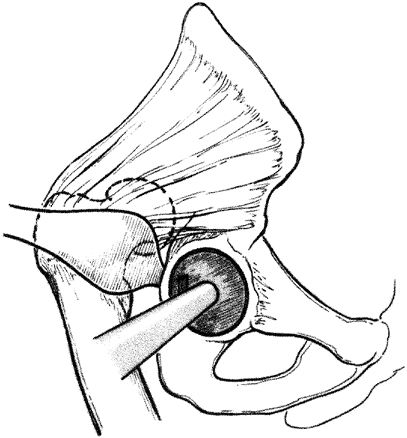 Figure 106.53. Dislocate the hip and ream the acetabulum with debris-retaining reamers.
 -
Next clean the femoral head of soft
tissue and cartilage with curets and ream it into a spherical shape
down to bleeding cancellous bone using spherical female reamers, such
as those used in surface replacement (Fig. 106.54). Using reamers with similar diameters on the acetabulum and femoral head ensures a more congruous fit.![]() Figure 106.54.
Figure 106.54.
Debride the femoral head down to bleeding cancellous bone using a
surface replacement femoral reamer of a size similar to that of the
acetabulum. -
Now reduce the femoral head into the
acetabulum, place the foot back into the foot holder on the fracture
table, and place the hip in 20° of flexion, neutral abduction, and
slight external rotation (0° to 10°). -
Verify the correct position with AP and
lateral radiographs. The width of field available on the typical
fluoroscope is usually inadequate to judge alignment, so use large
radiographic plates. Proper flexion can be maintained by using
appropriate table attachments or by placing a crutch beneath the distal
thigh to prop the hip into flexion. -
The fit of the femoral head into the
acetabulum is usually somewhat loose; therefore, pack any available
space with cancellous bone chips acquired from the reamings. -
Ensure that the hip is in proper position
and internally fix the proximal femur to the acetabulum with a
compression hip screw, using a side plate of 135° to 140° with three to
four screws in the side plate. -
The technique for inserting the hip screw
is identical to that for standard hip fracture fixation except that the
guide pin is inserted across the hip joint into the superior medial
bone of the acetabulum and the compression screw is placed into the
solid bone in the acetabulum.
P.2845
Fix the side plate to the femur and then use the compression screw of the device to apply compression across the joint. -
Insertion of two 6.5 mm cancellous bone screws around the hip screw supplements and improves the fixation.
-
Ensure hemostasis, place a drain at the level of bone, and close the wound in layers in the usual accepted fashion.
-
Apply a sterile dressing and then place the hip into a single hip spica while on the fracture table.
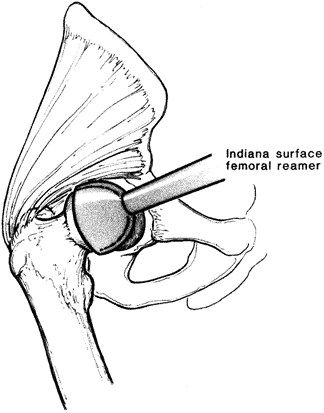
-
When the patient is comfortable, which is
usually by the second or third postoperative day, have physical therapy
stand the patient at bedside and begin walking with assistive devices
supporting the weight of the limb on the floor but allowing no weight
bearing. -
Before hospital discharge, it is usually
wise to change the spica cast because this gives surgeon the
opportunity to check the wound, remove staples or sutures, apply
adhesive wound closures if appropriate, and apply a much more snug,
better fitting cast. -
The home environment requires an overhead frame with a trapeze attached to either a regular or a hospital bed for 3 months.
-
At 8 to 12 weeks after surgery, remove
the spica cast and obtain radiographs to verify maintenance of position
and to check healing. If healing is progressing satisfactorily, at that
time, apply a pantaloon type of mini-spica cast, leaving the extremity
free from the knee distally. -
Then progress weight bearing with
crutches and remove the cast at 12 to 14 weeks if the fusion is
consolidated on radiographs. If there is any question, continue a
pantaloon spica cast or hip orthosis until union is solid. -
Most patients require 5 to 6 months
before unlimited weight bearing is possible. Manual laborers will
require 10 to 12 months before they are able to return to work.
-
Approach the hip through an anterolateral
approach, extending it proximally to expose the inner surface of the
ilium immediately superior to the acetabulum. -
Perform an anterior capsulotomy or
capsulectomy, dislocate the hip, and denude the femoral head and
acetabulum as described earlier for the Cabanela fusion. -
Reduce the hip and place the extremity in
appropriate position for the fusion. Internally fix the femoral head to
the acetabulum by inserting two 6.5 mm cancellous screws with washers
from the inner surface of the ilium across the hip joint into the
femoral head. -
Before tightening the screws to compress the femoral head into the acetabulum, perform a subtrochanteric osteotomy.
-
Postoperative management is similar to that described earlier.
solid fusion in 11 of 13 patients. The two patients with nonunions had
good stability and only mild symptoms.
first described in 1954 the use of a muscle pedicle bone graft in
fusion of the hip. The difficulty with his technique is that it
transfers the origins of the tensor fascia lata and the anterior fibers
of the gluteus medius and minimus, which can significantly interfere
with the function of the hip if later conversion to a total hip
arthroplasty were required. To preserve the function of the abductors,
Ranawat et al. in 1971 (39) described the use
of the anterior ilium containing the origins of the sartorius and
rectus femoris as a muscle pedicle bone graft. If a muscle pedicle bone
graft is needed to ensure healing of a hip fusion, this is now my
preferred technique.
-
Position the patient in the lateral
decubitus position on a fracture table supporting the trunk, pelvis,
and lower extremity in the appropriate position. -
Expose the hip, anterior pelvis, and
proximal femoral shaft through a modified Smith-Petersen approach.
Expose the inner table of the ilium, iliac crest, the anterosuperior
and anteroinferior iliac spines, and the pubic portion of the
acetabular rim. Leave the sartorius and rectus femoris origins intact. -
Next harvest the muscle pedicle bone
graft from the anterior ilium, including the origins of the sartorius
and rectus femoris muscles, as illustrated in Figure 106.55.
Although Ranawat et al. described harvesting the pedicle bone graft
with osteotomes, I prefer an oscillating saw because it minimizes the
risk of fracture of either the graft or the ilium. With the oscillating
saw, transect the ilium 4 cm medial to the anterosuperior iliac spine
(ASIS) and cut inferiorly parallel to the anterior border of the ilium
to enter the acetabulum and then exit anteriorly, including the
anteroinferior iliac spine (AIIS). Reflect the graft inferiorly and
away from the hip joint to avoid injury to the origins of the hip
abductor muscles.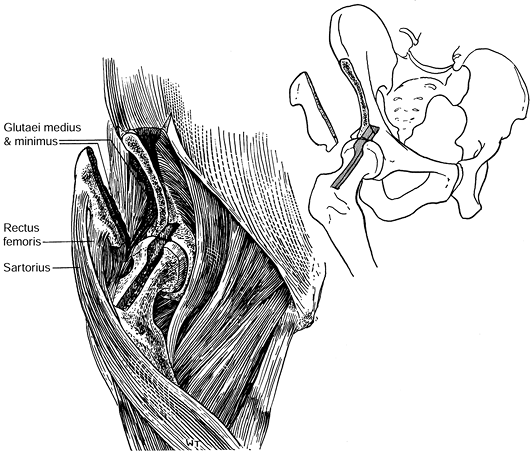 Figure 106.55.
Muscle pedicle bone graft for hip arthrodesis. Remove a 3 to 4 cm wide
portion of the anterior ilium as illustrated, with the origins of the
rectus femoris and sartorius attached. Spare the origins of the gluteus
medius, minimus, and tensor fascia lata. Make a 1.5 cm wide × 1.5 cm
deep trough in the anterosuperior aspects of the acetabulum, femoral
head, and femoral neck, which will receive the graft. -
Place the pedicle bone graft in a moist sponge and retract it laterally to expose the hip joint.
-
Dislocate the hip and prepare it for
fusion, as described for the Cabanela technique. Ranawat et al. do not
recommend dislocation when the patient’s hip is extremely stiff
preoperatively. In that situation, they rely entirely on the internal
fixation and muscle pedicle bone graft to secure union. -
The authors describe fixation of the
femoral head to the acetabulum with Knowles pins or a Smith-Peterson
nail, followed by a subtrochanteric osteotomy of the femur, when
indicated. Most surgeons today would probably use a compression hip
screw for fixation, as described in the Cabanela technique and would
probably not perform a subtrochanteric osteotomy. -
Insert the muscle pedicle bone graft into
this slot, with the rectus femoris origin distally near the
intertrochanteric line. This avoids stretching or twisting the vascular
pedicle. -
Secure the bone graft to the ilium and to
the head of the femur with appropriately sized screws using lag
technique to compress the graft into place (Fig. 106.56).![]() Figure 106.56.
Figure 106.56.
Impact the muscle pedicle graft in the trough across the hip joint,
with the most inferior portion of the graft at the intertrochanteric
line. Fix it into position with an interfragmentary compression screw
using lag technique in both the ilium and femur (not illustrated). -
Close the wound over a suction drain,
being certain to securely repair the abdominal muscles and the lateral
end of the inguinal ligament to the soft-tissue attachments along the
iliac wing. Ranawat et al. then applied a one and one-half spica cast.
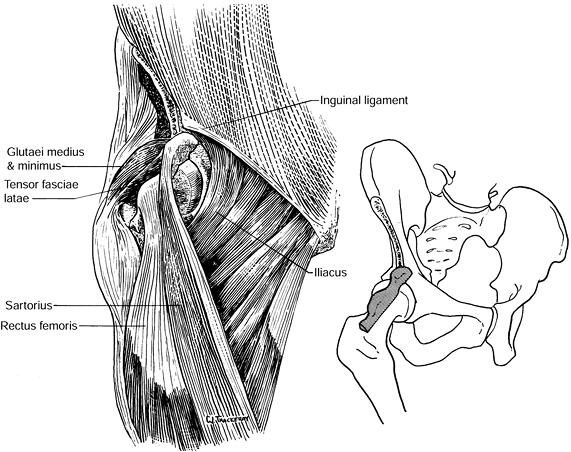
one-half hip spica cast for 6 weeks, and they modified the cast to
allow knee motion at about 6 weeks depending on the stability of the
fusion. In their 10 patients, they performed a subtrochanteric
osteotomy in five. All but one hip fused in a patient who did not have
a subtrochanteric osteotomy, and one subtrochanteric osteotomy went on
to nonunion. For a typical case see Figure 106.57.
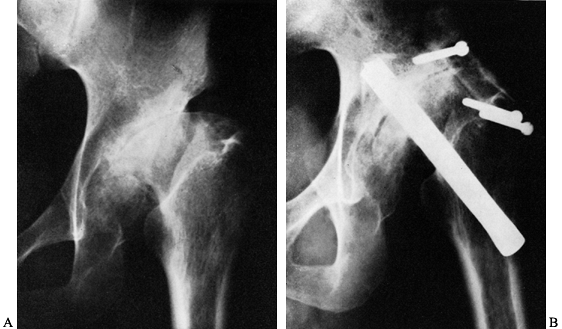 |
|
Figure 106.57. Arthrodesis of a hip using the Ranawat muscle pedicle graft. A: AP radiograph of the left hip with severe degenerative arthritis due to dysphasia of the hip. B:
AP radiograph 3 months after arthrodesis. The pedicle bone graft is fixed with one screw in the ilium and two screws in the neck of the femur. Rather than using the Smith-Peterson nail for the arthrodesis as shown in this case, most surgeons today would use a compression hip screw or multiple compression screws. (From Ranawat CS, Jordon LR, Wilson PD Jr. A Technique of Muscle-pedicle Bone Graft in Hip Arthrodesis: A Report of Its Use in Ten Cases. J Bone Joint Surg 1971;53A:928, with permission.) |
have modified Schneider’s technique to preserve the function of the hip
abductors in the event later conversion to total hip arthroplasty
becomes necessary. The primary disadvantage of this technique and any
technique that uses a plate for fixation is that the end of the plate
becomes a stress riser below the stiff hip and the potential site for
fracture in the event of significant trauma.
-
Position the patient supine on a radiolucent operating table with a bump under the ipsilateral buttock. The
P.2848
authors prepare and drape both lower extremities, including the pelvis,
because this method permits better assessment of leg lengths and allows
a Thomas test to be performed to verify the amount of flexion in the
arthrodesis after temporary fixation. Make a mid-lateral longitudinal
incision beginning 3 to 4 cm distal to the iliac crest extending
directly over the prominence of the greater trochanter to a point 8 cm
distal to the tip of the greater trochanter. -
Incise the fascia lata in line with a
skin incision and place a Charnley retractor. Identify the sciatic
nerve and protect it throughout the procedure. -
Reflect the vastus lateralis off the
lateral intermuscular septum and release its origin and elevate it
medially to expose enough shaft of the femur for application of the
cobra plate. Delineate the anterior and posterior margins of the
gluteus medius and minimus insertions. -
With an oscillating saw, osteotomize the greater trochanter, as illustrated in Figure 106.58A.
Reflect the trochanter and attached hip abductors superiorly off the
joint capsule and hold them with two large Steinmann pins inserted into
the iliac wing (Fig. 106.58B).![]() Figure 106.58. Murrell and Fitch modification of the AO cobra-plate arthrodesis of the hip. A:
Figure 106.58. Murrell and Fitch modification of the AO cobra-plate arthrodesis of the hip. A:
After exposure of the hip and proximal femur, osteotomize the greater
trochanter, preserving the attachments of the hip abductors to the
trochanter. B: Reflect the greater
trochanter and attached gluteus medius and minimus superiorly, exposing
the supra-acetabular area by subperiosteal dissection. Maintain the
retraction of the greater trochanter with two Steinmann pins inserted
into the ilium. Expose the lateral acetabulum from the sciatic notch
posteriorly to the iliopectineal imminence anteriorly and place two
blunt Hohmann retractors to protect the soft tissues anteriorly and the
sciatic nerve and gluteus vessels posteriorly. The line of the
osteotomy through the ilium is illustrated. C:
Displace the distal acetabular fragment and femoral head medially,
approximately the width of the ilium at the site of the osteotomy, and
temporarily fix a nine-hole cobra plate to the lateral aspect of the
ilium, just above the osteotomy, and to the shaft of the femur, using
the AO tensioner. Apply compression after the desired position of the
hip has been obtained. D: Complete the
fixation by securing the cobra plate to the ilium with six screws and
to the neck and the shaft of the femur distally with six screws.
Reattach the greater trochanter in an anatomic position with a screw
and washer. (Washer is not shown). E:
Lateral view of the fixation. (From Murrell GA, Fitch RD. Hip Fusion in
Young Adults, Using a Medial Displacement Osteotomy and Cobra Plate. Clin Orthop 1994;300;147, with permission.) -
Complete the exposure with a capsulotomy
of the hip. The hip capsule can be excised as necessary to gain
exposure. Elevate the periosteum off the outer table of the iliac wing
to the sciatic notch posteriorly and to the ASIS and AIIS anteriorly.
Place blunt Hohmann retractors in the sciatic notch to protect the
sciatic nerve and superior gluteal vessels and a second retractor
anteriorly over the iliopectineal eminence. -
With an oscillating saw, make a
transverse osteotomy of the ilium from lateral to medial, extending
from the iliopectineal eminence to the sciatic notch at the superior
edge of the acetabulum, taking an 0.5 cm wafer of bone from the
superior pole of the femoral head. Do not cut completely through the
ilium with the oscillating
P.2849
saw, but complete the osteotomy with an osteotome to avoid cutting intrapelvic neurovascular structures. -
Remove cartilage and sclerotic cortical
bone down to bleeding cancellous bone from the acetabulum and the
superior half of the femoral head using curets and osteotomes. -
Reduce the femoral head into the
acetabulum, and displace the femur and the distal portion of the
acetabulum medially for a distance equal to the full thickness of the
ilium at the osteotomy. Facilitate this procedure by placing a curved
blunt instrument such as Hohmann retractor into the osteotomy to level
the distal pelvis distally. -
Temporarily secure the cobra-plate with
one screw in the proximal fragment and the compression screw in the
femur, as illustrated in Figure 106-58C. -
To confirm proper position of the hip
fusion, remove the bump under the hip and insert Steinmann pins into
the right and left ASIS. Or simply palpate the ASISs to be certain that
the limb is positioned into neutral abduction or adduction. Determine
the position of rotation, which should be 0° to 10° by noting the
position of the patella and malleoli relative to the ASIS. With the
patient lying flat on the table, the hip will normally be in
approximately 20° flexion. This can be confirmed with a radiograph.
Before completing the fixation, take AP and lateral radiographs,
including the entire pelvis on the AP view, to confirm position. Use a
Thomas test to be certain that the position of the hip in flexion on
the operated side is correct. -
Once you are certain that the position is
good, compress the hip with the AO tensioner and secure the plate to
the ilium above and femur below by filling the remaining screw holes
with bicortical 4.5 mm cortical screws. Secure the greater trochanter
in anatomic position, as seen in Figure 106.58D and Figure 106.58E
by drilling a hole through the middle of the trochanteric fragment and
securing it back into position using a screw and washer inserted
through the appropriate hole in the cobra plate. Pack cortical
cancellous bone obtained from the debridement of the hip around the hip
joint and take final radiographs to verify the position of the fusion
and fixation. -
Thoroughly irrigate the wound, place drains, and perform a layered closure.
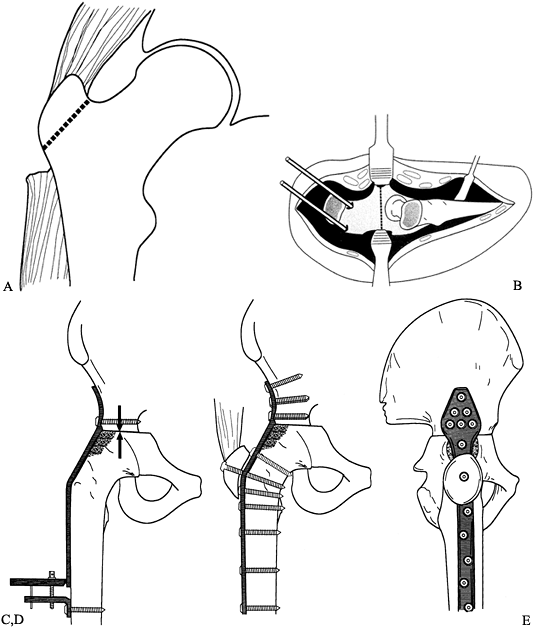
-
Encourage patients to be out of bed and
bear partial weight as soon as they are comfortable and no later than
the second or third day after surgery. -
Continue partial weight bearing to the
weight of the limb with two crutches for 6 weeks. Early motion and
gentle muscle rehabilitation can begin for unaffected joints. -
Radiograph the hip at 6 weeks and then at
6-week intervals until solid union is evident, which is usually around
12 to 14 weeks postoperatively. At that time, progress the patient to
full weight bearing as tolerated.
patients operated on at an average of age 17 years with a follow-up
interval from 1 to 4.5 years. All eight hips went on to union, with no
significant complications. The mean preoperative Harris hip score was
45 points, and the average at follow-up was 84 points. The average
shortening of the operated limb was 2.6 cm, with a range of 0 to 4.7
cm. A typical patient is seen in Figure 106.59.
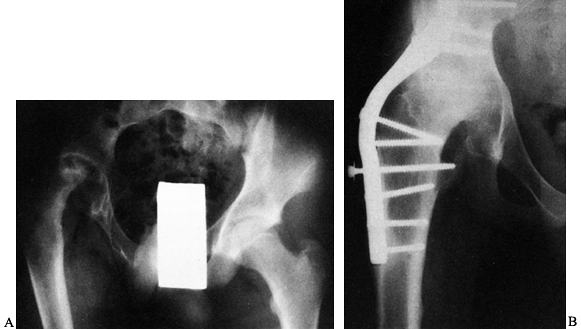 |
|
Figure 106.59. A:
Preoperative radiograph of a 13-year-old boy with a severely painful, stiff, adducted hip and leg length discrepancy of 4 cm, secondary to slipped capital femoral epiphysis (SCFE) with avascular necrosis of the femoral head. B: AP radiograph showing solid fusion of the hip. The patient had a 7 cm leg-length discrepancy, which was equalized with Ilizarov femoral lengthening. (From Murrell GA, Fitch RD. Hip Fusion in Young Adults, Using a Medial Displacement Osteotomy and Cobra Plate. Clin Orthop 1994;300:151, with permission.) |
cobra-plate arthrodesis of the hip, the pelvic osteotomy and extensive
surgery in the abductor mechanism will no
doubt
compromise eventual function of the abductor mechanism if a total hip
arthroplasty is performed. Matta described a technique using anterior
plate fixation to avoid any interference with the hip abductors.
-
Position the patient supine on a radiolucent operating table.
-
Through a Smith-Peterson approach (see Chapter 3)
expose the hip joint, proximal femoral shaft, and the inner pelvic brim
by taking down the sartorius origin and reflecting it medially with the
iliopsoas. Avoid dissection on the outer wall of the ilium in the
region of the hip abductors. -
Dislocate the hip anteriorly and prepare
it for intra-articular arthrodesis as described for the Cabanela
fusion. Relocate the hip, and fix it in appropriate position using
multiple 6.5 cancellous screws inserted from the prominence of the
greater trochanter up the femoral neck across the hip joint into the
acetabulum. -
With an osteotome or oscillating saw,
make a slot on the iliopectineal eminence on the anterior border of the
acetabulum and partially into the femoral head to accommodate an AO 4.5
mm broad plate. Use a template to delineate the configuration of the
anterior aspect of the femur through the slot and up the inner wall of
the ilium along the iliopectinate line. Select a broad plate long
enough to obtain at least four bicortical screws of fixation in the
ilium above the hip and in the femur below the hip. This will provide
three or four holes in the plate for fixation across the hip joint.
Bend the plate to fit. It is important to have the slot on the anterior
aspect of the pelvis deep enough that extreme bends in the plate are
avoided. -
With bicortical 4.5 mm cortical screws,
secure the plate to the femur, hip joint, and ilium. In the region of
the hip, avoid hitting the screws already in place and run the screws
from anterior to posterior in a bicortical fashion, taking care to
avoid injury to the sciatic nerve. Superiorly, it is important to have
the plate along the iliopectinate line because the pelvis is fairly
thick in this area, offering excellent screw purchase. If the plate is
positioned more laterally on the wall of the ilium, the bone is
sufficiently thin that fixation will not be secure. -
Close the wound over drains and treat the patient postoperatively as described earlier for the cobra-plate arthrodesis.
arthrodesis in 16 patients followed for an average of 4.5 years after
surgery. Of 11 patients undergoing primary fusion, five (45%) did not
heal. More important, five patients undergoing repeat fusion for a
previously failed surgical arthrodesis did not heal. They concluded
that anterior plate fixation alone was inadequate in patients with
limited bone stock, and I would agree. The anterior plate must be
combined with intra-articular arthrodesis and intra-articular
compression fixation at right angles to the plate to obtain sufficient
stability. It can be combined with cobra-plate fusion for arthrodeses
in the absence of the femoral head, as described below.
common cause of loss of the femoral head and bone stock around the hip
was destruction due to infection. Neglected nonunion of the femoral
neck in conjunction with osteonecrosis of the femoral head can also
result in substantial bone loss. Today, the most common cause of loss
of the femoral head and bone stock is failure of total hip arthroplasty.
described arthrodesis of the hip in wide abduction, placing the
proximal femur into the acetabulum to achieve arthrodesis. Patients
were treated in a spica cast in wide abduction, and when the
arthrodesis was solid, they performed a subtrochanteric osteotomy with
bilateral spica cast immobilization to place the limb in functional
position. Because of the staged surgery and prolonged immobilization in
a spica cast, I am not aware that this procedure is being performed
today.
for arthrodesis of the proximal femur to the ischium when the femoral
head was absent. Achieving fusion between the femoral shaft and the
ischium was challenging owing to limited bone stock and the inability
to fix this fusion internally.
-
The technique is performed as described
earlier for the Murrell and Fitch modification of the cobra-plate
arthrodesis with the following modifications: -
After removal of the total hip prosthesis
components from the acetabulum and femur insert the remaining proximal
femoral shaft into the acetabulum and internally fix it with the
cobra-plate. Kostuik and Alexander advocate placing the hip into 5° to
10° of abduction to compensate for the shortening, which in their group
averaged 4.6 cm. The only disadvantage of this method is that it forces
the patient to walk with a constant pelvic tilt. I believe that fusing
the patient in a neutral position and then either using shoe lifts or
equalizing the leg length with an Ilizarov lengthening or closed
intramedullary shortening of the opposite femur, if the patient desires
to have leg lengths equalized, is a better choice. -
Next, harvest an iliac crest bone graft and pack it around the arthrodesis site.
-
Reattach the greater trochanter. If
needed, the trochanter can be fixed across the arthrodesis site to
function as a muscle pedicle bone graft. -
Finally, add an AO broad plate anteriorly, as described above for the Matta fusion.
and the bone is often osteoporotic the authors recommend routine use of
a hip spica postoperatively. They continued this for an average of 3.3
months, at which time it was discontinued and the patient was then
gradually progressed to full weight-bearing using assistive devices.
They reported their results in 14 patients. Of these 14 patients, the
arthrodesis healed in 13. One nonunion occurred in a patient in whom
only the cobra plate was used. With repeat grafting, this nonunion
healed. All patients were ambulatory; three used a cane, and nine
returned to sedentary work.
using compression fixation across broad surfaces of bleeding cancellous
bone, combined with adjunctive fixation and muscle pedicle bone graft
in difficult cases, and protecting the fusion as necessary
postoperatively will minimize the occurrence of complications (18).
Use prophylactic antibiotics routinely. In most cases, previous surgery
will have been performed, which increases the incidence of infection
somewhat. In these cases, do not administer antibiotics until deep
cultures of the bone and soft tissues in the hip are taken and then
institute intraoperative antibiotics. If cultures are positive, treat
the patient with the appropriate antibiotics for 6 weeks
postoperatively. Prophylaxis against thromboembolic problems is
indicated. Nonunion rates of 10% to 35% occurred with older techniques (9,16,44,46). However, modern techniques of arthrodesis, even after failed arthroplasty, have reduced the nonunion rate to 0 to 7% (15,21,28,29,30,37,38,41,47). Malunion is rare today if internal fixation is used (22).
The challenge is determining the position of the hip intraoperatively.
I find that using a fully radiolucent operating table and positioning
the patients supine enhances the changes of obtaining optimal position
for the arthrodesis. The double bean bag technique of Blasier and
Holmes (9) can be adopted for the supine position.
shows a high incidence of patient satisfaction of 70% after 30 years’
follow-up (15,43).
There is little question that the average patient with severe disabling
pain and instability of a hip has improved function after a hip
arthrodesis. Murrell and Fitch (37) showed an improvement in the Harris hip score from 45 points to 84 points in their eight patients. Roberts and Fetto (41),
with 8.5 years of average follow-up in 10 young patients, showed 70%
with good or very good pain relief and 90% with good or excellent
functional results. However, longer term follow-up shows that most
patients develop symptomatic low back pain and ipsilateral knee pain,
which can impair function. This problem can be minimized by achieving
ideal position of the hip fusion. However, in our aging population,
these problems will lead to an increasing incidence of conversion of
hip arthrodesis to total hip arthroplasty. Therefore, techniques that
preserve the anatomic relationships of the hip and protect the abductor
mechanism are important (7,8).
total hip arthroplasty is usually indicated for disabling low back or
ipsilateral knee pain that is not responsive to nonoperative treatment.
Malposition of an arthrodesis that aggravates these problems is also an
indication for THP if an osteotomy to correct the position is not
appropriate. Kreder et al. (31) reported on 40
patients who had an arthrodesis converted to a hip replacement. These
patients had a 10% rate of infection and 10% incidence of revision.
Five percent had the prosthesis removed and went on to resection
arthroplasty owing to infection within 4 years of the conversion. These
results point out that there is a high rate of complications associated
with conversion of a hip arthrodesis to arthroplasty. Patients must be
aware of these potential problems before undergoing conversion. Kilgus
et al. (27) described conversion of 41 fused
hips in 38 patients to a total hip replacement, with an average
follow-up of 7 years. The postoperative arc of flexion averaged 87° and
LLD averaged 2.5 cm. They noted that hip abductor muscle strength
improved for at least 2 years after arthroplasty. The majority of
patients experienced complete or significant relief of pain, improved
mobility of the hip, and decreased dependence on walking aids. In the
41 hips, there were nine failures—four because of sepsis, four because
of loosening, and one because of malposition of the acetabular
component. Survivorship analysis of the prosthesis predicted a
probability of survival of the implant of 96% at 13 years
postoperatively. Rittmester et al. (40)
addressed the issue of total knee replacement for arthritis below a
total hip arthroplasty. Their data suggested that a knee replacement
alone in a patient with a fused hip is not likely to provide a
satisfactory outcome. They recommended conversion of the hip fusion to
a total hip arthroplasty, followed by total knee replacement. The
details of conversion of hip arthrodesis to a total arthroplasty are
discussed in the first section of this chapter.
infrequently. Only in the practices of adult reconstructive hip
surgeons doing large numbers of revision arthroplasties is hip fusion
reasonably common. These procedures are large operations that require
attention to technical details to ensure a high rate union with good
functional position of the hip. I advise all surgeons who perform hip
arthrodesis infrequently to not only read a chapter such as this but
also return to the original articles quoted earlier to refamiliarize
themselves with the important technical details of this challenging
operation. Because my practice is predominantly reconstruction after
the complications of major trauma, most of the arthrodeses I have
performed have been in the presence of pre-existing deformity; loss of
bone stock, particularly in the femoral head and neck; and often after
infection. In undertaking fusion under these circumstances, it is
important to avoid the complication of infection by resolving any
infection preoperatively and avoiding arthrodesis until there has been
an infection-free interval of at least 1 year. Second, take deep
cultures of bone and soft tissues, and treat the patient
prophylactically with antibiotics until cultures return negative. If
cultures are positive, treat the patient with 6 weeks of appropriate
intravenous antibiotics.
to ensure perfect position of the hip arthrodesis in neutral abduction,
20° of flexion, and slight external rotation before prepping the hip. I
confirm this with radiographs before the skin incision. I find this
much easier to do before prepping and draping the patient, and the
double bean bag ensures that the position is maintained at the time of
internal fixation.
techniques. When there is loss of bone substance, I perform an
intra-articular fusion with compression screw fixation across the hip
joint combined with an anterior plate, or I will use the modified
double plate–cobra plate method described by Kostuik and Alexander (30). To this I will add the anterior iliac crest muscle pedicle bone graft (39). I have not used a postoperative spica cast in adults for
20 years because I can usually obtain sufficiently stable fixation that external immobilization is not necessary.
scheme: *, classic article; #, review article; !, basic research
article; and +, clinical results/outcome study.
JD, Jacobs JJ, Tanzer M, et al. The Susceptibility of Smooth Implant
Surfaces to Periimplant Fibrosis and Migration of Polyetheylene Wear
Debris. Clin Orthop 1995;311:21.
OH, Masri BA, Garbuz DS, Duncan CP. Use of Reconstruction Rings for the
Management of Acetabular Bone Loss during Revision Hip Surgery. Journal of the American Academy of Orthopaedic Surgeons 1999;7:1.
JJ, Salvati EA, Pellici PM, et al. Results of Revision for Mechanical
Failure after Cemented Total Hip Replacement, 1979 to 1982. A 2 to 5
Year Follow-up. J Bone Joint Surg 1985:67A:1074.
DC, Albright JA. Current Concepts Review. Clinical Significance of the
Erythrocyte Sedimentation Rate in Orthopaedic Surgery. J Bone Joint Surg 1987;69A:148.
TC, Rubash HE, Shelley FJ, et al. Effect of Superior and Superolateral
Relocations of the Hip Center on Hip Joint Forces: An Experimental and
Analytical Analysis. J Arthroplasty 1996;11:693.
CA, Bobyn JD, Glassman AH. Porous Coated Hip Replacement: The Factors
Governing Bone Ingrowth, Stress Shielding, and Clinical Results. J Bone Joint Surg 1987;69B:45.
PM, Ritter MA, Abels RI. The Effects of Recombinant Human Erythropoetin
on Perioperative Transfusion Requirements in Patients Having a Major
Orthopaedic Operation. J Bone Joint Surg 1996;78A:62.
DD, Capello WN, Callaghan JJ, et al. Salvage of a Recurrently
Dislocating Total Hip Prosthesis with Use of a Constrained Acetabular
Component: A Retrospective Analysis of Fifty-six Cases. J Bone Joint Surg Am 1998;80:502.
MA, McCutchen JW, Jove MD, et al. A Safety and Efficacy Comparison
Study of Two Dosing Regimens of Epoetin Alfa in Patients Undergoing
Major Orthopaedic Surgery. Am J Orthop 1996;25:544.
RP, Callaghan JJ, Sullivan PM, Johnston R. Results of Cemented Femoral
Revision Total Hip Arthroplasty Using Improved Cementing Techniques. Clin Orthop 1995;319:178.
JA, Callaghan JJ, Vandemark RM, Goldner RD. The Relationship of the
Intrapelvic Vasculature to the Acetabulum: Implications in Screw
Fixation of the Acetabular Components. Clin Orthop 1990;258:183.
LR, Jacobs JJ, Tompkins GS, et al. Primary Cementless Acetabular
Reconstruction: Osteolysis and Interface Changes at Seven to Ten Year
Follow Up. Orthop Trans 1995;19:401.
I, Pelkonen P. Routine Analysis of Synovial Fluid Cell Is of Value in
the Differential Diagnosis of Arthrititis in Children. J Rheumatol 1986;13:1076.
OM, Lowbury EJJ, White W, et al. Effect of Ultraclean Air in Operating
Rooms on Deep Sepsis in the Joint after Total Hip or Knee Replacement:
A Randomized Study. Br Med J 1982;285:10.
JR, Callaway GH, Salvati EA, et al. Treatment of the Infected Total Hip
Arthroplasty with a 2 Stage Reimplantation Protocol. Clin Orthop 1994;301:205.
JH, Desai P, DiCesare PE, et al. The Reliabilty of Analysis of
Intraoperative Frozen Sections for Identifying Active Infection during
Revision Hip or Knee Arthroplasty. J Bone Joint Surg 1996;78A:1553.
AL, Lewallen DG, Cabanela ME, et al. Femoral Component Revision Using
an Uncemented, Proximally Coated, Long-stem Prosthesis. J Arthroplasty 1996;11:411.
WJ, Smith RL, Castro F, Schurman DJ. Fibroblast Response to Metallic
Debris In Vitro Enzyme Induction Cell Proliferation and Toxicity. J Bone Joint Surg Am 1993;75:835.
WJ, Herzwurm P, Paprosky W, et al. Treatment of Pelvic Osteolysis
Associated with a Stable Acetabular Component Inserted without Cement
as Part of a Total Hip Replacement. J Bone Joint Surg Am 1997;79:1628.
JP, Moore KD, Culpepper WJ 2nd, Engh CA. Total Hip Arthroplasty with
Porous Coated Prostheses Fixed without Cement in Patients Who Are
Sixty-five Years of Age or Older. J Bone Joint Surg Am 1998;80:1648.
RD Jr, Harris WH. The Effect of Improved Cementing Techniques on
Component Loosening in Total Hip Replacement: An 11 Year Radiographic
Review. J Bone Joint Surg 1990:72B:757.
WF, Harris WH. Revision Total Hip Arthroplasty with the Use of
So-called Second Generation Cementing Techniques for Aseptic Loosening
of the Femoral Component. A Fifteen-year Average Follow-up Study. J Bone Joint Surg 1996:78A:325.
MA, Barger WL, Christie MJ, et al. Mulitcenter Study of Acetabular
Reconstruction Using an Oblong Cup: 2–7 Year Results. San Francisco:
AAOS, 1997.
DA, Harris WH. Failed Total Hip Replacement: Assessment by Plain
Radiographs, Arthrograms, and Aspiration of the Hip Joint. J Bone Joint Surg 1984;66A:540.
DE, Silverman A, Schajowicz F, et al. Efficacy of Intraoperative
Cultures Obtained during Revision Total Hip Arthroplasty. J Arthroplasty 1995;10:420.
WG, Perona PG, Lawrence JM. Acetabular Defect Classification and
Surgical Reconstruction in Revision Arthroplasty. A Six Year Follow-up
Evaluation. J Artrhoplasty 1994;9:33.
VD, Konski AA, Gastel JA, et al. Prevention of Hetertopic Ossification
with Irradiation after Total Hip Arthroplasty. J Bone Joint Surg Am 1992;74:186.
CL, Curtain M, Samuelson KM. Acetabular Revison with the
Burch-Schneider Antiprotrusio Cage and Cancellous Allograft Bone. J Arthroplasty 1995;10:307.
EA, Robinson RP, Zeno SM, et al. Infection Rates after 3175 Total Hip
and Total Knee Replacements Performed with and without Horizontal
Unidirectional Filtered Air-flow Systems. J Bone Joint Surg Am 1982;64:525.
TP, Jasty M, Harris WH. Periprosthetic Bone Loss in Total Hip
Arthroplasty: Polyethylene Wear Debris and the Concept of the Effective
Joint Space. J Bone Joint Surg Am 1992;74:849.
P, Kjaersgaard-Andersen P, Pedersen NW, et al. The Use of Indomethacin
to Prevent the Formation of Heterotopic Bone after Total Hip
Arthroplasty: A Randomized Double-blinded Clinical Trial. J Bone Joint Surg Am 1988;70:834.
KR, Callaghan JJ, Kelley SS, Johnston RC. The Outcome of Charnley Total
Hip Arthroplasty with Cement after a Minimum Twenty Year Follow up. J Bone Joint Surg Am 1993;8:961.
JA, Bordner MA, Hamory BH. Efficacy of the Sterishield Filtered Exhaust
Helmet in Limiting Bacterial Counts in the Operating Room during Total
Joint Arthroplasty. J Arthroplasty 1996;11:469.
DA, Matthews LS, Grady-Barson JC. Infection Around Joint Replacements
in Patients Who Have a Renal or Liver Transplantation. J Bone Joint Surg Am 1997;79:36.
CD, Rosenberg AG, Sheinkopf MB, et al. Revision Total Hip Arthroplasty
Using a Cementless Acetabular component: Technique and Results. Seminars in Arthroplasty 1995;6:109.
Analysis of Preoperative and Intraoperative Studies for the Diagnosis
of Infection in Revision Total Hip Arthroplasties. Presented at the Meeting of the American Academy of Surgeons, San Francisco, CA, 1997.
MS, Masri BA, O’Connell JX, Duncan CP. Prospective Analysis of
Preoperative and Intraoperative Investigations for the Diagnosis of
Infection at the Sites of Two Hundred and Two Revision Total Hip
Arthroplasties. J Bone Joint Surg Am 1999;81A:672
CJ, Wilde AH, Borden LS, Marks KE. A Ten Year Follow-up of One Hundered
Consecutive Muller Curved Stem Total Hip Replacement Arthroplasties. J Bone Joint Surg 1982;64A:970.
M, Drucker D, Jasty M, et al. Revision of Acetabular Components with an
Uncemented Harris Galante Porous Coated Prosthesis. J Bone Joint Surg 1992;74A:987.
K, Callaghan J, Goetz D. Revision of a Failed Cemented Total Hip
Prosthesis with Insertion of an Acetabular Component without Cement and
a Femoral Component with Cement—A Five to Eight Year Follow-up Study. J Bone Joint Surg 1996:78A:982.
PD Jr, Amstutz HC, Czerniecki A, et al. Total Hip Replacement with
Fixation by Acrylic Cement: A Preliminarty Study of 100 Consecutive
McKee-Farar Prosthetic Replacements. J Bone Joint Surg 1972;54A:207.
ST, Milbauer JP, Bobyn JD, et al. Fatigue Fracture of a Forged
Cobalt-chromium Femoral Component Inserted with Cement: A Report of 10
Cases. J Bone Joint Surg Am 1997;79:1842.
LC, Fischer FJ. Arthrodesis of the Hip, with Special Reference to the
Method of Securing Ankylosis in Massive Destruction of Joint. Surg Gynecol Obstet 1931;52:863.
TE, Richards BS, Haideri N, Smith C. Intermediate Follow-up of a Simple
Method of Hip Arthrodesis in Adolescent Patients. J Pediatr Orthop 1996;16:30.
JB, Fagan TE, Beals RK. Follow-up Notes on Articles Previously
Published in the Journal: Muscle-pedicle Bone Graft in Hip Fusion. J
Bone Joint Surg Am 1971;53:1645.
HJ, Williams JI, Jaglal S, et al. A Population Study in the Province of
Ontario of the Complications after Conversion of Hip or Knee
Arthrodesis to Total Joint Replacement. Can J Surg 1999;43:433.
CS, Jordan LR, Wilson PD Jr. A Technique of Muscle-pedicle Bone Graft
in Hip Arthrodesis: A Report of Its Use in Ten Cases. J Bone Joint Surg Am 1971;53:925.