
– JOINT RECONSTRUCTION, ARTHRITIS, AND ARTHROPLASTY > Lower
Extremity > CHAPTER 108 – PRIMARY TOTAL KNEE ARTHROPLASTY
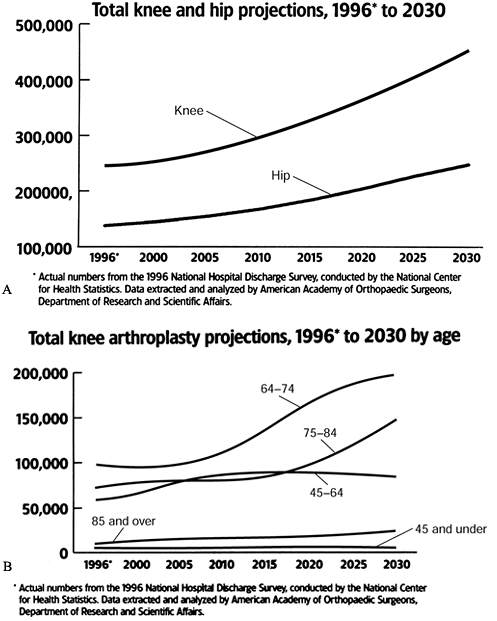
successful and commonly performed orthopedic surgeries. In 1997, a
total of 277,000 knee arthroplasties were performed, reflecting annual
increases in the 1990s of more than 10%. In comparison, only 139,000
total hip arthroplasties (THA) were performed, and the yearly growth is
lower (13) (Fig. 108.1).
Improvements in design, standardization of operative technique,
infection prophylaxis, and fixation techniques have led to extremely
low rates of revision. The best results for TKA at 10 and 15 years
compare to or surpass the best results of THA.
 |
|
Figure 108.1. Total hip and knee arthroplasty projections (A), 1996 to 2030, and total knee arthroplasty projections (B), 1996 to 2030, by age. (From Future Demand for Orthopedic Skills to Soar. AAOS Bull 1999;47:14, with permission.)
|
restoration of normal limb alignment, and restoration of a functional
range of motion. A successful result demands precise surgical
technique, sound implant design and kinematics, appropriate materials,
and patient compliance with rehabilitation. This approach can be
applied to implantation of any well-designed prosthesis.
and resist nonphysiologic motions such as varus or valgus or
supraphysiologic translation. Failure to resist nonphysiologic forces
within design tolerances results in fracture of bone, progressive loss
of fixation, or loss of bone or soft tissue around the prosthesis.
Accurate bone cuts and soft-tissue preparation facilitate the success
of the TKA.
and secondary osteoarthritis of the knee. The next most frequent
indication is rheumatoid arthritis and other arthritic disorders, such
as secondary arthritis from hemophilia and other types of arthropathy.
End-stage arthritis may occur in the knee joints and lower extremities
with normal alignment or may occur in lower extremities with flexion
contractures, hyperextension of the knee, varus or valgus angulation
either through the knee joint or adjacent to it, or rotary
malalignment. These malalignments may be secondary to an underlying
disease process or previous injury and, in part, are due to the
arthritis itself, which can produce angulation through asymmetric
wearing of the knee joint. All of these malalignments must be taken
into consideration when planning for TKA. Indications for TKA include
any arthritic disorder of the knee that is nonresponsive to the usual
nonoperative treatment, including appropriate nonsteroidal
anti-inflammatory or other arthritis medications, occasional bracing,
limitation of activities, and use of assistive devices such as a cane
or crutches. When the patient’s pain is such that he or she can no
longer accomplish his or her required activities of daily living or the
quality of life is such that they are willing to undertake the risks of
major surgery, then TKA may be indicated. It is preferable that
patients undergoing TKA have a remaining normal life expectancy of
between 20 and 30 years so that the need for repeat arthroplasty for a
failed TKA will be minimal. Arthroplasty may be indicated in a younger
age group, but the patient must understand the limitations of the
procedure, be willing to modify his or her lifestyle to prolong the
life of the prosthesis, and be willing to risk the lower success rate
in a revision TKA. Patients undergoing TKA in the vast majority of
cases have significant arthritis involving all three
compartments
of the knee. TKA may be indicated with only unicompartmental or
bicompartmental involvement when less surgically aggressive
alternatives do not provide an adequate solution for the patient’s
problems.
knee, ipsilateral extremity, or elsewhere in the body that would make
the risk of infection in the TKA high; inadequate bone stock due to
osteoporosis or other metabolic bone disease or bone loss that cannot
be replaced with an allograft or a specialized prosthesis; neurologic
disease that would preclude motor control of the knee or lead to a
Charcot knee; and generally poor health or systemic disease that would
made the risk of major surgery and general or regional anesthetic too
risky. Other than performing no surgery, the primary alternative to
TKA, especially when the risk of infection is high, is knee
arthrodesis, which is discussed in Chapter 109.
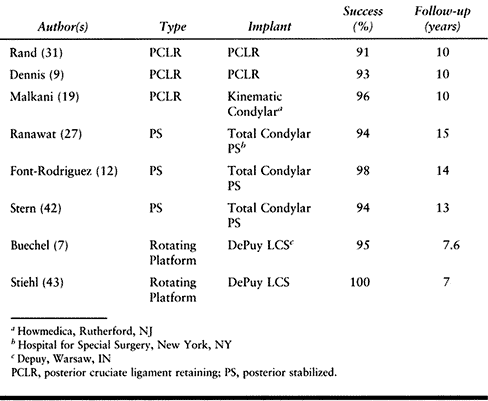
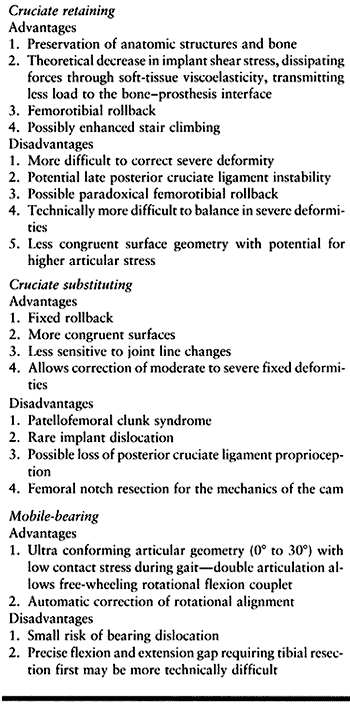
uncomplicated primary TKR today: cruciate-retaining,
cruciate-substituting, and mobile-bearing knees. For more complex
reconstructions in which instability due to ligament failure is
present, nonlinked constrained arthroplasties have been used. (Linked
constrained devices such as “hinges” are rarely used or even
indicated.) All of these arthroplasties are descendants of the
successful Total Condylar knee (Hospital for Special Surgery, New York,
NY), the gold standard for resurfacing types of total knee replacement.
In the best designed of each category, long-term results are excellent
in terms of fixation, function, pain scores, and motion (Table 108.1).
Philosophical differences in kinematics, constraint, and methods of
bony preparation, and subtle differences in postoperative results
underlie the continued development of parallel designs.
 |
|
Table 108.1. Results of Cemented Primary Total Knee Replacement
|
cruciate ligament (PCL) in TKA suggests that with a posterior tether
between the femur and the tibia, stresses bypass the arthroplasty
components, proprioception is maintained (49),
and more normal motion (femorotibial rollback) is preserved.
Preservation of quadriceps power and physiologic rollback may
theoretically result in a more normal gait in walking stairs (2,3). Whether cruciate retention or sacrifice results in an arthroplasty with greater motion
has not been established. The demands of balancing the anatomic
function of the PCL dictate that the normal joint line be closely
restored (24,34),
possibly further improving patellofemoral kinematics. In order to
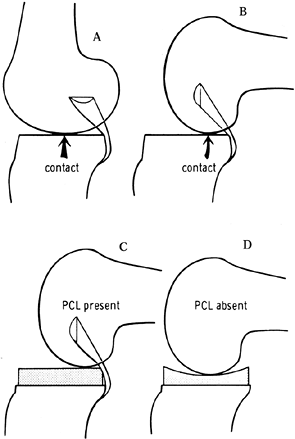
facilitate the femoral rollback, tibial polyethylene components were
historically kept relatively flat (Fig. 108.2)
in the anteroposterior (AP) direction, with a physiologic posterior
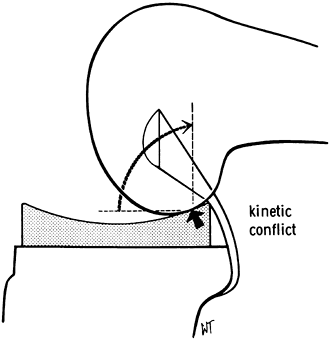
slope. This avoided the “kinematic conflict” of a dished polyethylene,
preventing normal rollback (Fig. 108.3). Although some laxity is necessary to preserve range of motion (46), more anametric posterior cruciate–sparing prostheses depend entirely on the soft tissues to resist posterior translation (20,40,46). Later iterations of cruciate-retaining implants
have added more congruence to the articular polyethylene to improve stability and contact stresses.
 |
|
Figure 108.2. The effect of posterior cruciate ligament (PCL) retention on prosthetic design. Because of the rollback enforced by the PCL (A, B), the prosthetic tibial surface has historically been flat to allow this movement. C, D: When the PCL was absent, a dished tibial plateau has been used. (From Insall JM, ed. Surgery of the Knee, 2nd ed. New York: Springer Verlag, 1991:600, with permission.)
|
 |
|
Figure 108.3.
Kinematic conflict occurs if concepts are mismatched. In this case, the posterior cruciate ligament is preserved using a dished tibial component. Impingement occurs posteriorly with flexion. (From Insall JM, ed. Surgery of the Knee, 2nd ed. New York: Springer Verlag, 1991:600, with permission.) |
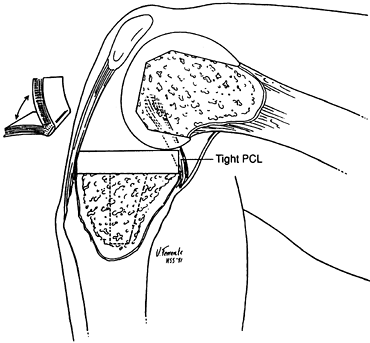
must be kept at or near anatomic height after resurfacing with the
arthroplasty. Failure to do this will result in a tight PCL, which will
produce restricted flexion, excess femur on tibia rollback (so-called
“booking”) (Fig. 108.4), and a high posterior
polyethylene-bearing load, potentially leading to articular failure.
The technical challenge with a PCL-retaining knee design is to realign
the limb and restore full motion while keeping the PCL under proper
tension.
 |
|
Figure 108.4. An overtight PCL causes “booking.” There is excessive rollback of the femur, and the knee hinges open. (From Insall JM, ed. Surgery of the Knee, 2nd ed. New York: Springer Verlag, 1991:602, with permission.)
|
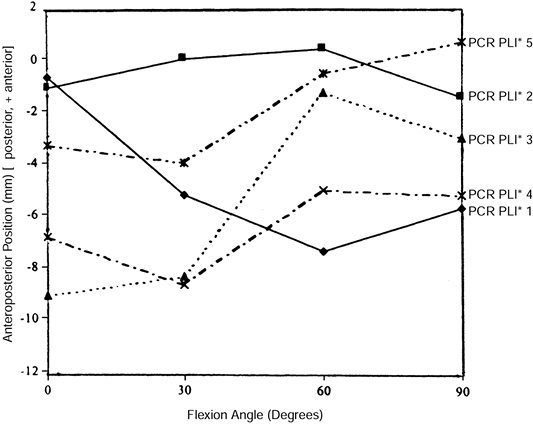
was able to demonstrate normal physiologic tension in only 1 of 10
knees undergoing a posterior cruciate-retaining TKA. Stiehl (44)
fluoroscopically visualized clinically well-functioning PCL-retaining
TKAs and found nonphysiologic AP movement. Some cases demonstrated
“roll forward” rather than “roll back” (Fig. 108.5). Laskin (16), Pagnano (26), and Waslewski (50)
showed clinical evidence of late failure of the PCL with sagittal
laxity. Other authors with large series show no evidence of this
phenomenon (9,19). The
risks of excessive laxity include gait abnormality with eccentric
loading, secondary soft-tissue attenuation, and edge loading with
resultant high contact stresses on polyethylene components. Progressive
weakening or elongation of the PCL and subsequently the capsule and
collaterals could lead to osseous deformity and frank joint subluxation.
 |
|
Figure 108.5.
Medial condyle contact positions for five randomly selected subjects having a posterior cruciate–retaining design with a posterior lipped insert. Note that some knees roll forward and others roll back, and that magnitude and starting points vary. This is a stochastic process. (From Dennis DA, Clayton ML, O’Donnell S, et al. Posterior Cruciate Condylar Total Knee Arthroplasty. Average 11-year Follow-up Evaluation. Clin Orthop 1992;168:52, with permission.) |
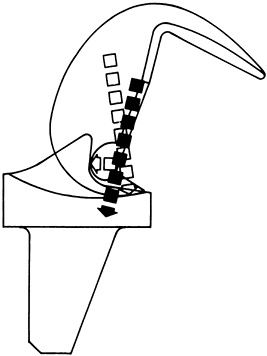
femorotibial kinematics and may facilitate balancing knees with greater
angular deformity, especially when secondary changes in the PCL
contribute to the deformity. The function of the PCL is partially
replaced by using a more congruent articular surface and commonly a
tibial spine and femoral cam mechanism (Fig. 108.6).
Historically, the most popular designs had a higher rate of
patellofemoral complications. Impingement of fibrous tissue proximal to
the patellar component or in the notch can cause “patellar clunk” (48). Patellar pathology may be partially due to the relative elevation of joint line (Fig. 108.7) that can occur using the gap technique of bone
preparation, and the relative patella baja that this produces. The
femoral profile of early models was boxy in the AP plane without
recession of the trochlear groove, increasing tension on the patellar
retinaculum (Fig. 108.8). Recently improved designs more physiologically duplicate patellofemoral anatomy and mechanics.
 |
|
Figure 108.6.
The cam mechanism of the posterior stabilized knee simulates the function of the PCL and causes a rollback of the femur on the tibia with flexion. The resulting vector of forces passes distally through the fixation peg. (From Insall JN, Lachiewicz PF, Burstein AH. The Posterior Stabilized Condylar Prosthesis. A Modification of the Total Condylar Design. Two to Four Year Clinical Experience. J Bone Surg [Am] 1982;64:1317, with permission.) |
 |
|
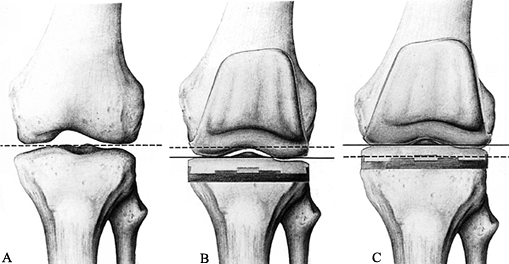
Figure 108.7. Spatial position of the joint line. A: The normal joint line is indicated by the dotted line. B: The joint line has been abnormally lowered (solid line) owing to overresection of the proximal tibia and underresection of the distal femur. C: The joint line has been abnormally elevated (solid line) owing to underresection of the proximal tibia and overresection of the distal femur. (From Laskin RS, ed. Total Knee Replacement. New York: Springer Verlag, 1991:58, with permission.)
|
 |
|
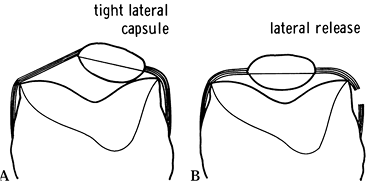
Figure 108.8. Effect of a tight patellar retinaculum: A: A tight lateral capsule causes patellar subluxation and loss of flexion. B: A good lateral release corrects this problem. (From Insall JM, ed. Surgery of the Knee, 2nd ed. New York: Springer Verlag, 1991:646, with permission.)
|
minority of knees in the United States at present, is attracting
interest because of its distinct potential design advantages. These
designs rely on highly congruent femoral and tibial articular surfaces
to produce very low contact stresses, theoretically reducing
polyethylene wear. Allowing the tibial articular surface to “float” by
a combination of gliding, rotating, or sliding mechanisms mitigates the
kinematic conflict created by highly congruent surfaces. Fluoroscopic
information suggests that in vivo kinematics may imperfectly replicate design goals (43).
To date, only one mobile-bearing design (Depuy LCS, Warsaw, IN) has
been approved by the U.S. Food and Drug Administration (FDA) (Fig. 108.9), although there has been considerable early experience overseas with other novel implants.
 |
|
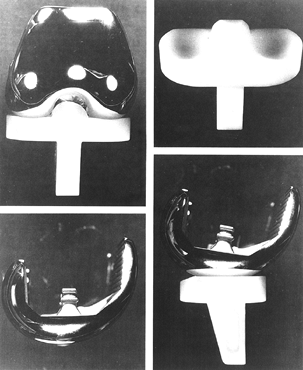
Figure 108.9. The Depuy LCS knee.
|
45% each for cruciate-retaining and cruciate-substituting designs, and
10% for mobile-bearing designs, with the cruciate-substituting and
mobile-bearing designs increasing in popularity. All three implant
types are viable and have proven long-term results. All have
theoretical and practical pluses and minuses (Table 108.2).
 |
|
Table 108.2. Advantages and Disadvantages of Types of Tibial Knee Implants
|
pain and restore normal function to the arthritic knee. The shapes of
the reconstructed femur and tibia, particularly in the sagittal plane,
dictate the kinematics of the reconstructed knee. The soft tissues are
physiologic restraints with limited elasticity. Within the range of
patient sizes and limitations of ligaments, a variety of sizes is
needed. The contours of the articulating surfaces create constraint,
and in some cases, a more constrained articulation can substitute for
ligamentous deficiency.
and fixation interfaces. The main goal of instrumentation is to provide
consistent accurate alignment by referencing from osseous landmarks.
Alignment may be assessed as “anatomic” or “mechanical.” The mechanical
axis of the limb is defined by a line that passes through the hip
center and through the center of the ankle. It typically falls on the
medial side of the center of the knee joint. Although the consistent
reproduction of a mechanical axis that passes through the central area
of the knee is a goal, the landmarks are difficult to measure
accurately in the operating room. Anatomic axis landmarks, by contrast,
are readily available, easy to instrument, and can reasonably
approximate the mechanical axis. Most contemporary arthroplasty
instrumentation references from the anatomic axes. The relationship of
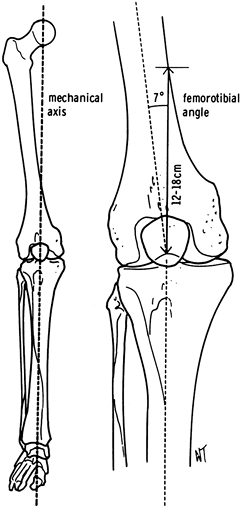
the longitudinal axes of the femur and tibia define the femorotibial
angle or anatomic axis (Fig. 108.10).
 |
|
Figure 108.10.
Comparison of the anatomic and mechanical axes. The mechanical axis usually corresponds to a femorotibial angle of about 7° and intersects the medial femoral cortex 12 to 18 cm proximal to the knee. |
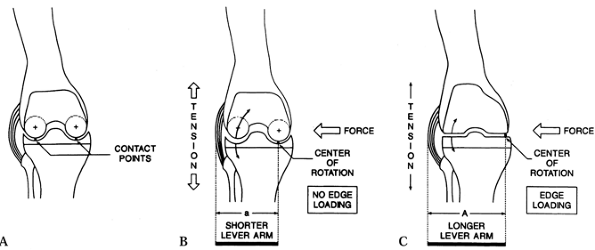
can lead to liftoff of the femoral component on the tibia, with
compressive forces all on one side and tensile forces on the other.
Subtle malalignment can magnify with time as soft tissues attenuate
under excessive forces (Fig. 108.11).
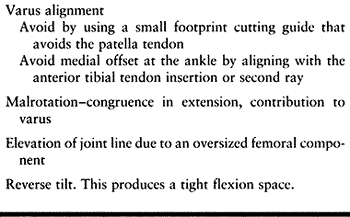
Specifically, varus alignment of the tibial component has been
associated with a higher rate of radiolucency about the prosthesis and
a higher rate of loosening (Fig. 108.12).
 |
|
Figure 108.11.
Edge loading between the femoral and tibial components can occur owing to AP instability or varus valgus forces in a TKA design with a flat tibial bearing surface as shown in C. A: Dished tibial component with central contact points. B: Dished tibial component with varus stress maintains central contact and loading. C: Flat tibial component with varus stress can result in edge loading medially. (From Laskin RS, ed. Total Knee Replacement. New York: Springer Verlag, 1991:92, with permission.) |
 |
|
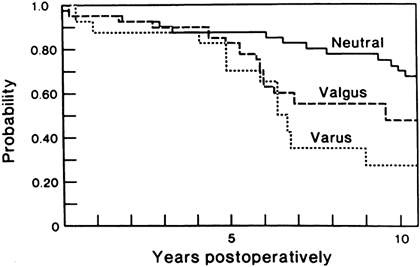
Figure 108.12.
Malalignment in a TKA significantly reduces survivorship of the implant. (From Lewallen DG, Bryan RS, Peterson LF. Polycentric Total Knee Arthroplasty. A Ten-year Follow-up Study. J Bone Joint Surg [Am] 1984;66:1211, with permission.) |
with both cemented and cementless techniques, but the use of
methacrylate cement remains the standard and generally the most widely
used technique.
the AP and lateral planes. AP weight-bearing films demonstrate better
any potentially dynamic instability. They also accentuate joint space
narrowing. A Merchant view (or other similar radiograph) is useful to
evaluate patellofemoral mechanics (23). A tunnel view may be useful to evaluate for osteonecrosis.
released at the time of surgery either through soft tissue or bony
maneuvers. The stiff knee can present a challenge for exposure alone.
Any knee with gross ligamentous instability, particularly in the
medial-lateral plane, may need to have specially stabilized components
or ligamentous augmentation for a successful procedure.
disease in the lower extremity. A consultation with a vascular surgeon
may be necessary. Prior vascular surgery, particularly with the use of
a prosthetic graft, may be a contraindication for use of a tourniquet.
arthroplasty. There is nothing more discouraging after undertaking a
technically successful arthroplasty than to have a skin slough that
leads to infection and dismal failure. Try to avoid flaps and
undermining of the skin, particularly laterally over the patella to
avoid potentially devastating problems. In general, old incisions
performed for prior medial or lateral menisectomy, which are either
oblique or behind the midline, can be ignored. Cross transverse
incisions for patellectomy or high tibial osteotomy at 90°. More recent
parapatellar incisions are problematic. In general, include recent
parapatellar incisions in the line of the main incision if practical.
Use the most lateral longitudinal incision if it will allow adequate
access to the knee for arthroplasty. Give special consideration to
patients with local skin problems such as psoriasis. Preoperative
dermatology consultation can significantly improve local skin lesions
and reduce the risk of infection.
standard 36-inch radiographic films with the patient standing are
adequate for preoperative planning. Three-foot films may be used to
assess mechanical axis versus anatomic axis, but they usually are
needed only to assess angular deformity away from the knee joint or
unusual hip offsets.
radiographs with acetate overlays that are compensated for radiographic
magnification. Preoperative templating is only an approximation of the
required prosthetic sizing—never use templating to determine the
precise size used at surgery. Often, the exact size determined in
surgery will vary from templating by plus or minus one size. Templating
provides the opportunity to consider the surgical plan, including
correct techniques to address deformities and need for soft-tissue
releases. Occasionally, templating reveals the need for a very small or
very large component, which requires—if not a custom device—at the
least a special request before surgery. Prior surgical procedures may
significantly alter the normal anatomic landmarks. Prior proximal
tibial osteotomies may make conventional tibial components difficult to
use owing to an offset of the tibial axis relative to the plateau.
Prior hardware, such as staples or screws, may have to be removed.
Severe bone deficiencies, such as those that result from marked valgus
deformity or a long-standing varus deformity, may require modular
prosthetic augmentations (28) or grafting (38).
the appropriate surgical instruments be available for the procedure.
These instruments may include special jigs, measuring devices, or
cutting tools. Administer a dose of prophylactic antibiotics before
inflation of the tourniquet. A first-generation cephalosporin is an
appropriate choice. If there is an allergy to a first-generation
cephalosporin, the alternatives include vancomycin or clindamycin (4).
-
Position the patient carefully in the
supine position on the operating table. Take great care to prevent
peripheral nerve palsies, which can occur during the prolonged
positioning in the recumbent position in the anesthetized patient.
Protect the elbows with foam pads and gently flex them approximately
30°. Elevate the patient’s buttock on the operative side with a soft
roll to produce a stable upright positioning of the knee. Occasional
sciatic nerve palsy has been seen from prolonged positioning on a hard
buttock roll. When the patient is rolled to the opposite side using the
buttock roll, the contralateral leg often lies in external rotation. To
avoid pressure on the peroneal nerve on the nonoperated side place the
heel on a soft elevation pad and pad the lateral side of the knee. -
Secure two separate bumps to the table on
the operated side as leg positioners. Position them such that the knee
is in full extension when the leg lies on top of the bumps, in
approximately 30° of flexion when the foot is placed on the first bump,
and in 100° of flexion when the second bump is used. These are the
three main positions of the knee used when the surgical procedure is
performed (Fig. 108.13). These bumps stabilize
the knee and free the surgeon’s and assistant’s hands. Once the patient
is positioned and the bumps are set, the extremity should be stable
with the patella pointing directly at the ceiling. There may be a
tendency for the limb to roll into external rotation. If this occurs,
gently rotate the table toward the opposite limb until the knee is in a
stable position
P.2879
straight up and down. Secure the patient with a strap.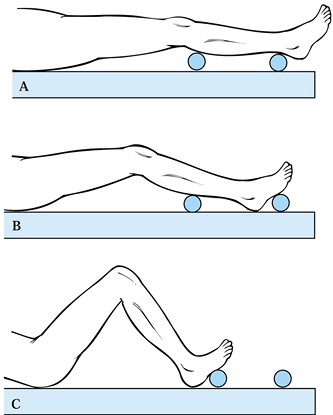 Figure 108.13. The use of bumps can facilitate intraoperative positioning. A: Full extension to check alignment. B: 30° position for the surgical exposure and wound closure. C: Position used for bone cuts.
 -
Finally, take a “walk around” the patient
just before scrubbing. Check all peripheral nerve sites for appropriate
padding. The tourniquet should have been placed on the thigh as high as
possible and the skin protected with soft webril padding. If the
patient is obese or short limbed, a sterile tourniquet may be used to
ensure adequate access to the surgical field. Place protective vinyl
draping distal to the tourniquet to prevent dripping of potentially
caustic scrub solutions under the pressure tourniquets. Confirm with
the anesthesiologist that preoperative antibiotics have been given. -
Reaffirm that the correct limb is being
prepared. Although it is rare, wrong limb side surgery does occur and
is disastrous for patient and surgeon. The American Academy of
Orthopedic Surgeons has made recommendations to minimize this
complication (47). Whatever system is used, it
is the attending surgeon’s ultimate responsibility to confirm that the
operation is performed on the correct knee. -
Shave the skin around the knee
immediately before the procedure to limit compromise of the skin
surface. Extended time between shaving and surgery promotes
colonization of small nicks with bacteria.
among hospitals and among surgeons. However, particularly in TKA, the
margins of the surgical field are subject to compromise unless very
careful preoperative draping is done. Now surgically scrub the limb and
do a final skin prep with an antibacterial solution. Take meticulous
care during draping. Drape the skin sterilely as high as possible, to
avoid drape creep, and to at least 4 inches below the tibial tubercle.
Apply an adherent sterile vinyl dressing, preferably iodine-impregnated
(3M Ioban, Minnesota Mining Co, Minneapolis, MN). Leave at least 1 inch
of plastic adhesive drape above and below the planned or extended
incision to ensure that the drapes do not lift up during the procedure,
thus preventing irrigation fluid and other fluids from the surgical
site from entering areas of contamination and vice versa. Always use a
wide prep and drape to provide for an extensile exposure. It will be
frustrating to find oneself “prepped out of the field” or to have the
field contaminated by an inadequate level of prepping.
-
Avoid excessively bulky drapes on the
lower extremity. Precise alignment in total knee replacement depends on
the ability to palpate the tibial spine, the malleoli, or bones of the
foot. A bulky drape on the foot obscures landmarks and makes surgery
more difficult. Use a plastic-impregnated stockinet that covers the
lower extremity, and place over it an elastic Coban wrap (3M,
Minneapolis, MN), which effectively walls off the foot from the sterile
upper leg, holds the stockinet on precisely, and provides a graded
compression for prophylaxis against venous stasis. Most important, it
does not mask the palpable subcutaneous landmarks of the lower
extremity, thereby allowing more accurate bone cuts.
-
With the patient prepped and draped, flex
the knee to a 30° position and mark the surgical incision. Flexion
produces tension on the anterior tissues, which allows a more precise
surgical exposure. A midline longitudinal incision is preferred unless
otherwise dictated by prior skin incisions. The exposure should be
extensile, extending approximately five fingerbreadths above the
superior patella and five fingerbreadths below the inferior patella. -
The technique of arthrotomy, soft-tissue
handling, and initial exposure is key to preventing problems. Put a
thumb on one epicondyle and a finger on the other epicondyle, and
visualize the knee in 30° of flexion to mark a center point. This is
not necessarily the center of the
P.2880
patella;
often, the center of the patella can be misleading. Mark the center of
the femur proximally at the appropriate length and distally place your
finger over the tibial tubercle and make a mark on the medial aspect of
the finger. The incision must be perpendicular to the skin at all skin
contours. This means that proximally the belly of the blade should be
as parallel to the limb as possible. -
Carry the incision through the midpoint
of the knee and distally just medial to the tibial tubercle, with the
blade angled perpendicular to the tibia so that it internally rotates
as the incision is carried distally. This will minimize skin flap
compromise and potential necrosis. -
Then carry the incision through the deep
fat and the prepatellar bursa, being careful to preserve the epitenon
above the patellar tendon and to roll back the layer of soft tissue
just above the epitenon. Preserve this for later closure; if a careful
incision is made, it makes a very nice layer for later closure. -
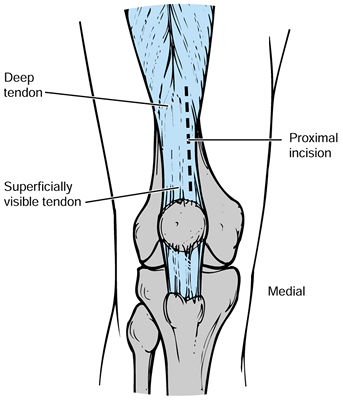
Perform a medial arthrotomy with a new
knife blade. The location of the quadriceps tendon can be very
deceiving proximally. The most superior portion of the tendon can be
biased laterally if only the visual landmarks are used, and this may
lead the surgeon to transect the bulk of the quadriceps. Often, just
deep to some of the quadriceps muscle fibers, there is additional
tendon medial to the visible quadriceps tendon (Fig. 108.14).![]() Figure 108.14.
Figure 108.14.
The exposure of the proximal superficial quadriceps tendon may deceive
the surgeon as to its true location. Palpate the tendon to be certain
that the incision is along its medial border. -
Use a #10 blade perpendicular to the
tendon, through its full thickness, and carry the arthrotomy
longitudinally in a gentle curve, which will start at the midpoint of
the quadriceps tendon proximally, curve around the patella so that it
intersects a point just medial to the patella, and then curve back to a
point on the tibial tubercle medially. It is important that the
arthrotomy be gently curving and transect a minimum of quadriceps
muscle fibers. Incorporate a millimeter or two of the most medial
portion of the patellar tendon distally. When a medial soft-tissue
sleeve is raised around the tibia, the closure toward the tibial
tubercle is often precarious. Incorporating an inconsequential amount
of the patellar tendon distally helps secure this layer and again lower
the risk of infection. -
In the inferior region of the arthrotomy,
split the fat pad with the medial bulk of fat maintained. This
facilitates the lateral exposure, which is especially important in more
difficult tight knees or heavy patients. This leaves a fair amount of
fat pad for closure even when the lateral fat pad is removed to expose
the difficult knee. Do not compromise the patellar tendon. -
After the intersection of the incision
with the tibial tubercle, bring the incision parallel to the shaft of
the tibia and carry it distally for a few more millimeters. -
Place a right angle retractor medially
and transect the anterior horn of the medial meniscus. Elevate a medial
soft-tissue sleeve with electrocautery or a sharp #10 scalpel. Release
the soft-tissue sleeve from proximal to distal, staying strictly at the
subperiosteal level to maintain the vascularity of the medial flap of
tissue. The viability of this flap is critical for covering the implant. -
The extent of the medial dissection
depends at this point on pre-existing angular deformities. For a severe
varus knee, the medial exposure can be extended into a medial release.
The medial collateral ligament is a tight band on the medial aspect of
the knee and can be easily transected by slight malposition of the
scalpel during dissection along the anteromedial and posteromedial
tibia. It is best to proceed with a subperiosteal stripping of the
medial aspect of the joint with a Cobb-type elevator to ensure that the
collateral ligament is protected. Once the deep portion of the medial
collateral ligament (MCL) has been elevated, place the Z-type retractor
between the MCL and bone to gain medial exposure. Remove large medial
osteophytes at this point as part of the medial release. -
Elevate the patella, with the knee in
extension and pulled toward the surgeon. Release tight bands in the
patellar retinaculum or plica with electrocautery and avoid the patella. -
Place a retractor along the medial joint line and flex the knee to 90° or 100°. The potential for patella tendon
P.2881
avulsion exists in the tight knee. As the knee is flexed, carefully
watch the insertion of the patella tendon to avoid any excessive
flexion that may avulse the patella tendon. If the patella cannot be
easily everted without the risk of patella tendon avulsion, obtain more
extensile exposure either by extending the arthrotomy proximally, doing
more distal soft-tissue releases, or considering quadriceps release or
tibial tubercle osteotomy. This situation most often occurs in the very
obese patient or the patient with prior knee surgery, such as proximal
tibial osteotomy, in which the patella tendon is scarred and tight.
Once patella tendon avulsion occurs, it is very difficult to treat, so
this complication is best avoided. We favor a tibial tubercle osteotomy
over proximal soft-tissue releases. -
At this point, flex the knee greater than
90°. The patella should be everted, both femoral condyles should be
evident, and the tibial plateau should be at least partially
visualized. Next, inspect the entire knee and identify and make a note
of the intraoperative pathology. -
The anterior cruciate ligament is
generally resected for all arthroplasties, and this enhances exposure.
Place a hemostat behind the anterior cruciate ligament from the lateral
to the medial direction and transect the ligament by electrocautery. It
is best to remove the stump of the anterior cruciate ligament off its
femoral insertion on the lateral side. -
In knees with advanced arthritis, the PCL
may be partially or totally obliterated by notch osteophytes. Using a
1-inch osteotome, remove medial and lateral osteophytes to expose the
PCL attachment to the femur. Most knees will have an intact PCL. In
some cases, it may be anatomic in structure but have abnormal function. -
If the PCL is being intentionally
sacrificed for surgical technique, it is best done at this point. The
PCL lies immediately in front of the posterior capsule, which lies in
front of the neurovascular structures. The PCL should not be sacrificed
in a cavalier fashion, but it should be done precisely. Place a curved
clamp behind the PCL to define its substance and direction, then take
electrocautery and remove the PCL subperiosteally off the femoral
attachment. Once it is completely detached from the femur, retract the
detached end forward and transect it at its insertion on the tibia. -
Now release the anterior horn of the
lateral meniscus. Separate the remaining fat pad beneath the patellar
tendon from the patellar tendon using a hemostat down to the level of
the lateral joint line, and transect it with electrocautery. This frees
the lateral meniscus. Then place a Kocher clamp on the lateral meniscus
and use electrocautery along the margin of the lateral meniscus
anteriorly. Then place the meniscus under tension with the clamp, and
release the lateral periphery of the meniscus with a #15 blade in a
precise curvilinear fashion along to its insertion next to the PCL.
Branches of the lateral geniculate artery are just outside the
insertion of the lateral meniscus and can be easily transected during
the removal. These branches commonly bleed if they not cauterized at
this time. Once the lateral meniscus is removed, place a Z-type
retractor in the corner overlying the lateral tibial condyle to gain
extensile exposure of the flexed knee.
generally rely on intramedullary alignment for the femur. The tibia may
use either intramedullary or extramedullary alignment guides (11).
It is important to follow the manufacturer’s instructions and at the
same time to understand the underlying mechanical principles of TKA so
adjustments can be made to suit the pathology encountered at surgery.
resection or flexion or extension gap balancing methods to determine
the location, depth, and angulation of bone cuts. The techniques are
more similar than different and ultimately result in the same or nearly
the same anatomical outcome. Measured resection uses trials as spacer
blocks, whereas blocks are typically used in the gap measurement method.
-
Make the cut 5 to 9 mm below the articular surface of the more normal side. Check ligament balance.
-
The femoral flexion gap is created by
sizing the anterior posterior diameter of the femur from the anterior
cortical surface, selecting the appropriate size, and adjusting the
rotation for ligament tension before the cuts are made to create the
femoral flexion gap. After the flexion gap is created, measure it with
spacers and use this information to create the extension gap (Fig. 108.15).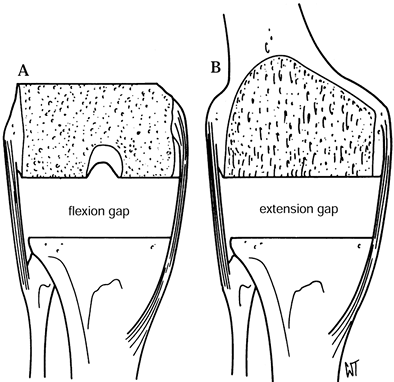 Figure 108.15. After resection of the distal femur and proximal tibia, the extension gap (B) must equal the flexion gap exactly (A). (From Insall JM, ed. Surgery of the Knee, 2nd ed. New York: Springer Verlag, 1991:626, with permission.)
has the possible disadvantages of midrange laxity (only 0° and 90° are
checked) and possible elevation of the joint line. Elevation most
commonly occurs in a knee with a preoperative flexion contracture, and
an aggressive flexion gap cut on the femur results in a femoral
component that is relatively undersized (34).
the so-called measured resection technique of TKA. Proponents suggest
that the femur is more readily accessible upon first exposure. The
measured resection technique works by resecting a measured amount of
bone from both the femoral and tibial condyles. This resected bone is
to correspond as closely as possible to the amount of implant being
replaced (Fig. 108.16). This is also known as a joint line technique because the joint lines are fairly well maintained
and the normal anatomy is essentially resurfaced. This is particularly
important when the implant is designed to retain the PCL. Slight
elevation of the joint line in PCL-retaining designs can have adverse
effects on knee kinematics (24).
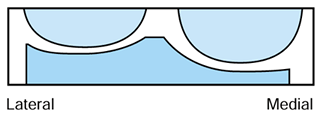 |
|
Figure 108.16. Flexion cuts forming equal resection when combined.
|
and consistent femoral rollback without the “booking” phenomenon avoids
increased posterior stresses and the limited flexion associated with a
tight PCL or excessive translation with a loose PCL. In the case of a
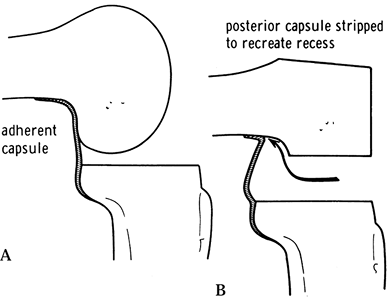
tight PCL, recession (37,57)
from the tibial side after the tibial cut and balancing can allow
interpolation between sizes. Flexion contracture can be addressed with
posterior capsular release (Fig. 108.17).
 |
|
Figure 108.17. Posterior capsular release from the femur to reduce a flexion contracture. A: The posterior capsule is adherent. B: The original recess is re-established. (From Insall JM, ed. Surgery of the Knee, 2nd ed. New York: Springer Verlag, 1991:643, with permission.)
|
abnormal femur with a femoral implant articulating surface. The distal
level of the femoral implantation is critical to preserve the proper
level of the joint line. The flexion and extension gap must be correct.
The varus and valgus alignment and proper external rotation are
critical. At least four directions for spatial relations must be
carefully maintained or reproduced to result in a good arthroplasty:
joint level, rotation, coronal plane angulation, and sagittal plane
angulation. Initial preparation of the distal femur to ensure correct
rotation includes marking a line in the sulcus of the trochlear groove,
the so-called Whiteside’s line, or the AP axis (53).
The AP axis of the distal femur is defined by a line through the
deepest part of the patellar groove anteriorly and the center of the
intercondylar notch posteriorly. This line defines the center of the
femoral condyles and the plane to which the knee component must be
perpendicular.
-
Make the center drill hole into the medullary canal, approximately 3/8
inch (9 mm), just medial to the center of the notch to provide the best
line of axillary alignment. Put your opposite hand on the femoral shaft
proximally to provide appropriate directional control, through tactile
feedback, to locate the intramedullary canal. Place the hole just above
the insertion of the PCL if this exists, but not so anterior that there
is any risk of perforating the anterior cortex. Drill the hole straight
and make it slightly larger than the intramedullary guide rod. -
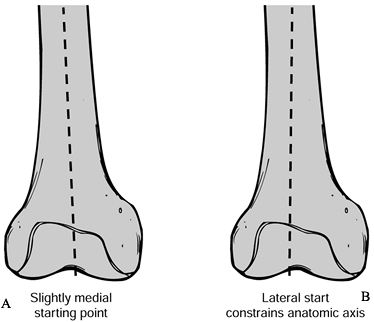
Once the hole is drilled, aspirate marrow
products to prevent embolization. The intramedullary guide rod should
be fluted for self-venting and approximately 30
P.2883
cm
in length to the femoral axis. Take care not to place the drill hole in
the midline of the femoral condyles because an abnormal valgus
angulation will occur because this is not aligned with the medullary
canal (Fig. 108.18).![]() Figure 108.18. Malposition of the center drill hole may lead to a varus femoral component. On this right femur, drawing A shows the preferred slightly medial starting point. In B, a lateral entry will constrain the anatomic axis, producing valgus alignment.
Figure 108.18. Malposition of the center drill hole may lead to a varus femoral component. On this right femur, drawing A shows the preferred slightly medial starting point. In B, a lateral entry will constrain the anatomic axis, producing valgus alignment.
reasons. The patellofemoral mechanics are altered dramatically by
femoral component rotation. An excessively internally rotated femoral
component will have much higher rates of patellar subluxation and
altered patellofemoral mechanics. In general, some external rotation of
the femoral component is desirable. Also, because tibial resections are
performed perpendicular to the long axis—not the normal 3° medial
inclination of the tibial plateau—an externally rotated femoral
component is necessary to make the flexion gap equal (Fig. 108.19).
 |
|
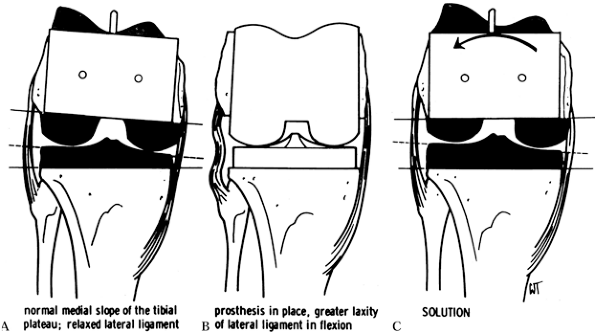
Figure 108.19. External rotation of the femoral component ensures a square extension gap. A:
When the femoral cuts are made in relative internal rotation, the normal medial slope of the tibial plateau results in a relaxed lateral ligament complex. B: This results in greater laxity of the lateral ligament in flexion. C: The lateral ligament is tightened by externally rotating the prosthesis. (From Insall JM, ed. Surgery of the Knee, 2nd ed. New York: Springer Verlag, 1991:624, with permission.) |
distal cut is typically made in a preset angle of varus or valgus from
the mechanical axis, marked by the intramedullary guide. Most surgeons
select 5° or 6° of valgus, altering this for special circumstances when
the anatomic axis departs from the mechanical axis.
the external rotation of the femoral component. No one landmark by
itself is always reliable. Use all three in combination to reach a
consensus as to what is the proper external rotation alignment.
-
The transverse axis of the femoral component should be perpendicular to the anteroposterior axis, or so-called Whiteside’s line.
-
The transepicondylar axis reliably produces 3° to 5° degrees of external rotation to the posterior femoral condyles.
-
The posterior femoral condylar axis references 3° of external rotation with respect to the condyles.
from the anatomic point of view, but the epicondyles may be difficult
to palpate. The posterior condylar axis is generally reliable but
suspect in valgus knees or in rheumatoid arthritis. A deficient lateral
condyle may produce false external rotation. In cases of severe
arthritis with marked anterior osteophytes, the intratrochlear groove
may be abnormal. We prefer checking three landmarks and making a final
determination on their confluence, erring on the side of external
rotation. In the case in which a tibial cut is made first, an
additional reference for a balanced flexion gap is available. Some
instrumentation sets are able to reference the tibial cut and use
soft-tissue tension to determine the rotation of the femoral cuts. This
can be dangerous, depending on the extent of soft-tissue contractures
and which structures have been released before using the instruments.
rotation has been determined, make the anterior and posterior femoral
cuts. In general, there are two references or approaches that may be
used at this point. One is the anterior referencing technique, whereby
the anterior cut is made first by referencing from the anterior cortex.
This approach ensures that no notching of the femur for anterior
femoral flange occurs. The difficulty with this technique is that the
exact location of the posterior femoral condyles is somewhat
indeterminate because of the finite number of component sizes that are
available. In general, take care in measuring the size of the femoral
component. The other method of measurement, used by most systems, is
some type of caliper or jig system to measure the distance between the
posterior condyles and the anterior cortex. If the size registers
between two sizes, which it often does, in general the smaller size is
preferable to avoid “overstuffing” the knee. Overstuffing the knee is a
phenomenon that occurs when too large a femoral component is placed. If
the component is placed too far posteriorly, a tight flexion gap and
decreased flexion will occur. If an oversized component is placed too
far anterior, the extensor mechanism may impinge on the femoral flange,
creating a tight knee.
resemblance to canine anatomy, there is a mismatch between the AP
diameter of the knee and the narrower medial-lateral dimension of the
femoral condyle. After selecting the proper AP dimension of the
component, an overhang on the medial and lateral sides becomes
apparent. Proper implant system selection can minimize this phenomenon.
for evidence of the appropriate rotations. The anterior cut on the
femoral condyles should leave a higher and longer prominence laterally,
and the removed bone fragment typically looks like a mountain, called
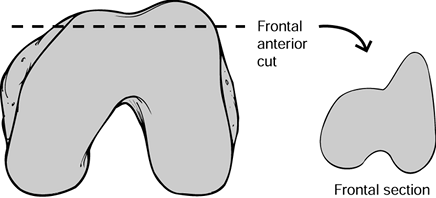
the Matterhorn sign (Fig. 108.20). The posterior cuts should show similar asymmetry, with more medial than lateral bone resected in most cases.
 |
|
Figure 108.20. The Matterhorn sign seen on this frontal view of the excised fragment of the femoral condyles.
|
such as a box for a PCL cam or a recessed trochlear groove for improved
patellar articulation.
finishing cuts. The posterior osteophytes not only act as a mechanical
block to limit flexion but also tent the posterior capsule and limit
full extension.
-
With the knee held in extreme flexion,
retract the femur superiorly with a blunt bone hook placed in the
intercondylar notch. Use a 1-inch sharp, curved osteotome to resect
posterior osteophytes from the medial, lateral epicondyles. Take care
to avoid injury to the neurovascular structures. -
Once these osteophytes are resected,
remove adherent capsular attachments by either curettage or rongeur. A
soft sulcus should result behind the posterior condyles and in front of
the posterior capsule. This approach will maximize the potential
extension and flexion of the knee (Table 108.3). Table 108.3. Pitfalls of Femoral Preparation
femoral cuts, turn your attention to the tibia. It may be appropriate
at this point to check the extension and flexion gaps again. The
flexion gap is determined by the space between the femur and the tibia
at 90° flexion, and the extension gap is determined by the space
between the femur and the tibia at full extension. This can be a guide
to the amount of resection needed on the tibial side and, equally
important, to the need for future ligamentous release.
long axis. The anatomic axis of the tibia is in 3° of varus. Implant
systems initially attempted to replicate this slight varus profile.
Because of the inability to reproduce angular cuts about the knee
precisely, often an attempt to produce a slight, 2° to 3° varus will
produce a 5° to 6° varus cut, which has been shown to lead to early
component loosening. Therefore, attempt a perpendicular cut with the
knowledge that a slight varus cut plus 2° to 3° should not
significantly alter clinical results. We prefer to use an
extramedullary technique.
-
Select a tibial cutting guide that allows
for multidirectional orientation, including rotation resection height,
varus-valgus alignment, and posterior-tibial tilt. In general, place
the rotational alignment of the tibial cutting edge such that the
profile of the cutting guide is centered on the medial edge of the
tibial tubercle. This is best determined by sighting down on top of the
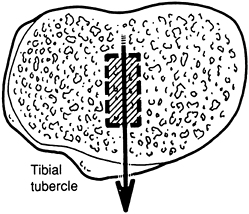
tibia in the so-called “bird’s-eye view” (Fig. 108.21). Once the rotation used for the cutting guide is determined, provisionally pin it in place.![]() Figure 108.21.
Figure 108.21.
Overhead view of the right tibia. To establish correct rotation, the
tibial component should align just medial to the tibial tubercle. (From
Insall JM, ed. Surgery of the Knee, 2nd ed. New York: Springer Verlag, 1991, with permission.) -
Next, secure the yoke of the distal end
of the tibia cutting guide above the ankle. Take care not to put the
yoke of the distal portion of the tibial guide at the ankle joint.
Because of the fibula and widening of the ankle joint, this will
produce an offset that can produce a varus deformity. Place the yoke
approximately two thirds of the way down the tibia to ensure as neutral
a cut as possible. It is imperative that this yoke be secured to the
tibia. -
Place the tibial alignment cutting guide
such that it is in the proximal region right over the center of the
tibial tubercle. The bulk of the patellar tendon may tend to bias the
cutting jig medially, producing a more varus angulation, so a smaller
footprint for the cutting block is recommended. Distally, place the tip
of the cutting guide over the anterior tibialis muscle compartment, in
general parallel to the anterior border of the tibia. All of these
landmarks can generally be palpated. Take care in patients with severe
foot deformities, such as rheumatoid arthritis, that have abnormal
landmarks. Avoid the general tendency to produce a varus cut. If the
tibial cutting guide allows for medial-lateral translation of the
distal portion of its guide, almost always place it medially so that
the tip of the cutting guide is over the anterior tibialis tendon (Fig. 108.22).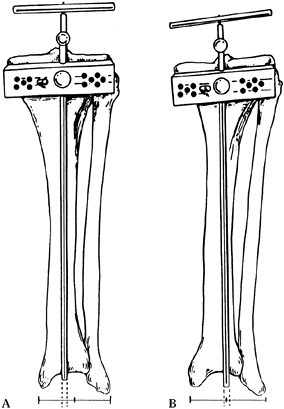 Figure 108.22. Position of tibial cutting jig: In A, the guide is aligned with the anterior tibial tendon and first web space of the toes, producing an appropriate cut. In B,
the alignment jig is centralized on the ankle joint, which is too
lateral, resulting in excessive varus in the cut of the tibial plateaus. -
After the varus-valgus position has been
determined, set the tibial height. A variety of guides are available
that can confirm the position of the cutting jig relative to the tibia,
including thin flat curved wing-shaped devices, or jigs that can
measure from the cutting surface to fixed points above the tibial
surface. In general, in most knees, there is one so-called “normal”
tibial plateau; the other is worn. We prefer to take 10 mm off the
“normal” side. This usually results in only slight subchondral
resection on the “abnormal” side. Place the anatomic tilt or
anterior-to-posterior caudal downslope of the tibia at approximately
5°. If the implant system has built-in posterior tibial tilt in the
tibial tray, then a neutral cut can be made. Avoid putting the tibial
plate into extension, which can produce a tight flexion gap and
decreased motion (Table 108.4).![]() Table 108.4. Pitfalls of Tibial Preparation
Table 108.4. Pitfalls of Tibial Preparation -
Size the tibial component to provide the
largest possible area to reduce force per unit of area while avoiding
overhang of the tibial plateau, particularly posterolaterally. The
rotation should match the femur in extension, which typically is at the
medial third of the tibial tuberosity.
-
Make a slot just in front of the PCL
using a reciprocating saw. Place an osteotome with parallel sides in
front of the PCL. With the osteotome in place, use a reciprocating saw
to cut on the medial and lateral aspects of the insertion of the PCL,
thus preserving a bone block to which it is attached. -
Then resect the proximal tibia,
protecting the medial collateral ligament on the inside of the knee,
the patellar tendon on the outside of the knee, and the posterior
vascular structures. -
Then lift off the tibial plateau in one piece after releasing it from the soft-tissue attachments along its periphery.
ligament balancing, and flexion and extension gap balancing using
appropriately sized blocks. Alternatively, if the femoral preparation
has been completed, trial components may be inserted and ligament
balance checked. In general, balance the knee with soft-tissue releases
rather than by bony cuts.
ligament balancing can be straightforward or complex. Plan to have more
constrained implants available if the preoperative deformity is
excessive. Specifically, in patients with greater than 15° of varus or
valgus deformity, it may be necessary to move to a more constrained
implant. These implants can make up for deficient medial or lateral
collateral ligaments. However, remember that constrained knee implants
have had poor longevity.
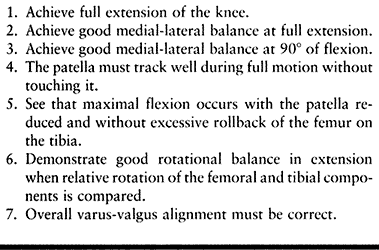
must be achieved for an arthroplasty to be successful. These are listed
in Table 108.5. Surgical techniques of
reconstruction can differ widely. In the patient with minimal to
moderate deformity, with acceptable surgical instrumentation from a
modern TKA kit, balancing can be as simple as placing the trial
components and checking the seven points of balancing (Table 108.5)
to ensure that the jigs did their work. More complex knee deformities
may require release of the posterior capsule, the posterolateral
corner, lateral collateral, iliotibial band, or the MCL from its tibial
insertion. At this point, balancing may
require
conversion from a posterior cruciate–retaining prosthesis to a
posterior cruciate–sacrificing and replacing prosthesis, because the
PCL can at times contribute to deformity, particularly in the patient
with severe pre-existing deformity.
 |
|
Table 108.5. Seven Points of Ligament Balancing
|
deformity to correct. However, in extreme cases, it can be as
challenging as any knee deformity.
-
Varus deformity can be resolved by making
the tibial cut perpendicular to the axis of the tibia and taking a
minimal cut medially. However, commonly there is still medial
tightness, particularly in extension, after appropriate bone cuts. -
Further steps include removing medial
osteophytes on the femur and tibia, and releasing the joint capsule at
the medial side of the tibia with careful attention to preserve the
continuity of the MCL. If this does not achieve balance, the MCL can be
released from its distal insertion on the tibia. Use a subperiosteal
dissection of the medial collateral ligament from the tibia. It can be
either partially or completely released from its insertion on the tibia
with a very low amount of force to break up any remaining Sharpey’s
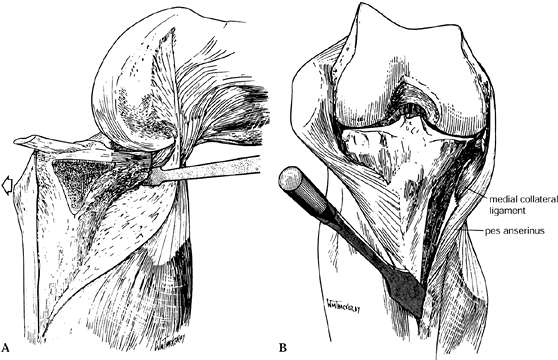
fibers connecting the ligament to bone (Fig. 108.23).![]() Figure 108.23. A: Completed varus release. B: The superficial medial collateral ligament can be detached if necessary.
Figure 108.23. A: Completed varus release. B: The superficial medial collateral ligament can be detached if necessary. -
Additional releases can include the pes
anserina as a secondary constraint medially. Release the posterior
capsule and PCL if further correction is needed, and
P.2888
finally, the origin of the medial gastrocnemius can be released (Table 108.6).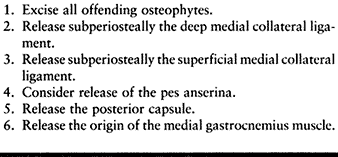 Table 108.6. Techniques of Sequential Varus Release (Do These in Sequence from 1 to 6)
and balance. After appropriate resection of the femur and tibia, a
persistent valgus deformity due to ligamentous imbalance requires a
release of the lateral structures.
-
The tightest structure is usually the
iliotibial band with the knee in full extension. Release this from the
inside out using a #15 blade perpendicular to the long axis of the
iliotibial band at the joint line. In the more severely valgus knees
(greater than 15° degrees), more extensive lateral releases may be
necessary. -
Starting from the anterior direction,
subperiosteally take the supporting lateral structures off the femoral
condyle. The popliteus tendon inserts just anterior to the lateral
epicondyle. -
Then remove the lateral collateral
ligament from its epicondylar insertion in a subperiosteal fashion.
This dissection can be carried down to the posterior lateral aspect of
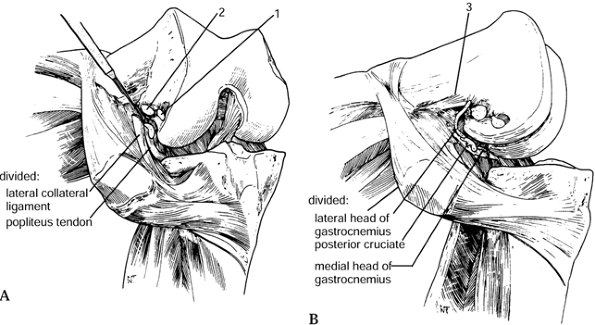
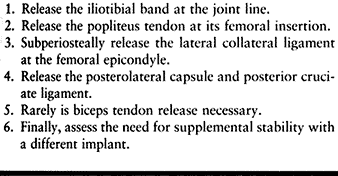
the capsule. The biceps femoris is rarely released. -
The iliotibial band can be released at
Gerdy’s tubercle. It is important to perform these releases
sequentially, releasing structures only as necessary (Fig. 108.24).![]() Figure 108.24. Valgus release to balance the knee. (A)
Figure 108.24. Valgus release to balance the knee. (A)
First, release the iliotibial band with the knee in extension from the
inside out, perpendicular to the long axis of the band and at the joint
line with a #15 blade. It may also be released at Gerdy’s tubercle. (B) If the knee is still tight, release more by detaching the structures (1,2 and 3) attaching to the lateral epicondyle using subperiosteal dissection. The biceps femoris rarely requires release.
arthroplasty should be available in case posterolateral instability
results from excessive lateral release or medial instability results
from MCL incompetence. In general, more severe lateral and medial
corrections are more easily dealt with using cruciate-substituting
devices because of the potential for a contracted PCL, which in itself
may be the limiting factor in deformity correction (Table 108.7).
 |
|
Table 108.7. Soft Tissue Release for Valgus Deformity (Do These in Sequence from 1 to 6)
|
contractures, are often the most challenging and require careful
evaluation of the anatomy of the knee. A more aggressive distal femoral
resection combined with lateral and posterior releases and perhaps a
more constrained knee prosthesis may be the best solution.
and extension gaps of the knee. With the knee in full extension and
with gentle traction on the heel, place a spacer block to judge the
relative tightness of the extension gap that was produced. At final
fit, the limb should be near an anatomic 7° of valgus at the knee. Both
the medial and lateral ligaments should be under equal tension and the
leg should be in full extension. In the ideal situation, both the
medial and lateral ligaments will be equally tense. Then place the
spacer block at 90° of flexion.
Three situations exist in which imbalance of the flexion and extension
gaps may occur. Test the patient for these imbalances intraoperatively,
and correct whatever problem is detected.
 |
|
Figure 108.25. A:
The flexion gap in A is larger than the extension gap seen in B. As seen in A’, this results in a knee that is too tight in flexion, producing a flexion contracture. As seen in B’, if this problem is approached by using a thinner tibial component, the prosthesis will be too loose in flexion. As seen in C’, the solution is to excise more bone from the distal femur. B: In A″ and B″, the extension gap is excessive. As seen in C″, this is solved by a “build-up” on the femoral side. (From Insall JM, ed. Surgery of the Knee, 2nd ed. New York: Springer Verlag, 1991:632, with permission.) |
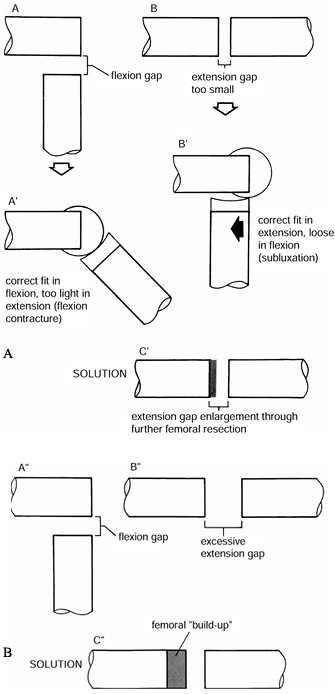
-
Too tight in flexion and too tight in extension.
This situation usually can be best corrected by either decreasing the
thickness of the tibial insert or, if necessary, recutting the proximal
tibia. -
Too tight in flexion and satisfactory in extension.
This situation may occur for several reasons. Too large a femoral
component, especially on anterior reference knee systems, overstuffs
the flexion gap. In this case, the femoral component can be downsized
by one. A tight PCL will show five signs (Table 108.8). The PCL itself will have “bowstring” tension, excess rollback of the femur on the tibia produces “booking,” the tibial
P.2890
component tends to sublux anteriorly in its tray, and the femoral
component subluxes off the femur. To correct this condition, recess the
PCL off the femur or tibia, increase the slope of the tibial component,
or increase the flexion gap by downsizing the prosthesis. Table 108.7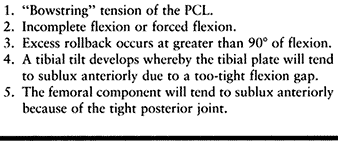 Table 108.8. Indications for Recession of the Posterior Cruciate Ligament
 -
Tight in extension and satisfactory in flexion.
This situation is produced either by a posterior capsular contracture,
which can be released, or by posterior osteophytes. If this maneuver
does not work, more distal femur can be resected to produce equal
extension and flexion gaps.
femoral and tibial trial components after ligament balancing has been
achieved. This should not be interpreted, however, as reducing the
importance of the patellofemoral articulation, which has been the
source of the majority of complications in TKA. This is particularly
true with earlier, boxier femoral components or when the importance of
patellar tracking was not as highly appreciated as it is now. The
complication known as the patella clunk (48) (Fig. 108.26) results from fibrosis on the quadriceps tendon that catches on the anterior aspect of the femoral component.
 |
|
Figure 108.26. Patellar clunk. A: Patellar clunk syndrome results from impingement of fibrous tissue between the patellar dome and the anterior femoral condyle. B:
This problem usually causes pain during extension as the tissue is dragged over the condyle. Although this syndrome has been identified in some cases of posterior stabilized arthroplasty, it has also occurred with other prostheses. The offending fibrous tissue may be resected arthroscopically. (From Vernace JV, Rothman RH, Booth REJ, Balderston RA. Arthroscopic Management of the Patellar Clunk Syndrome Following Posterior Stabilized Total Knee Arthroplasty. J Arthroplasty 1989;4:179, with permission.) |
parapatellar, the surface of the patella is easily accessible for
cutting. Replace the resected articular surface so that the thickness
of the patella stays roughly the same and the patellofemoral joint is
not overstuffed. Avoid resection of too much bone, which can result in
fracture of the patella.
Position
the patella medially on the flat resection surface to enhance tracking.
Appropriate external rotation of the femoral and tibial components,
along with lateral translation of the femoral and tibial components,
can diminish the tension on the lateral retinacular structures and
improve tracking.
-
Begin preparation of the patella with
reflection of the fat pad and synovium from around the periphery.
Remove all osteophytes. Visualize the margin of the patella without
compromising the patellar and quadriceps tendons. -
Cut the patella freehand or with one of many cutting jigs, the goal of which is to make a flat cut of the patella (Fig. 108.27). Asymmetric cuts can produce patellar tilt. Most components have pegs that are inserted into drill holes in the patella.
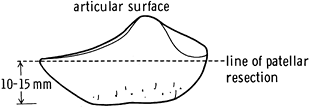 Figure 108.27. Level of patella resection. (From Insall JM, ed. Surgery of the Knee, 2nd ed. New York: Springer Verlag, 1991:645, with permission.)
 -
Perform a trial of patellofemoral
tracking using the rule of “no thumb,” or touch-free central
patellofemoral tracking. There should be no subluxation. Removal of
lateral patellar bone beyond the prosthesis may decrease tension
laterally. Verify final tracking with the actual components, with the
tourniquet down and before a lateral release is performed. With modern
implants, the need for lateral release should be less than 5% of cases.
A tibial tuberosity transfer or medial capsulorraphy, or both, may be
necessary in extreme cases.
several situations for which there is general consensus on the need to
resurface. Most surgeons would agree that all knees with inflammatory
arthritis should be treated with patellar resurfacing. People with
severely arthritic, deformed patellae may benefit from patellar
resurfacing. Some surgeons resurface the patella routinely.
-
In preparation for cementing, remove the
trial components and lavage the bone surfaces to be cemented with
normal saline. The attention paid to draping at the beginning of the
case pays off now. A tight seal of the adhesive plastic drapes
proximally and distally can ensure that fluid does not flow between
nonsterile and sterile areas of the field. -
Clear the bone surfaces of debris. In
addition, prepare sclerotic bone with a pick or drill point to produce
multiple small shallow holes to encourage interdigitation of cement.
Holes made in a line may predispose the bone to fracture, so make them
random. -
After all bone surfaces are lavaged and
debris has been removed, mix the cement. Then bring the final
components into the field. Cement the tibia first. Vigorously
pressurize the cement, in a doughy state, into the tibial plateau.
After the cement is pressured, add a 1-mm-thick flat layer of cement on
the tibial plateau. This uniform surface will ensure an adequate cement
mantle in spite of tibial bone irregularities, which may not be
apparent. -
Apply the tibial component and impact it
into position. Vigorous impaction may improve cement pressurization,
but take care not to fracture the tibia. Remove excess cement,
particularly posterior to the tibial tray. -
For the femur, apply a donut-shaped piece
of cement to the dry distal femur starting on both distal condyles and
then onto the anterior femur. Pressurize the cement by finger and
smooth it onto a uniform thickness. Do not allow cement to extrude
posteriorly. -
Place a small amount of cement on the
posterior rails of the femoral component and pressurize manually with
the thumb. Remove excess cement before applying the femoral component. -
The femoral component must be applied
neither in flexion nor in extension. Often, a pair of guiding posts or
a notch, or both, aid the placement of the femoral component. Then
impact the component into position and remove excess cement. -
Place a trial articular surface on the
tibial component and extend the knee fully. It may find its own balance
while the cement remains doughy. Flex the knee, remove excess cement,
and bring the knee back to extension and keep it there until the cement
has cured completely. -
The patellar component can be cemented
with the knee extended. Apply the cement to the patella with tuberculin
syringes that are cut off and have liquid cement aspirated into them.
Use these syringes to pressurize the cement peg holes. -
Apply an even layer of cement to the
undersurface of the patellar component with the inferior portions of
the three pegs visualized. Place the patellar component onto the three
holes in the patella and apply a patella clamp (5). Pressurize evenly and remove excess cement. -
After the cement has hardened, flex and extend the knee, and check the balance. Verify the seven points of ligament balancing (Table 108.5)
and patellar-femoral tracking. If the patella lifts laterally while
tracking, patellar bone beyond the polyethylene component can be
removed on the lateral side. The effect is similar to that of a lateral
release without the deleterious side effects of a soft-tissue release.
If the patella still tracks poorly,
P.2892
then a full lateral patellar retinacular release can be performed.
-
Irrigate all of the soft tissue, and
prosthetic and bony surfaces of the knee joint vigorously. Deflate the
pneumatic tourniquet and electrocoagulate bleeding points. In the
posterior knee and the posterior lateral corner, the lateral geniculate
vessels may bleed vigorously. It is important to perform pulsatile
irrigation hemostasis to eliminate cement and other particles that
cause rapid wear. -
After the knee has been irrigated,
exchange the trial tibial articular insert for the final polyethylene
liner. This is a good time to reassess knee balance, particularly in
extension, and to determine whether moving up or down one size in
tibial thickness may improve stability in flexion and extension. It is
vital to check behind the posterior condyles of both the medial and
lateral sides of the femur to ensure that extraneous cement has been
removed. This cement can limit motion, or break off and cause
third-body wear. -
Now close the knee. We prefer to close
the extensor mechanism with a running monofilament resorbable suture.
Closure of the extensor mechanism should be full thickness, with
adequate purchase of soft tissue on both sides producing a watertight
seal of the joint. This is easily achieved on the quadriceps side but
can be very challenging distally. That is one reason why the initial
incision is so important. A small amount of patellar tendon
incorporated into the most distal portion of the incision of the
arthrotomy gives a good purchase of the medial soft tissue and can
ensure a watertight seal distally. A proficient closure helps prevent
infection. -
After closure of the extensor mechanism,
use another running monofilament to close the deep fat layer, which
also includes the peritenon but not the deep dermis. Close the skin
with staples. Dress the wound.
with severe angular deformity, with bone deficiency, or with prior
surgery, or in obese patients. In these patients, we prefer to perform
a tibial tubercle osteotomy rather than a quadricepsplasty. Our
technique allows early mobilization, has excellent healing, and has a
low complication rate.
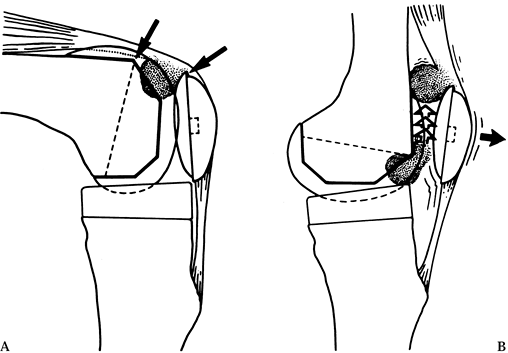
cannot be everted or when exposure is particularly poor. The tibial
tubercle osteotomy is useful for treating other disorders around the
knee as well.
-
Perform the standard arthrotomy and then
use an oscillating saw to make the osteotomy. We recommend an osteotomy
that produces a 1-cm-thick bone block at the insertion of the patellar
tendon into the tibial tubercle. It extends 8 cm distally on the tibia,
tapering to a sharp edge. -
Initiate the tibial tubercle osteotomy by
extending the medial periosteal incision along the anterior border of
the tibia, marking the tubercle. Place the oscillating saw parallel to
the tibia and make a 1-cm-thick cut beneath the tubercle from medial to
lateral across the tibia with the saw but not through the lateral
periosteum. Keep the lateral periosteal hinge intact laterally. -
Use an osteotome or a reciprocating saw
to make a cut parallel to the joint line and approximately 2 cm distal
to it at a 45° angle to meet the initial osteotomy site. Evert the
patella and the tubercle, and the osteotomy should hinge open. Minimal
release of the periosteal hinge may allow better mobilization.
Releasing the lateral meniscus and lateral soft-tissue attachments at
the capsule along with the fat pad may also improve access to the joint. -
At completion of the arthroplasty,
closure of the osteotomy is simple. Reduce the patella into the femoral
trochlear groove and then close the osteotomy. The lateral soft-tissue
attachments have been maintained throughout the procedure. -
Insert four guidewires transversely
approximately 1 cm deep and spread out along the cut surface of the
tibia. Pass these guidewires through the periosteal hinge laterally.
Then bend them over the top of the tubercle fragment, and tighten them
securely into place. Anatomic reduction of the tubercle at the angled
proximal cut restores the preoperative tension in the extensor
mechanism. Closure of the soft tissues over the tibial tubercle
osteotomy is assisted by a careful initial incision and arthroplasty.
clinical situation. Early motion can improve recovery and shorten the
hospital stay. The continuous passive motion (CPM) machine is useful
for obtaining early motion. The intent is to achieve extension early
and then to advance the CPM by 10° or more each day to achieve 90° by
the time of discharge from the hospital. Allow the patient to bear
weight on the first postoperative day. Use a knee immobilizer only
until sufficient quadriceps control has returned.
long-term success is generally the rule. Complications can be divided
into mechanical and nonmechanical etiology.
mainly at or below the level of the knee; 10% are proximal to the knee.
Pneumatic compression devices (52) and low-molecular-weight heparins (8)
may lower this incidence somewhat. Prophylaxis against propagation and
migration to pulmonary embolus is the mainstay of current treatment
regimens (51), and pharmacologic and mechanical
intervention should be routine postoperatively. Deep venous thrombosis
is largely asymptomatic, and patients may be treated empirically after
hospital discharge or undergo screening studies, the most popular of
which is Doppler ultrasound.
to minimize intraoperative blood loss, calculated estimates of
perioperative blood loss using hematocrits suggest a blood loss of 1500
ml for a cemented procedure, and 2000 cc for an uncemented procedure (17).
Dropping the tourniquet for hemostasis before closure or use of a
postoperative drain may actually increase overall blood loss (6,33).
Although omission of these steps is considered by some surgeons to be
contrary to general surgical principles, elimination of these steps
rarely results in a surgically significant hematoma. Appropriate
strategies for blood conservation include preoperative autologous blood
donation (56), preoperative use of erythropoetin, and postoperative blood salvage (14,21).
in the presence of valgus deformity, especially the flexion valgus
deformity of severe rheumatoid arthritis (35). This is almost entirely restricted to peroneal nerve injuries and occurs less than 1% of the time.
or medically compromised patient. Careful surgical approaches and
aggressive treatment of postoperative wound problems can prevent
infection. Local or free muscular flap coverage may be necessary for
loss of soft tissues (15).
Preoperative antibiotics, carefully controlled operative environments,
and meticulous surgical technique are required to minimize incidence.
Host factors such as diabetes or corticosteroid treated inflammatory
arthritis, surgical factors such as complexity of the procedure or
postoperative drainage, and late exposure to hematogenous seeding by
dental or urologic manipultion or infection elsewhere in the body may
predispose the patient to infection (54). In
the early postoperative infection, perform an open or arthroscopic
lavage of the knee and administer systemic intravenous antibiotics.
This approach may salvage the prosthesis. The standard of care for
treating late or established infection is resection of the prosthesis,
followed by a period of intravenous antibiotics and then reimplantation
of a new prosthesis (see Chapter 109) (55).
knee replacement can be minimized with careful attention to proper
soft-tissue balance in all planes. Patients with more challenging
preoperative deformity or motion restriction should be counseled about
possible postoperative shortcomings. This is especially true with
preoperative motion deficits. If a knee passes the seven points of
ligament balancing intraoperatively, late instability should be
uncommon. Minimizing the risk of instability as a complication is
discussed in the technique segment of this chapter.
aseptic loosening of the total hip arthroplasty. Polyethylene
debris–induced, macrophage-initiated osteolysis is considerably more
rare. This problem is thought to be due to the different wear
environment of the TKA. Threefold larger wear particles are produced in
a shearing, less-conforming environment. These larger particles are
less likely to induce a macrophage response and lead to a lower rate of
aseptic loosening (39). Malalignment, especially of the tibial component in varus (48), can lead to mechanical subsidence of the tibial component and loosening.
to the inherently elevated loads at the proximal end of the anterior
flange of the femoral component, owing to intraoperative notching of
the anterior femur (1), or owing to the
osteopenia of stress shielded bone under the femoral component. Rarely,
osteolysis may contribute. Special cases include diaphyseal fracture
above a stemmed femoral component or fracture through the stress riser
between total hip and TKAs. Stable internal fixation with either a
fixed angle device or a retrograde nail through an open notch is
generally preferred (10,41) (see Chapter 20).
In the compromised environment with either mechanical imbalance or
secondary to polyethylene failure, a tibial metal backing may rarely
crack. This type of mechanical failure may often lead to
particulate-induced synovitis and mechanical symptoms.
reproducible alignment and proper ligament balance, and materials and
design that permit functional and durable recovery of motion. When
implanted in closely monitored and maintained surgical and
rehabilitation environments, it has a remarkable and predictable record
of success. Most of the mechanical and some of the nonmechanical
complications of knee replacement are preventable by meticulous
surgical technique with careful cross checking of anatomic landmarks
and soft-tissue tensions with appropriate jigs.
scheme: *, classic article; #, review article; !, basic research
article; and +, clinical results/outcome study.
FF, Pappas MJ. New Jersey Low Contact Stress Knee Replacement System.
Ten-year Evaluation of Meniscal Bearings [published erratum appears in Orthop Clin North Am 1989;20:preceding 519]. Orthop Clin North Am 1989;20:147.
CW Jr, Spiro TE, Trowbridge AA, et al. Efficacy and Safety of
Enoxaparin Versus Unfractionated Heparin for Prevention of Deep Venous
Thrombosis after Elective Knee Arthroplasty. Enoxaparin Clinical Trial
Group. Clin Orthop 1995;321:19.
AM III, Rubash HE. Periprosthetic Fractures of the Femur after Total
Knee Arthroplasty: A Literature Review and Treatment Algorithm. Clin Orthop 1991;271:135.
DM, Lombardi AV, Mallory TH, et al. An Evaluation of the Efficacy of
Postoperative Blood Salvage after Total Joint Arthroplasty: A
Prospective Randomized Trial. J Arthroplasty 1991;1:109.
RS, O’Flynn HM. The Insall Award. Total Knee Replacement with Posterior
Cruciate Ligament Retention in Rheumatoid Arthritis. Problems and
Complications. Clin Orthop 1997;345:24.
PA, Faralli VJ, Orenstein EM, et al. Blood Loss after Total Knee
Replacement: Effects of Tourniquet Release and Continuous Passive
Motion. J Bone Joint Surg 1991;73A:1037.
AL, Rand JA, Bryan RS, Wallrichs SL. Total Knee Arthroplasty with the
Kinematic Condylar Prosthesis. A Ten-year Follow-up Study. J Bone Joint Surg [Am] 1995;77:423.
JW, Whiteside LA, Milliano MT, et al. Postoperative Blood Retrieval and
Transfusion in Cementless Total Knee Arthroplasty. J Arthroplasty 1992;7:205.
MW, Hanssen AD, Lewallen DG, Stuart MJ. Flexion Instability after
Primary Posterior Cruciate Retaining Total Knee Arthroplasty. Clin Orthop 1998;356:39.
CS, Flynn WFJ, Saddler S, et al. Long-term Results of the Total
Condylar Knee Arthroplasty. A 15-year Survivorship Study. Clin Orthop 1993:286:94.
JA, Ilstrup DM. Survivorship Analysis of Total Knee Arthroplasty.
Cumulative Rates of Survival of 9200 Total Knee Arthroplasties [see
Comments]. J Bone Joint Surg [Am] 1991;73:397.
MA, Montgomery TJ, Zhou H, et al. The Clinical Significance of Proximal
Tibial Resection Level in Total Knee Arthroplasty. Clin Orthop 1999;360:174.
RD, Thornhill TS. Posterior Cruciate Supplementing Total Knee
Replacement Using Conforming Inserts and Cruciate Recession. Effect on
Range of Motion and Radiolucent Lines. Clin Orthop 1994;309:146.
AS, Bailey HO, Hwang DS, et al. Quantitative Analysis of Ultrahigh
Molecular Weight Polyethylene (UHMWPE) Wear Debris Associated with
Total Knee Replacements. J Biomed Mater Res 2000;53:100.
SC, Markolf KL, Finerman GA. In Vitro Stability of the Implanted Total
Condylar Prosthesis. Effects of Joint Load and of Sectioning the
Posterior Cruciate Ligament. J Bone Joint Surg [Am] 1982;64:1201.
JB, Komistek RD, Dennis DA, et al. Fluoroscopic Analysis of Kinematics
after Posterior-cruciate-retaining Knee Arthroplasty. J Bone Joint Surg [Br] 1995;77:884.
JV, Rothman RH, Booth REJ, Balderston RA. Arthroscopic Management of
the Patellar Clunk Syndrome Following Posterior Stabilized Total Knee
Arthroplasty. J Arthroplasty 1989;4:179.
GL, Marson BM, Benjamin JB. Early, Incapacitating Instability of
Posterior Cruciate Ligament-retaining Total Knee Arthroplasty. J Arthroplasty 1998;13:763.
GH, Menezes A, Sharrock N, Sculco TP. Thromboembolic Disease
Prophylaxis in Total Knee Arthroplasty Using Intraoperative Heparin and
Postoperative Pneumatic Foot Compression. J Arthroplasty 1999;14:651.
MG, Kelley K, Thornhill TS. Infection as a Complication of Total
Knee-Replacement Arthroplasty: Risk Factors and Treatment in
Sixty-seven Cases. J Bone Joint Surg 1990;72A:878.
RE, Insall JN, Urs WK, et al. Two-stage Reimplantation for the Salvage
of Total Knee Arthroplasty Complicated by Infection: Further Follow-up
and Refinement of Indications. J Bone Joint Surg 1990;72A:272.