
of the most frequently injured. The knee and its supporting structures
are subjected to high-energy forces, especially during sporting
activities. The lower extremities act as a large moment arm, through
which the weight of the body imparts these high forces onto the knee.
The surgeon undertaking diagnostic and operative arthroscopy of the
knee should be able to identify all of the structures of the knee that
can be visualized and are accessible with an arthroscope.
literature, we believe the procedure is best performed under sterile
conditions in an operating room setting. Diagnostic arthroscopy can be
performed under local, regional, or general anesthesia. The advantages
of local anesthesia include low morbidity when compared with the
potential complications associated with a regional or general
anesthetic. Local anesthesia may be best suited for experienced
surgeons performing diagnostic and uncomplicated arthroscopic
procedures only. The disadvantages of local anesthesia include the
possibility of patient discomfort during more involved procedures or
those during which a tourniquet is used. Regional anesthesia and
general anesthesia keep the patient more comfortable if a procedure
runs longer than expected or the use of a tourniquet is required.
Regional anesthesia has the added advantage of better postoperative
pain control.
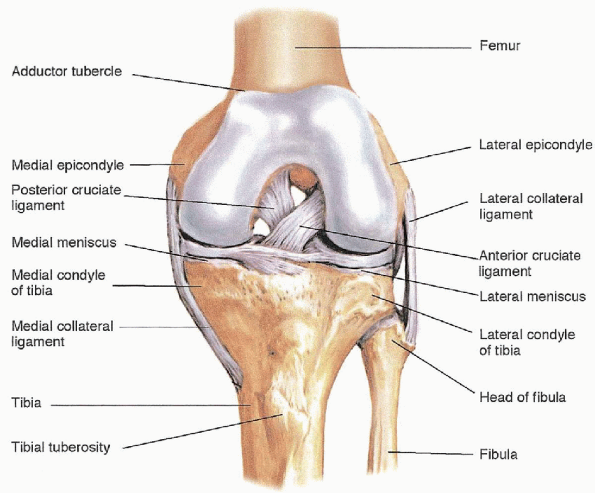
articulations: two condyloid joints, which are the medial and lateral
articulations of the distal femur and proximal tibia, and one sellar
joint, which is formed by the articulation of the patella with the
anterior aspect of the distal femur (Fig. 25-1). The surfaces of all three compartments of the knee joint are covered with articular cartilage.
between the articular surfaces of each compartment and are connected
anteriorly by the transverse intermeniscal ligament. These crescent, or
C-shaped, fibrocartilaginous structures deepen the concavity of the
proximal tibia, have a role in nutrition and lubrication of the joint,
and aid in protecting the articular surfaces. The peripheral one third
of the meniscus is vascular, has the potential for healing, and can be
considered for meniscal repair. The inner two thirds of the meniscal
cartilage is nourished by synovial fluid. The medial meniscus is a more
C-shaped structure, whereas the lateral meniscus is more circular. Both
meniscal cartilages are triangular in cross section and can be palpated
during arthroscopy on their inferior and superior surfaces.
knee, which is further enhanced by a complex arrangement of additional
ligaments, tendons, and capsular tissue. The medial and lateral
collateral ligaments resist valgus and varus angulation, respectively,
and are palpable at the joint line. The anterior and posterior cruciate
ligaments resist anterior and posterior displacement of the tibia on
the femur, respectively, and can be visualized and palpated within the
intercondylar notch. The popliteus tendon originates from the lateral
femoral condyle and inserts on the proximal tibia. It can be seen
traversing the posterior aspect of the lateral compartment by looking
into the hiatus behind the posterior horn of the meniscus.
operative tool. As an adjunctive tool, the arthroscope is used to
obtain or confirm a variety of diagnoses and should be used in
conjunction with a complete history, thorough physical examination, and
appropriate imaging studies. Diagnostic arthroscopy provides direct
visualization and tactile information about the intraarticular
structures of the knee. Damage to these structures can be assessed and
the information then used to develop a treatment strategy. Meniscal and
articular cartilage lesions, synovial lesions, and ligament
injuries are pathologic conditions that can be addressed with an arthroscopic examination of the knee.
 |
|
FIGURE 25-1. Anterior aspect of bony structures of the knee. From Bickley LS, Bates’ guide to physical examination and history taking, 8th ed. Philadelphia: Lippincott Williams & Wilkins, 2003.
|
morphology, size, stability, and location of the tear should be
described. The meniscus is divided into thirds: anterior horn, body,
and posterior horn. Basic patterns of meniscal tears include
longitudinal, horizontal, oblique, radial, and degenerative. The
stability of the tear should also be documented. Articular cartilage
damage is classified based on the location, size, and depth of
involvement. The cruciate ligaments are examined for intrasubstance
damage or avulsion from their insertion sites. Tears are classified as
partial or complete. Synovial lesions are classified by their location,
color, and morphology. Tissue can be obtained for specimen and sent for
histologic examination.
arthroscope and is confident in his or her ability to manipulate
instruments through a number of different portals, progression to
operative arthroscopy can gradually be made. Basic arthroscopic
procedures should be mastered before attempting complex surgeries:
-
Synovial biopsy
-
Synovectomy
-
Débridement of cartilage lesions
-
Removal of loose bodies
-
Partial meniscectomy
-
Lateral release
-
Saucerization of discoid lateral meniscus
-
Meniscal repair
-
Arthroscopic drilling and treatment of cartilage lesions
-
Arthroscopic assisted cruciate ligament reconstructions
examination and a complete standard radiographic examination. The
physical examination consists of the following elements:
-
Assessment of passive and active range of motion and of overall alignment
-
Tests for anterior-posterior, varus-valgus, and rotational instability (e.g., Lachman, drawer, pivot shift)
-
Palpation for focal areas of tenderness
-
Provocative tests for meniscal pathology (flexion-rotation)
-
Testing for patella tracking and instability
-
Assessment of gait
-
Anteroposterior, weight-bearing view of both knees
-
Anteroposterior and lateral views of the involved knee
-
Patella view
physical examination does not clearly point to a cause for the
patient’s symptoms and may help to delineate the exact nature and
extent of ligament and cartilage pathology.
MRI
is particularly useful for identifying lesions of the subchondral bone,
nondisplaced fractures, tumors, synovial lesions, and extraarticular
soft tissue lesions.
-
Arthroscopic video camera and monitor
-
Fiberoptic light source
-
4.5-mm, 30-degree arthroscope
-
Sheath for arthroscope
-
Trocar for arthroscope
-
4.5-mm, 70-degree arthroscope
-
Arthroscopic infusion pump or gravity inflow setup
-
Multiple 3-L bags of arthroscopic fluid
-
Suction setup
-
Manual probe
-
Manual meniscal cutters or biters
-
Grasping forceps
-
Motorized arthroscopic shaver system and an assortment of shaver blades
-
Suture material for portal closure
-
Tourniquet
-
Lateral post or leg holder
 |
|
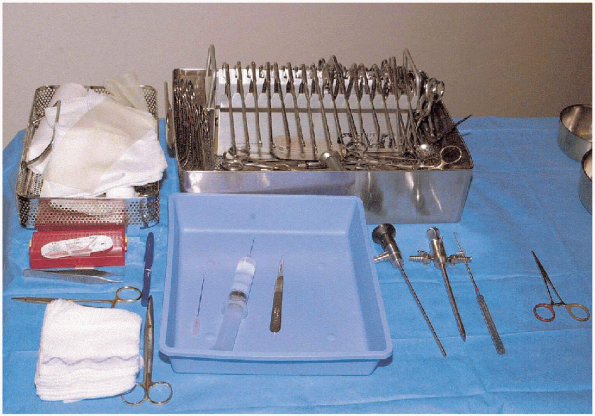
FIGURE 25-2.
Instruments for diagnostic and basic operative arthroscopy: dressings, sutures, forceps, needle driver, marker, suture scissors (left column); graspers and biters (top tray); spinal needle, syringe (normal saline), no. 11 scalpel (bottom tray); arthroscope, arthroscopic cannula and blunt trocar, probe, straight clamp (far right). |

Range of motion in all planes is assessed and recorded. Patella
mobility should be compared with the nonoperative extremity and
documented. Next, the knee is assessed for any varus or valgus laxity,
rotational laxity, or anterior or posterior instability. Pivot shift
testing should be performed and compared with the uninvolved knee.
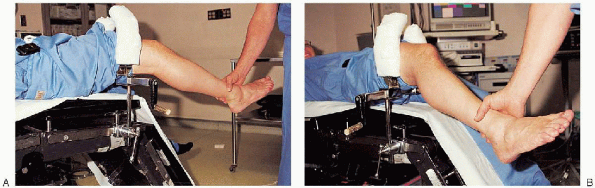
supine on the operating room table. A tourniquet is positioned over
padding that is placed on the upper most aspect of the patient’s thigh.
Some surgeons prefer to place the lower extremity into a leg holder and
to drop the foot of the table. Other surgeons choose to leave the lower
extremity flat on the table and use a lateral side post for
counterpressure with application of a valgus stress to the knee. A leg
holder is useful when the surgical assistant is not available to
help
support the leg and provide a valgus stress; however, the holder may
impede access to the lateral compartment and patellofemoral
compartments through superior portals (Fig. 25-3).
The leg holder also limits the ability to manipulate the leg to place
the knee into a figure-of-four position. Alternatively, the surgeon can
lever the leg against a lateral post to open up the medial compartment
of the knee (Fig. 25-4). The post does not confine or restrict the knee from being positioned or fully flexed. Excessive
stress applied to the knee while the leg is placed in a confining leg
holder can result in periarticular fractures or tearing of the
collateral ligaments. Care must be taken to avoid these complications,
especially in patients who may be at increased risk (i.e., arthroscopic
procedures in the older patient or those with disuse osteoporosis).
 |
|
FIGURE 25-3. The thigh can be placed in a leg holder for the arthroscopic procedure. (A) The foot of the bed is dropped, and the leg can hang free or be manipulated. (B) Valgus or varus stress can be applied to the knee by using the leg holding device for counter traction.
|
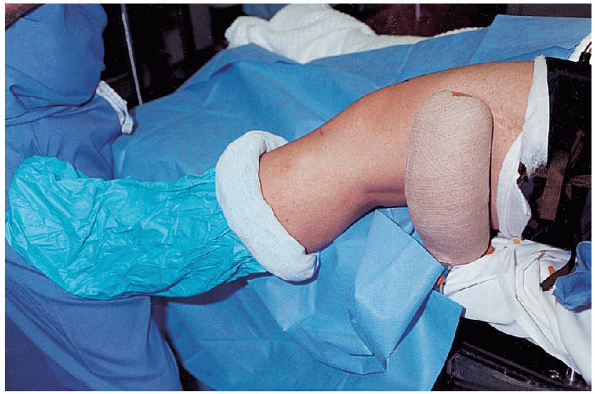
to the tourniquet. Many commercially available draping systems are
easily applied and provide access to the knee and lower extremity.
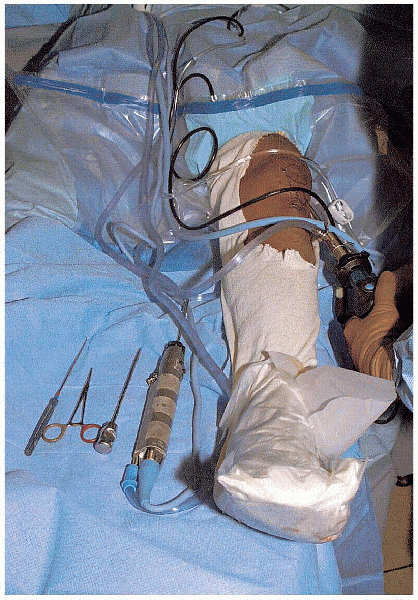
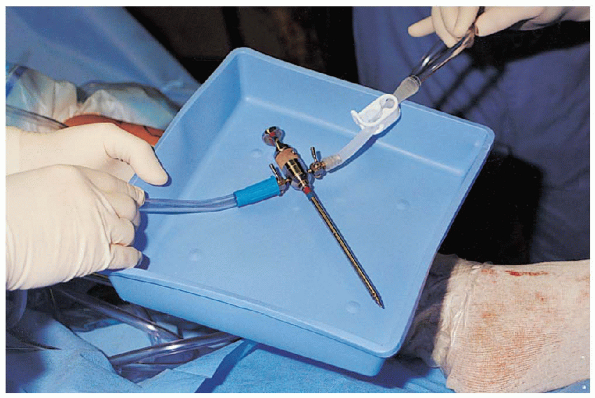
After preparing and draping the patient, all arthroscopic tubing and
equipment should be connected in an organized manner so they will not
become tangled during the procedure and interfere with the surgery (Fig. 25-5).
 |
|
FIGURE 25-4. Alternatively, arthroscopy can be performed on a flat table using a lateral post for countertraction.
|
success of the procedure. Improper placement of viewing and working
portals will make it difficult to visualize parts of the knee joint and
hinder the ability to maneuver instruments.
Poorly
placed portals also increase the risk of injury to the chondral
surfaces and may result in articular scuffing. Correct portal site
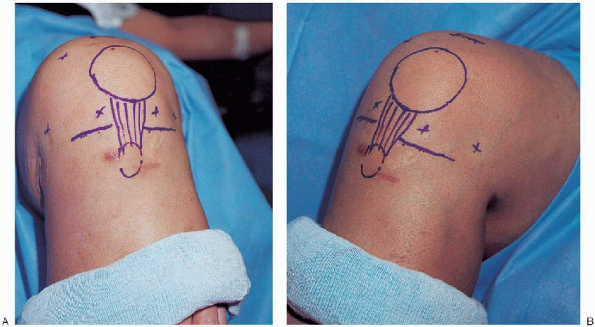
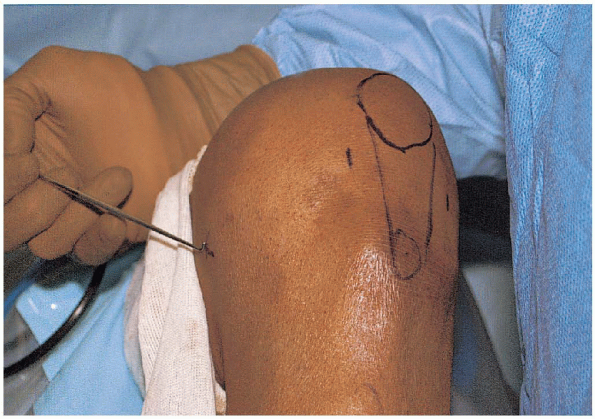
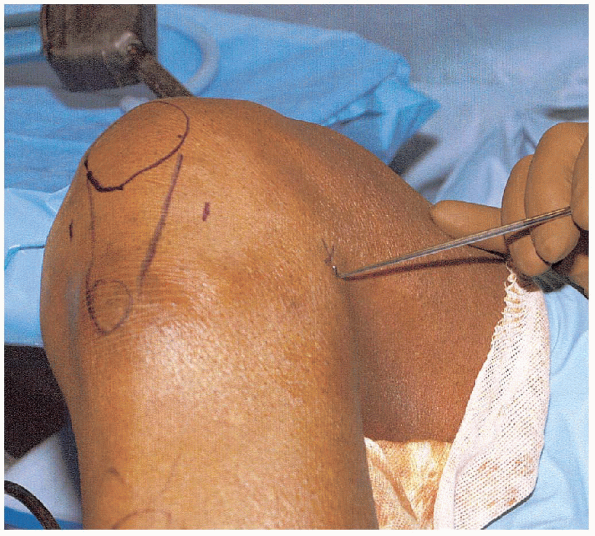
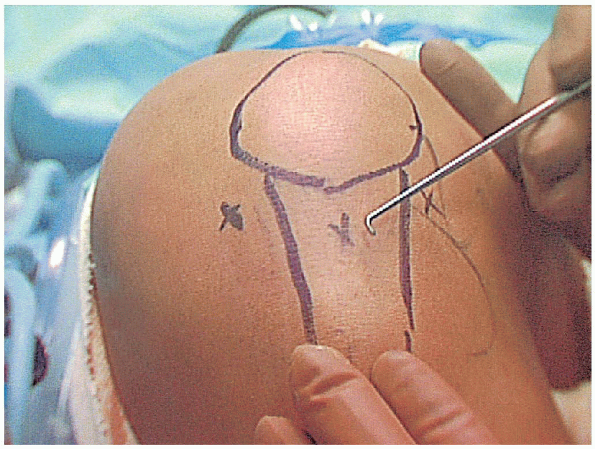
placement is best accomplished by preoperatively identifying all soft
tissue and bony landmarks and then drawing the outline of these
structures on the skin with a marking pen (Fig. 25-6). Markings should be made before distention of the knee joint, because this may become difficult after distention has occurred.
 |
|
FIGURE 25-5. Organization of tubing and equipment for arthroscopy: probe, straight clamp, blunt trocar, power shaver (lower left); arthroscope and camera in surgeon’s hand (far right).
|
 |
|
FIGURE 25-6. A, B:
The skin is marked to outline the knee anatomy before inflation with arthroscopic fluid. The positions of standard and accessory portals should be marked in case they are needed. |
-
Patella
-
Patellar tendon
-
Medial joint line
-
Lateral joint line
-
Posterior aspect of the medial and lateral femoral condyles
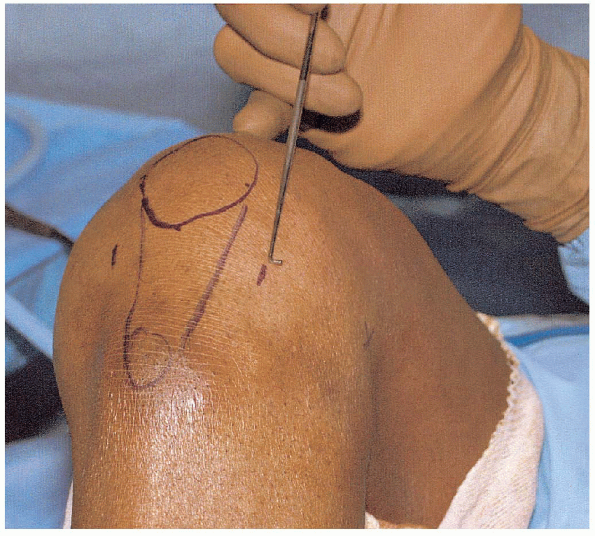
marked on the skin. Two basic arthroscopic portals are used for
diagnostic and operative arthroscopy: anterolateral and anteromedial (Fig. 25-7).
The anterolateral portal is the standard viewing portal used by most
arthroscopic surgeons and is located approximately 1 cm above the
lateral joint line and 1 cm lateral to the edge of the patellar tendon.
If a portal is placed too inferiorly, the anterior
horn of the lateral meniscus may be damaged. An anterolateral portal
that is placed too high risks damage to the chondral surfaces of the
lateral femoral condyle and may prevent viewing of and access to the
posterior lateral joint structures. If the portal is placed too close
to the edge of the patellar tendon, the arthroscope will pass through
the fat pad and make viewing and maneuvering within the joint difficult. When
an anterior cruciate ligament reconstruction is planned, it may be
helpful to place the portal closer to the edge of the patellar tendon
to provide better access to the medial aspect of the lateral femoral
condyle. This often requires partial débridement of the infrapatellar
fat pad for better visualization.
 |
|
FIGURE 25-7. Anterolateral and anteromedial portals.
|
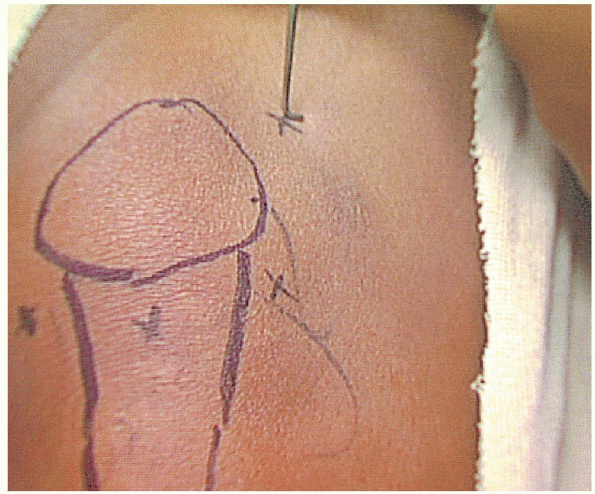
portal for knee arthroscopy. This portal is located 1 cm above the
medial joint line and approximately 1 cm medial to the edge of the
patellar tendon. It can be created before extension of the joint with
arthroscopy fluid, or it may be created after localization with a
spinal needle while viewing from inside the knee. Our
preference is to create the anteromedial portal after localization with
a spinal needle. This allows small adjustments to be made before the
portal is created and may ensure better access to the site of primary
pathology. The arthroscopic surgeon should become adept at
switching the working and viewing portals for more versatile access to
all aspects of the knee joint. The anteromedial portal may also be used
as a viewing portal by switching the arthroscope from the anterolateral
portal. If the portal is placed too inferiorly,
the anterior horn of the medial meniscus may be damaged. A portal that
is placed too high risks damage to the chondral surfaces and may not
allow access to the posterior aspect of the medial compartment. If the
portal is positioned too close to the edge of the patellar tendon,
instruments may get caught in the infrapatellar fat pad, or they may
not be able to access the posterior horn of the medial meniscus.
that may be used for inflow or outflow. It can also be used for
placement of the arthroscope to visualize the tracking of the patella
in the femoral groove. Instruments may be placed into this portal to
perform arthroscopic procedures such as a lateral release or excision
of a medial plica. The portal is located just lateral to the tendon of
the quadriceps muscle and approximately 2 to 3 cm above the
superolateral corner of the patella (Fig. 25-8). Newer
arthroscopic surgery systems allow inflow and outflow through the
arthroscopic camera sheath and may be used without an accessory inflow
or outflow portal (i.e., two-incision technique) (Fig. 25-9).
The superomedial portal may be established as an accessory inflow or
outflow cannula instead of the superolateral portal. The site for this
portal is approximately 2 to 3 cm above the superomedial corner of the
patella. The cannula or instruments should be passed underneath the
medial edge of the vastus medialis muscle.
 |
|
FIGURE 25-8. Superolateral portal.
|
 |
|
FIGURE 25-9. Arthroscopic cannula with inflow and outflow.
|
provides access to the structures of the posteromedial compartment.
This portal can be located by palpating the soft spot at the
posteromedial corner of the knee. The portal is placed in the
triangular soft spot formed by the posteromedial edges of the femoral
condyle and proximal tibia. It is best identified by marking the
landmarks and the site of portal placement on the skin before
distension of the knee. It is located 1 cm above the posteromedial
joint line at the posterior edge of the femoral condyle (Fig. 25-10). The
knee should be flexed to 90 degrees, and the joint should be fully
distended before creation of the portal. If a 70-degree arthroscope is
placed through the intercondylar notch, this portal site can be created
under direct visualization from within the knee. Palpation of the soft
spot can be seen as an indentation of the capsule, and a spinal needle
can be used
for localization and confirmation before establishing the portal.
The posterolateral portal is an accessory portal that provides access
to the posterolateral corner of the knee. It is established in a
fashion similar to the posteromedial portal. Its location is at the
posterolateral soft spot, which is found at the posterior edge of the
iliotibial band and anterior edge of the biceps femoris tendon,
approximately 2 cm above the joint line, at the posterolateral corner
of the knee (Fig. 25-11). This portal can also
be created under direct visualization with a 70-degree arthroscope
passed through the intercondylar notch. If a
trocar or instrument is passed posteriorly and penetrates the capsule,
there is a risk of injury to the neurovascular structures in the
popliteal space.
 |
|
FIGURE 25-10. Posteromedial portal.
|
 |
|
FIGURE 25-11. Posterolateral portal.
|
accesses the knee by passing through the patellar tendon. This portal
site is located approximately 1 cm below the inferior pole of the
patella at the midline (Fig. 25-12). The
patellar tendon is split, and the arthroscope is passed through this
split into the knee. The arthroscope should first be passed into the
superomedial aspect of the knee, which is in 45 degrees of flexion.
This allows the arthroscope to pass into the knee above the
infrapatellar fat pad. When this portal is used for visualization, it
allows the anteromedial and anterolateral portals to be used for
instrumentation.
 |
|
FIGURE 25-12. Anterior central portal.
|
surgical landmarks have been outlined on the skin, the knee is flexed
to between 70 and 90 degrees. If a tourniquet is not routinely going to
be used during the procedure, the portal sites can be infiltrated with
5 mL of a local anesthetic mixed with epinephrine. This helps control
bleeding at the portal sites. Care must be taken
not to infiltrate the sites with excessive fluid, because this may
distend the infrapatellar fat pad and interfere with visualization.
Next, the thumb is placed on the lateral tibial condyle and rolled up
into the soft spot 1 cm above the lateral joint line. This helps to
confirm that the portal site is just above the level of the meniscus.
Using a no. 11 scalpel, a 4- to 5-mm incision is made through the skin
and subcutaneous tissue and then extended down through the capsule. The
knife edge should be facing up to avoid inadvertent laceration of the
meniscus. Caution must be used so that the knife is not plunged too
deeply, because this may cut the chondral surface of the lateral
femoral condyle.
through the portal and directed into the intercondylar notch. The
trocar and sheath are then retracted slightly and advanced into the
suprapatellar pouch as the knee is brought into full extension. At this
point, the trocar is removed from the sheath; any fluid from inside the
knee can be collected in a basin and sent as a specimen for analysis,
if so desired. The arthroscope is then inserted into the sheath, and
the knee joint is inflated with fluid. Any
difficulty accomplishing this maneuver may indicate that the sheath is
caught in the patellar tendon or the ligamentum mucosa. If this occurs,
the sheath should be removed and reintroduced into the joint.
examination of all parts of the knee joint. The arthroscopic surgeon
should develop a consistent method of moving from one portion of the
knee to the next and then perform the examination in the same manner
for all arthroscopic knee cases.
-
Suprapatellar pouch
-
Patella
-
Patellofemoral articulation
-
Lateral gutter
-
Medial gutter
-
Medial femoral condyle
-
Medial meniscus and the medial compartment
-
Intercondylar notch
-
Anterior cruciate ligament
-
Posterior cruciate ligament
-
Lateral femoral condyle
-
Lateral meniscus and the lateral compartment
each part of the knee, the surgeon carefully visualizes all structures
and uses a probe for manual palpation. All visual and tactile
information (i.e., chondral softness) should be recorded. The
suprapatellar pouch and medial and lateral gutters are inspected for
the presence of loose bodies and for the condition of the synovial
lining. Samples of the synovial tissue can be obtained and sent for
analysis, if needed. The articular surface of the patella and femoral
groove is carefully examined for chondral damage.
The arthroscopic surgeon can visualize all portions of the knee by
using a combination of movements of the arthroscopic sheath and by
changing the direction of orientation of the arthroscopic lens. For
observation of patellofemoral congruity and tracking, the arthroscope
is best positioned in the superolateral portal with the lens pointing
medially. A medial plica may be encountered on attempting to
move the sheath to the medial gutter. If the sheath is caught in a
thickened medial plica, it should be retracted slightly so that it
disengages and can then be freely advanced into the medial gutter.
inspection of the medial gutter is completed, the lens is directed
medially while the scope is brought into the anteromedial aspect of the
knee. If the anteromedial portal has not yet been established, the lens
is directed laterally, and the portal is created after localization
with a spinal needle (Fig. 25-13). This helps
to ensure proper placement of the portal and adequate access to the
involved portion of the knee. With the lens pointing superiorly, the
medial femoral condyle is inspected as the knee is placed through a
range of motion, and a probe is used to palpate the chondral surfaces.
Next, the knee is placed in approximately 30 degrees of flexion, and a
valgus force is applied. The arthroscope is carefully placed between
the articulating surfaces, taking care not to cause any chondral
damage. The scope should be retracted from
between the chondral surfaces before the valgus stress is released.
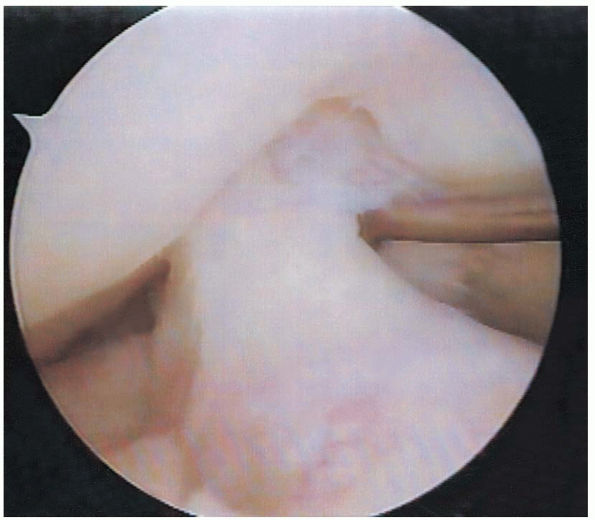
This can prevent inadvertent damage. The lens is then rotated to allow visualization of the anterior horn, body, and posterior horn of the medial meniscus (Figs. 25-14 and 25-15). Under direct visualization, a probe is used to manually palpate the superior and inferior surface of the meniscal tissue.
The posterior horn is best viewed with the knee in 30 degrees of
flexion and by externally rotating the tibia. The periphery of the
posterior horn can be visualized by placing the arthroscope through the
intercondylar notch (Fig. 25-16). The scope is advanced underneath the posterior cruciate ligament and
along the medial wall of the intercondylar notch.
The knee is placed between 80 and 90 degrees of flexion as the sheath
is advanced. After the scope enters the posteromedial compartment, the
lens can be directed between 4:30- and 7:30-o’clock positions to
visualize the posterior horn of the medial meniscus and the posterior
cruciate ligament. Additional structures can be visualized by changing
the 30-degree scope to a 70-degree scope.
 |
|
FIGURE 25-13. A spinal needle can be used to localize precise portal placement.
|
 |
|
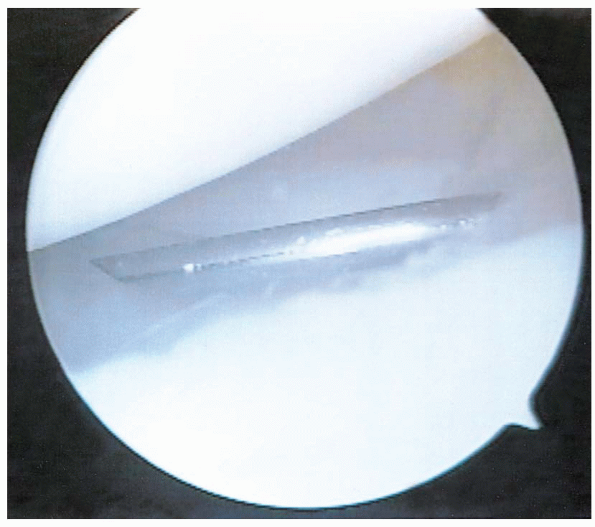
FIGURE 25-14. Visualization of the posterior horn of the medial meniscus, demonstrating a tear.
|
 |
|
FIGURE 25-15. Visualization of the body of the medial meniscus, demonstrating a tear.
|
 |
|
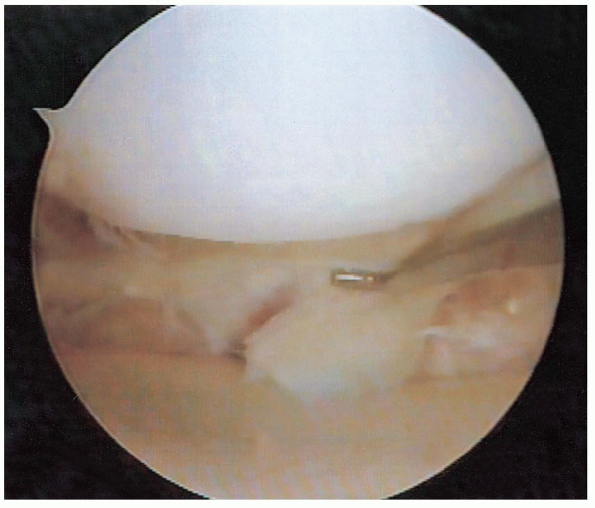
FIGURE 25-16. Visualization of the posterior horn of the medial meniscus with the arthroscope placed through the intercondylar notch.
|
the lens directed medially, the arthroscope is brought into the
intercondylar notch. Viewing may be obscured by the presence of the
ligamentum mucosa or a thick septum dividing the medial and lateral
compartments. The arthroscope should be used to follow the roof of the
intercondylar notch from medial to lateral aspects until the lateral
side of the ligamentum is reached. Dropping the scope down to the
lateral side of the ligamentum mucosa allows an unobstructed view of
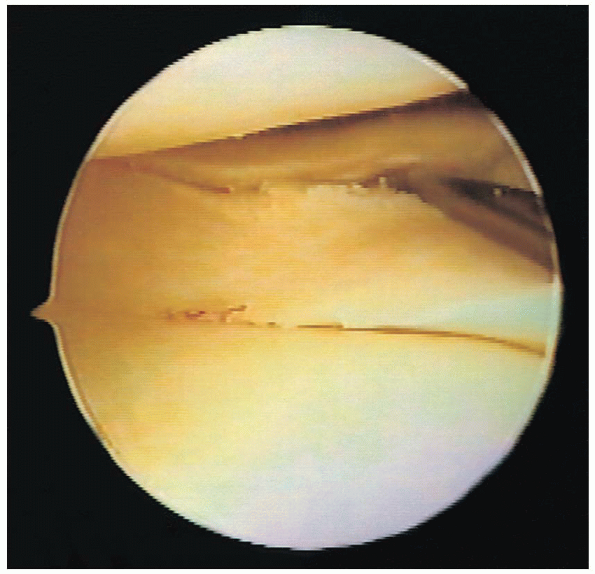
the anterior and posterior cruciate ligaments (Fig. 25-17).
To completely visualize the intercondylar notch, a thickened
infrapatellar fat pad or ligamentum mucosa sometimes must be débrided.
Both ligaments are manually probed and inspected for any signs of
disruption or hemorrhage (Fig. 25-18).
Instability testing can be performed while observing the ligaments to help determine if they are functioning properly.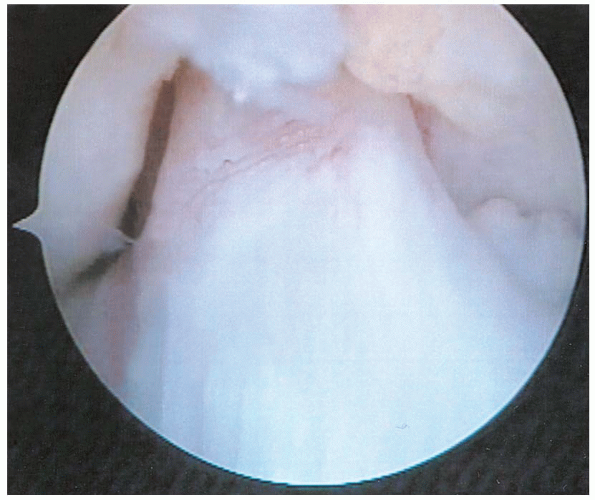 |
|
FIGURE 25-17. Anterior cruciate ligament.
|
 |
|
FIGURE 25-18. The cruciate ligaments should be probed as part of the inspection.
|
the arthroscope above the anterior horn of the lateral meniscus, the
knee is placed in a figure-of-four position to gain access to the
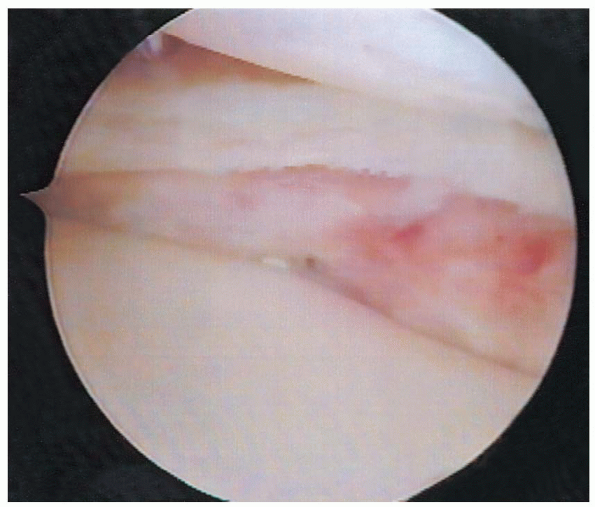
lateral compartment (Fig. 25-19). The arthroscopic camera should be rotated in conjunction with the knee as it is placed into this position. Downward pressure on the thigh helps to open the lateral compartment. The lateral meniscus is inspected and palpated throughout its entire length (Fig. 25-20).
The popliteus hiatus is visualized behind the posterior horn of the
lateral meniscus and should be inspected for the presence of loose
bodies. Manual pressure on the posterolateral aspect of the knee may
help identify loose bodies as they are displaced into the joint. The
posterolateral compartment can be viewed or accessed by means of a
posterolateral portal or by the use of a 70-degree arthroscope placed
through the intercondylar notch, as described previously.
the knee is irrigated with copious amounts of fluid and suctioned dry
to remove debris from the joint. All portal sites are closed with
simple nylon suture. Local anesthetic with epinephrine may be injected
into the knee to help with postoperative pain control and hemostasis.
sterile dressing and wrapped with an elastic bandage. If the surgeon
has performed diagnostic or basic operative arthroscopy, such as an
uncomplicated partial meniscectomy or chondral shaving (Fig. 25-21),
the patient is instructed to ambulate with a cane or crutches, as
needed, and to fully bear weight as tolerated, with no limitation on
the range of motion. If
subchondral
drilling, meniscal repair, or other more complex arthroscopic
procedures are performed, the postoperative protocol, including the
weight-bearing status, varies according to the procedure performed and
the surgeon’s preference. Home exercises may be started immediately, as
symptoms allow. These exercises can include active range of motion,
quadriceps sets, straight leg raises, and partial wall squats.
 |
|
FIGURE 25-19. The leg is placed into a figure-of-four position to gain access to the lateral compartment of the knee.
|
 |
|
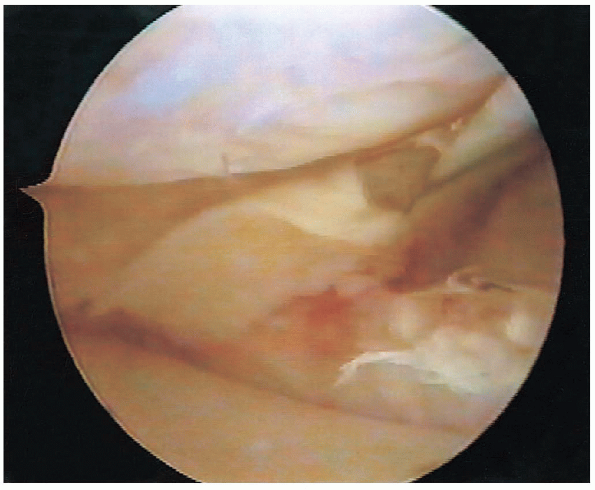
FIGURE 25-20.
Visualization of the posterior horn of the lateral meniscus, demonstrating a tear. The probe is placed in the superior surface of the tear. |
 |
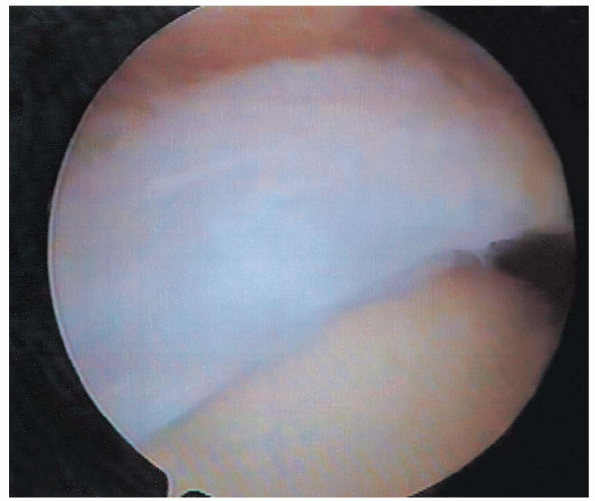
|
FIGURE 25-21. Partial medial meniscectomy and débridement has been completed.
|
for icing the knee for 15 to 20 minutes every hour. Patients are
instructed to contact the surgeon for any persistent drainage or
increasing pain with range of motion, which may suggest a postoperative
infection.
at 7 to 10 days after surgery for suture removal. Bandages may be
removed after 24 hours, and incisions covered with Band-Aids. The
incisions should be kept dry for 48 hours. The range of motion, amount
of swelling, and gait are assessed. If patients are progressing well
with home exercises, they may be instructed on advancing their home
program and on quadriceps strengthening. If a patient returns to the
office with poor range of motion and fails to progress with a home
therapy program, she or he should be sent for formal physical therapy
with the goals of achieving full range of motion and increasing
quadriceps control and strength. Most patients are usually able to
return to work within a few days of surgery. A return to sporting
activity is possible 3 to 6 weeks after diagnostic arthroscopy or basic
operative arthroscopic procedures.