
Cole & Sekiya: Surgical Techniques of the Shoulder, Elbow and Knee in Sports Medicine, 1st ed.
Copyright ©
2008 Saunders, An Imprint of Elsevier
CHAPTER 58 – High Tibial Osteotomy
Annunziato Amendola, MD
High tibial osteotomy is a useful technique for altering lower limb alignment, thereby allowing the surgeon to adjust the biomechanical environment of the knee. Jackson and Waugh first described a dome osteotomy of the proximal tibia to treat osteoarthritic knees with either varus or valgus malalignment. Coventry later described the use of either medial or lateral closing wedge high tibial osteotomy for malaligned knees with early signs of degenerative arthritis. Subsequent experience and the improved longevity of total knee arthroplasty have narrowed the indications for high tibial osteotomy in patients with knee arthritis. High tibial osteotomy is now receiving renewed interest as it has become evident that coronal and sagittal plane correction of the knee can augment or in some cases supplant the function of certain structures within the knee. The development of meniscal transplantation and the treatment of femoral chondral defects have opened the need to use the high tibial osteotomy to offload these injury-prone areas. Increased or decreased proximal tibial slope has been shown to affect the function of the cruciates and can be a contributing factor to recurrent cruciate injury. High tibial osteotomy can be used to correct the aforementioned sagittal plane deformities of the proximal tibia. This chapter outlines the preoperative considerations and appropriate indications as well as describes the surgical techniques used by the authors in performing a high tibial osteotomy for a variety of conditions.
Several factors are involved in ensuring a successful outcome of high tibial osteotomy, but none is more important than proper selection of the patient. The selection of the proper patient begins with a detailed history and physical examination and is aided by appropriate radiographic imaging. These aspects are then combined to determine which patients will benefit from high tibial osteotomy and which are better served by other treatment modalities.
The history should cover aspects including age of the patient, activity level, occupation, possible comorbidities, and previous conservative or surgical interventions. A history of antecedent trauma or injury to the affected knee needs to be elucidated. One of the most important facts to gather is the activity level the patient hopes to resume after surgery. The area of pain distribution is vitally important, and every effort should be made to accurately identify the specific locus of the patient’s knee pain. The presence or absence of mechanical symptoms, such as locking, catching, or episodes of instability, should be addressed as these may indicate underlying pathologic processes that may benefit from arthroscopic management at the time of high tibial osteotomy.
The physical examination notes the patient’s overall body habitus as well as the overall level of conditioning. Both lower extremities should be fully visualized in both the coronal and sagittal planes, with attention given to areas of deformity and overall limb alignment. Rotational malalignment is also sought. The patient’s gait is observed and evaluated for any thrusts in the direction of the deformity, which may reveal an underlying dynamic component. Deformities are assessed for potential to be corrected. The knee is inspected for previous surgical incisions or areas with suspect soft tissue that could alter standard surgical approaches. Range of motion is evaluated, as are any alterations in patellar tracking. Presence or absence of an effusion is noted. Palpation of the entire knee is carried out in an attempt to identify underlying mechanical sources of the patient’s pain. A thorough ligamentous examination is carried out to look for collateral or cruciate laxity. The ability of a valgus force to decrease the patient’s pain as the knee is put through a range of motion is assessed and may mimic the unloading effect of a proposed osteotomy. Other sites that can refer pain to the knee, such as the low back, hip, and ankle, are evaluated.
In addition to a thorough history and physical examination, radiographic evaluation is an integral portion of the work-up for a high tibial osteotomy. Plain radiographs are essential for preoperative assessment and planning and consist of a series of five films. The series is made up of bilateral anteroposterior weight-bearing views at full extension, bilateral posteroanterior weight-bearing views at 45 degrees of flexion, a Merchant view, and a lateral view of the affected knee. In addition, a full-length alignment view in double limb stance is obtained. It is important that weight-bearing views be obtained because supine views tend to underestimate both joint line narrowing and soft tissue laxity. Controversy exists as to whether single limb stance or double leg stance should be used for operative planning; however, single limb stance tends to overestimate the soft tissue laxity component of the deformity and is therefore not used for this purpose at our institution.
Various measurements are made from the radiographs to assist in preoperative planning. Common measurements taken are the axis of weight bearing, the joint congruency angle, and the articular angles of the tibia and femur to aid in determination of the site of deformity. To determine the axis of weight bearing, a line is drawn on the full-length radiographs from the center of the femoral head to the center of the tibiotalar joint. Articular angles are determined along with determination of the axes of both the tibial and femoral shafts to uncover coronal plane deformities. In like fashion, the lateral radiograph is used to calculate tibial slope for the assessment of sagittal plane deformities.
Several methods have been reported for determining the required correction on preoperative radiographs. In general, the desired location of the weight-bearing line postoperatively is determined and the angular correction is then calculated to achieve this position. In practice, satisfactory results are achievable with overcorrection of medial compartment arthritis into slight valgus alignment and with correction to neutral alignment when operating for lateral compartment arthrosis. High tibial osteotomy is most commonly performed for genu varum with associated medial compartment arthrosis, and an example of the calculation for correction is presented here. Dugdale et al first described the current method of calculation used at our institution. Full-length standing anteroposterior radiographs of both lower extremities are used. The final position of the weight-bearing line should rest in the zone of 62% to 66% as described by Dugdale. A line is then drawn from the center of the femoral head through this point at the knee joint. A line is then drawn from the center of the ankle joint to the same point at the knee, bisecting and forming an angle with the femoral line. The angle formed by this intersection represents the amount of angular correction needed to place the weight-bearing line at the desired more lateral position. A line is then drawn over the proximal tibial metaphysis, simulating the proposed position of the tibial osteotomy. The osteotomy should run in a medial-distal to proximal-lateral direction, with care taken to leave at least 1 cm of intact bone superior to the lateral extent of the osteotomy to prevent fracture into the joint at the time of angular correction. This point is usually just at the superior extent of the proximal tibia-fibula joint. The length of this cut is then calculated. The length of the cut is then transposed over the angular correction line, and the length between the two bisector lines at this level is calculated. The length measured represents the height of the wedge needed to create the exact angular correction. Measuring wedge height facilitates intraoperative correction and alleviates the need for intraoperative angular measurement.
The main indication for a high tibial osteotomy is in a young patient with isolated medial compartment arthritis or overload and a malaligned limb or in the older patient who is active and in whom a unicompartmental or knee arthroplasty is likely to fail. High tibial osteotomy can be used in patients with concomitant anterior cruciate ligament laxity or failed cruciate reconstruction who have varus malalignment and medial compartment overload. Also in the patient with cruciate laxity due to variances in proximal tibial slope, adjustment of the tibial slope can partially compensate for the cruciate deficiency by decreasing tibial translation. An example is increasing posterior tibial slope to compensate for a posterior cruciate ligament–deficient knee with a posterior sag and instability. Osteochondral defects and avascular necrosis of the medial femoral condyle can be off-loaded with a high tibial osteotomy. Realignment after meniscal or cartilage transplantation is another area in which high tibial osteotomy has proved useful.
High tibial osteotomy is contraindicated in individuals with concomitant arthritis in the opposite tibiofemoral compartment. Arthritic changes in the patellofemoral compartment are to be considered and may be a relative contraindication or concern. Other contraindications are pain referable to other areas of the knee and the lack of a functional lateral meniscus. Poor bone quality at the osteotomy site or other factors that might inhibit healing need to be considered.
The technique most commonly used at this institution is the medial opening wedge osteotomy (
Box 58-1
). The following is our step-by-step approach for performing this technique. The patient is generally given both femoral and sciatic single shot nerve blocks and then given a general anesthetic. The patient is placed in a supine position at the edge of the table on the operative side to facilitate intraoperative fluoroscopic imaging. A tourniquet is used in all cases. The operative limb is prepared and draped free. The surface anatomy is palpated, and the following structures are drawn on the skin: medial edge of the tibial tubercle and patellar tendon, inferior joint line, and posterior medial border of the tibia (
Fig. 58-1
).
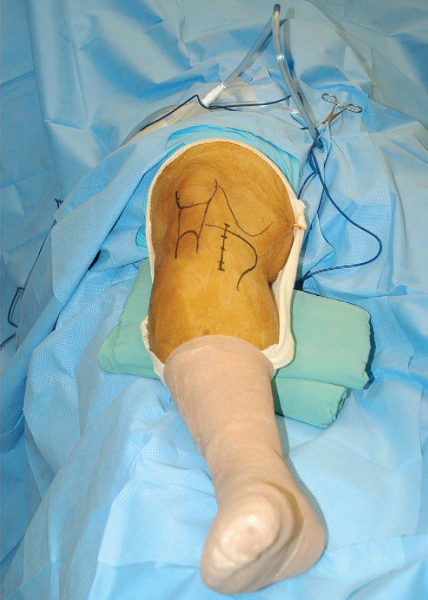
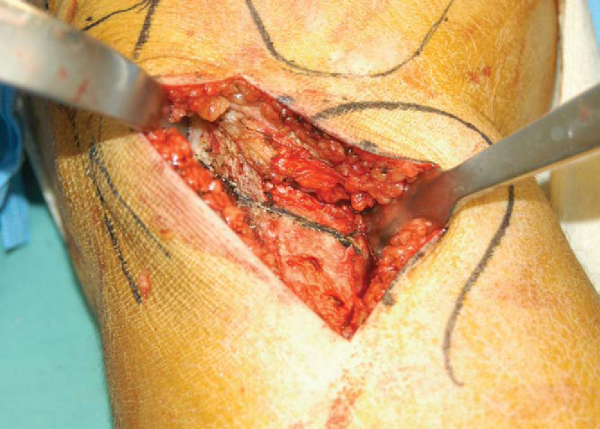
A 6-cm incision is made 1 cm distal to the joint line and halfway between the tibial tuberosity and the posteromedial border of the tibia. The subcutaneous tissue is dissected sharply down to the level of the sartorius fascia. Starting at the medial edge of the tibial tubercle, the sartorius fascia is incised longitudinally. The sartorius fascia and the pes anserine are then elevated off the medial tibia to the level of the medial collateral ligament. The deep fibers of the medial collateral ligament are then raised from an anterolateral to posteromedial direction subperiosteally. A Homan retractor is then placed around the posteromedial corner of the tibia. The medial edge of the patellar tendon is then identified, and a longitudinal incision just medial to the tendon is made for a short distance in a superior direction. This allows placement of a second Homan retractor just superior to the tibial tuberosity and underneath the patellar tendon, thereby protecting it during the osteotomy cuts (
Fig. 58-2
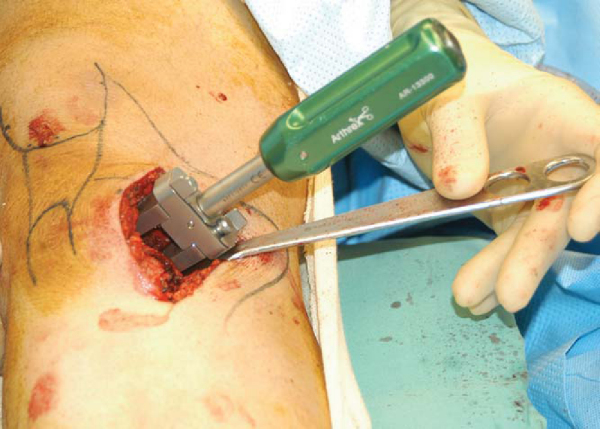
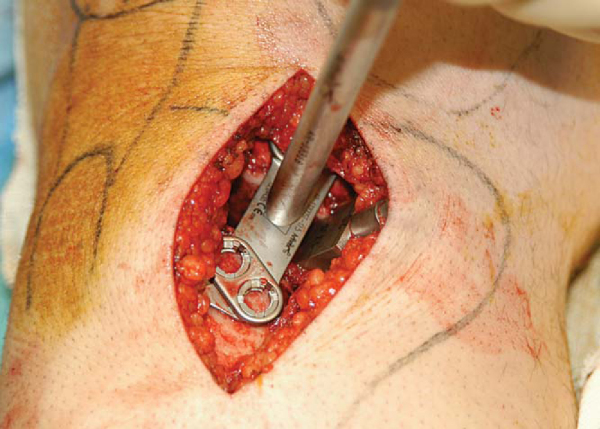
). The medial proximal tibia is thus exposed. Two parallel guide pins are placed just proximal to the intended osteotomy line. The starting point for these pins is approximately 3 to 4 cm distal to the medial joint line. The pins are directed in an oblique fashion from an inferior-medial position to a superior-lateral position (Figs. 58-3 and 58-4 [3] [4]). Because the proximal tibia is sloped posteriorly, the osteotomy must be made in an oblique fashion to maintain an adequate bridge of bone along the posterior cortex of the tibia. The pins should be no less than 1 cm from the joint surface of the lateral tibial plateau. The pins guard against proximal migration of the osteotomy toward the joint. Distances less than 1 cm are more likely to fracture into the joint at the time of osteotomy correction. Absolute requirements for pin placement include osteotomy placed above the insertion of the patellar tendon, adequate distal starting point to allow proximal plate fixation, and osteotomy at least 1 cm distal to lateral tibial articular surface. A small sagittal saw is then used from anterior to posterior to initiate the osteotomy cut just below the two guide pins and parallel to them. Thin broad AO osteotomes are then used to complete the osteotomy. The use of thicker, more traditional osteotomes can lead to fracture into the joint. Fluoroscopic images are obtained throughout to ensure that the lateral tibial cortex is not violated and to ensure parallelism between the guide pins and the osteotome (Figs. 58-5 and 58-6 [5] [6]).


Once the osteotomy is complete, a second osteotome is placed under the first to begin to open the osteotomy. A third can also be added if the need arises. This stacking technique gradually opens the osteotomy, leaving the lateral tibial cortex intact. A gentle valgus stress can also be applied on the knee to assess mobility of the osteotomy (
Fig. 58-7
).
|
|
|
|
Figure 58-7 |

The medial aspect of the osteotomy can be opened further for larger corrections by inserting the screw jack into the osteotomy and gradually advancing the screw to apply a controlled opening force (
Fig. 58-8
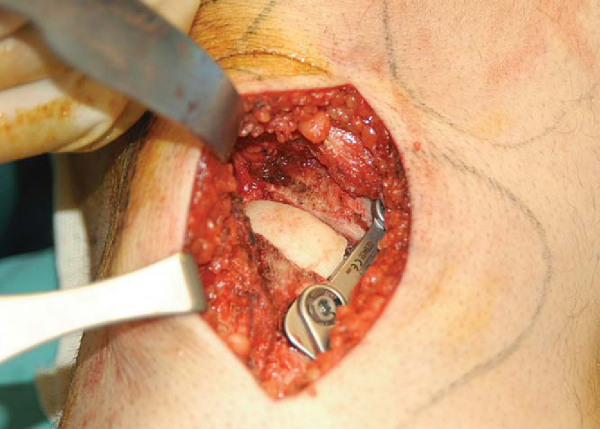
). A graduated Puddu wedge is then inserted at the same angle as the osteotomy, creating the exact wedge height as had been calculated preoperatively. The graduated wedge should be advanced slowly (5 mm/min) to allow gradual opening of the osteotomy (
Fig. 58-9
). A wedged Puddu plate of the same size is then inserted (
Fig. 58-10
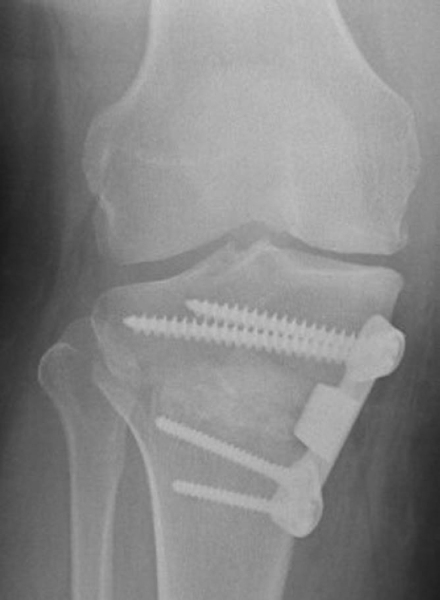
). The graduated wedge is removed, and the plate is then placed in a more posterior position. A common mistake is to leave the plate in an anterior position, which leads to an unwanted increase in posterior tibial slope. The plate is then secured with two 6.5-mm cancellous screws superiorly and two 4.5-mm cortical screws inferiorly (
Fig. 58-11
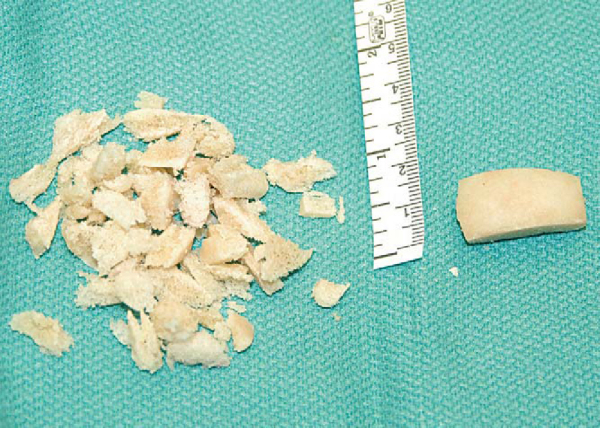
). Femoral head allograft is then morselized and placed into the wedge defect. A corticocancellous wedge is then placed just anterior to the plate to help maintain the open wedge (Fig. 58-12 and 58-13 [12] [13]). Autologous iliac crest can be used, but this can lead to donor site morbidity. Final images are obtained to ensure proper hardware placement (
Fig. 58-14
). The wound is irrigated, and the pes anserine and sartorius fascia are repaired over the plate. The subcutaneous tissue is reapproximated, the skin is closed and a dressing applied.

|
|
|
|
Figure 58-11 |

|
|
|
|
Figure 58-14 |
Anterior Cruciate Ligament Reconstruction and High Tibial Osteotomy
The high tibial osteotomy is generally performed after harvesting of the hamstring tendons if autograft is being used. Once the high tibial osteotomy is complete, the anterior cruciate ligament reconstruction can be performed. The tibial tunnel should be placed just proximal to the proximal screws of the high tibial osteotomy.
The patient is placed in a hinged knee brace that allows motion from 0 to 90 degrees of flexion. The patient is kept overnight for pain control and to work with physical therapy. The patient is kept touch-down weight bearing in the hinged knee brace for 6 weeks. The patient is encouraged to work on range of motion from 0 to 90 degrees in the hinged knee brace during this time. Plain films are obtained at 6 weeks postoperatively, and if adequate healing is apparent, progressive weight bearing is initiated. If the lateral cortex was violated during the operative procedure, the weight-bearing protocol is adjusted to include a longer interval of protected weight bearing. Total time for recovery and resumption of normal activities generally averages 6 months.
| PEARLS AND PITFALLS | |||||||||||||||||||||||||||||||||||||||||||||||||||||||||
|
Longer term followup studies of high tibial osteotomy demonstrate a general decline in the therapeutic effects with time (
Table 58-1
). Studies have shown that high tibial osteotomy is more effective in the younger, more active patient with maintenance of knee range of motion. The higher demands placed on the knee by these more active individuals may make high tibial osteotomy a better alternative to knee arthroplasty. High tibial osteotomy may be effective for 10 to 20 years in these well-selected patients. Factors that predict a poorer outcome include advanced age, severe arthrosis, joint instability, limited range of motion, operative overcorrection or undercorrection, and loss of correction.