
incongruity or instability are best treated by open reduction and
internal fixation (ORIF). Contraindications to surgery are ill defined
and not absolute. Important concerns include preexisting patient
factors, such as poor general medical status and osteopenia, and
factors that relate to overall patient prognosis, such as advanced age
and associated injuries. All of these conditions must be considered
with the knowledge that with nonoperative treatment in the face of
joint incongruity or instability or both, the prognosis for hip-joint
function is poor.
surgeon has an objective to select the least extensive exposure that
allows sufficient bony access for anatomic joint reconstruction. The
Kocher-Langenbeck approach provides direct visualization of the entire
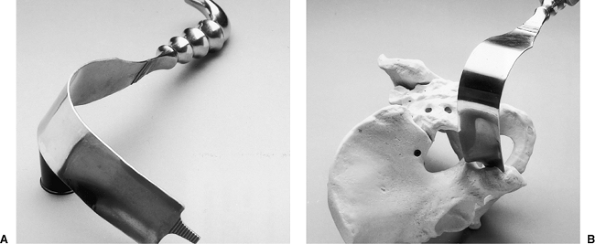
lateral aspect of the posterior column of the acetabulum (Fig. 41.1) (1).
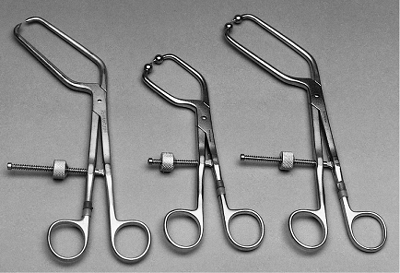
Indirect access to the true pelvis and to the anterior column can be
attained by the palpating finger or through the use of special
instruments (Figs. 41.1, 41.2 and 41.3) (1).
Therefore, the Kocher-Langenbeck approach is applied in the treatment
of fractures with the main displacement involving the posterior column.
In the classification of Letournel and Judet (Table 41.1),
this group consists of six fracture types: posterior wall, posterior
column, posterior column and wall, transverse, transverse and posterior
wall, and T-shaped. The Kocher-Langenbeck approach is the surgical
exposure of choice for the first three types, in which the
fracture
extent is limited to the posterior wall or column or both. For the
transverse, transverse and posterior wall, and T-shaped fractures, some
decision making is required. All three of these fracture types have a
transverse fracture line as a common component. As a general guideline,
if the fracture is less than 15 days old and the transverse component
is located at (juxta-) or below (infra-) the level of the roof (tectum)
of the acetabulum (therefore not involving the weight-bearing area of
the acetabulum), the Kocher-Langenbeck approach is indicated (1).
Otherwise, an alternative exposure, such as the extended iliofemoral
approach, should be used. For acute juxtatectal- and infratectal-level
transverse and T-shaped fractures, in which the major displacement
occurs anteriorly at the pelvic brim and only minor posterior
displacement, the ilioinguinal approach is perhaps the best choice.
 |
|
Figure 41.1. Access provided by the Kocher-Langenbeck approach.
|
additional consideration. Acetabular fracture surgery through a
compromised soft-tissue envelope is ill advised because of the
increased risk of infection. Closed, degloving, soft-tissue injuries
over the trochanteric region associated with underlying hematoma
formation and fat necrosis (the Morel-Lavalle lesion) or open wounds
may require debridement followed by delayed wound closure (1).
The fracture pattern should be reassessed to determine whether
reduction and fixation can be accomplished by using an alternative
surgical approach located outside of the zone of soft-tissue injury.
Another treatment option is to delay surgery until wound healing. This
delay, as noted previously, may preclude use of the Kocher-Langenbeck
approach.
 |
|
Figure 41.2. Examples of available special instruments that permit intrapelvic and anterior column access.
|
 |
|
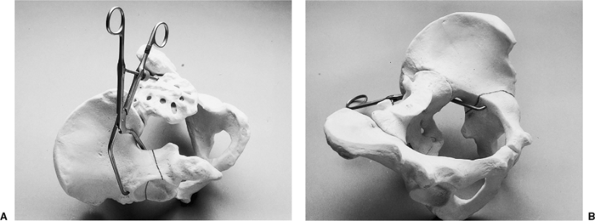
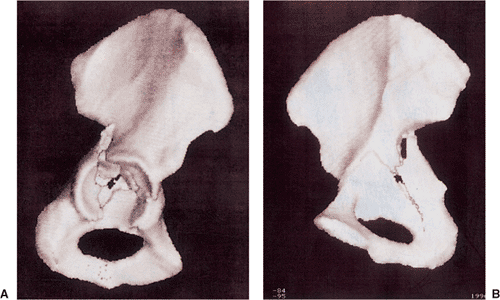
Figure 41.3. A,B. Example of clamp application for fracture reduction with a bone model.
|
sustained high-energy trauma. Therefore, examination of the injured
limb, even in those with an apparent isolated injury, should be just
one part of a comprehensive and systematic approach. Associated
injuries can be life or limb threatening. The Advanced Trauma Life
Support evaluation sequence should be followed (Table 41.2).
Detailed examination of the hip and lower extremity is performed during
the secondary survey. As previously noted, soft-tissue injury has
important implications regarding subsequent surgery; therefore, the
soft tissues should be evaluated carefully. The incidence of
preoperative, posttraumatic, sciatic-nerve injury was reported as being
as high as 31% (2). Other peripheral nerves,
such as the femoral and obturator nerves, also may be injured. A
complete and clearly documented neurologic examination is extremely
important both for patient prognosis and for medical-legal concerns.
Preoperatively, this evaluation should be repeated periodically.
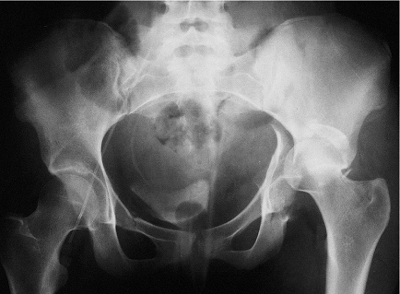
obtained during the secondary survey and can provide substantial
diagnostic information regarding fracture type, as well as indicate a
need for emergency treatment (Fig. 41.4). This
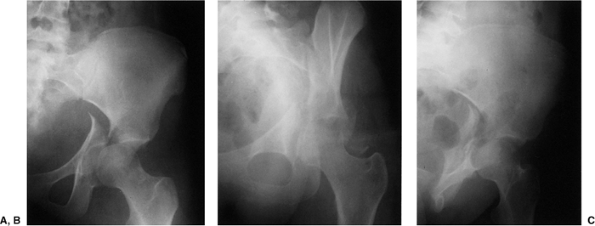
x-ray must be supplemented by further studies to define completely the
acetabular fracture pattern. The three necessary additional plain
x-rays (Fig. 41.5) are centered on the affected hip and include an AP and
two 45-degree oblique views (the internal or obturator oblique view and the external or iliac oblique view) (1).
Although these four plain x-rays usually provide all the information
needed to define the acetabular fracture type, the standard
two-dimensional computed tomography (CT) scan can supply important
additional information and is indispensable for preoperative planning (Fig. 41.6).
The eventual universal availability of high-quality three-dimensional
CT reconstructions may eliminate much of the mystery associated with
the radiographic interpretation of acetabulum fractures (Fig. 41.7). However, except for the AP
hip x-ray, which in most cases provides the same information as the AP
pelvis examination, the plain and two-dimensional CT radiographic
studies continue to be indispensable and should be viewed concurrently
to make the definitive fracture diagnosis (1).
|
Table 41.1. Acetabular Fracture Classification
|
|||||
|---|---|---|---|---|---|
|
|
Table 41.2. Advanced-Trauma Life-Support Evaluation Sequence
|
||||||
|---|---|---|---|---|---|---|
|
 |
|
Figure 41.4.
Initial AP pelvis x-ray of a 19-year-old woman involved in a motor vehicle accident. The left hip is dislocated, and there is a transverse fracture of the left acetabulum. A double density just superior to the dislocated femoral head suggests a posterior-wall fracture component. |
 |
|
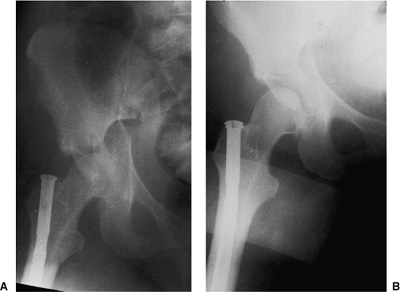
Figure 41.5. A–C.
AP and 45-degree oblique hip x-rays after emergent reduction of the hip dislocation. The juxtatectal transverse-acetabular fracture with an associated posterior wall fracture is more completely delineated. |
 |
|
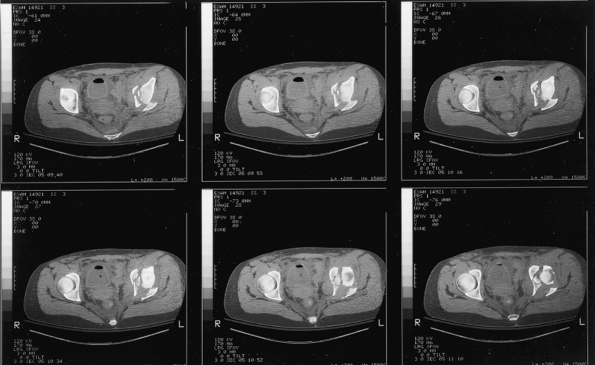
Figure 41.6.
Selected two-dimensional CT sections through the dome of the acetabulum. In addition to findings consistent with a juxtatectal transverse and associated posterior-wall fracture, comminution involving the articular surface and quadrilateral plate is evident. |
 |
|
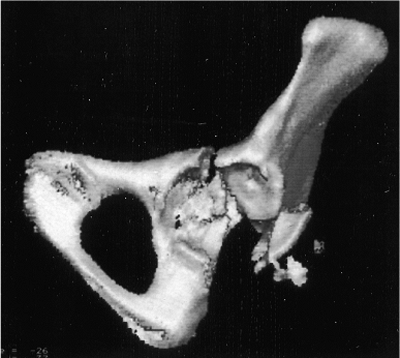
Figure 41.7.
Three-dimensional CT. The fracture as deduced by evaluation of the plain x-rays and two-dimensional CT is shown fairly clearly. An overall appreciation of the fracture pattern is provided. However, there is some loss of definition, especially of the quadrilateral-plate fracture involvement. |
 |
|
Figure 41.8. AP pelvis x-ray before (A) and after (B)
the application of traction. The hip joint is distracted with the application of traction, pulling the articular cartilage of the femoral head a safe distance away from the acetabular fracture surface. A defect in the femoral head from the impact of the injury is evident (B). The femoral nail is from a previous injury. |
|
Table 41.3. Indications for Emergency Acetabular Fracture Fixation
|
|||||||
|---|---|---|---|---|---|---|---|
|
study, the appropriate surgical approach can be determined. The
indications for emergency fracture fixation are uncommon (Table 41.3).
Operative treatment is generally delayed 3 to 5 days to allow
stabilization of the patient’s general status and for preoperative
planning. My preference is to use preoperative, skeletal, femoral-pin
traction both to maintain an unstable hip in a located position and to
prevent further femoral head articular-surface damage from abrasion by
the raw acetabular bony fracture surfaces (Fig. 41.8). Significant intraoperative blood loss can occur.
Two to four units of blood should be made available, depending on the
extent of the fracture pattern. The use of an autologous
blood-transfusion system, such as the cell saver, may decrease the need
for intraoperative, homologous, banked-blood transfusion.
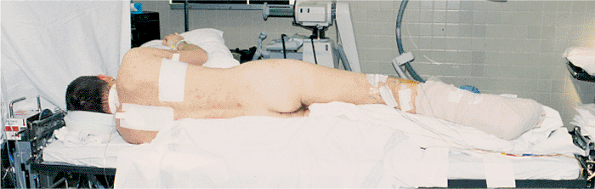
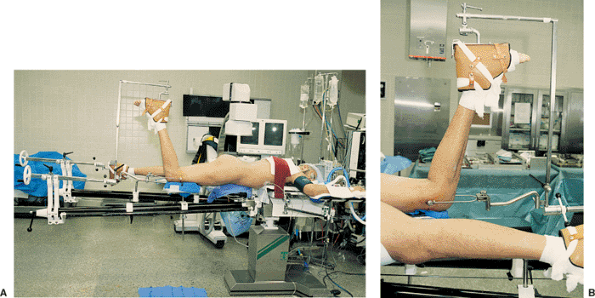
approach can be performed with the patient in either the lateral or the
prone position. Orthopedic surgeons from North America are more
familiar with and perhaps more comfortable using lateral positioning
with the affected extremity draped free, as in hip arthroplasty surgery
(Fig. 41.9). However, the Kocher-Langenbeck
approach is most effective with the patient placed prone on a fracture
table. The benefits of the prone position are realized by maintaining
the femoral head in a reduced position. Gravity becomes a help rather
than a hindrance in fracture exposure and reduction. The fracture table
provides controlled traction and limb positioning, further assisting in
fracture reduction. Traction is applied through use of a distal femoral
pin with the knee flexed to approximately 90 degrees (Fig. 41.10).
This angle of knee flexion places the sciatic nerve in a relaxed
position, minimizing the risk of intraoperative sciatic-nerve injury.
An unscrubbed assistant is required for intraoperative adjustment of
the table.
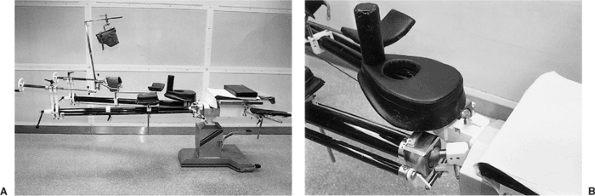
used to elevate the head and to avoid excessive abdominal pressure. The
fracture table generates the added risk of injury (i.e., pudendal nerve
palsy) from pressure against the perineal post. The Judet fracture
table, an updated version of which is now available from Orthopedic
Systems, Inc. (Union City, CA), adequately addresses these concerns (Figs. 41.10 and 41.11).
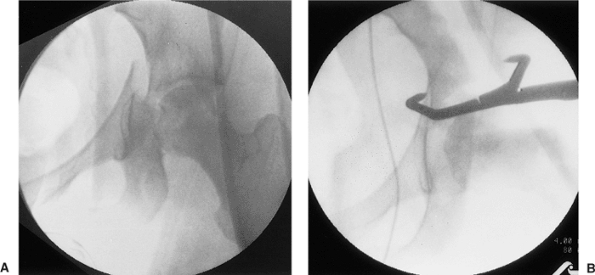
radiolucent operating table is advisable. Intraoperative c-arm
fluoroscopy can then be used to assess fracture reduction and hardware
location (Fig. 41.12). Before the sterile
preparation and draping of the patient, the hip area should be quickly
scanned with the c-arm to ensure adequate fluoroscopic visualization.
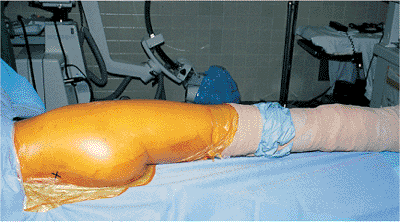
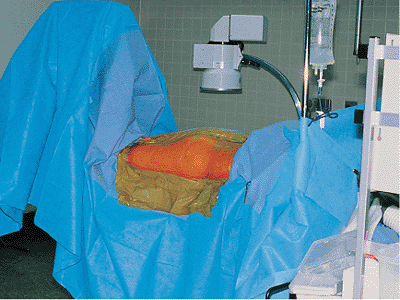
draped free, the sterile field is similar to that in hip arthroplasty
surgery but extended posteriorly to include the region of the
posterior–superior iliac spine (Fig. 41.13).
With the patient prone on the fracture table, the sterile field
consists of the buttock and the posterior and lateral aspects of the
thigh (Fig. 41.14).
 |
|
Figure 41.9.
Lateral position for surgery on the right hip. The patient is supported on a beanbag on a radiolucent operating room table. The down leg is padded, and an axillary roll and head supports are in position. For this patient with an ipsilateral ankle fracture, the right leg is splinted and padded. Wires attached to the right leg are to be used for SSEP monitoring. |
 |
|
Figure 41.10. Patient in the prone position for surgery on the right hip (A) with a detailed view of the affected limb and femoral pin position (B).
|
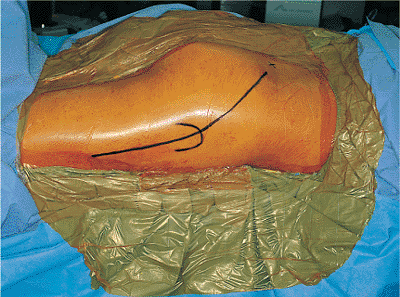
is centered over the greater trochanter. The proximal branch of the
incision is directed toward the posterior–superior iliac spine, ending
approximately 6 cm short of this bony landmark. Distally, the incision
extends approximately 15 cm along the midlateral aspect of the thigh.
This skin incision is carried through the subcutaneous tissue and
superficial fascia onto the fascia lata of the lateral thigh (the
iliotibial tract) and the thin, deep fascia overlying the gluteus
maximus muscle (Fig. 41.16).
incision, beginning at the distal aspect of the wound, continuing
proximally toward the greater tuberosity, and ending at the first
sighting of the gluteus maximus muscle fibers as they insert into the
iliotibial tract (Fig. 41.17). The trochanteric bursa of the gluteus maximus (a large bursa between the
tendon of this muscle and the posterolateral surface of the greater
trochanter) is incised, allowing clear visualization of the insertion
area of the gluteus maximus muscle and access to the undersurface of
this muscle (Figs. 41.18 and 41.19).
Beginning the deep dissection in this way, at the distal branch of the
Kocher-Langenbeck incision, the surgeon facilitates the next step:
splitting of the gluteus maximus muscle.
 |
|
Figure 41.11. The Judet fracture table. A small pad can be used to elevate the patient’s head (A). A detailed view (B)
shows the padded perineal post and the padded support with perineal cutout for male patients. The separation between the chest and padded perineal support serves to reduce abdominal pressure without requiring additional padding or chest rolls. |
 |
|
Figure 41.12. Intraoperative fluoroscopic views of a transverse with an associated posterior-wall fracture before (A) and after (B) the transverse fracture component was reduced by using a pointed reduction forceps.
|
 |
|
Figure 41.13. Patient from Figure 41.9
after sterile preparation and draping. The posterior–superior iliac spine is marked with an “X.” The right leg is draped free. The wires for SSEP monitoring exit through a sterile plastic wrap located at the foot. |
 |
|
Figure 41.14.
Operative field with the patient in the prone position on the Judet fracture table after sterile preparation and draping for surgery on the right hip. Please note that all subsequent intraoperative illustrations are oriented as if the patient is in this position (i.e., prone having surgery on the right hip with the anatomically superior direction on the patient located to the right and posterior located toward the top of the illustration). |
 |
|
Figure 41.15.
Skin incision for the Kocher-Langenbeck approach. The posterior–superior iliac spine is marked with an “X.” The greater trochanter is outlined. |
 |
|
Figure 41.16.
Incision through the skin and subcutaneous tissue onto the iliotibial tract and the deep fascia overlying the gluteus maximus muscle. |
 |
|
Figure 41.17.
The iliotibial tract is incised, showing the underlying trochanteric bursa, and at the superiormost aspect of the fascial incision, a few muscle fibers of insertion of the gluteus maximus. |
from two major vessels: the superior gluteal artery supplying the upper
one third of the muscle and the inferior gluteal artery supplying the
lower two thirds. Although within the substance of the muscle multiple
anastomotic connections are extant between these two arteries, the
upper one-third/lower two-thirds division in the muscle is a relatively
avascular interval and is the desired plane of dissection. This
interval can often be identified by digital palpation of the
undersurface of the gluteus maximus. In addition, inspection of the
superficial surface of the muscle frequently reveals a line of fat
marking the interval (Fig. 41.20). This
intervascular interval may not correspond exactly with the line of the
skin incision that is directed toward the posterior–superior iliac
spine. Often it is oriented in a more lateral direction (as in Fig. 41.20), but it is well within the limits of the wound (see Fig. 41.20).
Once the intervascular interval is identified, incision in the gluteal
fascia and blunt dissection, splitting the gluteus maximus muscle
fibers, can begin. Despite possessing a dual blood
supply
and potential for an intervascular plane of dissection, the gluteus
maximus muscle has innervation only from the inferior gluteal nerve.
There is no internervous plane, and the nerve branches of the upper one
third of the muscle cross the intended interval of dissection a little
more than halfway between the level of the greater trochanter and the
posterior–superior iliac spine. Therefore, splitting of the muscle
fibers should stop as soon as the first nerve branch to the upper part
of the muscle is encountered (Fig. 41.21).
 |
|
Figure 41.18. Trochanteric bursa is isolated before its incision.
|
 |
|
Figure 41.19. View after incision of the trochanteric bursa.
|
 |
|
Figure 41.20.
Palpation of the undersurface of the gluteus maximus muscle after incision through the trochanteric bursa. A fat line is noted at the tip of the scissors. The line of the scissors marks the upper one-third/lower two-thirds division in the gluteus maximus muscle. |
 |
|
Figure 41.21.
Gluteus-maximus muscle fibers are split to the first nerve branch. A self-retaining retractor holds the gluteus-maximus muscle fibers apart. The nerve (located at the tip of the scissors) is crossing the split in the gluteus-maximus muscle fibers from posterior to anterior in the surgical field. |
subgluteal bursa often must be cleared to allow visualization of the
tendon of the deep, lower portion of the gluteus maximus muscle that
inserts into the gluteal tuberosity of the femur (Figs. 41.22 and 41.23).
Release of this gluteus maximus insertion into the femur allows
adequate posteromedial retraction of the large mass of the gluteus
maximus muscle without undue stretch on the inferior gluteal nerve. The
tendon is released, with care taken not to injure branches of the first
perforating branch of the profunda femoris artery, which run in close
proximity (Fig. 41.24).
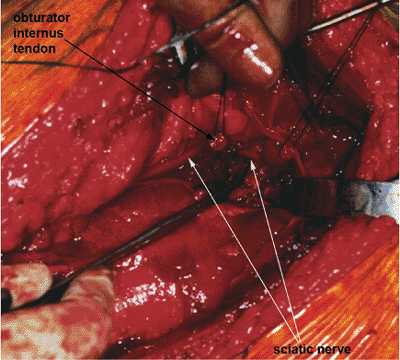
way to locate the nerve is along the posterior surface of the quadratus
femoris muscle. Variations in the musculature of the
buttock are fairly common (3).
However, important variations in the quadratus femoris anatomy are
virtually nonexistent. Furthermore, posterior injuries that may disrupt
the short external-rotator anatomy generally leave the quadratus
femoris muscle unscathed. Therefore, the relation between the sciatic
nerve and the quadratus femoris muscle serves as a constant reference
point. The posterior surface of this muscle is usually obscured by
residual bursal and areolar tissue (Figs. 41.24 and 41.25). This tissue must be incised to expose the nerve (Fig. 41.26).
Dissection of these tissues may be accomplished through the use of
either scissors or blunt dissection. Once the nerve is visualized, it
should be explored through its course to the greater sciatic notch (Fig. 41.27).
Any impinging bone fragments should be removed, and any anatomic
variations in the nerve noted. Direct manipulation of the nerve should
be avoided.
 |
|
Figure 41.22.
Exposure deep to the iliotibial tract and the gluteus maximus muscle. The rake retraction places tension on the gluteus maximus tendon of insertion into the femur, which is partially obscured by a subgluteal bursa. |
 |
|
Figure 41.23.
Thickened superior aspect of the gluteus maximus tendon is visualized after removal of the bursa and is isolated with a right-angle clamp. |
 |
|
Figure 41.24. Gluteus maximus tendon has been released.
|
 |
|
Figure 41.25.
Delineation of the tissue just superior to the released gluteus maximus tendon that obscures the posterior surface of the quadratus femoris muscle. This tissue runs from posterior to anterior, covering the sciatic nerve. |
 |
|
Figure 41.26.
Tissue has been partially incised, revealing the sciatic nerve deep to it. The tip of the scissors points to the remaining tissue over the quadratus femoris muscle. |
 |
|
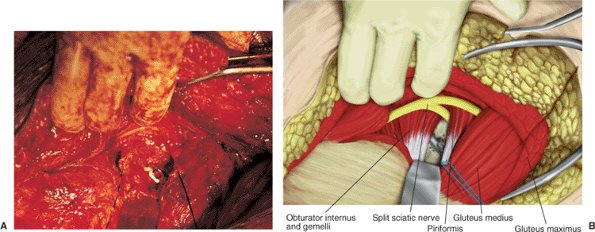
Figure 41.27.
Tissue has been completely incised, and the course of the sciatic nerve can be seen. The sciatic nerve runs superficial to the obturator internus tendon and gemelli muscle bellies and then dives deep to the piriformis muscle toward the greater sciatic notch. |
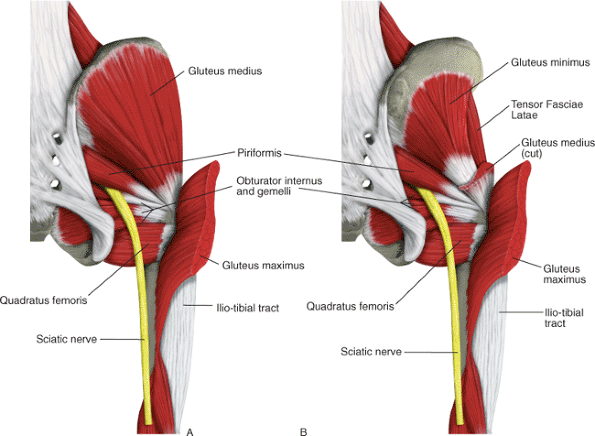
tendons of the short external rotators of the hip. First, the
piriformis tendon is identified. It can be found running alongside the
gluteus minimus muscle just under the cover of the inferior aspect of
the gluteus medius muscle as it inserts into the greater trochanter (Figs. 41.28 and 41.29).
If one is not careful, it is possible to mistake the posterior aspect
of the gluteus medius muscle and its tendon for the piriformis (Fig. 41.30) (4).
Adding to the potential for confusion is the variability in the
relation between the sciatic nerve and the piriformis muscle. Typically
(about 84% of the time), the sciatic nerve runs deep to the piriformis
muscle, appearing in the buttock at the inferior border of this muscle
(see Fig. 41.27) (3). Three variations of this “normal” anatomy have been reported, and others probably exist (3).
The most common variation (12%) is for one part of the nerve (the
peroneal division) to pass through the muscle and the other part (the
tibial division) to appear below the muscle. The entire nerve also may
pass through the muscle (1%). These two variations result in a split
piriformis muscle with two tendons of insertion. The third variation is
passage of the peroneal division above the piriformis and the tibial
division below it (3%). With enough operative cases, one will
eventually encounter one of these anatomic anomalies (Fig. 41.31).
Knowledge of the anatomic variability of this area and the prior
identification of the sciatic nerve on the posterior surface of the
quadratus femoris muscle will prevent intraoperative confusion and
decrease the risk of iatrogenic sciatic nerve injury. After its
identification, the piriformis tendon is isolated, tagged with a
suture, and released from its insertion (Fig. 41.32).
The anastomotic branch of the inferior gluteal artery (which
participates in the cruciate anastomosis of the thigh) runs in
proximity to the piriformis muscle almost in parallel with the
piriformis tendon (5). Failure to locate this
artery may result in its unintentional laceration, followed by
troublesome intraoperative bleeding. This vessel does not provide an
important blood supply. Formal ligation is the easiest and best course
of action.
 |
|
Figure 41.28. Muscle relationships deep to the gluteus maximus (A) and deep to the gluteus medius muscle (B).
|
 |
|
Figure 41.29.
Isolation of the piriformis muscle. The gluteus maximus muscle (split) is held by the self-retaining retractor. The posterior margin of the gluteus medius muscle is reflected anterosuperiorly by an Army-Navy retractor to reveal the piriformis tendon, which is held by a right-angle clamp. The tip of the intraoperative suction points to the gluteus minimus muscle. |
inferior gemelli muscles on either side, can be found just inferior and
slightly deep to the piriformis (see Fig. 41.28).
The gemelli muscles insert onto the tendon of the obturator internus,
and the bellies of these two muscles may obscure this tendon (Fig. 41.33).
If this situation occurs, the tendon can be identified by palpation,
with either a right-angle clamp or a finger placed deep to the tendon.
External rotation of the hip will relax the tendon, allowing easier
access to its deep surface. Internal rotation of the hip, placing the
tendon under tension, will verify its position. In an alternative
approach, the overlying gemelli muscles can be teased away to reveal
the obturator internus tendon (Fig. 41.34).
Once located, the obturator internus tendon is isolated, tagged with a
suture, and released from its insertion. To avoid injury to the blood
supply of the femoral head, both the piriformis and obturator internus
tendons should be incised approximately 1.5 cm
from their insertion points into the greater trochanter (Fig. 41.35).
A fascial layer running from the undersurface of the gluteus maximus
muscle to the posterior column of the acetabulum separates the
piriformis muscle from the obturator internus and gemelli muscles. This
fascia is easily visualized after the release of the piriformis and
obturator internus tendons (Fig. 41.36). The sciatic nerve lies directly adjacent to the medial origin of this fascia (see Fig. 41.36).
Care must be taken not to injure the sciatic nerve when this fascia is
released during the clearing of the soft tissues from the posterior
column (Fig. 41.37).
 |
|
Figure 41.30. Illustration from a patient different than that shown in Figure 41.9,
showing a variation of the gluteus medius muscle in which a deep fold creates an apparently separate posterior portion of the muscle and tendon of insertion. A clamp reflects the more superficial portion of the muscle, revealing a tendon that may be mistaken for the piriformis (A). The actual piriformis tendon has a different orientation and configuration (B). |
 |
|
Figure 41.31. Intraoperative photograph (A) and companion drawing (B)
showing a split sciatic nerve with the peroneal division above the piriformis muscle and the tibial division below the piriformis muscle. |
true pelvis from the internal circumference of the obturator foramen
and the obturator membrane (5). The muscle fibers end in four or five tendinous bands that converge and pass through the lesser sciatic notch.
These bands turn a right angle around the grooved external surface of
the lesser sciatic notch, joining to form the single tendon of
insertion. The bony surface is covered by cartilage and is separated
from the tendon by a bursa. Once the obturator internus tendon is
released from its insertion into the greater trochanter, it is elevated
away from the hip capsule (along with the gemelli muscles) and followed
medially toward the lesser sciatic notch. The underlying bursa is
opened, permitting access to (and palpation through) the lesser sciatic
notch (Fig. 41.38). A specially designed sciatic nerve retractor can now be placed with its tip anchored in the lesser sciatic notch (Fig. 41.39).
Use of this instrument facilitates the bony exposure by permitting
controlled retraction of the sciatic nerve and the posterior soft
tissues.
The retractor is positioned such that at the level of the lesser
sciatic notch, the obturator internus tendons and gemelli muscles lie
between the retractor and the sciatic nerve, cushioning the nerve.
However, the surgeon must realize that the sciatic nerve retractor
extends beyond the limits of this muscle cushion and directly contacts
the nerve at the superior and inferior aspects of the retractor (Fig. 41.40).
The relation between the sciatic nerve and the sciatic nerve retractor
must be such that the edges of the retractor do not impinge or place
undue pressure on the nerve. The surgical assistant in charge of
maintaining position of the retractor must be cognizant of the
importance of this task. The position of the retractor should be
checked frequently during the operative procedure.
 |
|
Figure 41.32. The piriformis tendon is isolated and tagged with a suture.
|
 |
|
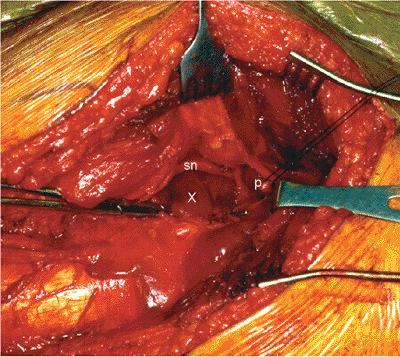
Figure 41.33. Obturator internus tendon, obscured by the muscle bellies of the gemelli (X), is isolated with a right-angle clamp. The sciatic nerve (sn) and piriformis tendon (p) can be seen.
|
 |
|
Figure 41.34. Muscle bellies of the gemelli have been dissected to reveal the obturator internus tendon.
|
 |
|
Figure 41.35.
Obturator internus tendon is isolated and tagged with a suture. The stump of the previously released piriformis tendon can be seen just cephalad to the obturator internus tendon as it inserts into the greater trochanter. |
 |
|
Figure 41.36.
Delineation of the fascia separating the piriformis muscle from the superior gemellus muscle/obturator internus tendon/inferior gemellus muscle group. A right-angle clamp clearly shows the medial margin of this fascia and its proximity to the sciatic nerve. The sciatic nerve can be seen running superficial to the obturator internus tendon and gemelli muscles and then coursing deep to the piriformis muscle. |
 |
|
Figure 41.37. This fascial band has been released.
|
 |
|
Figure 41.38.
Obturator internus tendon has been elevated, allowing access to the lesser sciatic notch. In this photograph, the hemostat is directed toward, and its tip inserted into, the lesser sciatic notch. |
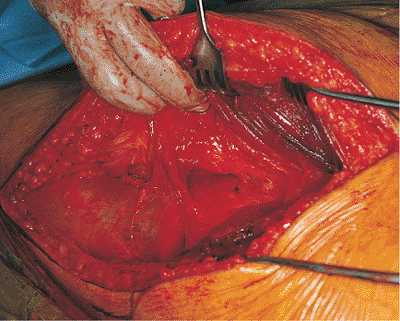
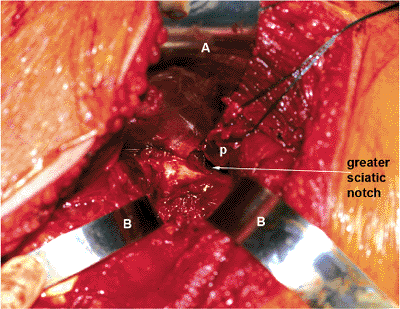
positioned, the posterior hip capsule and retroacetabular surface of
the posterior column are explored and cleared of debris. The dissection
is carried from lateral to medial, progressing from the fracture site
superiorly toward the greater sciatic notch and inferiorly toward the
ischial tuberosity. Superiorly, the hip abductors are elevated from the
external surface of the ilium and held with a curved retractor (Fig. 41.41).
 |
|
Figure 41.39. Sciatic nerve retractor (A) and its desired position in the lesser sciatic notch, as demonstrated in a bone model (B).
|
 |
|
Figure 41.40.
Sciatic nerve is unprotected both below and above (arrows and as marked by the tip of a hemostat) the obturator internus tendon and gemelli muscles. |
must be taken to prevent injury not only to the sciatic nerve that is
unprotected at this level, but also to the superior-gluteal
neurovascular bundle. The superior-gluteal neurovascular bundle exits
the greater sciatic notch above the piriformis muscle, superior to the
level of the sciatic nerve. Its position can often be assessed by
palpation of the superior-gluteal arterial pulse at the level of the
greater sciatic notch. The superior-gluteal neurovascular bundle
tethers the abductor muscle mass. It can be injured not only by direct
laceration but also by traction from excessive retraction of the
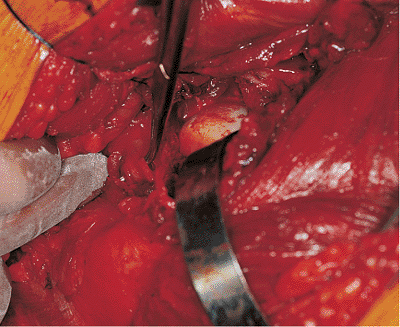
abductor muscle mass. Inferiorly, the tendon of the obturator externus
muscle may be encountered (Fig. 41.42). Release of this tendon usually is not necessary.
or others requiring increased access to this area, more extensive
exposure may be obtained through the release of the quadratus femoris
muscle, and infrequently, the obturator externus tendon. The quadratus
femoris muscle is extremely vascular. It should be released at its
origin from the ischial
tuberosity
to avoid excessive bleeding and damage to the branches of the medial
circumflex artery. Release of the obturator externus tendon in a manner
similar to that described for the piriformis and obturator internus
tendons is not required for fracture treatment. Furthermore, this
release is ill advised due to the obturator externus tendon’s close
proximity to the blood supply of the femoral head.
 |
|
Figure 41.41. Sciatic nerve retractor (A) is placed in the lesser sciatic notch. Just superior to this retractor, the greater sciatic notch (arrow) and the overlying piriformis muscle (p) can be seen. Two curved retractors (B)
reflect the hip abductors. The external surface of the posterior column, with its overlying soft-tissue debris, is well visualized. |
 |
|
Figure 41.42.
Obturator externus tendon is identified with a right-angle clamp. For orientation, sutures mark the released piriformis and obturator internus tendons, the curved retractor reflects the hip abductors, and the incised hip capsule reveals the femoral head. The surgeon’s middle finger rests on the quadratus femoris muscle just inferior to the obturator externus tendon as it heads toward the greater trochanter. The posterior column and hip joint can be well visualized without release of this tendon. |
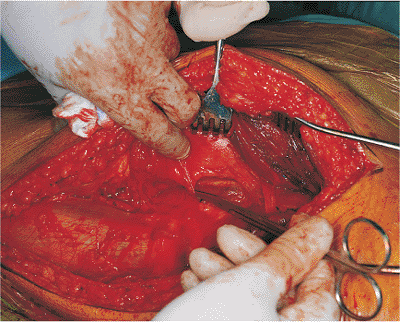
of the surgical approach. For fractures limited to the posterior wall
that do not require access to the true pelvis, the dissection is
basically complete, as described up to this point. Otherwise, the
dissection must continue through the greater sciatic notch into the
true pelvis and onto the quadrilateral surface of the acetabulum. With
the careful use of digital dissection and periosteal elevators, the
origin of the obturator internus muscle is elevated from the
quadrilateral plate. Access is now available for digital assessment of
column fracture reduction and for the use of specialized reduction
clamps (see Figs. 41.2, 41.3, and 41.12). If necessary, this access can be enlarged by release of the sacrospinous ligament (1).
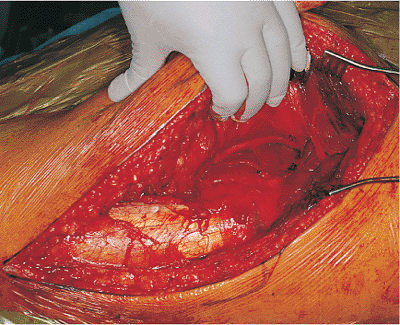
However, for fractures involving the posterior wall, capsular
attachments to the posterior-wall fracture fragment must be maintained
to minimize the risk of posterior wall devascularization. Marginal
capsulotomy is performed on either side of the posterior-wall fracture
fragment, which is then reflected in continuity with the remainder of
the hip-joint capsule. Incision of the labrum is avoided unless needed
to assess fracture reduction. Radial capsular incisions also should be
avoided to avoid injury to the blood supply to the femoral head.
visualized through application of traction to the femur. This can be
accomplished easily and in a controlled manner with the use of the
fracture table (Figs. 41.44 and 41.45).
Other methods include use of the femoral distractor (Synthes, Paoli,
PA), manual distraction by a surgical assistant using a traction pin in
the distal femur or a Schanz screw in the greater trochanter, or just
pulling directly on the leg. Visualization of different aspects of the
acetabular joint surface is often improved by movement of the hip from
the neutral position. Hip flexion facilitates access to the acetabular
fossa and the anteroinferior joint surface. This is helpful for the
removal of loose bodies but places increased stretch on the sciatic
nerve.
the access of the Kocher-Langenbeck approach farther along the external
surface of the anterior column is rarely
required
or indicated. The hip abductors remain tethered by the superior-gluteal
neurovascular bundle, limiting the effectiveness of this method in
gaining significant added exposure. Placing the hip in an abducted
position, especially with the patient prone, approximates the exposure
gained by trochanteric osteotomy. If sufficient anterosuperior exposure
cannot be obtained by this maneuver, gluteus medius tenotomy or
trochanteric osteotomy are available options. The need for adjunctive
tenotomy or greater trochanteric osteotomy usually means that an
alternative to the Kocher-Langenbeck approach should have been
initially selected.
 |
|
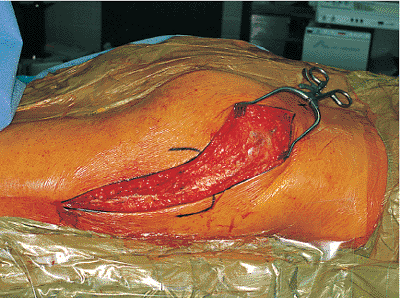
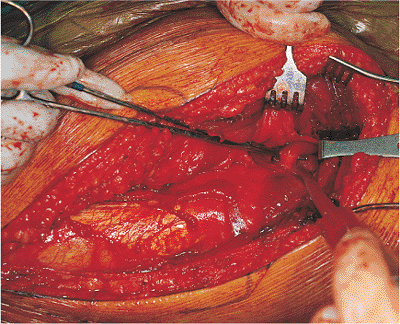
Figure 41.43.
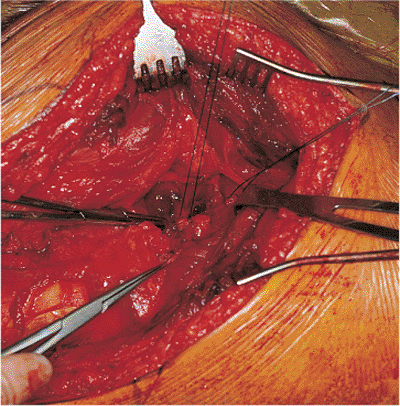
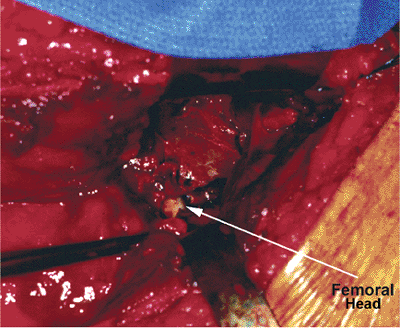
Hip capsule has been incised in a marginal, circumferential manner to reveal the femoral head (arrow) and the hip joint. Fracture of the posterior column with a displaced, intra-articular, free fragment is visualized. |
 |
|
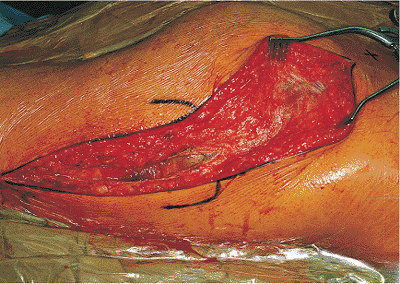
Figure 41.44.
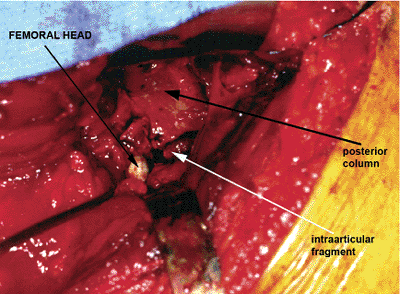
With a fracture table, the hip has been distracted to improve visualization and to unload the hip joint for the facilitation of fracture reduction. Arrows identify the femoral head, posterior column, and the displaced, intra-articular, fracture fragment. |
straightforward. Released tendons of insertion of the gluteus maximus
and short external-rotator muscles are reattached through use of
nonabsorbable suture. After the placement of deep, closed suction
drains, the fascia lata, gluteal fascia, subcutaneous tissues, and skin
are closed in layers.
 |
|
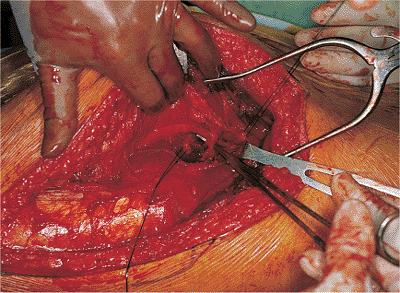
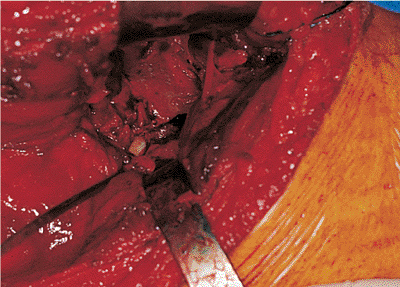
Figure 41.45. Intra-articular, osteochondral, fracture fragment is reduced.
|
the associated injuries will allow. Out of bed on the first
postoperative day, the patient subsequently begins formal physical
therapy for muscle strengthening and active range-of-motion exercises.
Total hip arthroplasty precautions are not needed, as internal fixation
has (or should have) rendered the hip joint completely stable. Partial,
toe-touch weight bearing with crutches or a walker is required for 10
to 12 weeks. However, progression to full weight bearing must be
individualized. Physical therapy should continue until muscle strength
and range of motion are regained or a plateau is reached. Multiple
elements must be factored into the recovery equation including the
magnitude of the soft-tissue injury, the fracture type, any associated
injuries, and preexisting medical status. Therefore the expected
recovery time is quite variable, ranging from approximately 6 to 12
months for return to a fully ambulatory status.
surgery may occur as a direct result of the surgical approach selected
for fracture fixation, or they may be related to the magnitude of the
patient’s overall injury pattern. Major complications associated with
the Kocher-Langenbeck approach include sciatic nerve injury, infection,
severe bleeding, and heterotopic bone formation. Thromboembolic disease
(deep vein thrombosis [DVT]/pulmonary embolism [PE]) is a serious
problem associated with the trauma of acetabular fracture as well as
the subsequent surgery for fracture fixation.
reported nerve palsy incidences at 10% via the Kocher-Langenbeck
approach. However, he noted that one fourth of these patients had not
had complete documentation of their preoperative status, leaving the
actual cause of nerve injury in doubt. Whatever the actual number, risk
of sciatic nerve injury is substantial with the use of the
Kocher-Langenbeck approach. Intraoperative somatosensory evoked
potential (SSEP) monitoring has been advocated as a method for
decreasing this risk (6). Although the results of using SSEP monitoring appear promising, its actual value awaits a randomized prospective trial (7).
Management of sciatic nerve injury consists of observation and the use
of an ankle-foot orthosis. The prognosis for recovery of the tibial
division is good despite severe initial damage. Recovery of the
peroneal division is more dependent on the severity of the initial
injury.
Perioperative antibiotics and meticulous surgical technique are
preventive measures. Once diagnosed, infection requires urgent surgical
debridement. Secure internal fixation should be maintained until the
fracture has united (8).
well-described complication of the Kocher-Langenbeck approach, with an
incidence as high as 5% (9). Exposure and
ligation of the vessel may be required but is associated with
iatrogenic injury to the superior gluteal nerve. The application of
topical thrombogenic agents and extended direct pressure with packing
are often effective in obtaining hemostasis. Continued excessive
bleeding from retraction of the artery into the pelvis, requiring
retroperitoneal exposure for vessel control, is extremely rare.
widespread complication of acetabular fracture surgery. However, HO
after the Kocher-Langenbeck approach, resulting in significant loss of
hip motion, probably occurs in fewer than 10% of patients (1,10,11).
Options for treatment include the use of perioperative prophylactic
agents or delayed excision after the maturation of functionally
significant HO or both (10). In nonrandomized
retrospective studies, both indomethacin and irradiation have been
shown to be effective for prophylaxis. The combination of indomethacin
and irradiation appears to be extremely effective (11).
The advisability of using irradiation in a young fracture-patient
population to suppress HO in less than 10% is subject to debate.
 |
|
Figure 41.46. A–C.
AP and 45-degree oblique x-rays. These x-rays and the figures that follow are from the same patient whose surgery supplied the foregoing intraoperative photographs used to demonstrate the Kocher-Langenbeck approach. |
complications of acetabular fracture surgery. The risk of DVT is high
(34% in one series) (12). PE occurs in
approximately 2% of cases. Routine perioperative anticoagulant
prophylaxis is indicated. Preoperative screening by using duplex
Doppler ultrasonography or magnetic resonance venography provides early
diagnosis and allows identification of candidates for inferior
venal-caval filter placement (12).
accident, sustaining an atypical T-shaped fracture of the acetabulum
with intra-articular comminution (Figs. 41.46, 41.47 and 41.48).
ORIF was advised because of the instability and incongruency of the hip
joint. Surgery was performed 4 days after injury by using the
Kocher-Langenbeck approach (Figs. 41.49, 41.50, 41.51 and 41.52).
One week later, the patient was discharged to home from the hospital
with instruction to proceed with toe-touch weight bearing with crutches.
 |
|
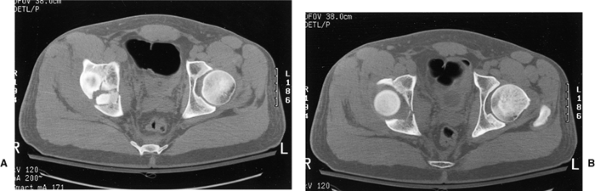
Figure 41.47. A,B. Selected preoperative two-dimensional CT sections through the dome and columns of the acetabulum.
|
 |
|
Figure 41.48. Preoperative three-dimensional CT, showing the external (A) and endopelvic (B) aspects. An atypical T-shaped pattern with intra-articular comminution is demonstrated.
|
 |
|
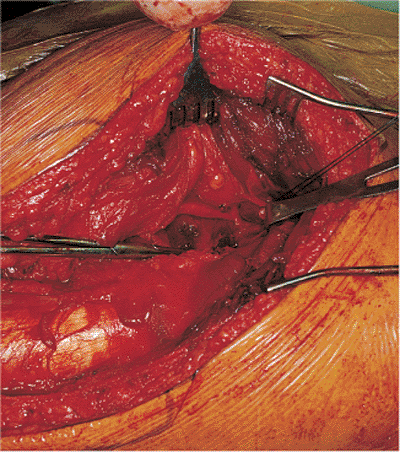
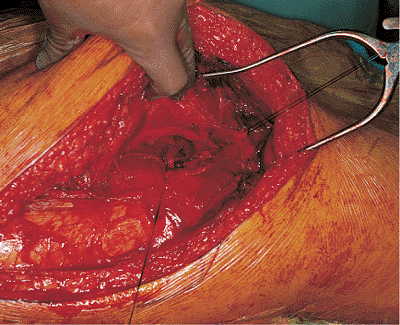
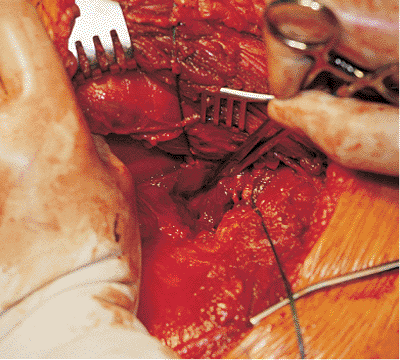
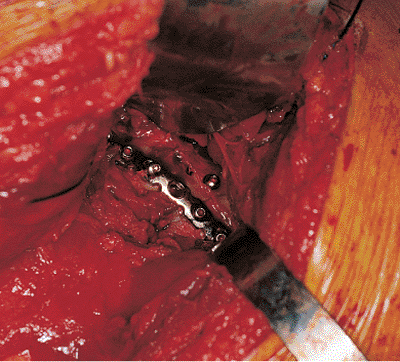
Figure 41.49. Intraoperative photograph of the reduction of the posterior column (previously seen unreduced in Figs. 41.43, 41.44 and 41.45) and the fixation construct used.
|
 |
|
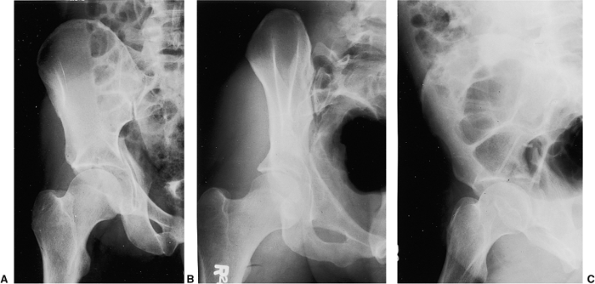
Figure 41.50. A–C. Postoperative x-rays.
|
 |
|
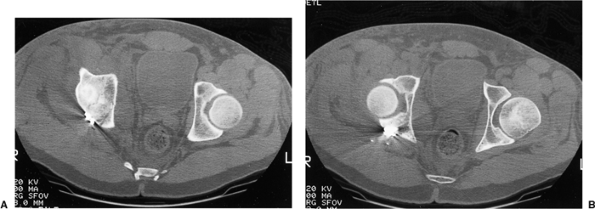
Figure 41.51. A,B. Postoperative two-dimensional CT sections corresponding to the levels of the preoperative samples shown in Figure 41.47.
|
 |
|
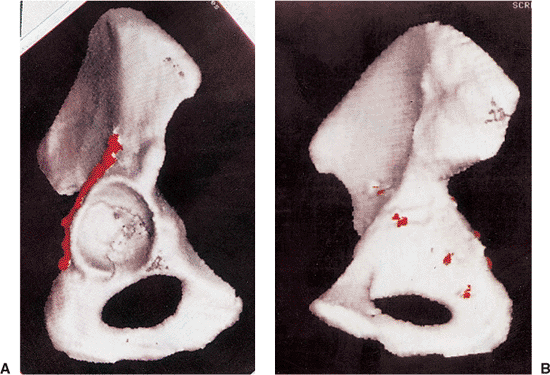
Figure 41.52. A,B. Postoperative three-dimensional CT with fixation highlighted in red.
|
DL, Schmeling GJ. Somatosensory evoked potential monitoring in the
surgical treatment of acute, displaced acetabular fractures: results of
a prospective study. Clin Orthop 1994;301:213–220.