
Cole & Sekiya: Surgical Techniques of the Shoulder, Elbow and Knee in Sports Medicine, 1st ed.
Copyright ©
2008 Saunders, An Imprint of Elsevier
CHAPTER 54 – Osteonecrosis of the Knee
William D. Bugbee, MD
Osteonecrosis of the knee is a difficult clinical entity. Three general categories include idiopathic or spontaneous osteonecrosis (also known as Ahlbäck disease), secondary or atraumatic osteonecrosis, and traumatic osteonecrosis. The diagnosis of osteonecrosis can be arduous. A common error is to misdiagnose degenerative subchondral bone cysts of osteoarthritis as spontaneous osteonecrosis. There are several theories of the etiology of spontaneous osteonecrosis and atraumatic osteonecrosis, but in general, these premises are not well understood. Traumatic osteonecrosis hypothetically occurs after fracture or surgery. This chapter focuses on the unique presentations and various treatment options of spontaneous osteonecrosis and atraumatic osteonecrosis.
A thorough history may simplify the diagnosis of osteonecrosis. Risk factors for atraumatic osteonecrosis include corticosteroid use, alcohol consumption, Gaucher disease, sickle cell disease, caisson disease, coagulopathy, and systemic lupus erythematosus. The typical patient with spontaneous osteonecrosis is an obese woman older than 55 years. Spontaneous osteonecrosis is usually unilateral and typically affects just one condyle. Atraumatic osteonecrosis often presents bilaterally and can affect multiple condyles or plateaus. In addition, it is frequently seen in other joints.
| • | Sudden pain usually over the medial aspect of the knee (may be initiated by a minor injury) | |
| • | Increased pain at night and with activity |
| • | Long-standing insidious pain (note: some patients may be asymptomatic) | |
| • | Pain may be difficult to localize |
| • | Range of motion may be decreased secondary to pain, muscle spasm, or subchondral collapse | |
| • | Nonspecific knee pain (especially with multiple lesions) | |
| • | No swelling, no effusion | |
| • | Ligaments: stable |
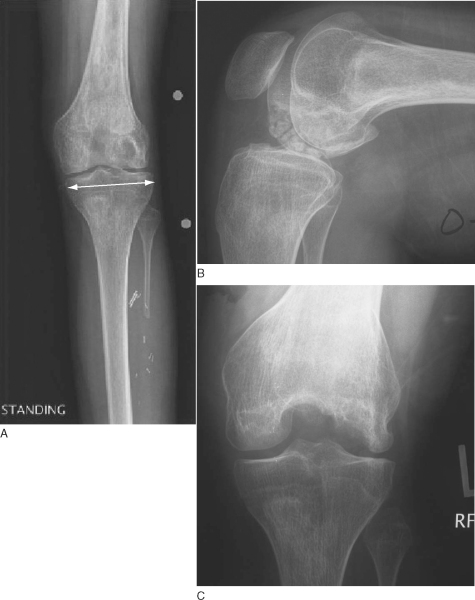
| • | Weight-bearing anteroposterior radiograph of knee in full extension with a radiopaque magnification marker ( Fig. 54-1A ) |
|
| • | Non–weight-bearing 90-degree-flexion lateral view of knee ( Fig. 54-1B ) |
|
| • | Notch ( Fig. 54-1C ) or Rosenberg view of knee |
|
|
|
|
Figure 54-1 |
| • | Merchant view of patellofemoral joint | |
| • | Long-leg anteroposterior mechanical axis view to evaluate for malalignment |
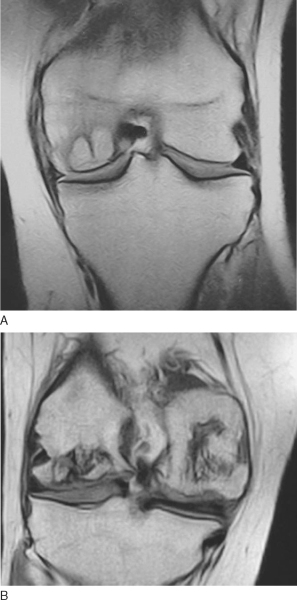
Magnetic resonance imaging can help confirm the diagnosis and the extent of the lesion (
Fig. 54-2
)
|
|
|
|
Figure 54-2 |
Technetium Tc 99m bone scan is generally unreliable but may assist in diagnosis when radiographs are normal. Bipolar uptake is more indicative of osteoarthritis, except in the late stages of osteonecrosis. Conversely, simultaneous atraumatic osteonecrosis of the ipsilateral tibial plateau and femoral condyle is certainly possible during any stage and usually presents with more intense uptake than with osteoarthritis.
The Aglietti classification for spontaneous osteonecrosis (modified Koshino) and the Mont and Hungerford classification for atraumatic osteonecrosis (modified Ficat-Arlet) are described in Boxes 54-1 and 54-2 [1] [2].
| Mont and Hungerford Classification for Atraumatic Osteonecrosis (Modified Ficat-Arlet) | ||||||||
|
| • | Anti-inflammatory medicines (? benefit) | |
| • | Analgesics | |
| • | Pharmacologic treatment based on underlying disease process | |
| • | Activity modifications, protective weight bearing | |
| • | Closed-chain quadriceps exercises | |
| • | Unloader knee brace |
| • | Arthroscopy ± débridement | |
| • | Core decompression by extra-articular drilling ± bone grafting | |
| • | Osteochondral allograft for large lesions versus osteochondral autograft for small lesions | |
| • | Realignment procedure: high tibial osteotomy for genu varum versus distal femoral osteotomy for genu valgum | |
| • | Unicompartmental knee arthroplasty versus total knee arthroplasty |
Because of the heterogeneous nature of osteonecrosis of the knee in both etiology and stage, no single technique is always preferred. Treatment should be individualized. Core decompression and allografting with or without realignment are our preferred treatments for the younger population of patients and are further discussed in this chapter. Our general treatment algorithm is presented in
Figure 54-3
.
|
|
|
|
Figure 54-3 |

Extra-articular drilling is recommended in the treatment of symptomatic osteonecrosis of the knee in pre–subchondral collapse stages. Core decompression can be done in conjunction with knee arthroscopy. A small incision is made just proximal to the metaphyseal flare for femoral lesions and adjacent to the tubercle for tibial lesions. With fluoroscopic guidance, a 3- to 6-mm trephine is advanced to within 3 mm of the subchondral bone. The surgeon may elect to lightly pack autologous iliac crest bone graft inside the lesion. Postoperatively, the patient is restricted to 50% partial weight bearing for 4 to 6 weeks.
Fresh Osteochondral Allografting for Osteonecrosis of the Knee
Indications and Contraindications
Fresh osteochondral allografting can be used as a salvage procedure in patients for whom other treatments of osteonecrosis have failed, including nonoperative care, arthroscopy, and core decompression. Allografts are used as an alternative to arthroplasty in the young population. Typically, the lesions should be more than 2 cm (approximately) in diameter. Osteochondral autografting is an excellent alternative for smaller lesions with compromised articular cartilage.
Relative contraindications to fresh osteochondral allografting include uncorrected limb malalignment and joint instability. The senior author has not found steroid dependency to be a contraindication to fresh osteochondral allografts, as previously reported in the literature.[7a] Allografting should not be considered an alternative to total knee arthroplasty or unicompartmental knee arthroplasty in a patient with symptoms, age, and activity level appropriate for prosthetic replacement. Finally, fresh osteochondral allografting should not be performed in the individual with advanced multicompartmental knee arthrosis.
Significant limb malalignment, ligamentous instability, or meniscal disease can be addressed either before or concomitant with fresh osteochondral allograft transplantation. Concomitant distal femoral osteotomy or femoral condyle osteochondral allografting is not recommended and should be staged because of the increased fear of nonunion.
A measurement of the width of the tibia, a few millimeters inferior to the plateau, is made from a standing anteroposterior knee radiograph with a radiopaque magnification marker (see
Fig. 54-1A
). The measurement is corrected for magnification and sent to the tissue bank for a matched donor.
Surgical Technique: Fresh Osteochondral Allografting
| • | General | |
| • | Epidural | |
| • | Spinal | |
| • | Regional (±) |
| • | Supine on a standard operating room table | |
| • | Padded thigh tourniquet | |
| • | Leg holder to position knee between 70 and 100 degrees of flexion for access to the lesion |
Surgical Landmarks, Incisions, and Portals
Patella
Patellar tendon
Joint line
Tibial tubercle
| • | Mini medial parapatellar arthrotomy | |
| • | Mini lateral parapatellar arthrotomy | |
| • | Standard medial parapatellar arthrotomy for bicondylar lesions |
| • | Medial parapatellar approach: anterior horn of medial meniscus, patellar tendon | |
| • | Lateral parapatellar approach: anterior horn of lateral meniscus, patellar tendon |
Examination Under Anesthesia and Diagnostic Arthroscopy
Examine the knee’s range of motion and stability under anesthesia. Perform a diagnostic arthroscopy before the allografting procedure if questions about the meniscus or articular cartilage exist.
Specific Steps (
Box 54-3
)
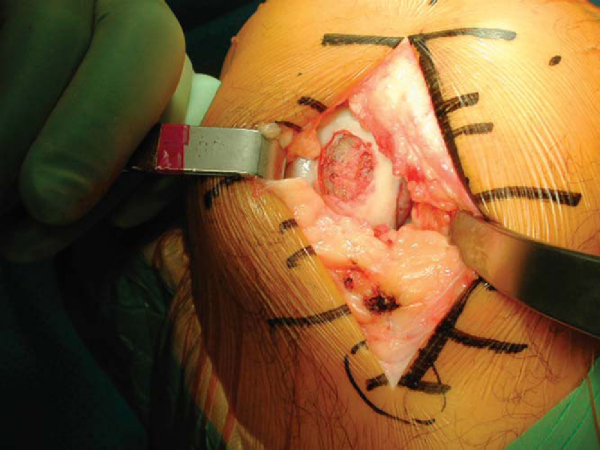
A standard midline incision is made from approximately the center of the patella to the tip of the tibial tubercle (
Fig. 54-4
). A medial or lateral parapatellar arthrotomy is then made extending from the superomedial or superolateral aspect of the patella down to the distal end of the incision. The incision can be extended for bicondylar lesions. Care is taken to preserve the anterior horn of the meniscus after incision through the infrapatellar fat pad. For access to deep posterior femoral condyle lesions, the meniscus may need to be taken down, leaving a cuff of tissue for later repair. Retractors are placed medially and laterally to better expose the condyle. One of these retractors is carefully placed in the notch, retracting the patella and protecting the cruciate ligaments. The knee is then flexed to the appropriate level to deliver the lesion to the arthrotomy. If additional mobilization of the patella is necessary, the fat pad can be released further, staying anterior to the anterior horn of the opposite meniscus.
| Surgical Steps | |||||||||||||||
|
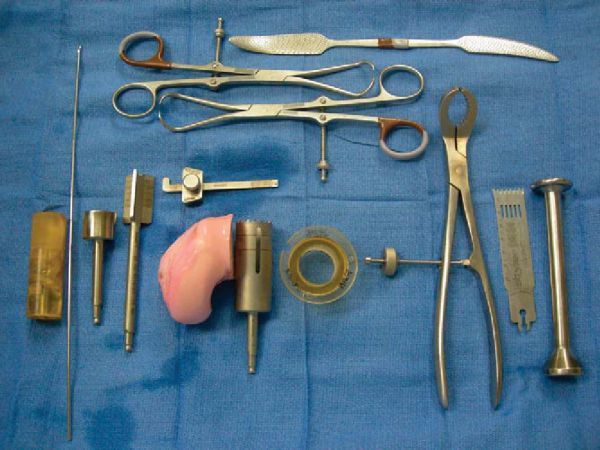
Two techniques are used for osteochondral allografting, the dowel and the shell techniques. When possible, a dowel or plug (generally 20 mm or larger) is the preferred technique as the instrumentation facilitates the procedure (
Fig. 54-5
). This is the typical scenario for spontaneous osteonecrosis. Often, however, the disease is too extensive for a dowel or multiple dowels, and a freehand shell technique is performed (typical for atraumatic osteonecrosis lesions).
With the dowel technique, the lesion is inspected and probed to assess its margins. A guide wire is then drilled perpendicular to the curvature of the articular surface into the center of the lesion. The graft is sized with cannulated dowels. A cannulated cutting reamer is used to penetrate the remaining articular cartilage. Next, 3 to 4 mm of subchondral bone is removed with the appropriately sized cannulated bone reamer. If it is indicated, more necrotic bone can be reamed down to bleeding margins, not to exceed 6 to 10 mm. The guide wire is then removed (
Fig. 54-6
). The depth of the lesion is measured in four quadrants (
Fig. 54-7
). If necessary, multiple small drill holes can be made to decompress the lesion. Curettage and autologous bone grafting (i.e., iliac crest bone graft) can be performed for extensive bone deficiency. At times, a second graft is necessary to cover the entire lesion. In this case, the dowel technique is repeated, overlapping the grafts (
Fig. 54-8
).


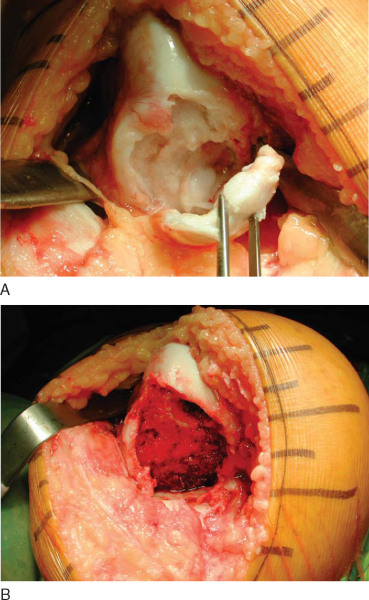
Alternatively, the entire condyle might be involved, rendering it difficult to graft with simple dowels (
Fig. 54-9A
). In this situation, the recipient site is prepared by a freehand technique with osteotomes and burs. The goal is to produce a simple geometric pattern (
Fig. 54-9B
). This often incorporates the entire hemicondyle. The dimensions and position of the prepared site are measured and transferred to the allograft.
|
|
|
|
Figure 54-9 |
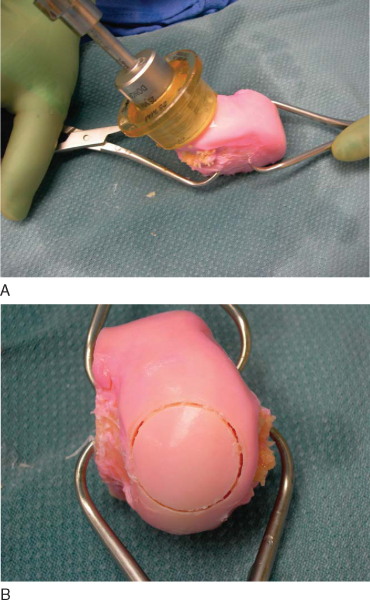
3. Fresh Osteochondral Allograft Preparation
With the dowel technique, the matching anatomic location on the donor graft is identified. The graft is held securely by an assistant with a large tenaculum bone clamp. A saw guide is placed perpendicular to the articular surface. The appropriately sized tube saw is placed over the guide and used to core the graft (
Fig. 54-10
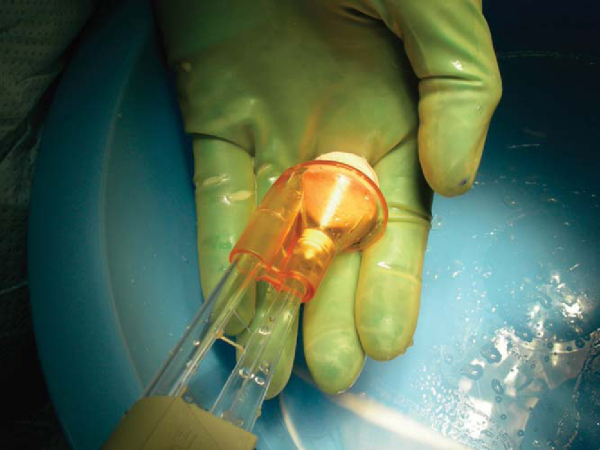
). The graft is then amputated from the condyle with a cut at its base by an oscillating saw. The previously measured recipient site depths are marked at the four corresponding quadrants of the graft. The graft is placed in a special bone holder, and the oscillating saw is used to make the final cut at the marks. Fine adjustments can be made with a bone rasp. To reduce its immunogenicity, the graft is then copiously irrigated with bacitracin solution by the jet lavage system to remove any remaining bone marrow elements (
Fig. 54-11
).
|
|
|
|
Figure 54-10 |
|
|
|
|
Figure 54-11 |
With the shell technique, the cuts are made freehand, forming a geometric match of the recipient site (
Fig. 54-12
). Repeated trial fittings are performed. The graft is modified accordingly until the articular geometry is restored.
|
|
|
|
Figure 54-12 . |
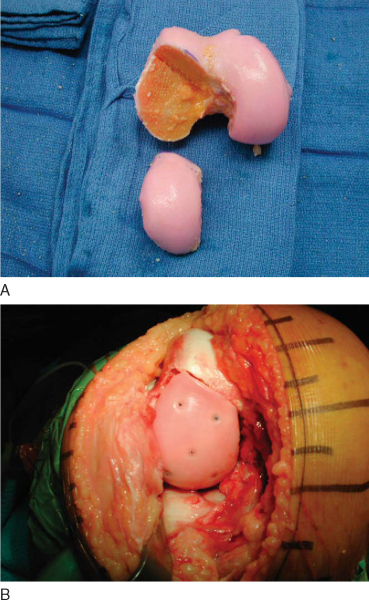
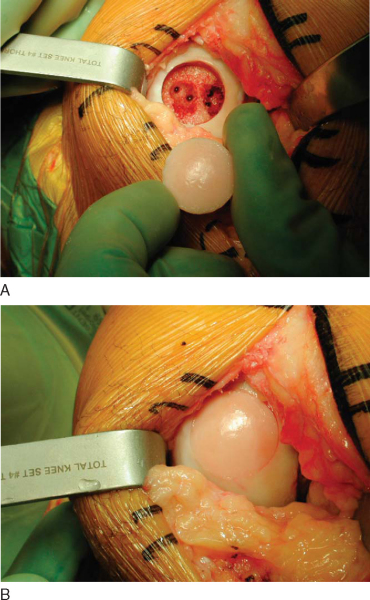
4. Graft Insertion and Fixation
With the appropriate orientation, the allograft dowel is manually inserted and gently tapped in place until flush. If necessary, the recipient site can be opened up farther with an oversized dilator. Fine adjustments to the allograft are made. An excellent press fit is typically noted (
Fig. 54-13
); however, the graft can be secured further with bioabsorbable pins. With a shell graft, fixation is obtained with a combination of bioabsorbable pins and small titanium screws. The knee is then put through a range of motion to assess for graft stability and possible impingement, especially at the notch.
|
|
|
|
Figure 54-13 |
Standard layered closure of the arthrotomy is performed over a 1/8-inch drain.
| • | Hospital admission for 23 to 48 hours | |
| • | Intravenous antibiotics for 24 hours | |
| • | Drain removed on postoperative day 1 |
| • | Immediate touch-down weight bearing is permitted with unlimited range of motion and quadriceps strengthening for 6 to 12 weeks. | |
| • | Stationary bicycling is started at 4 weeks. | |
| • | With meniscal detachment or repair and large posterior grafts, flexion is limited to 60 degrees for 4 to 6 weeks. | |
| • | Progressive weight-bearing begins at 6 to 12 weeks. | |
| • | Sports and recreation are resumed at 6 months. |
| • | Delayed union or nonunion of the allograft | |
| • | Infection | |
| • | Arthrofibrosis |
| PEARLS AND PITFALLS | ||||||||||||||||||
|
General
Surgical
|
Core decompression can be an effective way to treat osteonecrosis of the knee, especially before the development of subchondral collapse. Recent data have shown a 94% success rate with fresh osteochondral allografting with or without realignment in steroid-induced osteonecrosis of the knee in the young patient. Unicompartmental knee arthroplasty has been shown to be successful for the treatment of end-stage spontaneous osteonecrosis. Total knee arthroplasty is an excellent treatment for all end-stage osteonecroses. The use of cemented stems during total knee arthroplasty improves the long-term results in patients with mutifocal osteonecrosis. Uncemented total knee arthroplasty is no longer recommended in the treatment of osteonecrosis. These results are summarized in
Table 54-1
.
| Procedure | Osteonecrosis Type | Author | Mean Followup | Miscellaneous Notes | Outcome |
|---|---|---|---|---|---|
| High tibial osteotomy | Spontaneous | Koshino[9] (1982) | 5.1 years | 23 knees with concomitant core decompression or bone grafting | 35 of 37 (95%) successful |
| Unicompartmental knee arthroplasty, total knee arthroplasty | Spontaneous | Aglietti et al[1] (1983) | 4.4 years | 35 total, 2 unicompartmental; all stages included | 35 of 37 (95%) successful |
| Fresh osteochondral allograft, débridement, high tibial osteotomy, core decompression | Atraumatic, spontaneous, traumatic | Bayne et al[2] (1985) | 4.8 years | 3 of 3 patients with steroid-induced osteonecrosis treated with only fresh osteochondral allograft failed after 18 months | 6 of 13 (46%) spontaneous successful; 4 of 7 (57%) atraumatic successful |
| Core decompression | Atraumatic | Jacobs et al[8] (1989) | 4.5 years | 16 of 18 patients with steroid induced osteonecrotic lesions | 7 of 7 (100%) stage I-II successful; 11 of 21 (52%) stage III successful |
| Total knee arthroplasty | Atraumatic, spontaneous | Bergman and Rand[3] (1991) | 4 years | Only a 68% 5-year predicted implant survivorship by revision due to pain as end point | 33 of 38 (87%) successful |
| Unicompartmental knee arthroplasty | Spontaneous | Marmor[10] (1993) | 5.5 years | 2 of 4 failures due to subsequent osteonecrosis of opposite femoral condyle | 30 of 34 (88%) successful |
| Fresh-frozen osteochondral allograft | Atraumatic, spontaneous, traumatic | Flynn et al[5] (1994) | 4.2 years | Young patient group, 2 patients with steroid-induced osteonecrosis converted to total knee arthroplasty | 12 of 17 (71%) successful |
| Nonoperative treatment | Atraumatic | Mont et al[11] (1997) | 11 years | Mean asymptomatic period, 11 months; all but 6 required total knee arthroplasty by 6 years | 26 of 32 (81%) unsuccessful |
| Core decompression | Spontaneous | Forst et al[6] (1998) | 3 years | No late stages | 16 of 16 (100%) successful |
| Total knee arthroplasty | Atraumatic | Seldes et al[14] (1999) | 5.3 years | 5 patients required revision (3, aseptic loosening; 2, sepsis) | 26 of 31 (84%) successful |
| Core decompression | Atraumatic | Mont et al[12] (2000) | 7 years | No late stages; 15 successful knees needed repeated surgery | 72 of 91 (79%) successful |
| Total knee arthroplasty | Atraumatic, spontaneous | Mont et al[13] (2002) | 9 years | Improved results attributed to use of cement in all patients and stems as warranted | 31 of 32 (97%) successful |
| Iliac crest autograft with periosteum | Atraumatic | Fukui et al[7] (2002) | 6.6 years | Young patient group with large steroid-induced osteonecrotic lesions | 9 of 10 (90%) successful |
| Fresh osteochondral allograft | Atraumatic | Bugbee et al[4] (2004) | 5.3 years | Young patient group with large steroid-induced osteonecrotic lesions | 17 of 18 (94%) successful |