
lateral approach to the proximal femur, which is used to treat the
growing number of patients who have intertrochanteric hip fractures, is
the most frequently used approach in orthopaedic surgery.
all penetrate elements of the quadriceps muscle. Only the
posterolateral approach uses an internervous plane, but all are
relatively straightforward because the femoral nerve, which supplies
the quadriceps femoris muscle, divides proximally in the thigh,
allowing the more distal muscle elements to be separated without
denervation. (The posterior approach is reserved for exploration of the
sciatic nerve and for patients who cannot undergo more anterior
approaches because of skin problems.)
two windows. The lower window is derived from the lateral parapatellar
approach to the knee and the upper window from the lateral approach to
the femoral shaft. As in all minimal access surgical approaches,
imaging during surgery is mandatory.
with intramedullary nails inserted using a closed technique. A minimal
access approach to the proximal femur for the insertion of
intramedullary nails is described.
thigh, passing in an anterior to posterior direction, the anatomy of
the thigh is discussed in a separate section in this chapter following
the descriptions of the surgical approaches. Within this section, the
unique anatomic features of each approach are discussed individually.
gaining access to the upper third of the femur. It also can be extended
inferiorly to expose virtually the whole length of the bone. Although
it is an extremely quick and easy approach, it involves splitting the
vastus lateralis muscle. The subsequent blood loss that results from
the rupture of vessels during this procedure may make surgery awkward,
but rarely is life-threatening.
-
Open reduction and internal fixation of intertrochanteric fractures (this is by far the most common use of the approach)
-
Insertion of internal fixation in the treatment of subcapital fractures or slipped upper femoral epiphysis
-
Subtrochanteric or intertrochanteric osteotomy
-
Open reduction and internal fixation of
femoral shaft fractures, subtrochanteric fractures, and supracondylar
fractures of the femur -
Extraarticular arthrodesis of the hip joint
-
Treatment of chronic osteomyelitis of the femur
-
Biopsy and treatment of bone tumors
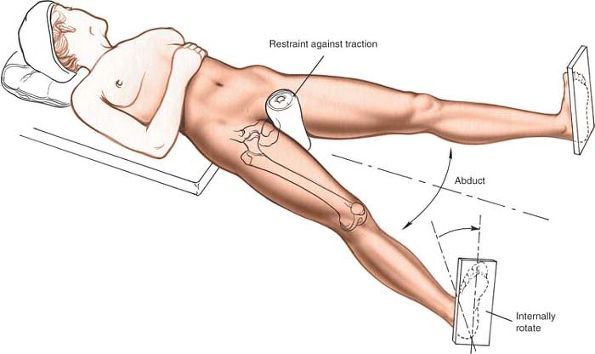
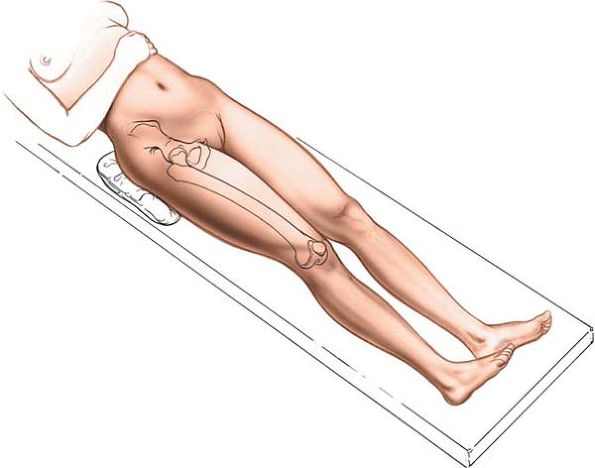
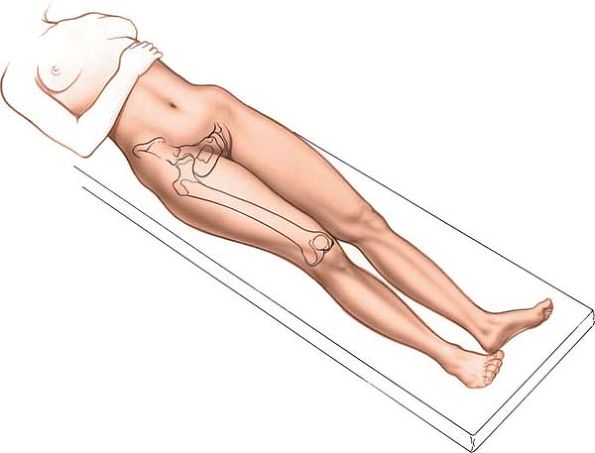
an orthopaedic table in the supine position so that their fractures can
be manipulated or controlled during surgery. Use an orthopaedic table
for any procedure that involves the use of an image intensifier (Fig. 9-1).
Internally rotate the leg 15° to overcome the natural anteversion of
the femoral neck and to bring the lateral surface of the bone into a
true lateral position.
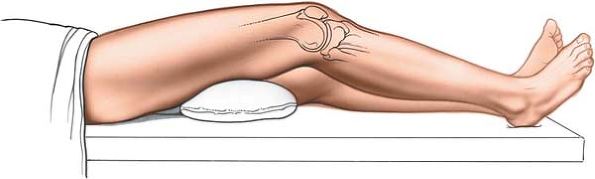
position. Place the patient on his or her side, with the affected limb
uppermost. Take care to pad the bony prominences of the bottom limb to
avoid pressure necrosis of the skin. Place other pillows between the
two limbs to pad the medial surface of the knee and the medial
malleolus of the side that is being operated on.
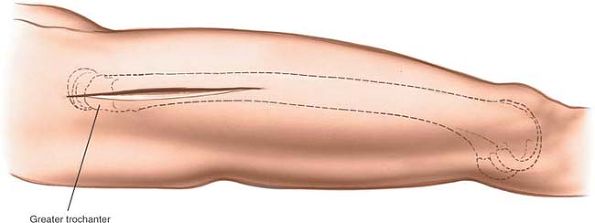
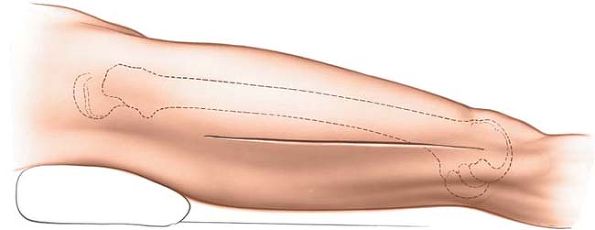
of the greater trochanter and extending down the lateral side of the
thigh over the lateral aspect of the femur. The length and position of
the incision will vary with the requirements of the surgery (Fig. 9-2).
 |
|
Figure 9-1 Position of the patient on the operating table for the lateral approach to the proximal femur.
|
incision significantly reduces the length of the incision. Because it
is accurately sited, this in turn reduces the amount of dissection and
soft-tissue damage necessary for adequate exposure.
the dissection splits the vastus lateralis muscle, which is supplied by
the femoral nerve. The muscle receives its nerve supply high in the
thigh, however, so splitting the muscle distally does not denervate it.
 |
|
Figure 9-2 Incision for the lateral approach to the proximal femur.
|
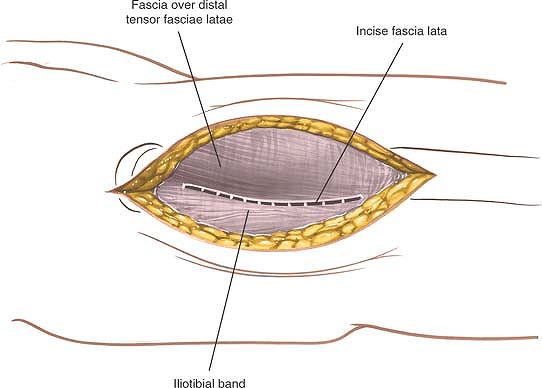
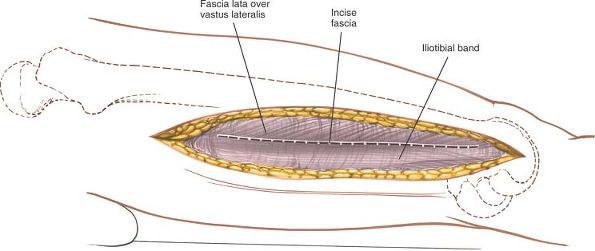
skin incision. At the upper end of the wound, the distal portion of the
tensor fasciae latae may have to be split in line with its fibers to
expose the vastus lateralis
(Fig. 9-3).
This split is needed in about one third of patients, those who have
tensor fasciae latae fibers extending distally beyond the greater
trochanter.
 |
|
Figure 9-3 Incise the fascia lata in line with the skin incision.
|
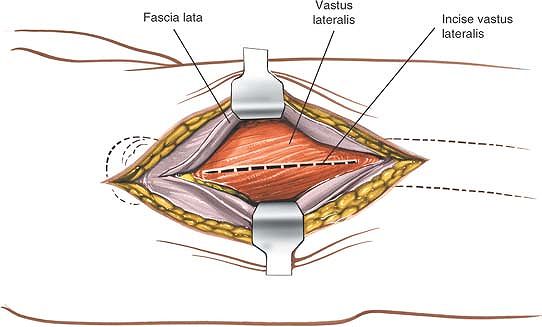
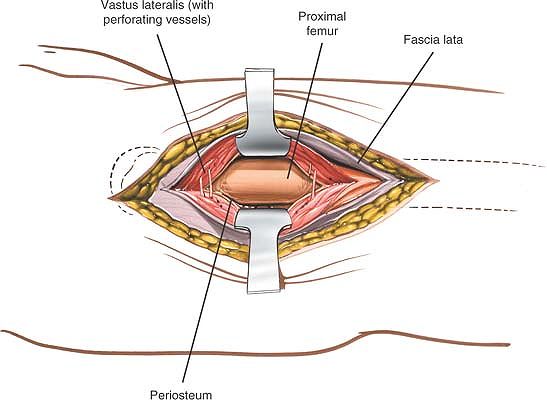
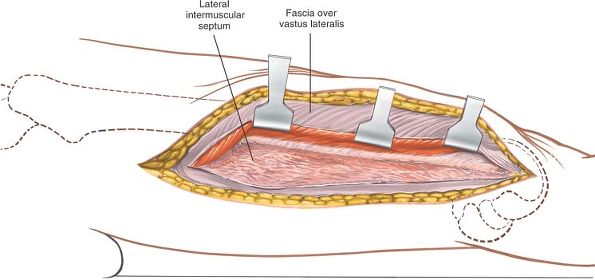
Insert a Homan or Bennett retractor through the muscle, running the tip
of the retractor over the anterior aspect of the femoral shaft. Then,
insert a second retractor through the same gap and down to the femoral
shaft. Manipulate the second retractor so that it moves underneath the
femur, and pull the two retractors apart to split the vastus lateralis
in the line of its fibers (Fig. 9-5).
 |
|
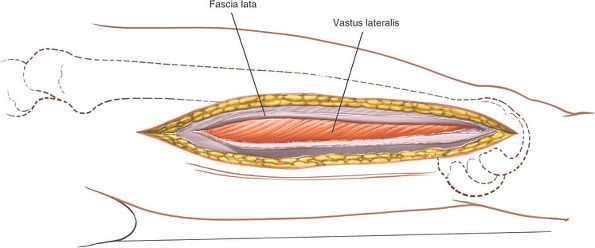
Figure 9-4 Incise the fascia covering the vastus lateralis.
|
proceeds, several vessels that cross the field will be exposed.
Coagulate them, if possible, before they are avulsed by the blunt
dissection.
 |
|
Figure 9-5
Split the fibers of the vastus lateralis. To develop a subperiosteal plane, squeeze two Homan retractors down to the femoral shaft and separate them to split the vastus lateralis further. |
They are damaged during the approach and should be ligated or
coagulated. These arterial branches can be identified more easily if
the muscle is split gently with a blunt instrument rather than cut
straight through with a knife.
 |
|
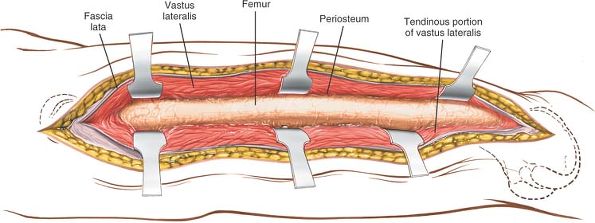
Figure 9-6 The incision may be extended distally to expose the entire shaft of the femur.
|
third of the bone for internal fixation of a hip fracture. It can be
extended to the knee joint, however, to allow full exposure of the
lateral aspect of the femoral shaft for reduction and fixation of all
types of femoral fractures (Fig. 9-6; see Figs. 9-39 and 9-40).
can expose the entire length of the femur. Because it follows the
lateral intermuscular septum, it does not interfere with the quadriceps
muscle. Although other lateral approaches involve splitting the vastus
lateralis or vastus intermedius muscles, the functional results of the
posterolateral approach do not differ significantly from those of other
approaches, probably because the vastus lateralis originates partly
from the lateral intermuscular septum. As a result, surgery still
involves detaching a part of the muscle’s origin and does not use a
true intermuscular plane.
femoral shaft at its proximal end. This septum overlies the middle of
the shaft at its distal end. The posterolateral approach is therefore
ideal for exposure of the distal one third of the femur. The more
proximal the approach, the greater the bulk of the vastus lateralis
that will need to be retracted anteriorly and the more difficult the
approach will be.
 |
|
Figure 9-7 Position of the patient on the operating table for the posterolateral approach to the femur.
|
-
Open reduction and plating of femoral fractures, especially supracondylar fractures
-
Open intramedullary nail placement for femoral shaft fractures if facilities for closed nailing do not exist
-
Treatment of nonunion of femoral fractures
-
Femoral osteotomy (which is performed rarely in the region of the femoral shaft)
-
Treatment of chronic or acute osteomyelitis
-
Biopsy and treatment of bone tumors
elevate the buttock and to rotate the leg internally, bringing the posterolateral surface of the thigh clear of the table (Fig. 9-7).
 |
|
Figure 9-8
The internervous plane lies between the vastus lateralis (which is supplied by the femoral nerve) and the hamstring muscles (which are supplied by the sciatic nerve). |
on the lateral surface of the knee joint. The epicondyle actually is a
flare of the condyle. Moving superiorly, note that the femur cannot be
palpated above the epicondyle.
 |
|
Figure 9-9 Incision for the posterolateral approach to the thigh.
|
aspect of the thigh. Base the distal part of the incision on the
lateral femoral epicondyle and continue proximally along the posterior
part of the femoral shaft. The exact length of the incision depends on
the surgery to be performed (Fig. 9-9).
 |
|
Figure 9-10 Incise the fascia of the thigh in line with its fibers and the skin incision.
|
 |
|
Figure 9-11 Identify the vastus lateralis under the incised fascia lata.
|
Follow the muscle posteriorly to the lateral intermuscular septum.
Then, reflect the muscle anteriorly, dissecting between muscle and
septum. Begin at the distal end of the incision where the plane is
easiest to identify and develop. Numerous branches of the perforating
arteries cross this septum to supply the muscle; they must be ligated
or coagulated (Fig. 9-12). If the approach involves the supracondylar region, identify and ligate the numerous branches of
the superior lateral geniculate vessels, which cross the operative
fields. Failure to do so will result in profuse hemorrhage, which will
be difficult to control.
 |
|
Figure 9-12 Elevate the vastus lateralis anteriorly, separating the muscle from the septum.
|
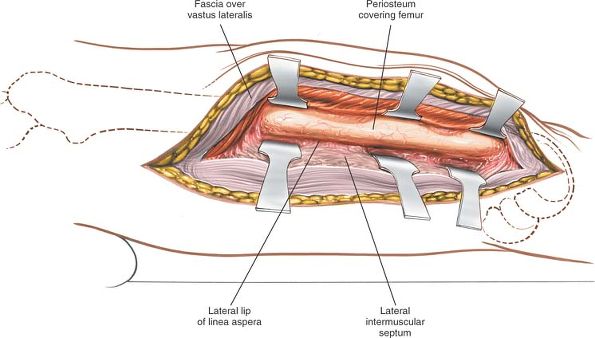
lateral intermuscular septum and the vastus lateralis muscle, detaching
those parts of the vastus lateralis that arise from the septum until
the femur is reached at the linea aspera (Fig. 9-13).
Incise the periosteum longitudinally at this point and strip off the
muscles that cover the femur, using subperiosteal dissection. Detaching
muscles from the linea aspera itself usually has to be done by sharp
dissection (Fig. 9-14).
 |
|
Figure 9-13
Detach those portions of the vastus lateralis that arise from the septum until the femur and linea aspera are reached. Then, incise the periosteum longitudinally. |
lateralis muscle and the lateral intermuscular septum in the distal
third of the femur. Moving
proximally,
the muscle becomes thicker, and it becomes more difficult to lift the
muscle bulk anteriorly to reveal the femoral shaft. To aid in this
process, place a Homan or Bennett retractor over the anterior aspect of
the femoral shaft, lifting the vastus lateralis forward. A retractor
placed on the lateral intermuscular septum will help open up the gap
and facilitate proximal dissection.
 |
|
Figure 9-14 Expose the shaft of the femur.
|
(which are branches of the profunda femoris artery) pierce the lateral
intermuscular septum to supply the vastus lateralis muscle. They must
be ligated or coagulated one by one as the dissection progresses. If
they are torn flush with the lateral intermuscular septum, they may
begin to bleed out of control as they retract behind it (Fig. 9-40).
cross over the lateral surface of the femur at the top of the femoral
condyles. These vessels will need to be ligated for exposure to the
bone.
the distal two thirds of the femur. It can be extended superiorly,
however, up to the greater trochanter, to expose virtually the entire
femoral shaft. Note that, superiorly, the tendon of the gluteus maximus
muscle lies behind the lateral intermuscular septum.
parapatellar approach to the knee joint. This allows accurate
visualization of the entire distal end of the femur. This extension is
used to allow reduction and fixation of intraarticular fractures of the
distal femur.
the lower two thirds of the femur and the knee joint. Its uses include
the following:
-
Open reduction and internal fixation of
fractures of the distal femur, particularly those that extend into the
knee joint and require medial plating (its major use) -
Open reduction and internal fixation of femoral shaft fractures
-
Treatment of chronic osteomyelitis
-
Biopsy and treatment of bone tumors
-
Quadricepsplasty
 |
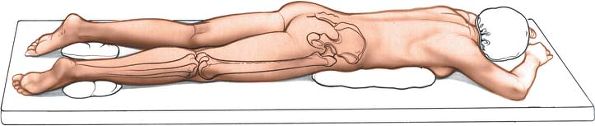
|
Figure 9-15 Position of the patient on the operating table for the anteromedial approach to the femur.
|
is a distinct bulge superomedial to the upper pole of the patella. Only
the inferior portion can be seen and palpated distinctly. The vastus
medialis atrophies rapidly in many patients with knee pathology;
therefore, it may be difficult to find.
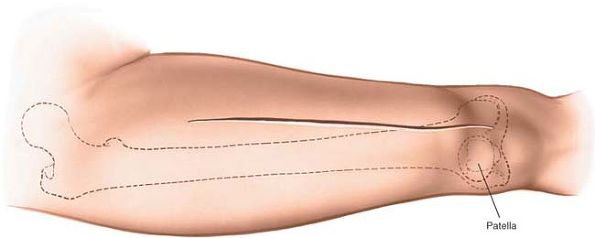
anteromedial aspect of the thigh over the interval between the rectus
femoris and vastus medialis muscles. (There are no specific landmarks
for this interval other than the contour of the vastus medialis.)
Extend the incision distally along the medial edge of the patella to
the joint line of the knee, if the knee joint
must be opened. The exact length of the incision depends on the pathology being treated (Fig. 9-16).
 |
|
Figure 9-16 Incision for the anteromedial approach to the thigh.
|
between the vastus medialis and rectus femoris muscles, both of which
are supplied by the femoral nerve. The intermuscular plane can be used
safely to expose the distal two thirds of the femur, however, because
both muscles receive their nerve supplies well up in the thigh.
 |
|
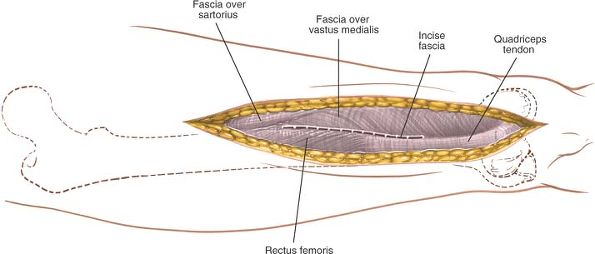
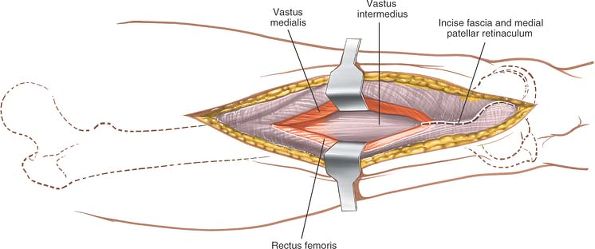
Figure 9-17
Incise the fascia lata in line with the skin incision, and identify the interval between the vastus medialis and the rectus femoris. |
skin incision, and identify the interval between the vastus medialis
and rectus femoris muscles (Fig. 9-17). Develop this plane by retracting the rectus femoris laterally (Fig. 9-18).
 |
|
Figure 9-18
Develop the plane between the vastus medialis and the rectus femoris, retracting the rectus femoris laterally. Begin the parapatellar incision into the joint capsule. |
line with the skin incision by cutting through the medial patellar
retinaculum (see Fig. 9-18). Continue
proximally, splitting the quadriceps tendon almost on its medial
border. Open up the plane by sharp dissection, staying within the
substance of the quadriceps tendon and leaving a small cuff of the
tendon with the vastus medialis attached to it. This preserves the
insertion of these fibers and allows easy closure. If the vastus
medialis is stripped off the quadriceps tendon, it is very difficult to
reinsert, and muscle function will be compromised. Next, continue to
develop the interval between the vastus medialis and rectus femoris
muscles proximally to reveal the vastus intermedius muscle. Split the
vastus intermedius in line with its fibers; directly below lies the
femoral shaft covered with periosteum. Continue the dissection in the
epi- periosteal plane to get to the bone (Figs. 9-19 and 9-20).
 |
|
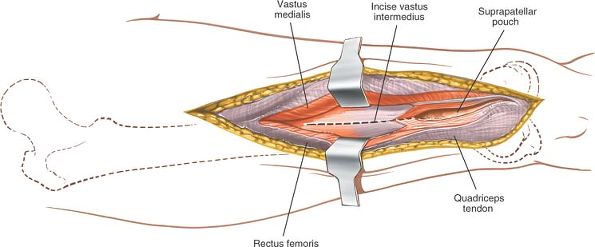
Figure 9-19
Continue the parapatellar incision proximally, opening the joint capsule and suprapatellar region. Carry the incision into the substance of the vastus intermedius. |
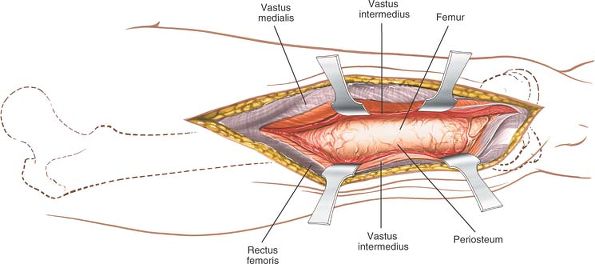 |
|
Figure 9-20 Incise the periosteum of the femur longitudinally, and expose the distal femur by subperiosteal dissection.
|
crosses the operative field just above the knee, winding around the
lower end of the femur. Although it looks small, it must be ligated or
coagulated to avoid hematoma formation (see Fig. 10-43).
muscle insert directly onto the medial border of the patella. Their
main job is to stabilize the patella and prevent lateral subluxation
(see Fig. 9-37). The fiber attachments of the
muscle inevitably are disrupted during this approach, unless a small
cuff of quadriceps tendon is taken with the muscle. Make sure to repair
the incision meticulously during closure to prevent subsequent lateral
subluxation of the patella.
approach can be extended along the same interval between the rectus
femoris and vastus medialis muscles. To extend the deep dissection,
continue to split the vastus intermedius muscle. The extension offers
excellent exposure of the lower two thirds of the femur. Higher up,
however, the femoral artery, vein, and nerve intrude into the
dissection; the upper third of the femur is explored best by a lateral
approach.
Continue the skin incision downward, and curve it laterally so that it
ends just below the tibial tubercle. Incise the medial retinaculum in
line with the skin incision, making the patella more mobile and subject
to lateral subluxation for full exposure of the knee joint. Take care
not to avulse the quadriceps tendon from its insertion during the
maneuver (see Medial Parapatellar Approach in Chapter 10).
is useful in patients who cannot undergo more anterior approaches
because of local skin problems. It provides access to the middle three
fifths of the bone, as well as to the sciatic nerve. Although it is
performed rarely, its uses include the following:
-
Treatment of infected cases of nonunion of the femur
-
Treatment of chronic osteomyelitis
-
Biopsy and treatment of bone tumors
-
Exploration of the sciatic nerve
 |
|
Figure 9-21 Position of the patient on the operating table for the posterior approach to the femur.
|
to the biceps muscle in its proximal half, but proceeds medial to it in
its distal half. This is because of the relationship of the posterior
aspect of the femur to the sciatic nerve.
supporting the pelvis and chest on longitudinally placed pillows or
thick foam pads to allow the abdomen and chest to move freely, ensuring
adequate ventilation (Fig. 9-21).
down the midline of the posterior aspect of the thigh. The incision
should end proximally at the inferior margin of the gluteal fold, and
its length will vary with surgical need (Fig. 9-23).
 |
|
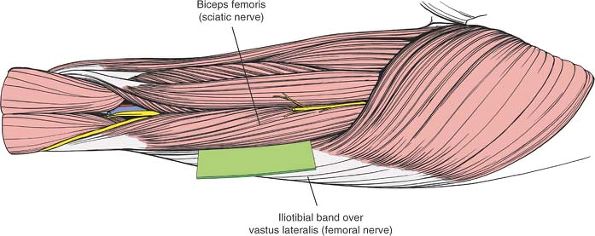
Figure 9-22
The internervous plane lies between the vastus lateralis (which is supplied by the femoral nerve) and the biceps femoris (which is supplied by the sciatic nerve). |
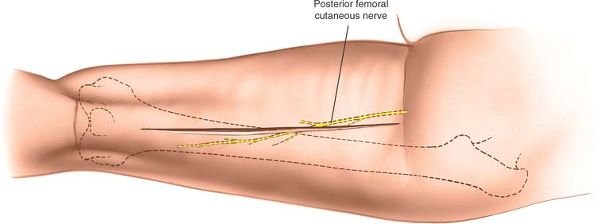
skin incision, or lateral to it, taking care not to damage the
posterior femoral cutaneous nerve, which runs longitudinally under the
deep fascia (and roughly in line with the fascial incision), in the
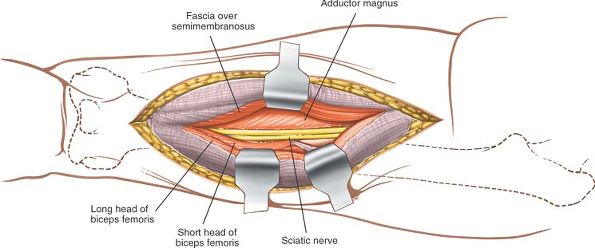
groove between the biceps and semitendinosus muscles (Fig. 9-24). Identify the lateral border of the biceps femoris in the proximal end of the
wound by palpating it. Then, develop the plane between the biceps
femoris and vastus lateralis muscles, which are covered by the lateral
intermuscular septum (Fig. 9-25).
 |
|
Figure 9-23 Make a straight longitudinal incision in the midline of the posterior aspect of the thigh.
|
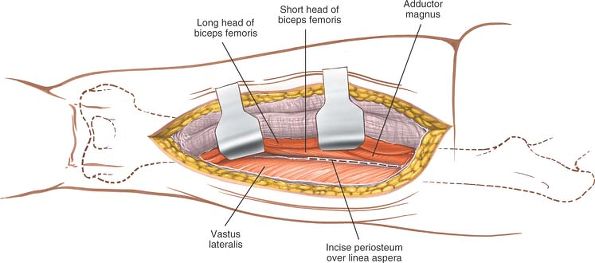
femoris muscle medially and the lateral intermuscular septum laterally,
developing the plane with a finger (see Fig. 9-25).
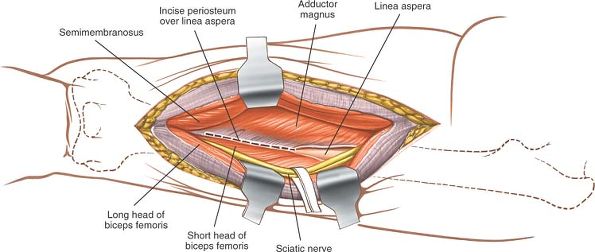
Identify the short head of the biceps as it arises from the lateral lip
of the linea aspera. Detach its origin from the femur by sharp
dissection, and reflect it medially to expose the posterior aspect of
the femur (Fig. 9-26).
 |
|
Figure 9-24
Incise the deep fascia of the thigh in line with the skin incision or just lateral to it, taking care not to damage the posterior femoral cutaneous nerve. |
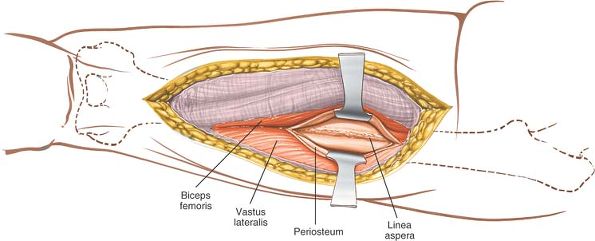
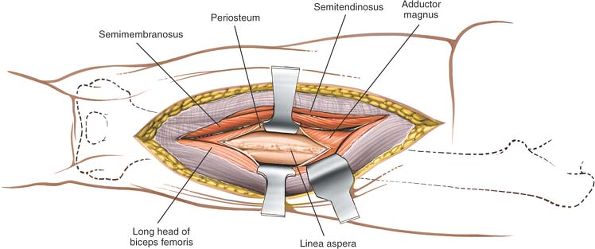
to reveal the posterior aspect of the femur, which is covered with periosteum (Fig. 9-28). Develop an epi-periosteal plane between the periosteum and overlying soft tissues (Fig 9-29: see Fig. 9-28).
 |
|
Figure 9-25 Identify the lateral border of the biceps femoris; develop the plane between the biceps femoris and the vastus lateralis.
|
 |
|
Figure 9-26
Detach the origin of the short head of the biceps from the femur by sharp dissection, and reflect it medially to expose the posterior aspect of the femur. |
 |
|
Figure 9-27 Retract the long head of the biceps laterally to expose the sciatic nerve.
|
 |
|
Figure 9-28 Retract the sciatic nerve laterally to expose the posterior aspect of the femur. Incise the periosteum.
|
 |
|
Figure 9-29 Develop the subperiosteal plane to expose the posterior aspect of the femur.
|
down the back of the thigh in the posterior compartment. Because it
lies medial to the biceps muscle in the upper part of the incision, it
is protected from damage during the proximal part of the approach as
long as the correct intermuscular plane is maintained. Distally, the
nerve must be identified and care taken not to retract it overzealously
(see Fig. 9-41).
branches from the sciatic nerve and enters the biceps from its medial
side well up in the thigh. Because the dissection is on the safe
lateral side, the nerve cannot be damaged proximally.
superiorly or inferiorly. It is valuable solely for its exposure of the
middle three fifths of the shaft of the femur.
two windows. The distal window is in effect a lateral parapatellar
approach to the knee and allows visualization of the articular surface
of the distal femur. The proximal window provides access to the femoral
shaft and is a portion of the lateral approach to the femoral shaft
(see Fig. 9-6). The minimally invasive
approach is indicated for open reduction and internal fixation of
distal femoral fractures, especially those that involve intra-articular
fractures associated with complex metaphyseal injuries.
If a tourniquet is to be used, place the tourniquet high on the
patient’s thigh and exsanguinate the limb using a compressive bandage
or elevate for 3 to 5 minutes before the tourniquet is inflated. Use a
radiolucent table and ensure that adequate imaging can be obtained of
the knee and femoral shaft by using an image intensifier before
prepping and draping.
 |
|
Figure 9-30 Position for the lateral approach to the distal femur.
|
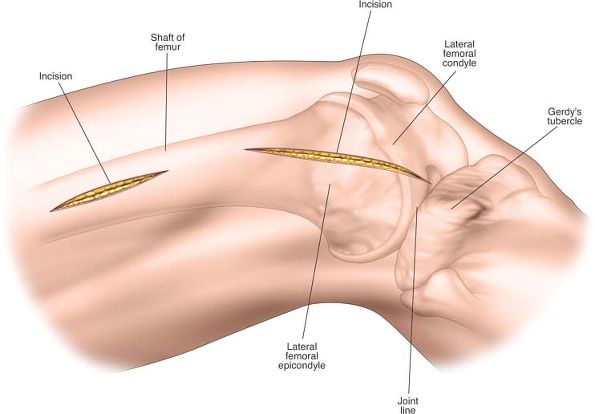
and extending the joint. The lateral margin of the patella and anterior
surface of the lateral femoral condyle are easily palpable. The femoral
shaft, however, is merely felt as a resistance beneath the tight
iliotibial band.
 |
|
Figure 9-31
Distally make a 6- to 8-cm incision over the anterior half of the femoral condyle beginning at the joint line. Proximally make a longitudinal incision over the lateral aspect of the femoral shaft. The position and length of the proximal incision depends on the site of the pathology and the implant to be used for treatment. |
anterior half of the lateral femoral condyle, extending upwards from
the joint line. Make a second proximal longitudinal incision overlying
the lateral aspect of the shaft of the femur (Fig. 9-31). The positioning and length of this second incision will relate to the
implant being used, and the site of the incision must be determined using image intensification.
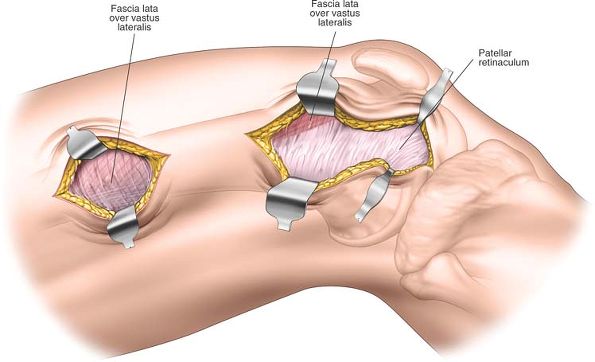 |
|
Figure 9-32
Distally incise the subcutaneous tissues in the line of the skin incision to reveal the fascia overlying the vastus lateralis and the lateral patellar retinaculum. Proximally incise the subcutaneous tissues in the line of the skin incision to reveal the fascia covering the vastus lateralis. |
between the vastus lateralis muscle supplied by the femoral nerve and
the biceps femoris muscles supplied by the sciatic nerve. Proximally,
no internervous plane is available for surgery, but splitting the
vastus lateralis muscle usually does not result in significant
denervation.
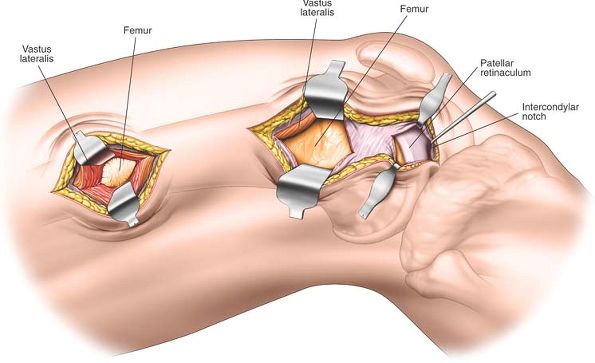
in the line of the skin incision. Divide the lateral retinaculum to
visualize the joint capsule. At the proximal end of the distal window,
develop a plane between vastus lateralis anteriorly and the lateral
intramuscular septum posteriorly. Numerous branches of the superior
lateral genicular artery with associated veins cross the operating
field at this point and will need to be ligated or diathermied.
the skin incision and then divide the deep fascia overlying the vastus
lateralis also in a longitudinal fashion (Fig. 9-32).
longitudinally to expose the entire distal end of the femur. Retract
the patella using an appropriate retractor and visualize all aspects of
the joint by flexing and extending the knee. Proximally split the
vastus lateralis muscle in a line of its fibers to give direct access
to the periosteum on the lateral aspect of the femoral shaft (Fig. 9-33).
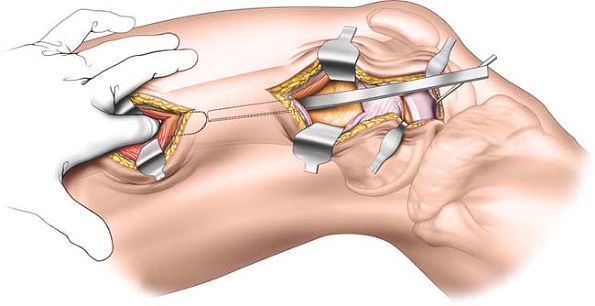
Finally, develop an epi-periosteal plane between the two windows on the
lateral aspect of the femur using a blunt dissector or the surgical
implant (Fig. 9-34).
and ligated. These vessels tend to be numerous and are closely adherent
to the periosteum. If these
vessels are not controlled, a large hematoma will result postoperatively.
 |
|
Figure 9-33
Distally incise the lateral patellar retinaculum and the underlying joint capsule to enter the knee joint and expose the distal end of the femur. More proximally, incise the deep fascia to reveal the lateral aspect of the distal femur. Proximally incise the fascia overlying the vastus lateralis and split the fibers of that muscle to expose the periosteum covering the lateral aspect of the femoral shaft. |
 |
|
Figure 9-34 Connect the two incisions by developing an epi-periosteal plane along the lateral aspect of the femur using blunt dissection.
|
applied to the lateral aspect of the femoral shaft and the lateral
aspect of the tibia. This will cause the lateral aspect of the knee to
open up, facilitating visualization of the articular surface.
lateralis divided in the line of its fibers to provide access to the
entire lateral aspect of the shaft of the femur. This maneuver will, of
course, increase the degree of soft-tissue damage and will reduce the
blood supply to the femoral metaphysis.
-
The adductors of the hip are supplied by
the obturator nerve and occupy the medial segment of the thigh. The
adductor magnus both adducts and extends the hip, and it has a dual
nerve supply, the obturator and sciatic nerves. -
The extensors of the knee are supplied by the femoral nerve and occupy the anterior segment of the thigh.
-
The flexors of the knee (which also
extend the hip) are supplied by the sciatic nerve and lie in the
posterior segment of the thigh.
by the thin medial intermuscular septum and from the knee flexors by
the tough lateral intermuscular septum. The adductors and flexors are
not separated by an intermuscular septum.
arises from the lumbosacral plexus (L4-5, S1-3), lies in the posterior
segment of the thigh, supplying the hamstrings and the extensor portion
of the adductor magnus. Running deep to the long head of the biceps and
lying on the adductor magnus, it ends medial to the biceps as the
muscle crosses from the ischial tuberosity toward the head of the
fibula (see Fig. 9-41).
a branch of the lumbar plexus (L2-4), divides into its branches soon
after entering the thigh and supplies all the extensors of the knee (Fig. 9-38).
artery of transit through the thigh. Its major branch, the profunda
femoris artery, is the main blood supply of the thigh musculature.
After the femoral artery gives off the profunda femoris artery in the
femoral triangle, it gives off no other major branches of importance in
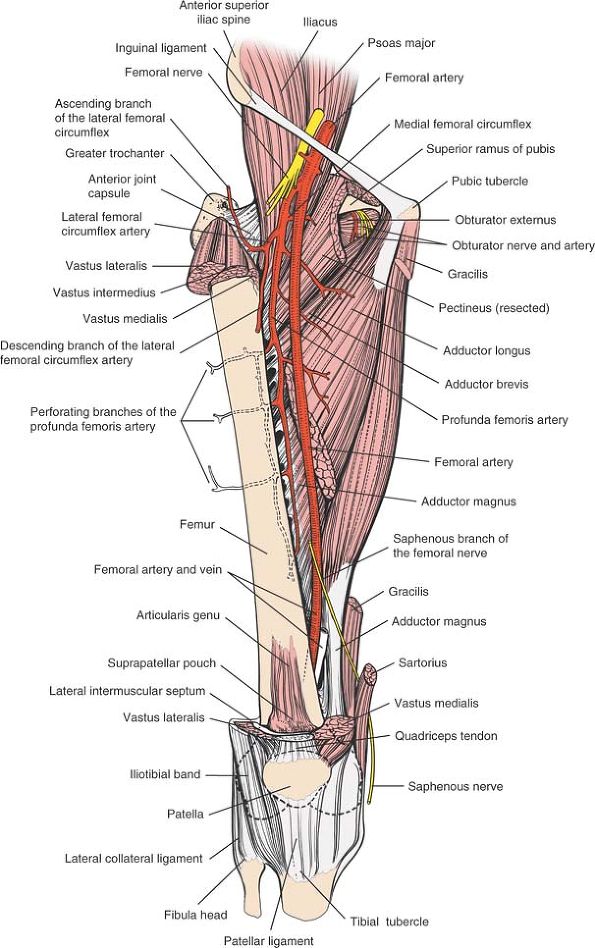
the thigh (Fig. 9-39).
inguinal ligament at the midinguinal point, directly over the head of
the femur, which is why the femoral pulse is the surface marking of the
femoral head. The artery then travels distally on the iliopsoas muscle
and disappears at the bottom of the femoral triangle beneath the
sartorius muscle, running on the adductor longus muscle. There, the
artery lies in a depression known as the subsartorial canal of Hunter.
The canal runs between the extensor and adductor compartments of the
thigh and is roofed by a thick fascial layer and the sartorius muscle.
The posterior wall is formed by the adductor muscles (the adductor
longus superiorly and the adductor magnus inferiorly), and the anterior
wall is formed by the vastus medialis muscle. Running with the artery
in the canal is the saphenous nerve (a cutaneous nerve that is derived
from the femoral nerve), the femoral vein, and, in the upper half, the
nerve to the vastus medialis muscle.
magnus muscle one handbreadth above the knee to join the sciatic nerve
in the popliteal fossa before entering the posterior compartments of
the thigh. There, it lies deep and medial to the sciatic nerve (Fig. 9-41).
fossa, perhaps as a result of the rotation of the limb that occurs during fetal development.
 |
|
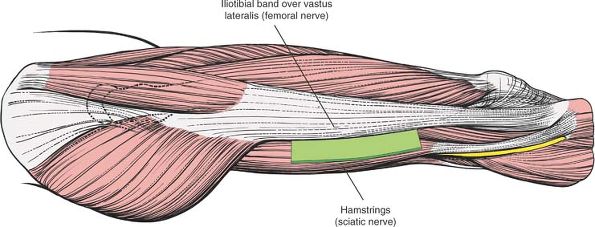
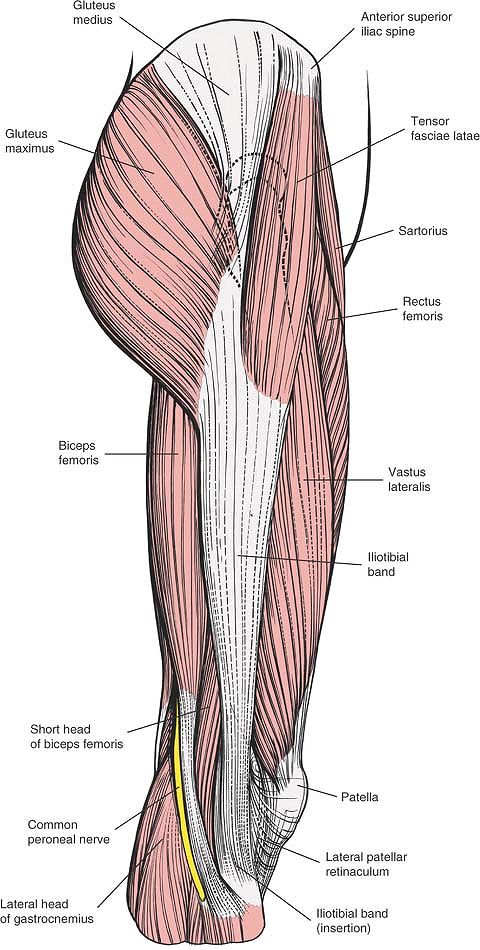
Figure 9-35
The superficial musculature of the lateral aspect of the thigh. The iliotibial band (tract) overlies the vastus lateralis proximally. |
 |
|
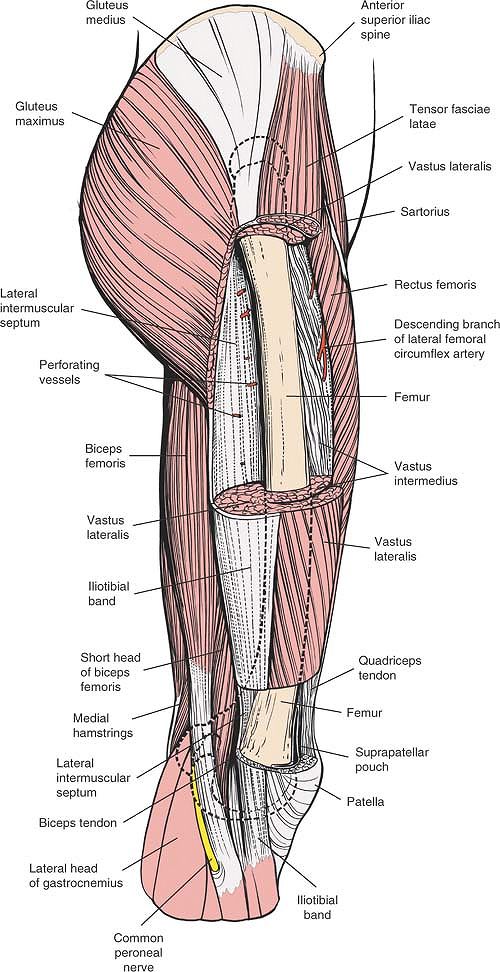
Figure 9-36
The tensor fasciae latae, the vastus lateralis, and a portion of the vastus intermedius have been resected to reveal the femur and the lateral intermuscular septum. Note the perforating vessels as they pierce the septum. Note that the vastus lateralis bulges posteriorly. |
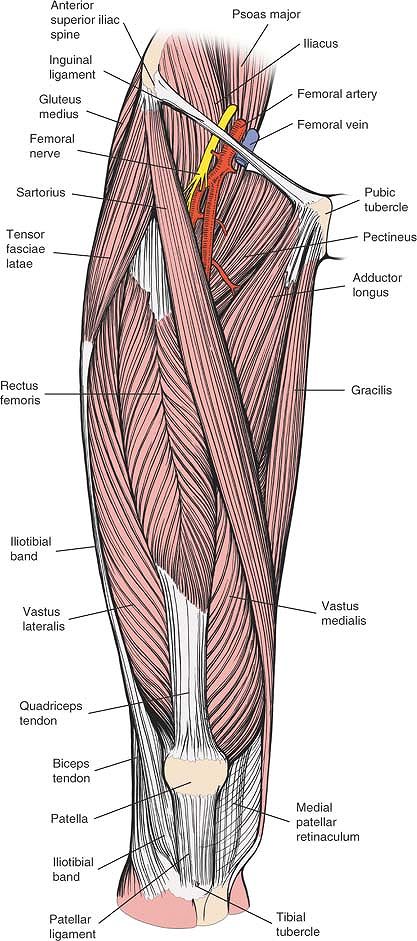 |
|
Figure 9-37 The superficial musculature of the anterior aspect of the thigh.
Rectus Femoris. Origin. Reflected head from just above acetabulum and anterior capsule of hip joint; straight head from anterior inferior iliac spine. Insertion. Upper border of patella, tibial tubercle. Action. Powerful extensor of knee and weak flexor of hip. Nerve supply. Femoral nerve (L2-L4).
|
 |
|
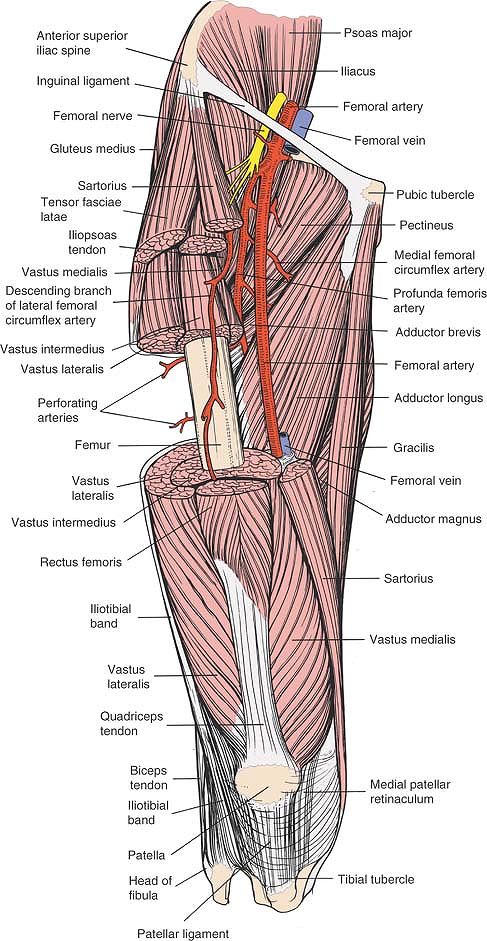
Figure 9-38
The sartorius, the rectus femoris, the tensor fasciae latae, the vastus lateralis, and the vastus intermedius have been resected to reveal the course of the femoral and profunda femoris arteries; note the relationship of the arteries to the quadriceps and the adductor muscles. Vastus Lateralis. Origin.
Upper half of intertrochanteric line. Vastus lateralis ridge, lateral lip of linea aspera, and upper two thirds of lateral supracondylar line of femur. Also from lateral intermuscular septum. Insertion. Lateral border of patella and tibial tubercle. Action. Extensor of knee. Nerve supply. Femoral nerve (L2-L4). Vastus Intermedius. Origin. Anterior and lateral aspect of upper two thirds of femoral shaft. Insertion. Tibial tubercle. Action. Extensor of knee. Nerve supply. Femoral nerve (L2-L4). Vastus Medialis. Origin. Medial lip of linea aspera and spiral line of femur. Insertion. Tibial tubercle and medial border of patella. Action. Extensor of knee. Nerve supply. Femoral nerve (L2-L4).
|
 |
|
Figure 9-39
The complete course of the femoral artery and profunda femoris artery. Note the perforating branches of the profunda femoris artery. Note that the adductor longus muscle has been resected to show the course of the profunda femoris artery, which runs posterior to it. |
 |
|
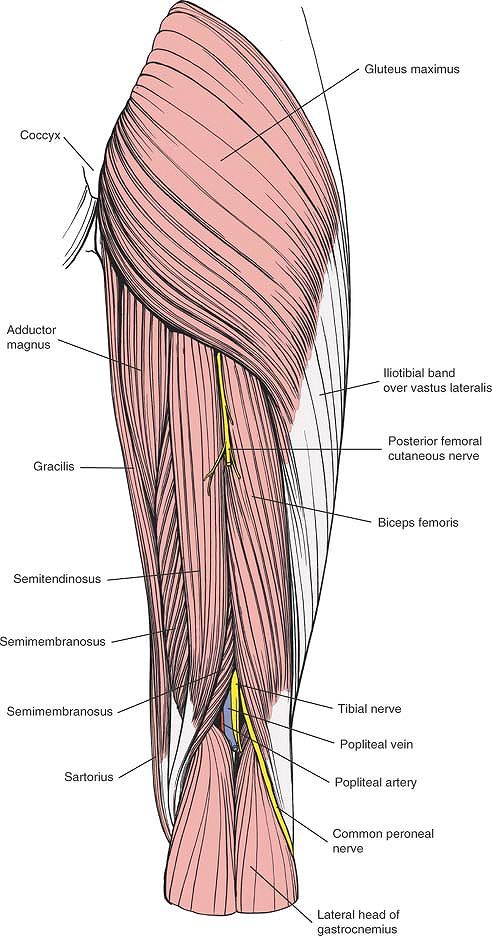
Figure 9-40
The superficial musculature of the posterior aspect of the thigh. Note the central course of the posterior femoral cutaneous nerve. Biceps Femoris. Origin. Long head from ischial tuberosity. Short head from linea aspera and lateral supracondylar line of femur. Insertion. Head of fibula. Action. Flexor of knee, extensor of hip, and lateral rotator of leg. Nerve supply. Long head: sciatic nerve (tibial division) (L5, S1, S2). Short head: sciatic nerve (common peroneal division) (S1-S2).
Semimembranosus. Origin. Ischial tuberosity. Insertion. Medial condyle of tibia. Action. Weak extensor of hip, flexor of knee, and medial rotator of leg. Nerve supply. Tibial nerve (L5, S1, S2).
Semitendinosus. Origin. Ischial tuberosity (common origin with biceps femoris). Insertion. Subcutaneous surface of tibia. Action. Flexor of knee, extensor of hip, and medial rotator of leg. Nerve supply. Tibial nerve (L5, S1, S2).
|
 |
|
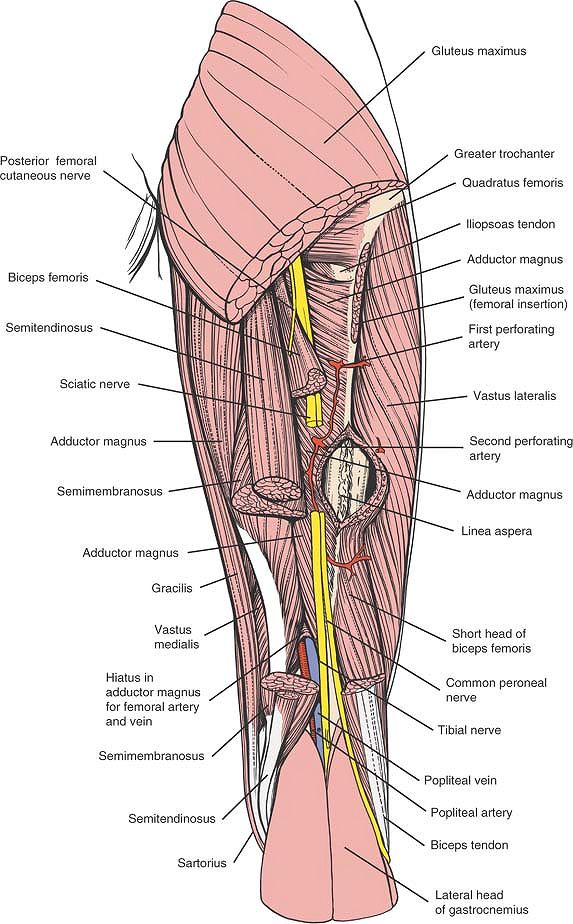
Figure 9-41
The course of the sciatic nerve and the anatomic location of the linea aspera. The gluteus maximus and hamstring muscles are resected. |
femur; it is anterior to it at its upper end, medial to it in its
middle portion, and behind it at its lower end. These changes influence
not only the planning of approaches, but also the insertion of skeletal
pins for traction and the application of external fixative devices.
supplies the thigh musculature. It arises from the femoral artery in
the femoral triangle, coming off its lateral side before passing behind
it quickly. The two arteries then leave the femoral triangle. The
profunda femoris artery passes behind the adductor longus muscle,
whereas the femoral artery passes anterior to it. Thus, the muscle is
sandwiched between the two arteries (Fig. 9-40; see Fig. 9-39).
artery pass posteriorly through the medial compartment of the thigh.
They wind around the femur just as the medial femoral circumflex artery
does and enter the anterior compartment again by piercing the lateral
intermuscular septum. They must be ligated at that point in the
posterolateral approach to the femur (see Fig. 9-39)
passes between the iliopsoas and pectineus muscles to lie on the upper
border of the adductor longus muscle. From there, it winds around the
interval between the quadratus femoris and adductor magnus muscles,
where it divides. The ascending branch runs along the superior border
of the quadratus femoris, where it may be cut in posterior approaches
to the hip, causing troublesome bleeding. The horizontal branch passes
between the quadratus femoris and the adductor magnus to form one limb
of the cruciate anastomosis (see Fig. 9-39).
passes lateral to the rectus femoris muscle, where it appears in the
upper part of the anterolateral approach. There, it divides into three
branches:
-
The ascending branch runs upward toward
the anterior superior iliac spine in the intermuscular interval between
the sartorius and tensor fasciae latae muscles. There, it requires
ligation in the anterior approach to the hip. -
The transverse branch continues to wind
around the femur and joins the transverse branch of the medial femoral
circumflex, contributing to the cruciate anastomosis. -
The descending branch passes along the
interval between the vastus intermedius and vastus lateralis muscles,
where it is encountered in the anterolateral approach to the femur (see
Fig. 9-39).
the dorsum of the ankle at the medial end of the dorsal venous arch.
Passing anterior to the medial malleolus (where it can be found during
cutdown for the insertion of intravenous lines), it passes behind the
knee before spiraling forward on the medial side of the thigh into the
femoral vein. The saphenous vein is the major superficial vein of the
thigh, but although it frequently is the object of general surgical
procedures, it has little importance for the orthopaedic surgeon.
deeply in muscle; only the greater trochanter and the femoral condyles
are easily palpable. The femur has a natural anterior bow, which is
important for the design of intramedullary rods.
varies but is usually about 130°. The femoral neck is displaced about
15° in anteversion on the femoral shaft. These angles should be borne
in mind when pins or nails are inserted up the femoral neck.
of cleavage of the skin; the resultant scars usually are cosmetically
acceptable.
extensor compartment. (The posterior approach penetrates the hamstring
compartment and is considered separately.)
muscle that arises from four heads and inserts through the extensor
apparatus of the knee into the tibial tubercle. This muscle, the
quadriceps femoris, is the largest muscle in the body. It is supplied
by the femoral nerve (see Fig. 9-41; see Figs. 9-37, 9-38 and 9-39).
contract differently. Because the gliding that occurs between muscle
elements is so vital to function, any incision that penetrates the
muscle may endanger its efficacy. The distal third of the quadriceps is
free to glide over the anterior aspect of the femur, because no part of
the muscle is attached to that part of the bone.
-
Rectus femoris. The rectus femoris is bipennate in structure, like the feathers of an arrow. It is the
P.494
only part of the quadriceps that crosses two joints, the hip and knee,
as it descends the thigh over the vastus intermedius. Its ability to
slide over the vastus intermedius during movement of the knee is the
result of the presence of a thick fascial layer on its underside.
Because its origins are so close to the hip joint, both heads of the
rectus femoris must be detached to allow access to the anterior aspect
of the hip and to the inner and outer walls of the pelvis at the upper
margin of the acetabulum. -
Vastus lateralis.
The plane between the lateral intermuscular septum and the vastus
lateralis is difficult to define, and dissection is bloody, mainly
because the muscle arises in part from the septum itself. Following the
plane between the lateral intermuscular septum and the muscle leads to
the posterior aspect of the femur at the linea aspera (the origin of
the muscle) and not onto the lateral aspect of the bone. The plane is
defined most easily and is most useful in the distal third of the femur.The vastus lateralis glides on the vastus intermedius
during movement. As is true for the rectus femoris, its deep surface is
covered with a thick fascial attachment. -
Vastus intermedius.
The vastus intermedius cloaks the anterior and lateral aspects of the
upper two thirds of the femoral shaft and forms the innermost layer of
the quadriceps. This muscle is split during most approaches to the
femur. -
Vastus medialis.
The nerve supply of the vastus medialis is the largest branch of the
femoral nerve, a branch that contains a large number of proprioceptive
fibers. When trauma affects the knee, fibers of the vastus medialis
that attach to the patella tend to lose tone quickly, possibly because
of a neuromuscular reflex mediated via the nerve to the vastus
medialis. Wasting of these muscle fibers produces a subjective sense of
instability that persists until the muscle bulk returns to normal.
Therefore, rehabilitating the vastus medialis is vital in the treatment
of any knee injury.The lowest fibers of the vastus medialis insert into the
patella, pulling it medially. They are crucial in preventing lateral
subluxation of the patella during flexion of the knee.
The key to the approach lies in understanding the anatomy of the
sciatic nerve and its relationship to the biceps femoris muscle.5
less in a straight line. The biceps femoris muscle angles across the
posterior aspect of the thigh in a medial to lateral direction, forming
a bridge under which the sciatic nerve runs. The nerve, therefore, lies
underneath the biceps femoris in the proximal thigh and lateral to it
in the distal thigh. Hence, during exposure of the proximal half of the
posterior aspect of the bone, the biceps should be retracted medially,
taking with it and protecting the sciatic nerve. For more distal
exposures, the biceps require retraction laterally, and the nerve must
be retracted with it. If a wide exposure of the whole length of this
piece of the bone is required, the long head of the biceps should be
divided; the proximal half of the muscle, together with the short head,
should be retracted medially with the sciatic nerve.
run down the posterior compartment of the thigh. All cross two joints,
the hip and the knee, and all act as hip extensors and knee flexors.
The hamstring muscles are supplied by branches of the sciatic nerve.
The muscle may be transferred to the anterior surface of the lateral
femoral condyle, together with the semitendinosus tendon, to correct
internal rotation deformity of the hip in patients with a variety of
neurologic lesions, a technique that is used only rarely.6
extremely long tendon in relation to the size of its muscle belly. The
tendon is at least 13 cm long and can be used in a variety of surgical
procedures. It may
be
left attached to the tibia, even as it is attached via a drill hole to
the patella, to hold that bone medially in cases of recurrent
dislocation.7 It also may be used for posterior8 and anterior9
cruciate reconstruction; in that procedure, the tendon is separated
from the muscle at the musculotendinous junction and is threaded
through the femur so that it mimics the function of the missing
cruciate ligaments. In addition, it may be used to reinforce a torn
medial collateral knee ligament.
 |
|
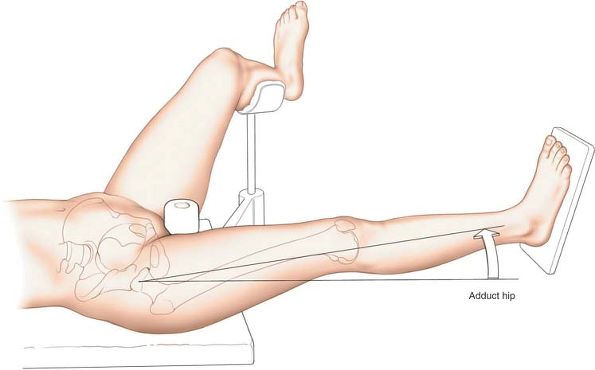
Figure 9-42
Place the patient supine on the traction table. Reduce the fracture by traction and manipulation. Adduct the leg as much as possible around the traction pole. Abduct and flex the opposite hip to allow c.-arm access to the whole of the femur. |
 |
|
Figure 9-43 (A) Adducting the leg moves the skin incision distally. (B)
In obese patients, nailing in this supine position is impossible. Note that even with maximal adduction, the ideal incision lies above the iliac crest. |
used for the insertion of intramedullary nails for the treatment of the
following:
-
Acute femoral shaft fractures
-
Pathological femoral shaft fractures
-
Delayed union and nonunion of femoral shaft fractures
nail into the femur is determined radiographically. It depends on the
design of the nail and the anatomy of the proximal femur in the
individual patient. The majority of intramedullary nails are straight
when viewed in the anterior-posterior plane. The nail should be
inserted so that its entry point into the bone is exactly in line with
the intramedullary canal on both anterior-posterior and lateral
radiographs. The use of preoperative templates overlying radiographs
allows for a precise calculation of the entry point. The nearest
anatomical landmark to this entry point is the piriform fossa, but it
cannot be used reliably in all patients because it does not always line
up with the intramedullary canal in both planes. In addition, the fossa
cannot be palpated because of overlying musculature.
anterior-posterior plane, the skin incision, the entry point of the
nail in the bone, and the medullary canal of the femur should all be in
a straight line.
insertion via the tip of the greater trochanter. These nails require a
skin incision directly over the tip of the greater trochanter.
nails. The supine position allows easier control of fracture reduction
and distal locking of the nail (Fig. 9-42). The lateral position allows easier access to the entry point in the proximal end of the femur.
traction using a supracondylar femoral pin or a traction boot. Adduct
the leg as much as possible around the traction post to make it
anatomically possible to enter the upper end of the femur via the skin
on the lateral aspect of the buttock. Laterally flex the trunk of the
patient away from the operative side. Flex and abduct the opposite hip
and flex the knee, placing the leg in a support (see Figs. 9-42 and 9-43A).
Ensure that adequate anterior-posterior and lateral radiographs of the
entry point of the nail and the fracture site can be obtained. Be sure
that the fracture is reduced or reducible before commencing surgery.
Although this may be time-consuming, it is important to obtain
good-quality radiographs before commencing surgery, or you will
struggle to obtain quality imaging during the case. Five minutes of
preoperative time may shorten your operating time by 2 hours.
the proximal fragment will flex and abduct due to the unopposed pull of
the psoas and the abductor muscles. Displaced proximal femoral
fractures cannot be reduced by traction alone. Control of the proximal
fragment frequently requires percutaneous insertion of a Steinmann pin
into the proximal fragment, allowing its manipulation.
table with the affected limb uppermost. Apply traction to the femur
through a distal supracondylar pin or a plaster boot. Adduct the leg
over the traction pole. Place the contralateral limb in a flexed
position at both hip and knee. Take care to pad the bony prominences of
the bottom leg to prevent skin breakdown due to pressure. Ensure that
adequate anterior-posterior and lateral radiographs of the entry point
and the fracture site can be obtained. The fracture must be reduced or
reducible before commencing surgery. Proximal femoral fractures will
require ancillary modes of reduction (Steinmann pins) (see Supine Position above).
proximal femur than the supine position because it allows more
adduction, which is particularly useful in obese patients. In cases of
extreme obesity, even this position may not permit successful
intramedullary nailing; such patients are probably best treated by a
retrograde nailing technique with an entry point into the bone in the
intercondylar notch.
 |
|
Figure 9-44
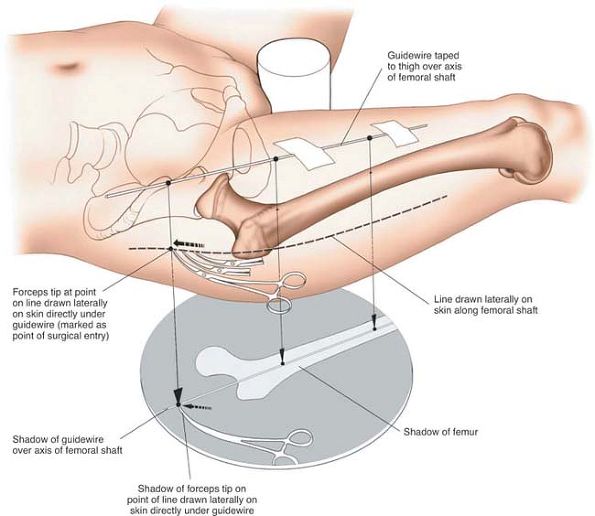
Palpate the shaft of the femur through the vastus lateralis muscle. Draw a line on the skin, marking the line of the shaft of the femur. Note that this line is curved. |
Palpate the shaft of the femur on the lateral aspect of the thigh
through the bulk of the vastus lateralis muscle. With a marker pen,
draw a line on the skin, marking the lateral aspect of the shaft of the
femur (Fig. 9-44). This line is curved because
the femur is bowed anteriorly when viewed in the lateral plane. Extend
this gently curving line proximal to the tip of the greater trochanter,
up to the level of the iliac crest (Fig. 9-45).
the anterior aspect of the thigh. Using radiographic control, ensure
that the guidewire is overlying the center of the medullary canal when
viewed in the anterior-posterior plane (Fig. 9-46).
the line you have drawn on the skin. Screen this instrument using an
image intensifier in the anterior-posterior planes (see Fig. 9-46). When the image of the tip of the forceps coincides with the guidewire radiographically, mark the skin (see Fig. 9-46).
This skin mark will be the center of the skin incision. A wire inserted
through this incision and through the correct entry point in the bone
will pass perfectly down the center of the medullary canal of the femur
in both anterior-posterior and lateral planes.
the leg, then this entry point will be above the level of the iliac
crest (see Fig. 9-43B).
Such an entry point is clearly not usable. If this is the case, then
alternative techniques using curved instrumentation will need to be
used through a more proximally based incision.
Palpate the shaft of the femur through the bulk of the vastus lateralis
muscle. With a marker pen, draw a curved line on the skin of the
lateral aspect of the thigh, marking the shaft of the
femur (see Fig. 9-44). Extend this line proximally beyond the tip of the greater trochanter, curving it slightly posteriorly.
 |
|
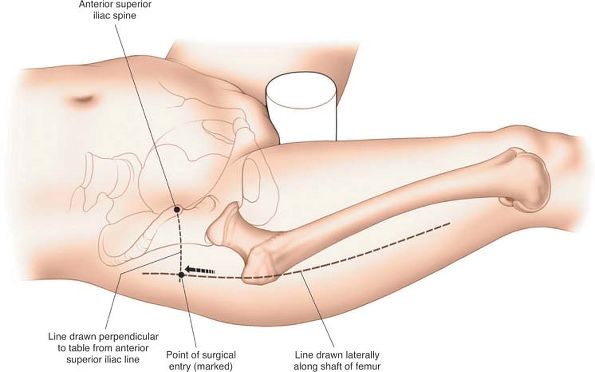
Figure 9-45 Extend the drawn line above the tip of the greater trochanter to the level of the anterior superior iliac spine.
|
perpendicularly downward from the iliac spine toward the buttock. The
incision should be centered at the point where these two lines cross (Fig. 9-47).
The size of the incision depends on the type of nail to be used. Nails
that have proximal interlocking jigs that are considerably offset from
the nail can be inserted through a 3-cm incision. Nails whose proximal
jigs attach close to the nail require a longer skin incision (up to 7
cm).
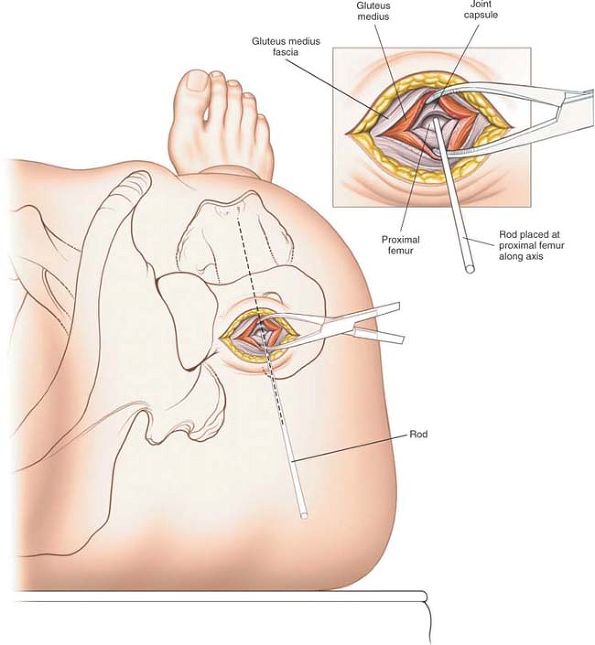
The dissection splits fibers of the gluteus maximus and gluteus medius
but does not denervate either muscle.
gluteus maximus in line with the incision. Split the fibers of gluteus
maximus for 3 cm in the line of its fibers using a curved clamp.
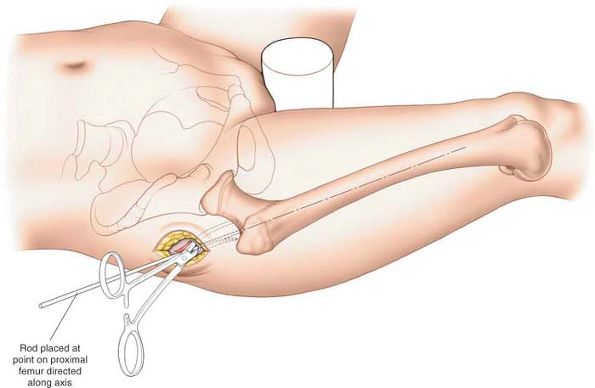
clamp to split the fibers of the gluteus medius muscle to gain access
to the proximal femur. Careful use of a finger as a blunt dissector to
identify the medial aspect of the greater trochanter is often helpful
as well. Insert a marker wire (or rod) through the completed dissection
onto the proximal end of the femur, and adjust the position of the wire
using X-ray control in both anterior-posterior and lateral planes until
the
wire is at the correct entry point into the bone. The wire must line up
with the intramedullary canal on both anterior-posterior and lateral
planes (Figs. 9-48 and 9-49).
 |
|
Figure 9-46
Place a long guidewire on the anterior surface of the thigh and position it under image intensifier control so that its image overlies the center of the medullary canal of the femur. Take a long artery forceps and move it proximally along the drawn line on the lateral aspect of the thigh. When the image of the forceps coincides with the image of the guidewire radiographically, mark the skin. |
vary from nail to nail. You must consult the appropriate literature to
ensure that the instrumentation is used correctly.
at the fracture site if the nail used is rigid, and the fracture is in
the proximal third of the femur. Lateral entry points may also create
an iatrogenic fracture of the medial femoral cortex during nail
insertion.
iatrogenic fracture of the femoral neck, usually a vertical
basicervical fracture. On occasion, medial entry points may also damage
the blood supply to the femoral head, creating avascular necrosis.
3 to 5 cm above the tip of the greater trochanter. If the femur is
adducted, the nerve will not be damaged during insertion of a nail. If,
however, a retrograde nailing technique is used when the femur is not
necessarily abducted, then damage to the nerve may occur.
 |
|
Figure 9-47
Landmark technique. Draw a line perpendicularly downwards from the anterior superior iliac spine. Where this line crosses the previously drawn line on the lateral aspect of the thigh, mark the skin. |
 |
|
Figure 9-48
Split the fibers of the gluteus maximus in line with the skin incision. Deepen the incision down to the femur by splitting the fibers of the gluteus medius. |
 |
|
Figure 9-49 Insert a guidewire (or rod) into proximal femur, checking its position in both A-P and lateral planes using a C-arm.
|
intramedullary nailing utilizes a small portion of the medial
parapatellar approach to the knee. It allows excellent percutaneous
access to the distal femoral intercondylar region. Its sole use is for
the insertion of retrograde intramedullary nails used to treat femoral
shaft fractures.
large triangular ridge underneath the knee to allow the knee to flex to
90º. Finally, place a small sandbag under the ipsilateral buttock to
correct the natural external rotation of the limb and ensure that the
patella faces directly anteriorly. This will allow you to more
accurately access rotational control during fracture reduction and
fixation.
 |
|
Figure 9-50
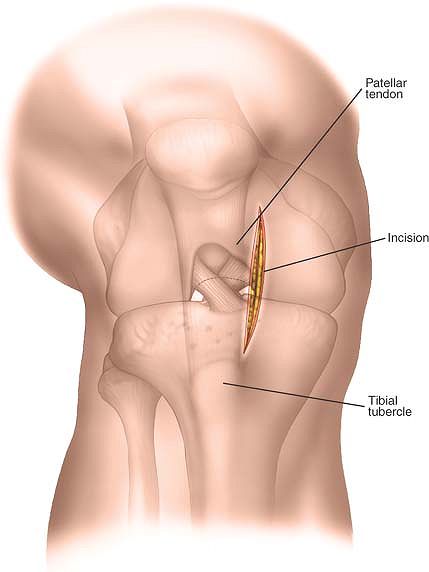
Make a 3-cm longitudinal incision approximately 1 cm from the medial border of the patella, beginning about 2 cm proximal to the distal pole of the patella. |
longitudinal incision approximately 1 cm from the medial border of the
patella, beginning about 2 cm proximal to the distal pole of the
patella (Fig. 9-50).
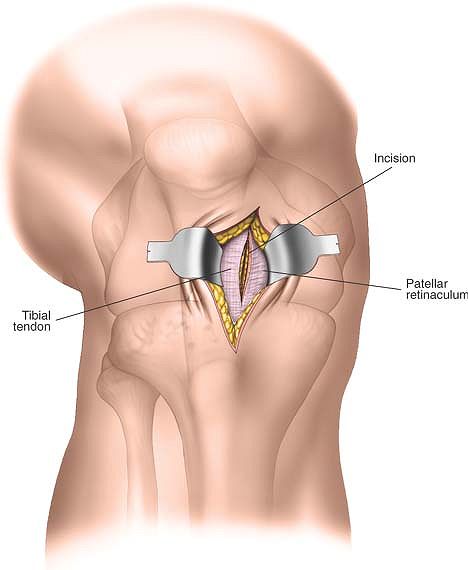
approach. The approach is merely through the medial patella retinaculum
and synovium.
line of the skin incision. Identify the capsule of the knee joint and
divide it longitudinally (Fig. 9-51).
 |
|
Figure 9-51
Deepen the incision through subcutaneous tissue in the line of the skin incision. Identify the capsule of the knee joint and divide it longitudinally. |
 |
|
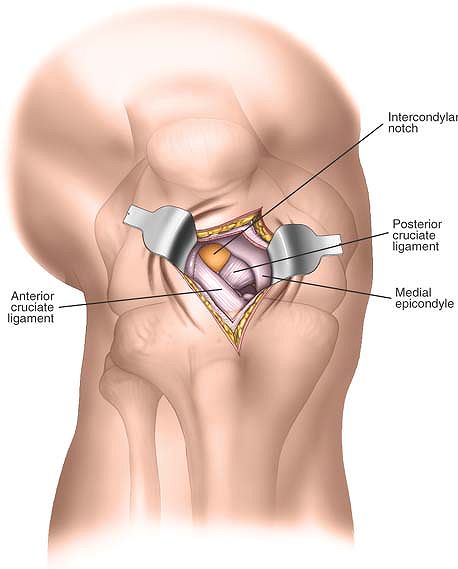
Figure 9-52
Divide the underlying synovium of the knee. Insert two retractors to visualize the intercondylar notch and the insertion of the posterior cruciate ligament onto the lateral aspect of the medial femoral condyle. |
 |
|
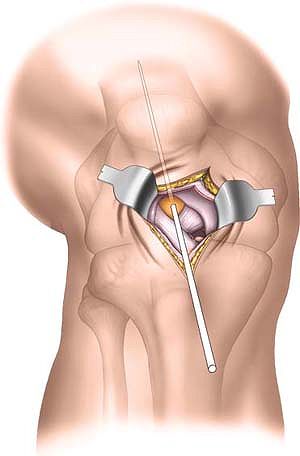
Figure 9-53
Insert a guidewire into the distal femur. The entry point in the intercondylar notch varies with the implant to be used, and accurate positioning of the guidewire must be confirmed by C-arm imaging at the time of surgery. |
retractors to visualize the intercondylar notch. The insertion point
and direction of guidewires used for nail introduction must be
confirmed using appropriate X-ray control (Figs. 9-52 and 9-53).
lie distal to the distal end of the incision. It is only in danger if
the incision is extended distally.
inserts into the lateral aspect of the medial femoral condyle. The
insertion may be damaged by the intramedullary nail or the reamers used
to create the opening if the entry point is not correctly located.
proximally and distally, and this may be required in obese patients.
The skin incision may be extended distally and an extra-articular
approach to the proximal tibia may be used to insert a tibial nail in
cases of floating knee. (See Minimal Access Approach to the Proximal Tibia page 589).
DH, Schottstaedt ER, Larsen LJ et al: Clinical and electromyographic
study of seven spastic children with internal rotation gait. J Bone
Joint Surg [Am] 51:1070, 1969
R: Nuove applicazion del trapianto muscolare e tendineo (XII Congress
Societa Italiana di Ortopedia). Archivo di Ortopedia 1922:38
O, Krettek C, Miclau T et al: Effectors of percutaneous and
conventional plating techniques on the blood supply to the femur. Arch
Orthop Trauma Surg 117:438, 1998
PJ, Stannard J, Ziowodzki M et al: Distal femoral fracture fixation
utilizing the less invasive stabilization system (LISS). The technique
and early results. Injury 32(suppl):SC 32, 2001
C, Muller M, Miclau T: Evolution of minimally invasive plate
osteosynthesis (MIPO) in the femur. Injury 32(suppl): SC 14, 2001
C, Miclau T, Stephan C: Trans-articular approach and retrograde plate
osteosynthesis for complex distal intra-articular femur fractures. Tech
Orthop 14:219, 1999