CHAPTER 4 –
Cole & Sekiya: Surgical Techniques of the Shoulder, Elbow and Knee in Sports Medicine, 1st ed.
Copyright ©
2008 Saunders, An Imprint of Elsevier
CHAPTER 4 – Knotless Suture Anchor Fixation for Shoulder Instability
Bradley Butkovich, MD, MS
Shoulder instability has been treated by myriad arthroscopic and open techniques. It is well documented that restoration of stability can be reliably obtained by the Bankart repair. Open Bankart procedures are successful; however, there is some morbidity associated with them. In an effort to restore stability to the shoulder while avoiding these morbidities, arthroscopic Bankart repair procedures have been developed. Arthroscopic procedures are not without problems. Some of the poor results of arthroscopic repairs continue to be attributed to labral repair without adequately addressing capsular laxity. Furthermore, early fixation methods (tacks, staples, transglenoid sutures) did not achieve anatomic repairs similar to those of open methods. The use of current suture anchors and arthroscopic knot-tying techniques provides fixation comparable to that of open repair. However, arthroscopic suture anchor repair continues to have pitfalls related to the quality, consistency, and technical challenges associated with arthroscopic knots.
A knotless suture anchor technique that eliminates arthroscopic knot tying has been described and has been found to be successful in addressing shoulder instability. Knotless suture anchors provide a strong, consistent, and low-profile repair with an increased superior capsular shift while eliminating the problems associated with the use of special knot-tying devices, multiple knot designs, and time-consuming techniques of standard suture anchors.
It is essential to obtain a history that is consistent with shoulder instability, including the mechanism of injury, associated injuries, treatment history, chronicity, and disability. Younger patients, increased activity level, and participation in collision sports increase the likelihood of further dislocation and indication for subsequent surgical repair.
| • | Presence of apprehension sign | |
| • | Positive Jobe relocation test result | |
| • | Range of motion: usually preserved | |
| • | No rotator cuff symptoms or weakness |
| • | Anteroposterior radiograph | |
| • | Scapular Y radiograph | |
| • | Axillary radiograph to evaluate the anterior glenoid for a large bony Bankart lesion or glenoid rim fracture |
A history of documented recurrent dislocations precludes the need for other diagnostic studies unless an associated pathologic condition of the shoulder, such as a superior labral anterior-posterior (SLAP) lesion or rotator cuff tear, is suspected.
Indications and Contraindications
A typical candidate for arthroscopic shoulder stabilization has a history of multiple shoulder subluxations or dislocations, normal strength, and normal range of motion. Associated findings such as rotator cuff tears, SLAP tears, biceps tears, impingement, and acromioclavicular joint arthritis can be addressed at the same time as the index procedure. Capsular redundancy is often addressed with a capsular shift, plication, or resection as indicated.
Significant glenohumeral arthritis, rotator cuff arthropathy, glenoid deficiency, and significant glenoid fracture are contraindications to arthroscopic Bankart repair. A marked glenoid deficiency may require bone grafting. Furthermore, humeral avulsions of the glenohumeral ligament often require open repair.
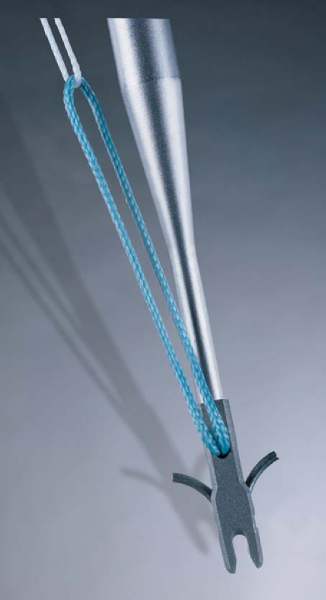
The knotless suture anchor (
Fig. 4-1
) consists of a titanium body with two nitinol arcs. The arcs have a memory property that creates resistance to anchor pullout after insertion into bone through small drill holes. The knotless suture anchor looks similar to the GII anchor (Mitek Products, Westwood, Mass); however, it differs structurally in several ways. A channel or slot is located at the tip of the knotless suture anchor. A short loop of green No. 1 Ethibond suture (Ethicon, Somerville, NJ), called the anchor loop, is attached to the tail end of the anchor instead of the long strands used in the GII anchor. A second longer loop of white 2-0 Ethibond suture, called the utility loop, is linked to the anchor loop and serves as a passing suture.
|
|
|
|
Figure 4-1 (From Thal R. Knotless suture anchor fixation for shoulder instability. In Miller MD, Cole BJ, eds. Textbook of Arthroscopy. Philadelphia, Elsevier, 2004.) |
The BioKnotless suture anchor (
Fig. 4-2
), which is an absorbable version of the knotless suture anchor, is also available. The BioKnotless suture anchor looks similar to the Mitek Panalok anchor. The BioKnotless suture anchor has a wedge-shaped, poly-l-lactic acid anchor body with a slot located at the tip. The anchor loop is white No. 1 Panacryl, and the utility loop is green 2-0 Ethibond.
|
|
|
|
Figure 4-2 (From Thal R. Knotless suture anchor fixation for shoulder instability. In Miller MD, Cole BJ, eds. Textbook of Arthroscopy. Philadelphia, Elsevier, 2004.) |
The sides of both anchor designs are flat to create space for the captured suture loop to pass without suture abrasion.
This procedure can be performed under general anesthesia, interscalene block, or a combination of both. The patient can be positioned in either the lateral decubitus position with a 30-degree posterior tilt or the beach chair position. We prefer the lateral decubitus position. The arm is placed in traction in the lateral position and left free in the beach chair position. Additional distraction of the glenohumeral joint can be achieved by manually lifting the proximal humerus laterally. This increases the space between the humeral head and the glenoid, which greatly improves visualization of the anterior glenoid rim, labrum, and anterior inferior glenohumeral ligament (AIGHL).
Surgical Landmarks, Incisions, and Portals
| • | Acromion | |
| • | Posterior soft spot | |
| • | Humeral head | |
| • | Coracoid |
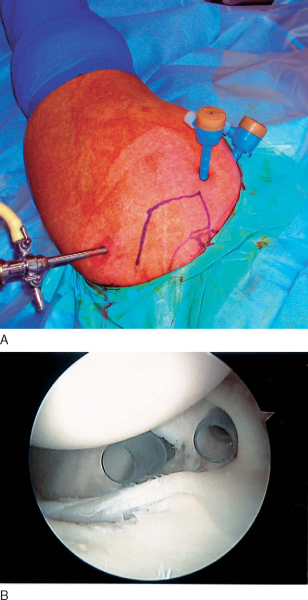
Portals (
Fig. 4-3
)
| • | Axillary nerve: during mobilization of the anterior inferior labrum | |
| • | Musculocutaneous nerve: must stay lateral to coracoid with anterior portal placement |
Examination Under Anesthesia and Diagnostic Arthroscopy
Examination under anesthesia should demonstrate instability consistent with physical examination findings and the history. Testing for instability in 90 degrees of abduction with the application of anterior pressure is adequate. Diagnostic arthroscopy should be thorough. Evaluation of the articular surfaces, labrum, biceps tendon, rotator cuff, and glenohumeral ligaments should be completed through both the posterior and anterior portals. Particular attention should be specifically directed toward the anterior labrum and AIGHL.
Specific Steps (
Box 4-1
)
1. Ligament Preparation and Mobilization
Preparation of the AIGHL is determined by the pathologic findings of the ligament at diagnostic arthroscopy. Visualization is through the posterior portal and instrumentation is through the anterior portals. If visualization is inadequate from the posterior portal, then visualization can be achieved from the anterior superior portal with instrumentation through the anterior inferior portal. The exposed labral edge of the Bankart lesion is débrided with a motorized shaver or bur to promote healing of the ligament to bone after repair.
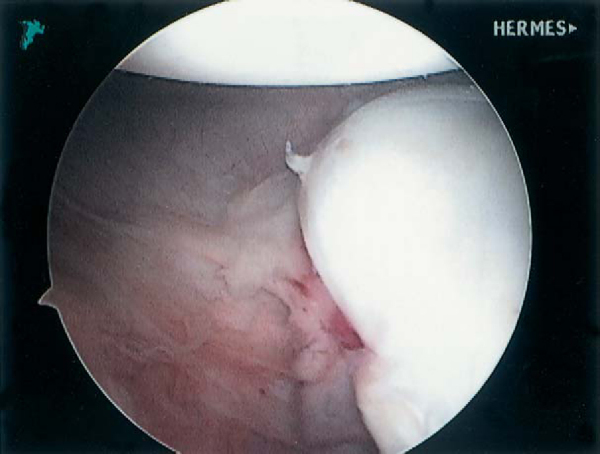
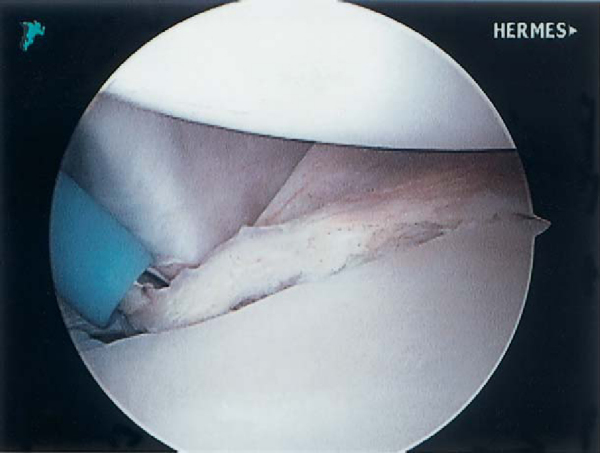
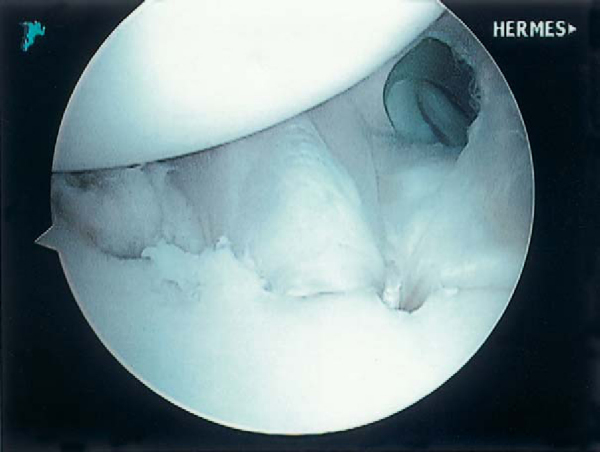
Commonly, the AIGHL is released and mobilized with care from both the glenoid and the underlying subscapularis with the use of an electrocautery device. If an anterior labroligamentous periosteal sleeve avulsion (ALPSA) lesion is encountered (
Fig. 4-4
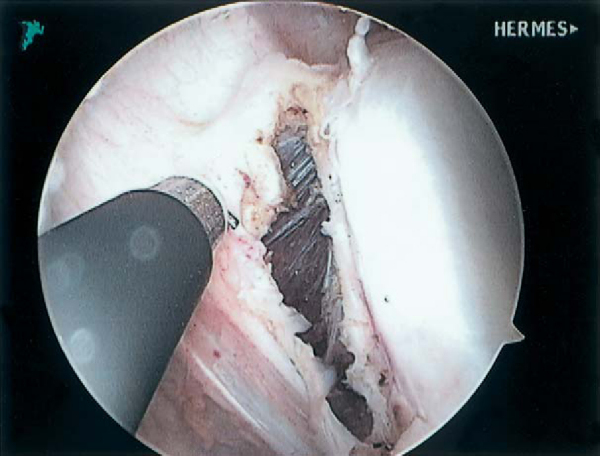
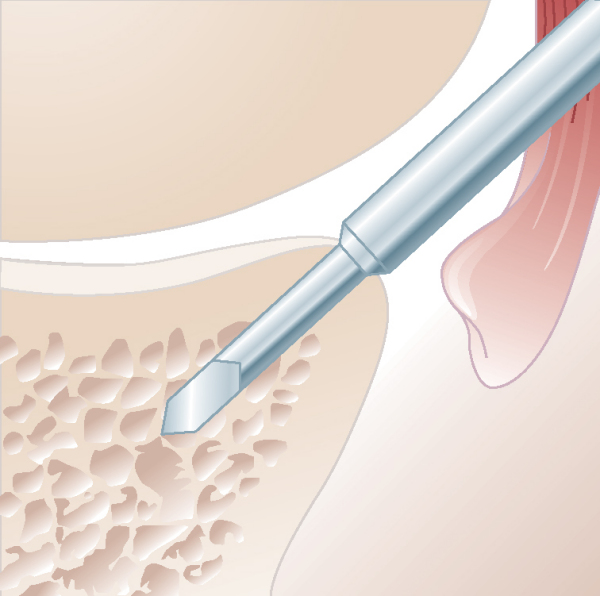
), the periosteum should be incised to release the AIGHL from the anterior glenoid (
Fig. 4-5
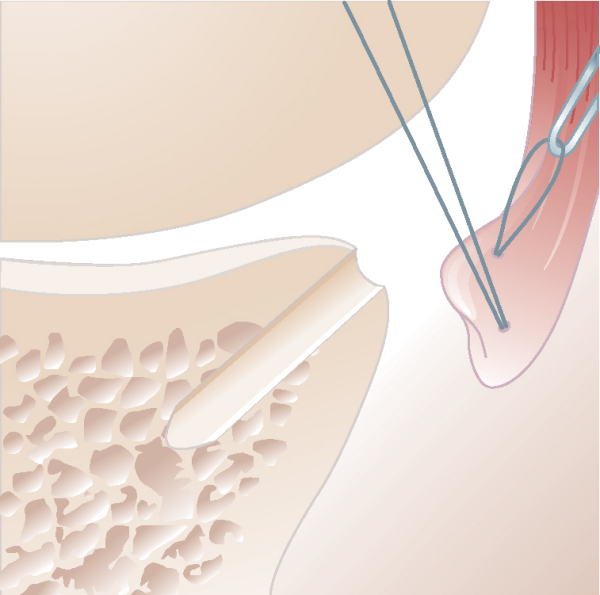
), essentially converting the ALPSA lesion into a Bankart lesion. Once the ligament is mobilized, a grasper is used to pull the ligament superiorly and to the articular margin while capsular tension and mobility are evaluated. Capsular laxity is also assessed at this time (
Fig. 4-6
). Complete capsular mobilization allows superior capsular shift that often corrects capsular laxity and stretch. Capsular plication is rarely needed when the capsule is mobilized and adequately shifted superiorly. If concerns about the redundancy of the tissue remain, a small section of the edge of the detached AIGHL can be resected by use of a suction punch to shorten the ligament. The proper amount of ligament to resect is determined by approximating the ligament to the glenoid. Determination of capsular laxity and appropriate tensioning is a critical step and greatly affects the final outcome of the repair.
|
|
|
|
Figure 4-4 (From Thal R. Knotless suture anchor fixation for shoulder instability. In Miller MD, Cole BJ, eds. Textbook of Arthroscopy. Philadelphia, Elsevier, 2004.) |
|
|
|
|
Figure 4-5 (From Thal R. Knotless suture anchor fixation for shoulder instability. In Miller MD, Cole BJ, eds. Textbook of Arthroscopy. Philadelphia, Elsevier, 2004.) |
|
|
|
|
Figure 4-6 (From Thal R. Knotless suture anchor fixation for shoulder instability. In Miller MD, Cole BJ, eds. Textbook of Arthroscopy. Philadelphia, Elsevier, 2004.) |
A motorized bur is used to decorticate the anterior glenoid neck medially 1 to 2 cm through the anterior portals. Abrasion of the articular surface of the anterior glenoid 2 to 4 mm from the edge is also performed to promote appropriate healing of ligament to bone.
The anterior inferior cannula is then replaced by a larger 8-mm cannula to accommodate the drill guide, suture passer, and knotless or BioKnotless suture anchors. Three drill holes are made in the anterior glenoid rim with use of the Mitek drill guide and the Mitek 2.9-mm arthroscopic superdrill (
Fig. 4-7
). The drilling of the holes is completed in one step because drilling after each anchor is placed is difficult secondary to poor visualization once the shift has been performed. These drill holes are spaced as far apart as possible (1, 3-, and 5-o’clock positions in the right shoulder) and at the edge of the articular cartilage. It is important to avoid damage to the articular cartilage; as such, the drill bit must be directed medially away from the articular surface of the glenoid by at least a 15-degree angle. Furthermore, it is critical not to torque the drill in determining hole placement, as this can cause difficulty in placing the anchor; undue tissue tension could distort the inserter rod and lead to an inability to line up the anchor with the drilled hole. The drill holes are marked with a basket forceps, suction punch, or electrocautery to ease hole identification during anchor insertion.
|
|
|
|
Figure 4-7 (Redrawn from Thal R. Knotless suture anchor fixation for shoulder instability. In Miller MD, Cole BJ, eds. Textbook of Arthroscopy. Philadelphia, Elsevier, 2004.) |
Before implant placement, the utility loop of the knotless suture anchor assembly is passed through the AIGHL at a selected site through the anterior inferior portal (
Fig. 4-8
). This can be achieved by use of various arthroscopic suture-passing instruments and techniques. Our preferred technique for arthroscopic passage of the utility loop is a suture loop shuttle technique (
Fig. 4-9
). A Shutt suture punch (Linvatec, Largo, Fla) is used in grasping the ligament and pulling it superiorly to the drill hole site while ligament tension is assessed at the most inferior glenoid hole. This allows precision placement of the utility loop through the ligament and simultaneous assessment of proper capsular shift. A 2-0 polypropylene (Prolene) suture loop 48 inches long is then passed through the ligament, by use of the suture punch, and pulled out the anterosuperior portal. The Prolene suture loop then serves as a suture shuttle and is used to pull the utility loop into the anteroinferior portal, through the AIGHL, and then out the anterosuperior portal. For the inferior two anchors, passing the Prolene suture loop from the intraarticular side of the ligament to the extra-articular side positions the utility loop similarly after shuttling. This helps orient the anchor loop at a better angle and facilitates easy anchor capturing of the anchor loop.
|
|
|
|
Figure 4-8 (Redrawn from Thal R. Knotless suture anchor fixation for shoulder instability. In Miller MD, Cole BJ, eds. Textbook of Arthroscopy. Philadelphia, Elsevier, 2004.) |
|
|
|
|
Figure 4-9 (Redrawn from Thal R. Knotless suture anchor fixation for shoulder instability. In Miller MD, Cole BJ, eds. Textbook of Arthroscopy. Philadelphia, Elsevier, 2004.) |
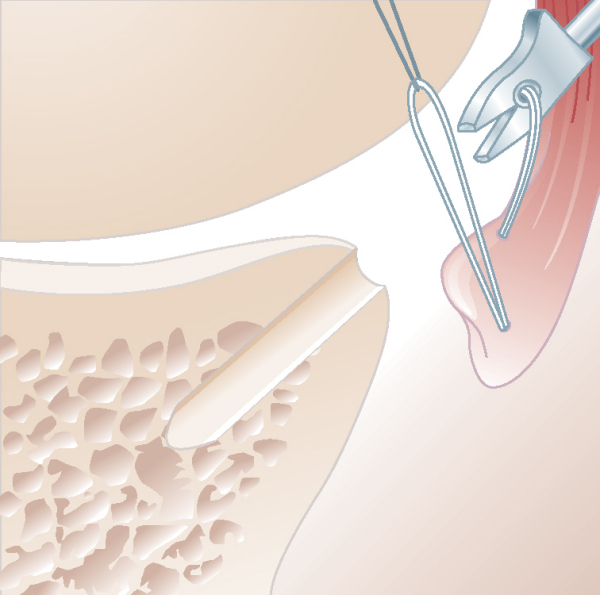
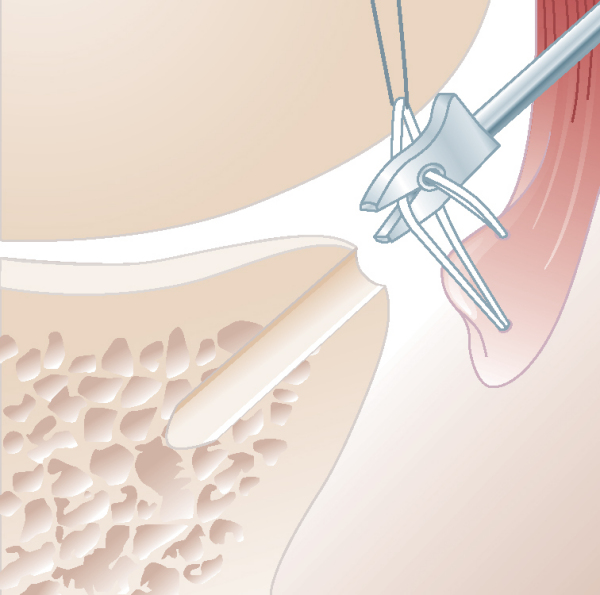
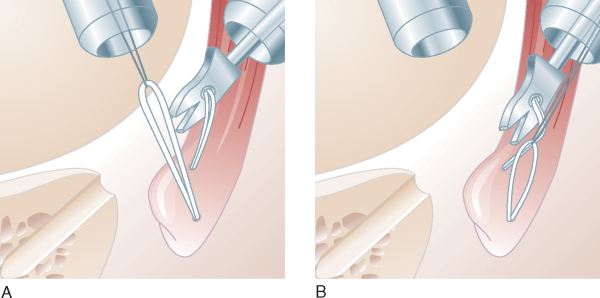
The utility loop is then used to pull the anchor loop through the AIGHL (
Fig. 4-10
). As the utility loop pulls the anchor loop through the AIGHL, the attached anchor is brought down the anterior inferior cannula while being controlled with the threaded inserter rod.
|
|
|
|
Figure 4-10 (Redrawn from Thal R. Knotless suture anchor fixation for shoulder instability. In Miller MD, Cole BJ, eds. Textbook of Arthroscopy. Philadelphia, Elsevier, 2004.) |
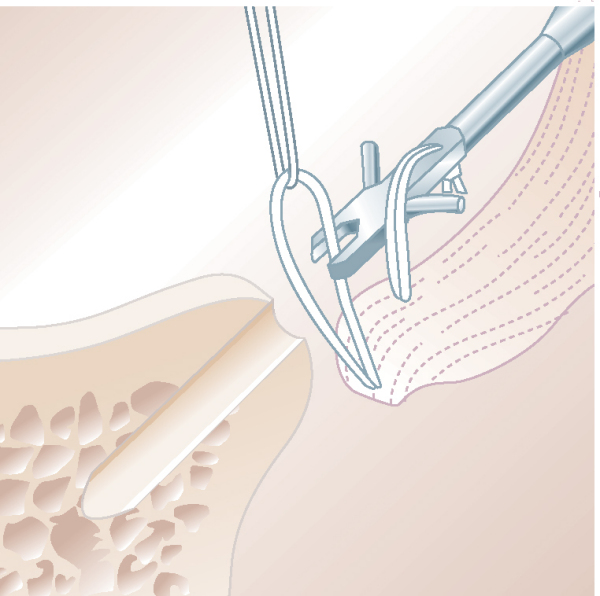
5. Loop Capture and Anchor Insertion
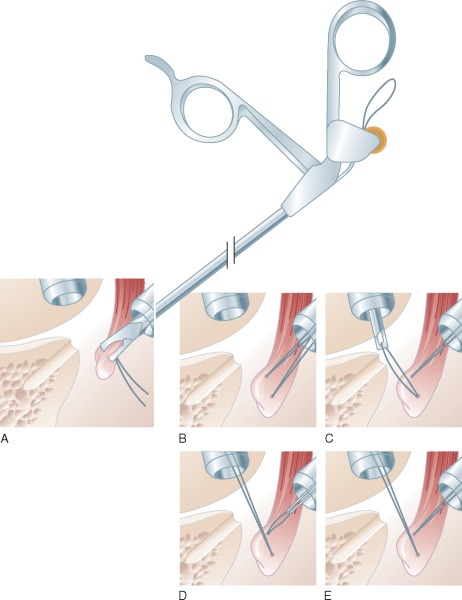
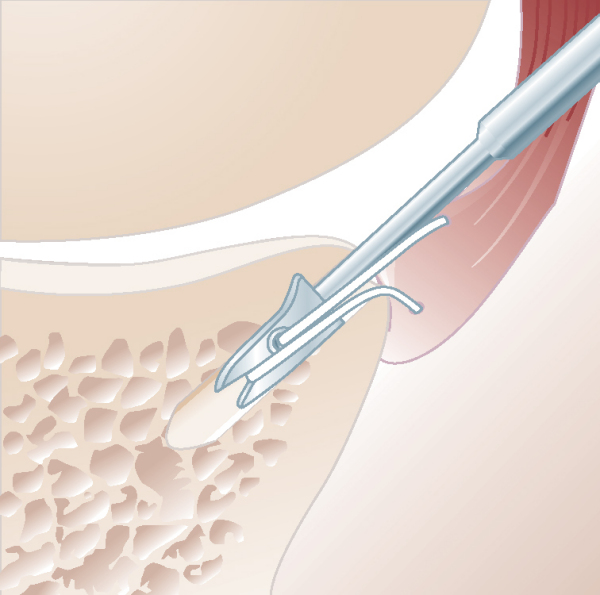
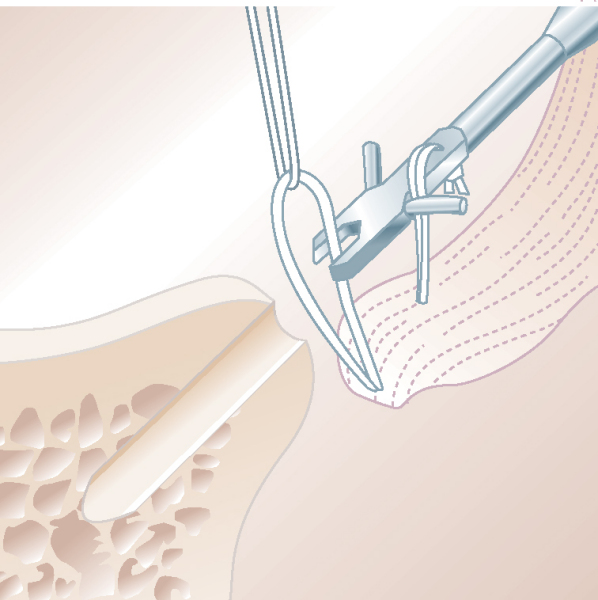
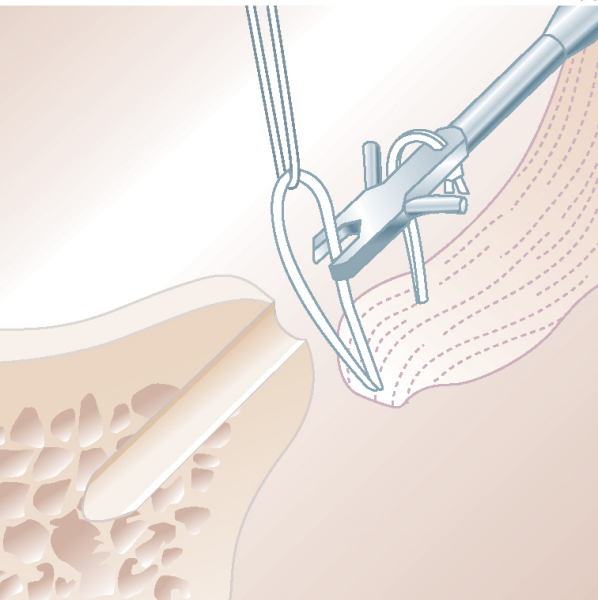
After the anchor loop has passed through the AIGHL, one strand of the anchor loop is captured or snagged in the channel at the tip of the anchor (
Fig. 4-11
). When the metallic knotless anchor is used, the anchor is rotated so the arc positioned inside the anchor loop is facing the utility loop. The anchor is then inserted and tapped into the glenoid drill hole to the desired depth to achieve appropriate tissue tension (
Fig. 4-12
).
|
|
|
|
Figure 4-11 (Redrawn from Thal R. Knotless suture anchor fixation for shoulder instability. In Miller MD, Cole BJ, eds. Textbook of Arthroscopy. Philadelphia, Elsevier, 2004.) |
|
|
|
|
Figure 4-12 (Redrawn from Thal R. Knotless suture anchor fixation for shoulder instability. In Miller MD, Cole BJ, eds. Textbook of Arthroscopy. Philadelphia, Elsevier, 2004.) |
6. Loop-Anchor Repair Tensioning and Completion
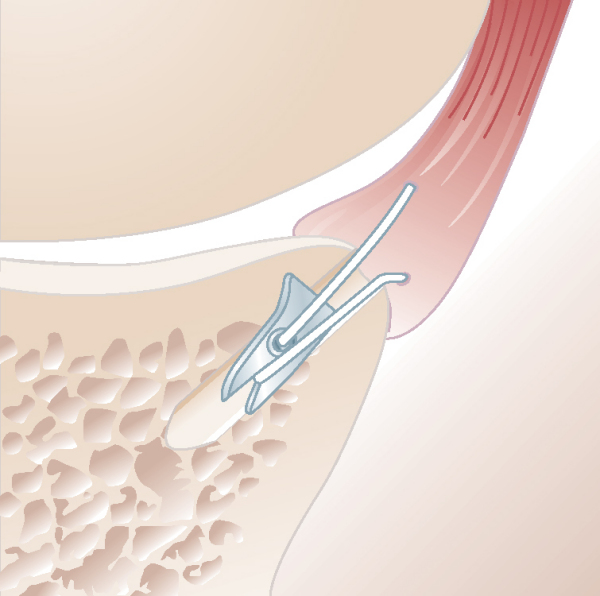
Depth of anchor insertion is determined by observing the ligament approximation to the glenoid and by intermittently pulling the utility loop to test the tension of the anchor loop during insertion. The anchor should not bottom out in the drill hole. Overtensioning can cause the anchor loop to tear through the ligament. Once this has been completed, the AIGHL is noted to shift superiorly and securely approximate to the glenoid rim in a low-profile manner (
Fig. 4-13
). The inserter rod is removed, and suture passage, anchor insertion, and tensioning are repeated for the remaining glenoid drill holes.
|
|
|
|
Figure 4-13 (Redrawn from Thal R. Knotless suture anchor fixation for shoulder instability. In Miller MD, Cole BJ, eds. Textbook of Arthroscopy. Philadelphia, Elsevier, 2004.) |
Standard closure of the portals is performed.
| PEARLS AND PITFALLS | ||||||||||||||||||||||||||||||||||||||||||||||
|
Several Techniques can Facilitate Capture of the Anchor Loop
Placement of the Utility Loop and Anchor Loop in the Aighl is Critical
Avoid breakage of the anchor loop
|
| • | 7 to 10 days for initial postoperative evaluation |
| • | 0-4 weeks: Use of a sling, with pendulum exercises, range-of-motion exercises of the shoulder and elbow, and isometric exercises of the forearm. External rotation is limited to neutral. | |
| • | 4 weeks: Progressive active and passive range-of-motion exercises are begun; external rotation is limited to 45 degrees; isometric deltoid and periscapular exercises are begun. | |
| • | 6 weeks: Progression to full, active range of motion is allowed. | |
| • | 8 weeks: Resistive training with the use of isotonic and isokinetic modalities is performed in a progressive manner with no limitation on the patient. | |
| • | Return to contact and overhead sports is not allowed until 5 months postoperatively. |
| • | Traumatic redislocation | |
| • | Incomplete healing of labral repair | |
| • | Infection | |
| • | Arthrofibrosis | |
| • | Anchor loop breakage secondary to improper anchor loop positioning |
After arthroscopic Bankart repair with the knotless suture anchor, increased superior capsular shift is attained compared with a standard suture anchor, as the knotless anchor pulls the ligament into the drill hole (
Fig. 4-18
). The problems associated with tying knots, knot loosening, and complex suture management are eliminated. Suture strength is improved compared with standard suture anchors. Furthermore, satisfactory results are attained with a low recurrence rate, minimal loss of motion, and reliable functional return, even in contact and collision athletes (
Table 4-1
). The recurrence rate was higher in patients 22 years old or younger.
|
|
|
|
Figure 4-18 (From Thal R. Knotless suture anchor fixation for shoulder instability. In Miller MD, Cole BJ, eds. Textbook of Arthroscopy. Philadelphia, Elsevier, 2004.) |
Table 4-1
— Clinical and Biomechanical Results of Knotless Suture Anchor Fixation in Shoulder Instability
| Clinical Results | ||
|---|---|---|
| Author | Followup | Outcome |
| Thal[2] (2001) | 29-month average | 21 of 22 (96%) successful |
| Thal et al[3] (2004) | 2-year minimum (range: 2-7 years) | 67 of 72 (93%) successful |
| Garafalo et al[1] (2005) | 43 months (range: 36-48 months) | 18 of 20 (90%) successful |
| Biomechanical Results | ||
|---|---|---|
| Author | Parameters Tested | Results |
| Thal[2] (2001) | Suture breakage | Knotless anchor with statistically higher failure load (P < .0001) |
| Bone pullout of anchor | Increased anchor pullout force in knotless anchor not significant (P = .195) | |
| Average capsular shift | Bankart repair: 4.33 mm | |
| Barrel stitch repair: 6.04 mm | ||
| Plication repair: 6.50 mm[*] | ||
| Knotless repair: 6.79 mm[*] | ||
1.
Garafalo R, Mocci A, Biagio M, et al: Arthroscopic treatment of anterior shoulder instability using knotless suture anchors.
Arthroscopy 2005; 21:1283-1289.
2.
Thal R: Knotless suture anchor: arthroscopic Bankart repair without tying knots.
Clin Orthop 2001; 390:42-51.
3.
Thal R, Nofzinger M, Bridges M, Kim JJ: Arthroscopic Bankart repair using knotless or BioKnotless suture anchors: 2- to 7-year results.
Arthroscopy 2007; 23:367-375.
Bacilla et al., 1997.
Bacilla P, Field LD, Savoie FH: Arthroscopic Bankart repair in a high demand patient population.
Arthroscopy 1997; 13:51-60.
Bendetto and Glotzer, 1992.
Bendetto KP, Glotzer W: Arthroscopic Bankart procedure by suture technique: indications, technique, and results.
Arthroscopy 1992; 8:111-115.
Caspari, 1988.
Caspari RB: Arthroscopic reconstruction for anterior shoulder instability.
Tech Orthop 1988; 3:59-66.
Coughlin et al., 1992.
Coughlin L, Rubinovich M, Johansson J, et al: Arthroscopic staple capsulorrhaphy for anterior shoulder instability.
Am J Sports Med 1992; 20:253-256.
Grana et al., 1993.
Grana WA, Buckley PD, Yates CK: Arthroscopic Bankart suture repair.
Am J Sports Med 1993; 21:348-353.
Green and Christensen, 1993.
Green MR, Christensen KP: Arthroscopic versus open Bankart procedures: a comparison of early morbidity and complications.
Arthroplasty 1993; 9:371-374.
Lane et al., 1993.
Lane JG, Sachs RA, Riehl B: Arthroscopic staple capsulorrhaphy: a long-term followup.
Arthroscopy 1993; 9:190-194.
Loutenheiser et al., 1995.
Loutenheiser TD, Harryman II DT, Yung SW, et al: Optimizing arthroscopic knots.
Arthroscopy 1995; 11:199-206.
Neviaser, 1993.
Neviaser TJ: The anterior labroligamentous periosteal sleeve avulsion lesion: a cause of anterior instability of the shoulder.
Arthroscopy 1993; 9:17-21.
Thal, 2001.
Thal R: A knotless suture anchor: design, function, and biomechanical testing.
Am J Sports Med 2001; 29:646-649.
Thal, 2001.
Thal R: A knotless suture anchor: technique for use in arthroscopic Bankart repair.
Arthroscopy 2001; 17:213-218.
Warner et al., 1995.
Warner JJ, Miller MD, Marks P, Fu FH: Arthroscopic Bankart repair with the Suretac device. Part I: experimental observations.
Arthroscopy 1995; 11:2-13.
Warner et al., 1995.
Warner JJ, Miller MD, Marks P, Fu FH: Arthroscopic Bankart repair with the Suretac device. Part II: experimental observations.
Arthroscopy 1995; 11:14-20.
Wolf et al., 1991.
Wolf EM, Wilk RM, Richmond JC: Arthroscopic Bankart repair using suture anchors.
Oper Tech Orthop 1991; 1:184-191.

