
Department of Orthopaedics, University of Colorado Health Sciences
Center, Denver Health Medical Center, Denver, Colorado 80204.
orthopaedic problem with an annual incidence of approximately 95,000
cases a year, and some 50,000 of these knees are reconstructed annually
(42,74). During the
1990s, an explosion of both basic science and clinical research on the
ACL has contributed greatly to our understanding of the ACL-deficient
knee and its successful treatment. It is now widely agreed that
reconstruction of the ACL is far superior to repair (36) and that extraarticular reconstruction is not necessary for isolated ACL insufficiency (85).
Yet despite this plethora of research, controversy still surrounds many
issues in ACL reconstruction, such as the appropriate timing of
surgery, the method of reconstruction, and the means of fixation of the
reconstruction.
the art of isolated anterior cruciate ligament reconstruction in the
skeletally mature individual. Anatomy and biomechanics of the ACL and
ACL injury in the skeletally immature individual are discussed in Chapter 83 and Chapter 97, respectively.
ACL injury consists of a noncontact deceleration mechanism, usually
occurring with a sudden stopping, cutting, or jumping maneuver. A “pop”
is usually felt or heard, and the patient may describe a hyperextension
injury. Infrequently, the patient is able to continue activity, and
within a few hours the knee swells considerably, secondary to
hemarthrosis. With the above history and the presence of a
hemarthrosis, the likelihood is more than 70% that the patient has torn
the ACL (79). Contact injuries are more likely
to result in multiligament injuries, as is seen with O’Donoghue’s
classic triad in which a direct blow valgus load on the knee results in
injury to the ACL, medial collateral ligament (MCL), and medial
meniscus. The differential diagnosis for an acute traumatic
hemarthrosis includes patellar subluxation or dislocation,
osteochondral injury, peripheral meniscus tear, or intraarticular
fracture.
activities, with basketball, soccer, and skiing predominating in
noncontact injuries. Contact injuries are frequently described in
football players. The true incidence of ACL injuries is not known, as
many patients sustaining injuries are unaware of the severity of the
injury and may not seek medical attention initially. A reported 72 ACL
injuries per 100,000 skier-days occur in skiing (37); in college football, 2.4 injuries occur per team per season (54).
Recent NCAA statistics have also demonstrated an increased incidence of
ACL injuries in female athletes compared to their male counterparts in
equivalent sports, with women having a three to four times greater
likelihood of injuring the ACL in soccer and basketball (4).
remains controversial, several studies have provided insight into the
likely outcome of the ACL-injured patient. Noyes and co-authors
specifically evaluated athletically active patients 5 to 10 years after
they sustained their injuries (80).
Approximately one third had symptoms of pain or giving way with all
activities of daily living (ADL), one third had symptoms in sports but
not in ADLs, and one third had no symptoms in sports or ADLs.
Meniscectomy contributed significantly to pain and swelling, and
radiographic changes of degeneration correlated with giving-way
episodes and the level of athletic participation. Changes became
manifest an average 109 months after injury and tended to worsen with
increased length of follow-up. Patients who had symptoms with sporting
activities and persisted in participation had the poorest prognosis. A
subset of these patients underwent rehabilitation and activity
modification, and they used a brace in sporting activities (81).
One third of these patients were helped with this program, but another
third worsened, and a final third remained the same. The patients who
were helped still had symptoms with athletic activities, however.
Patients who were unwilling to modify their activities had a worse
prognosis and tended to require reconstructive surgery.
the results of bracing and rehabilitation in an active-duty military
population and concluded that young adults involved in athletic and
strenuous physical activity can expect unsatisfactory results. Only 11%
of the patients were graded as excellent, and only 4 of 72 (5.5%)
competed at the same level and performance of sport. Sixty percent
either changed sports, discontinued sports, or limited sporting
activity, and 88% were symptomatic with pain and giving way of the
knee. Similar poor results were seen in a series of 40 patients
followed nonoperatively (53). Only 14% were able to return to full athletic activity, and 88% were graded as fair to poor.
evaluated the ACL-injured patient and also evaluated who was most
likely to require ACL reconstruction (35).
Eighty-one percent of the 292 patients with a hemarthrosis had an ACL
tear, and 49% of these patients had a meniscal tear diagnosed by
arthroscopy, though not all of these meniscal tears required surgery.
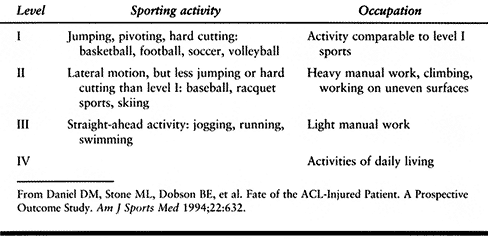
The best predictor of which patients required surgery was the number of
preinjury hours per year spent in sporting activities that involved
jumping, pivoting, hard cutting, and lateral motion
(Table 89.1).
More than 200 h per year (i.e., 4 h/week) was considered moderate to
high risk for requiring surgery. Instrumented knee laxity measurements
that demonstrated a manual maximum side-to-side difference greater than
5 mm were also predictive of the need for reconstructive surgery.
Patients who required meniscal surgery had a greater incidence of joint
arthrosis at final evaluation.
 |
|
Table 89.1. Sports and Occupation Levels
|
ACL-deficient athlete with recurrent episodes of giving way places the
knee at high risk for subsequent chondral and meniscal damage. Animal
and human studies also support the concept that ACL deficiency
predisposes for osteoarthritis (111), and animal studies demonstrate that ACL reconstruction is protective of articular cartilage (86).
No human studies have yet to demonstrate that ACL reconstruction
protects against articular surface degeneration, however. Andersson et
al. reported on a randomized trial of three different treatment methods
for ACL injury (3). Group I underwent primary
repair with extraarticular augmentation, and group II had primary
repair without augmentation, with both groups having all other injured
structures concurrently repaired. Group III had all injured structures
except the ACL repaired. One third of the patients in group III
sustained meniscal tears after reconstruction. Patients in groups I and
II had significantly fewer subsequent meniscal tears and had
significantly more stable knees. It is well recognized that ACL
reconstruction helps protect against further meniscal damage and that
loss of the menisci predisposes the knee to articular degeneration.
Success of meniscal repair is greatest when it is done in conjunction
with ACL reconstruction (26). Hence, for the
singular reason of protecting the menisci and its role in protection of
articular cartilage, ACL reconstruction may be chondroprotective.
Whether ACL reconstruction in and of itself prevents articular
degeneration remains to be seen in more controlled, prospective studies
with longer-term follow-up.
improved since the 1970s as much as has the treatment for the injury.
Historically, many patients did not receive an accurate diagnosis until
recurrent instability or mechanical symptoms from a meniscal tear
occurred.
history, and the mechanism of injury is obtained from the patient or
any witnesses to the injury. Most ACL injuries are the result of
noncontact and rotational forces. Valgus/external rotation,
hyperextension, and deceleration mechanisms are commonly described.
Varus injuries occur less frequently, are often contact injuries, and
usually involve injury to the lateral ligaments. The classic “terrible
triad” of ACL, MCL, and medial meniscal injuries caused by a direct
blow to the lateral aspect of the knee is not as common as noncontact
injuries and more often involves injury to the lateral meniscus than to
the medial meniscus (104).
highly suspicious for an ACL injury, with this finding accompanying the
vast majority of ACL injuries. This is usually accompanied by the
inability to continue athletic participation on the day of injury and
the onset of a knee joint effusion within a few hours of injury. Any
effusion within hours of injury is considered a hemarthrosis, and 70%
to 80% of knee joint hemarthroses are secondary to ACL tears (79). Differential diagnosis of a hemarthrosis
with an associated “pop” should include patellar dislocation or
subluxation with retinacular tearing, an osteochondral lesion, MCL
tear, a posterior cruciate ligament (PCL) tear, a fracture, or
peripheral meniscus tear.
generally recall the specific event that caused the injury, but often
retrospectively report fewer symptoms after the initial event than are
generally recalled by patients who present acutely. Nevertheless,
complaints are geared toward a feeling of instability or “giving way.”
Patients involved in pivoting sports will describe the need to “round
out” corners and avoid hard cutting on the affected leg. Effusions may
be associated with vigorous activity. Occasionally a second traumatic
event or a “giving way” episode results in a meniscal tear that causes
mechanical symptoms such as locking or catching in the knee (66).
-
Ideally, examine the knee shortly after
the injury, before swelling and pain prevent an accurate diagnosis.
Examine the opposite leg to serve as a baseline for comparison. First
inspect the injured leg for abrasions, contusions, ecchymoses, and the
presence of an effusion. Next, palpate for point tenderness to evaluate
associated injuries. -
Examine the patellofemoral joint for the
presence of retinacular tearing or a dislocation or subluxation and
perform patellar mobility and apprehension testing. Palpate the
quadriceps and patellar tendons for defects at their respective
insertions and ask the patient to perform a straight-leg raise. -
The lateral femoral condyle may be tender
secondary to a bone bruise. Tenderness at the tibiofemoral joint lines
may represent an associated meniscal tear, though the evaluation of
meniscal pathology in the presence of an ACL tear is not as sensitive (106).
and diagnostic. It will relieve pressure and pain, allowing a more
accurate physical examination to be performed, and the hemarthrosis can
be examined for the presence of fat globules, which is indicative of an
intraarticular fracture. It should be noted that with acute ACL tears,
other pathologies commonly coexist, with an approximate 60% incidence
of meniscal tears, 10% to 20% incidence of osteochondral fractures, and
20% incidence of associated ligamentous injuries (79).
mechanical blocking. This could be secondary to a displaced
bucket-handle meniscal tear or a loose osteochondral fragment, but a
block to full extension can be caused by hamstring spasm. Furthermore,
the distal portion of the ACL may flip forward and produce a block in
the anterolateral joint line with the knee in full extension, causing
pain, which is usually retropatellar.
and 30° of knee flexion. Laxity is graded from I to III in 5-mm
increments of joint opening. Grade III injuries connote complete
disruption of the ligament. Rule out injury to the posterolateral
structures by the “dial test,” in which external rotation of the tibia
at 30° and 90° of knee flexion is compared to that on the opposite
side. More than 10° of increased external rotation at 30° is indicative
of a posterolateral corner injury and, if also present at 90°,
indicates an injury to the posterior cruciate ligament as well (117).
Flex the knee to 20° to 30°, stabilize the thigh with one hand (left
hand for examining a right knee), and translate the tibia forward with
the other hand. Note the amount of anterior translation and the
presence or absence of a firm endpoint and compare it to the opposite
side. Grade by comparing the amount of increased anterior translation
on the injured side to the normal side, with 1 to 5 mm as grade I, 6 to
10 mm as grade II, 11 to 15 mm as grade III, and >15 mm as grade IV.
Individual variations may exist; hence, the absence of a firm endpoint
is a crucial factor in determining the presence of an ACL tear.
diagnosing ACL tears. It is performed with the knee flexed 90° and the
foot stabilized. Perform it with the tibia in neutral rotation as well
as in both internal and external rotation, as increased anterior
translation in external rotation may signify injury to the
posterolateral structures. Also do posterior drawer testing, as what
may seem to be increased anterior translation from a reduced position
may actually be reduction of the tibia from a posteriorly subluxated
position. The quadriceps active test is a useful adjunct to the
posterior drawer.
maneuver performed, as this phenomenon is pathognomonic for ACL
deficiency. There have been numerous descriptions of this test, with
the knee placed in various positions, but all can produce the
pivot-shift phenomenon. Our method is to place the hip in slight
abduction and flexion and the knee in full extension with the tibia
externally rotated, apply a valgus load, and flex the knee (6).
This method is chosen because it results in fewer false-negative
examinations. The pivot shift will occur in 15° to 30° of flexion. It
represents a reduction of the anteriorly subluxated tibia on the femur
as the knee is moved from extension to flexion. This reduction is the
result of the iliotibial band moving from an anterior position relative
to the center of the knee to a posterior position, contributing to the
reduction. In examining a right knee, palpate the joint line with your
left hand to ensure that what is being perceived is reduction of the
anterior subluxated tibia rather than posterior subluxation of a
reduced tibia, as can be seen with PCL injuries. Causes of
false-negative
results
include a displaced bucket-handle meniscal tear, a complete tear of the
MCL, and a previous lateral extraarticular tenodesis of the iliotibial
band. Grade the exam as a glide (1 + ), jump sensation (2 + ), or
transient lock (3 + ).
useful in the office diagnosis of the ACL-injured knee. Testing is
especially helpful in the acute setting when patient guarding precludes
an accurate physical examination. Instrumented laxity testing is
generally minimally painful, and the support that rests under the
patient’s thigh facilitates hamstring relaxation. An objective and
quantitative method of documenting ACL laxity also helps gain the
patient’s trust in the physician’s diagnostic acumen, and it is
imperative that laxity testing be performed for follow-up studies of
ACL reconstruction.
It is extremely unusual for normal knees to have an anterior maximum
manual translation of more than 10 mm. Other criteria that are useful
in diagnosing ACL injury are a maximum manual side-to-side difference
exceeding 3 mm and a compliance index (the difference between the
readings at 15 and 20 lb) of more than 2 mm. The maximum manual test is
the strongest predictor of differentiating between normal and
ACL-injured knees. Essentially, if the side-to-side difference between
the injured and normal knees is 3 mm or greater at 15 lb, 20 lb, or
maximum manual testing with the KT-1000 arthrometer (Medmetric, San
Diego, CA), the likelihood of ACL injury is greater than 95%.
Furthermore, if anterior translation of the injured knee is greater
than 11 mm at any level tested, the likelihood of ACL injury is 95%.
under consideration for reconstructive surgery should undergo routine
knee radiographs. Our current protocol is to take weight-bearing AP,
lateral, and 45° PA views as well as a Merchant view of the
patellofemoral joint. This allows us to evaluate the medial and lateral
joint spaces for degeneration or osteochondral injuries, and the
patellofemoral joint can also be examined for subluxation and/or tilt
as well as degeneration or osteochondral injury. Though it is unlikely
that plain film radiographs will have tremendous yield, occasionally
bony avulsions of tibial eminences are noted; other findings, such as
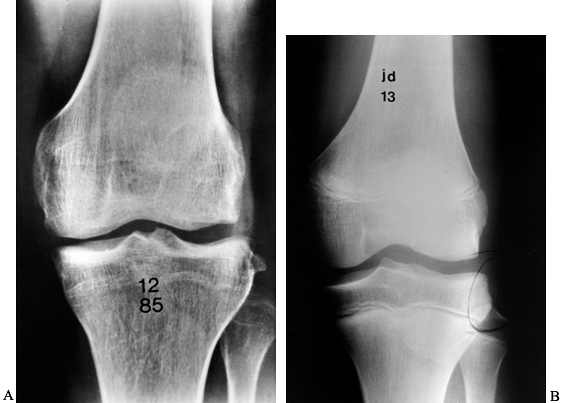
the lateral notch sign and the lateral capsular sign, or Segond
fracture, may be pathognomonic of ACL injury (Fig. 89.1) (121).
 |
|
Figure 89.1. A:
Anteroposterior radiograph of a skeletally mature right knee with chronic ACL insufficiency. A healed Segond fracture is noted by the bony spur on the lateral tibial plateau’s lateral cortex, proximal to the fibula. B: Anteroposterior radiograph of a skeletally immature individual with a painful traumatic effusion. The x-ray reveals a lateral capsular avulsion, indicative of an injury to the ACL. |
bone scanning have little place in the evaluation of the ACL-injured
patient. A thorough history, physical examination, and plain film
evaluation, with the addition of instrumented laxity testing, is
generally all that is needed for proper diagnosis. The addition of
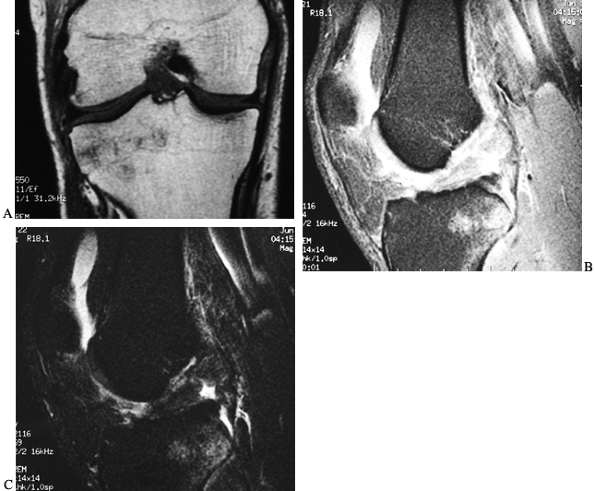
magnetic resonance imaging (MRI) (Fig. 89.2),
though quite sensitive and specific for detection of ACL disruption and
meniscal pathology as well as bone bruises, frequently does not change
the treatment plan and adds cost to the care of the patient (41,45).
 |
|
Figure 89.2. Magnetic resonance image of an ACL-injured knee. A: Coronal T1-weighted image depicting the intercondylar notch. The torn ACL displays higher signal intensity than the PCL. B: Intermediate and C: T2-weighted
sagittal images demonstrate the increased signal intensity of interstitial damage to the ACL. Also, note the increased signal intensity in the posterolateral tibial plateau indicative of a bone bruise. |
plain radiography, scintigraphy, MR imaging, and arthroscopy.
Eighty-five percent had ACL tears, and 83% of these had meniscal tears
diagnosed by arthroscopy. The MRI was an excellent tool to detect
meniscal tears that required surgery, but it was not sensitive or
accurate in detecting partial-thickness meniscal lesions and stable
full-thickness lesions (1).
Eighty percent of ACL tears had bone bruises detected by both
scintigraphy and MRI, usually in the lateral femoral condyle. The
authors concluded that scintigraphy and MR imaging added little
information to the physical examination, did not guide treatment, and
was not as good as an arthroscopic evaluation. Other authors have also
demonstrated that many of these meniscal tears associated with ACL
injury are not symptomatic on exam and can be left alone at the time of
surgery (106). Knowledge of their presence
before surgery will not change the operative plan. Currently, we do not
use routine MR imaging, and our primary utility of MRI is when a
patient with an acute ACL tear still exhibits a painful knee flexion
contracture 2 weeks postinjury. In this instance we use it to rule out
a displaced bucket-handle meniscal tear. Should this be the case, we
prefer to operate earlier than usual in order to reduce the meniscal
tear, repair it if possible, and reconstruct the ACL.
ACL-deficient knee is not accurately known because of the differences
in study design, the nonrandomized nature of many studies regarding
treatment, the lack of truly long-term follow-up, and the inclusion of
methods of treatment that have been shown to be inferior to current
methods for surgical reconstruction and rehabilitation. Nevertheless,
the studies outlined above clearly demonstrate that nonoperative
treatment for the ACL-deficient patient who is involved in athletic
activities that require cutting and jumping is uniformly unsuccessful
and places the knee at risk for chondral injury and degeneration.
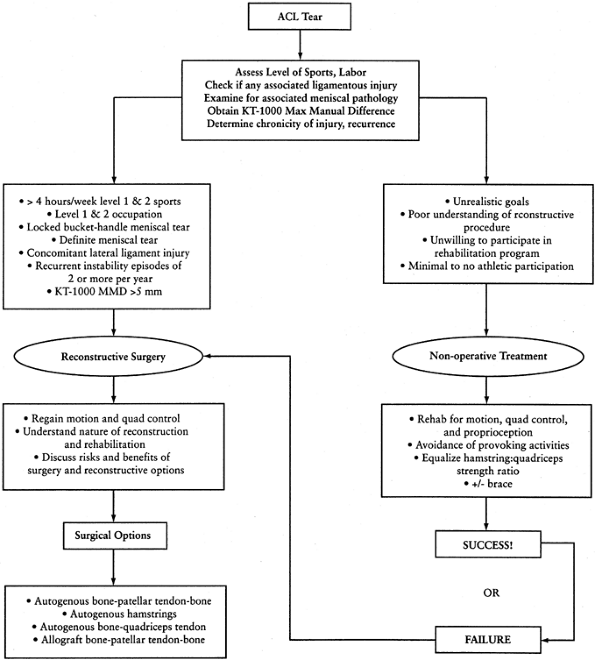
Activity level is perhaps the most important; the patient who is
involved in many hours of level I and II sports, as defined by Daniel
et al., is most at risk for recurrent instability and potential
chondral injury (35). Patients employed in
physical labor that places the knee at risk for giving way should be
considered for reconstruction as well. Sedentary patients who do not
participate in activities that place them at risk for recurrent injury
may still have symptoms with activities of daily living, however.
Essentially any patient with recurrent episodes of giving way is at
high risk for further injury and is a candidate for surgery.
 |
|
Figure 89.3.
Treatment algorithm for the ACL-deficient patient. This algorithm is meant only as a guide. No absolutes are intended. The decision to reconstruct the ACL should be made only after a discussion between the patient and the treating orthopaedic surgeon regarding ACL reconstruction has taken place. |
symptoms of meniscal injury should be considered for ACL
reconstruction. Meniscal repair at the time of reconstruction is more
successful than that done in isolation or in the face of a chronically
unstable knee. The status of the menisci is perhaps the most important
factor in preserving the articular cartilage over time.
knee injury, but nonoperative treatment of the MCL with later
reconstruction of the ACL results in fewer motion problems and more
predictable healing of the MCL and stability of the reconstructed ACL
than combined repair and reconstruction (104).
On the other hand, associated lateral ligamentous injury should be
addressed within a few weeks of injury with primary repair with or
without augmentation, as results of acute repair of lateral ligamentous
structures are superior to results of reconstruction of chronic laxity
of the lateral ligaments (13,58). Acute repair should be done along with ACL reconstruction.
regards to ACL reconstruction. Though it seems intuitive that the older
patient likely spends less time in high-risk activities, in today’s
society more and more people are actively involved in athletic pursuits
and wish to continue participation throughout their life. As ACL
reconstruction has evolved into a less invasive and more successful
procedure, age has become less of a determining factor in advocating
operative treatment, and equivalent results can be expected in the
older patient (14,92). In our practice, patients over 35 years of age comprise 8% of the ACL reconstructions, and those over 40 comprise 3%.
reconstruction, preexisting chondral degeneration does not preclude
successful ACL reconstruction (84,105).
Shelbourne et al. in fact demonstrated that ACL-deficient patients with
preexisting osteoarthritis had not only improvement in stability but
also decreased pain, and the level of activity was able to be increased
postoperatively as well (105). Noyes et al.
were also able to demonstrate that patients with articular cartilage
damage who underwent ACL reconstruction had improvements in pain,
giving way, and function, and 79% were able to increase their athletic
participation without aggravating their preexisting cartilage
degeneration (84).
reconstruction to our patients include (a) participation in level I and
II sports more than 4 h weekly, (b) KT-1000 maximum manual difference
over 5 mm, and (c) more than two episodes of instability per year.
Patients with definite displaced bucket-handle meniscal tears or knees
with combined ACL and lateral ligament injury are also encouraged to
have reconstruction. Perhaps the only contraindications to ACL
reconstruction are active infection in the knee joint and loss of
motion in the knee that is secondary to adhesions and/or arthrosis. A
relative contraindication would be a patient with highly unrealistic
expectations
or a patient who is unwilling to participate in the postoperative rehabilitation.
that no treatment is given. After an acute injury, control of pain and
swelling via the established principles of rest, ice, compression, and
elevation (RICE) is undertaken. Efforts are made early to reestablish
full range of motion, especially full extension; although a knee
immobilizer and crutches are generally used initially, a normal gait
with full weight bearing is encouraged after 7 to 10 days. The acute
inflammatory phase generally resolves within 1 to 3 weeks, and full
range of motion is regained. Should full motion not be reestablished in
this time frame, an MRI is recommended to evaluate the knee for a
mechanical block, such as a displaced bucket-handle meniscal tear.
and endurance. Avoid open-chain exercises such as leg extensions, which
allow the quadriceps to anteriorly translate the tibia. Emphasize
closed-chain exercises, which cause cocontraction of the quadriceps and
hamstrings and thus minimize anterior tibial translation and
patellofemoral contact stresses. These include minisquats, stairmaster,
seated leg press, and cycling. Open-chain hamstring exercises can be
performed without risk. One goal of these exercises is to equalize the
quadriceps/hamstring strength ration from its normal 3:2 ratio to a 1:1
ratio.
the normal side, begin proprioceptive exercises such as those done on a
balance board. Progression to activities that may require cutting,
pivoting, and twisting motion can be undertaken when the knee has 90%
of the strength of the normal side. Though basic science studies have
not been able to demonstrate that functional braces provide significant
mechanical stability to prevent giving-way episodes, some patients feel
that these braces improve confidence and enhance knee proprioception (20,27).
knee is for the patient to determine which activities create
instability, pain, and swelling, and then to modify the life style to
avoid such activities. This will help avoid further injury and
potential risk of degenerative joint disease.
quadriceps atrophy, which is a time-related phenomenon secondary to
“quadriceps avoidance” and “hamstring overuse” (17).
In these patients as well, begin a rehabilitation program that
emphasizes muscle strengthening and endurance, proprioceptive control,
and avoidance of activities that provoke instability.
controversial is the timing of surgery. Many studies have shown that
reconstruction done before 3 weeks carries a significantly higher
incidence of postoperative arthrofibrosis and loss of motion (31,75,103).
Studies that evaluated acute repairs and reconstructions had higher
rates of postoperative knee stiffness that resulted in the need for
reoperation (50). It must be realized, however,
that many of these patients did not undergo an accelerated
rehabilitation program emphasizing early restoration of full
hyperextension, and in many cases the patients were immobilized for a
period of time. Subsequently, some authors have demonstrated that acute
reconstruction can be done without any increased risk of postoperative
stiffness (59). Hunter et al. evaluated
patients who were operated on within 48 h, between 3 and 7 days
postinjury, between 1 and 3 weeks postinjury, and more than 3 weeks
postinjury. Despite equivalent results for KT-1000 testing and passive
flexion and extension at 1-year follow-up among all four groups,
patients who were operated on more than 3 weeks postinjury achieved
their full range of motion sooner than the other three groups.
Furthermore, no patients operated on more than 3 weeks postinjury
required repeat operation for motion problems or revision surgery,
whereas 11 patients in the other three groups did require additional
procedures.
prevent any additional trauma to the knee that could occur with a
giving-way episode and to possibly decrease rehabilitation time.
Despite the persistence of this controversy, no study has been able to
demonstrate any benefit to acute reconstruction before the patient
regains full range of motion, and the risk of motion problems and
possible need for repeat operation to treat motion limitations remain
higher. Furthermore, regaining motion preoperatively may allow
postoperative rehabilitation time to be lessened by an easier
restoration of motion.
regained near full range of motion, has minimal effusion, and has
regained quadriceps control. No time limit is placed on the patient.
Some patients will regain motion within a few weeks, and others may
take longer. It is extremely unusual, however, to operate before 2
weeks postinjury. Patients are generally enrolled in preoperative
therapy to help with the restoration of motion and quadriceps function
and to help prepare for the postoperative rehabilitation process. The
patient is seen on a weekly basis to gauge progress and to ensure that
a displaced bucket-handle meniscal tear is not present. It should be
noted that often the distal stump of the ACL may flip anteriorly, and
this may become impinged when the knee is passively extended, causing
pain. This is not a concern and should not be interpreted as a
displaced bucket-handle meniscal tear, which usually causes a more
significant flexion contracture along with a loss of full flexion. This
“prehab” process is invaluable in allowing us to get to know our
patients and mentally preparing the patient for both surgery and
subsequent rehabilitation.
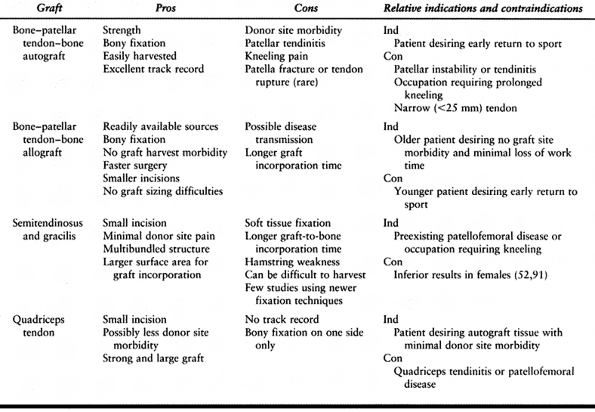
ACL-deficient knee, the next decision to be made is how to reconstruct
it. This is a complex issue, as there are not only a variety of
autogenous and allograft tissues from which to choose but also a
multitude of ways to secure the tissues in an anatomic position. In ACL
reconstruction, the principal tissues used include both autograft and
allograft bone–patellar tendon–bone grafts (BTB), autogenous
semitendinosus and gracilis tendons (STG), and autogenous quadriceps
tendon (QT). All of these grafts have advantages and disadvantages that
must be weighed
by both the surgeon and the patient in deciding on which graft source to use (Table 89.2).
 |
|
Table 89.2. Pros and Cons of Various Graft Sources
|
comparing grafts. The ultimate strength is the load at which a
particular graft material fails. The material properties of a graft
refer to the substance of the graft, whereas the structural properties
refer to the entire graft complex. Material properties are determined
by the orientation and collagen makeup of the tissue and are reflected
by the stress–strain curve, whereas the structural properties are
affected by the strength, stiffness, and three-dimensional orientation
of the entire graft complex and are reflected by the load–deformation
curve. Stiffness of tissues is determined by the steepness of the
stress–strain or load–deformation curve. Stiffer grafts will take up
load before less stiff grafts will, and less stiff grafts may stretch
out, causing greater forces on the graft per amount of energy absorbed
by the graft relative to a stiffer graft. It should be noted that most
studies of strength and stiffness of graft materials and their fixation
evaluate the structural properties by a single load to failure, which
is probably not the primary mode of clinical graft failure. Cyclic
loading more closely resembles the milieu in which grafts are subjected
to stress and is in all likelihood the mode in which grafts most
commonly fail clinically, especially in the first few months.
stiffness characteristics as the native ACL. The ultimate strength of
the ACL is roughly 1,750 N, though this value is age-dependent (82,120).
The eventual strength of the graft material will be decreased by
roughly half when it is fully incorporated; hence, the graft material
should initially be twice 1,750 N, or 3,500 N. Despite the high
strengths of numerous graft materials, the limiting factor for
biomechanical failure is the fixation of the graft until it has been
incorporated into its femoral and tibial tunnels, as failures often
occur within the first 3 to 6 months postoperatively.
Bone-to-bone
healing, as occurs with BTB grafts, is a process that takes
approximately 6 weeks, whereas tendon-to-bone healing takes 8 to 12
weeks (94).
During this time period the patient is undergoing a rehabilitation
program that places the graft under stresses approximating 450 N (72,82).
It is during this time frame that the fixation is the limiting factor
for failure of the graft/fixation construct. Once graft incorporation
has occurred, it is the strength of the graft that limits failure.
Hence, the fixation should be able to withstand the stresses applied to
the graft–fixation construct during the early rehabilitation program
before graft incorporation.
reconstruction is the BTB autograft, harvested from the central third
of the patella tendon. Numerous studies advocate its excellent short-
and medium-term results (10,11 and 12,107).
It is an easily accessible graft source; through the incision by which
one harvests the graft, the inferolateral and inferomedial portals may
be made as well as the entrance to the tibial tunnel. It is a strong
graft, with an ultimate strength of 2,977 N (30),
and its two bone blocks can be rigidly fixed with interference screws,
leading to early graft incorporation. Because of the graft’s strength
and the rigidity of the fixation, aggressive rehabilitation can be
undertaken with little risk of damage to the graft–fixation construct.
popular and well studied. Their appropriate use provides a construct
that approaches the strength of the native ACL and nearly equals its
stiffness (114). It is recommended that 9-mm
screws be used on the tibial side, and 7-mm screws can be used on the
femoral side in an endoscopic technique, but 9-mm screws should be used
for a double incision technique (23,67).
Screw length should equal the length of the bone plug. Pitfalls are
many and include screw divergence or convergence, bone plug fracture,
traction suture laceration, laceration of the graft’s tendon, and graft
advancement (7). These problems can be avoided
with meticulous attention to detail and the use of appropriately sized
cannulated screws. Alternatively, buttons on each end of the graft
secured by sutures placed through the bone plugs can be used, but this
results in a weaker, less stiff graft–fixation construct (23).
Direct complications such as patella fracture or tendon rupture are
exceedingly rare but do occur (19,22,28,47).
Some studies indicate that its harvest may contribute to anterior knee
pain, quadriceps weakness, and extensor mechanism dysfunction (95,97).
Careful review reveals that many patients in these studies were acutely
fixed, had failed repairs as revealed by positive pivot shifts, and
were immobilized for up to 6 weeks, hence not undergoing an accelerated
rehabilitation program. Later studies have not had nearly the rate of
patellofemoral complications (11,12,107),
and this is felt to be a result of accelerated rehabilitation programs
and avoidance of acute reconstruction. Some reports evaluating the
morbidity of harvesting the graft by comparing autograft BTB patients
with allograft BTB patients show no difference in anterior knee pain (98).
Methods of decreasing graft site morbidity include bone grafting of the
patellar and tibial defects and loose closure of the tendon rent with
the knee in flexion. Some kneeling pain, which may in fact be a result
of the incision and not the graft harvest, is quite common in the first
year postsurgery but diminishes with time.
gracilis tendons (STG), have been used for ACL reconstruction with
clinical success equal to that of BTB autograft (2,71,88,89).
The tendons can be harvested through a smaller incision than that used
for harvesting BTB, which may help to minimize perioperative pain.
Proponents of the use of STG point to its avoidance of causing donor
site morbidity to the extensor mechanism. Nevertheless, this issue
remains unresolved: Aglietti et al. noted a 16% incidence of anterior
knee pain in BTB patients versus a 3% incidence in STG patients,
whereas Marder et al. noted no difference (2,71).
The tendons can be doubled, tripled, or even quadrupled, depending on
the length of the tendon harvested, and a multibundled graft construct
that is round rather than rectangular can be produced. This
theoretically creates a larger surface area for graft incorporation as
well as a geometric configuration that more closely resembles the
native ACL. The strength of the tendons appears to be adequate, as
extrapolating data from Noyes et al. reveals that doubling both
semitendinosus and gracilis tendons could produce a graft construct
with twice the strength of the native ACL (82).
some, as harvesting them removes a critical antagonist to anterior
translation of the tibia. Hamstring strength recovery appears to be
adequate at 2 years of follow-up, but weakness is noted for up to 9
months postsurgery (69,122). Local donor site pain is self-limiting and does resolve within 3 months, and the tendons themselves appear to regenerate (32).
biomechanical studies comparing STG to BTB demonstrated that both graft
constructs had strengths comparable to the intact ACL but that BTB was
significantly stiffer than STG and more closely approximated the
stiffness of the native ACL (114). This is
likely because of the longer STG construct, which is fixed at the ends
of the femoral and tibial tunnels rather than within the tunnels as the
BTB with interference screws is (61).
Later studies using younger specimens revealed that the differences in
stiffness between quadrupled semitendinosus and BTB graft-fixation
constructs were not significant but that semitendinosus grafts fixed
with endobuttons and polyester tape proximally and #5 braided polyester
suture around a post screw distally was stronger than BTB fixed with
interference screws (96). Another method of STG
fixation that appears to have biomechanical features that would support
accelerated rehabilitation stresses includes placing the loop of
tendons around a post placed through the femoral condyles into the
femoral socket (29). Because of concerns with
intratunnel graft motion and long distances between fixation points in
constructs depending on sutures and buttons, some authors have
advocated fixing STG grafts with bioabsorbable interference screws, and
strengths approaching those needed to withstand the stresses of
rehabilitation were achieved in older cadaveric bone (25).
for graft incorporation. Unlike bone-to-bone healing, as in the healing
of BTB grafts, tendon-to-bone healing takes longer, with graft
incorporation taking at least 8 to 12 weeks (94). Hence, the graft-fixation construct will be under stress for a longer period of time than the BTB graft-fixation construct.
bone block from the proximal pole of the patella, providing a graft
that has a tendinous length of 7 cm and a thickness that is twice that
of the patellar tendon (43,51).
It can generally be harvested with an incision 4 to 5 cm in length, and
notchplasty can often be performed concurrently with graft harvest.
Minimal pain and morbidity to the extensor mechanism has been reported (44).
sufficient strength to undergo reconstruction and accelerated
rehabilitation (51). As for graft fixation, the
bony end may be fixed with an interference screw, and the tendinous end
may be fixed with sutures tied over a post or with a bioabsorbable
interference screw. Graft incorporation combines both bone-to-bone and
tendon-to-bone healing. To date, no published reports of clinical
results in peer-reviewed English journals exist, nor do any studies
evaluating graft site morbidity.
reconstructive surgery. The most common allograft tissue used in ACL
reconstruction is BTB allograft. No donor site morbidity exists, and
smaller incisions are used in performing the reconstruction, which
enhances cosmesis and allows for shorter operative time. Allograft
tissues are readily obtainable, and appropriately sized grafts may be
fashioned without compromising remaining structures. Though final
outcome regarding graft site morbidity at 2 years is similar in studies
comparing allografts versus autografts, the early postoperative
morbidity is less (50,112,115).
The allograft tissue of choice for ACL reconstruction is BTB because of
the ability to achieve rigid fixation with interference screws and
bone-to-bone healing.
however, including the increased cost of the surgery because of the
allograft. The most significant downside by far to using allografts is
the possibility of disease transmission. Viral diseases such as human
immunodeficiency virus and hepatitis are not eradicated by freezing
tissue, and high-dose radiation cannot effectively kill viruses without
damaging the graft tissue. Proper donor screening is the most effective
means of decreasing risk of viral transmission, and the use of
polymerase chain reaction techniques to screen for the presence of
viruses decreases the risk even further to roughly 1 in 2 million.
Since proper donor screening has been in place, no case of disease
transmission has been reported (5).
remodeling time. Though allografts readily heal in patterns similar to
the healing and ligamentization of autografts, they do so at a slower
rate (64). Mechanical properties of allografts
are affected by the sterilization and processing methods as well.
γ-Irradiation weakens the graft (40,93)
and, because it is not efficacious in eliminating viral disease, is
probably not recommended. Ethylene oxide sterilization is effective in
sterilization but produces synovial reaction after implantation and is
not recommended (62). Sterility is assured
through strict aseptic procurement and repeated bacterial and fungal
culturing. Immunogenicity of grafts is a third concern, but appropriate
processing can eliminate this problem. Deep freezing to -70°C decreases
the antigenicity of the grafts without affecting the mechanical
properties. This is a preferable method to freeze drying, as these
grafts require long periods of time to rehydrate. Cryopreservation is
also an excellent means of processing but is more costly and is best
reserved for cartilaginous grafts.
tempered by the surgeon’s familiarity with the technique and success
with using a particular reconstructive method. Considerations are given
in Table 89.2. The graft with the best track
record is BTB autograft. Young, highly athletic individuals who will
undergo an accelerated rehabilitation program and wish to return to
competitive athletics in 4
to
6 months are excellent candidates for BTB autograft. Patients who
desire less early postoperative graft site morbidity and do not wish to
return to competitive athletics in such a short period of time may also
consider hamstring reconstruction. Laborers who often kneel in their
occupation and patients with preinjury abnormal patellofemoral
biomechanics may also consider grafts other than autogenous BTB. The
exact role for the use of quadriceps tendon is still evolving, though
it may also have less early postoperative donor site morbidity.
Allograft BTB is an excellent choice for older patients who desire no
donor site morbidity and are not returning to competitive athletics in
an accelerated time frame. Results in patients with chronic ACL
deficiency, however, may not be as good as those with acute injury (60,83).
available in ACL reconstruction, one common feature is the anatomic,
impingement-free placement of the graft. If this is accomplished, knee
stability can be restored, full range of motion can be achieved without
undue stresses on the graft, and the patient can undergo an accelerated
rehabilitation program and eventually return to athletic endeavors with
full function. In this section we discuss methods for reconstructing
the ACL with autogenous BTB using both endoscopic and two-incision
techniques, allograft BTB reconstruction, endoscopic STG reconstruction
using cross-pin femoral fixation, and endoscopic QT reconstruction. We
go into detail on notch preparation and tunnel placement in the
endoscopic BTB section and restrict our descriptions of the other
techniques to aspects specific to that reconstructive method.
endotracheal anaesthesia using propofol (Diprivan, Stuart
Pharmaceuticals, Wilmington, DE); narcotic anesthetics are avoided to
reduce postoperative nausea.
-
Place the patient in the supine position.
Before placing the leg in a leg holder, perform a thorough examination
under anesthesia including Lachman, anterior and posterior drawer,
varus/valgus, and pivot-shift testing. Evaluate external rotation at
30° and 90° of flexion to assess for posterolateral instability and
compare findings to the contralateral knee. -
If pivot-shift testing clearly
demonstrates ACL insufficiency, harvest the BTB graft before diagnostic
arthroscopy so that the inferolateral and inferomedial portals can be
placed through the operative wound and the graft can be prepared by an
assistant during the diagnostic arthroscopy. -
Though it is rarely used, place a
tourniquet on the upper thigh before placing the leg in a leg holder.
Secure the contralateral leg in a padded foot holder with the hip and
knee slightly flexed, paying careful attention to padding the common
peroneal nerve. The foot of the table must be fully flexed, and flexing
the waist slightly minimizes lumbar extension. In the endoscopic
technique, one must be able to flex the knee 100° to 110° of flexion to
facilitate femoral screw placement in a parallel fashion. In the
two-incision technique, it is not as crucial. -
Give 1 g of a first-generation
cephalosporin such as cefazolin intravenously or 600 mg of clindamycin
or 1 g of vancomycin if the patient is allergic to penicillin. After
the leg is prepped and draped, infiltrate all portal sites and the
anterior wound with 0.5% Marcaine (bupivacaine) with epinepherine in
the subcutaneous tissue.
-
For diagnostic arthroscopy, establish a
superomedial or superolateral portal for outflow. The use of an
arthroscopic pump has nearly eliminated the need for inflating the
tourniquet for intraarticular hemostasis. Use an inferolateral portal
for arthroscope placement and an inferomedial portal as a working
portal. Attach the inflow to the arthroscopic cannula. -
Thorough diagnostic arthroscopy consists
of evaluation of the suprapatellar pouch, patellofemoral joint, medial
and lateral gutters, medial and lateral compartments, and the
intercondylar notch. -
Pay particular attention to the menisci,
which must be carefully evaluated for the presence of tears. Make all
attempts to repair full-thickness longitudinal and bucket-handle tears,
generally using an inside-out technique. Partial thickness tears and
small tears less than 1 cm that are stable to probing we leave alone.
Carefully note and grade all articular cartilage injuries. -
Visualize the intercondylar notch for
evidence of the torn ACL: a long tibial ACL stump scarred to the PCL or
roof (“vertical strut” sign) or failure of the ACL to extend to its
normal femoral attachment (“empty lateral wall” sign) (8).
-
Make the incision (Fig. 89.4)
from the tip of the patella to 2 cm below the tibial tubercle, slightly
medial to the midline, so the tibial tunnel can be placed through the
incision. A smaller, more cosmetic incision can be used if adequate
skin mobility is present. Carry the incision
P.2360
down sharply to the peritenon and then incise it with a #15 scalpel blade.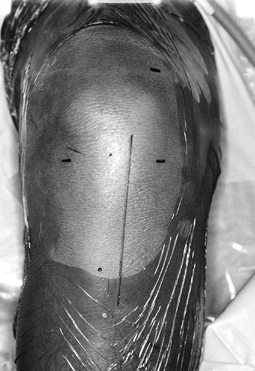 Figure 89.4.
View of a right knee. Make the incision slightly medial to the midline,
from the distal tip of the patella to 2 cm below the tibial tubercle,
approximately 8 cm in length. Placement of superomedial, inferomedial,
and inferolateral portals is depicted as well. Should the graft
harvesting occur before arthroscopy, place the inferomedial and
inferolateral portals through the graft harvest incision. -
Extend the peritenon incision proximally
and distally with Metzenbaum scissors and retract the edges medially
and laterally to fully expose the patellar tendon. -
Measure the width of the tendon and
document it in the operative dictation. Mark the midline both
proximally and distally with a sterile marking pen and plan on a
10-mm-wide tendon with 10 mm by 25 mm bone plugs. -
Use a #10 scalpel blade to incise the
tendon on one side of the graft. Extending the knee facilitates
incising the patellar and tibial bone block edges, and flexing the knee
places the tendon on tension, which helps guide the scalpel down the
longitudinal axis of the tendon fibers. Placing a retractor distally
helps prevent inadvertent extension of the distal aspect of the
operative incision when outlining the tibial bone block with the
scalpel. Incise the other side of the graft with the scalpel, being
careful to remain parallel with the opposite side of the graft’s fibers. -
Outline the distal cross-cut on the tibia
and the proximal cross-cut on the patella. Use an oscillating saw with
a #238 saw blade to create the tibial and femoral bone plugs. With the
saw in your dominant hand, stabilize the saw with the nondominant thumb
and place the nondominant index finger in the axilla between the inner
and outer aspects of the graft to prevent inadvertent graft damage (Fig. 89.5).![]() Figure 89.5.
Figure 89.5.
View of a right knee, harvesting the medial aspect of the tibial bone
plug. Place the left index finger between the graft’s tendon and the
remaining medial third of the patellar tendon, and use left thumb to
stabilize the oscillating saw. -
When making the other side of the bone
plug, use an identical technique with hands switched. Score the tibial
cortex and make an equilateral triangle on profile with the saw in
order to maximize the remaining bone in the tubercle region beneath the
medial and lateral thirds of the remaining patellar tendon (Fig. 89.6).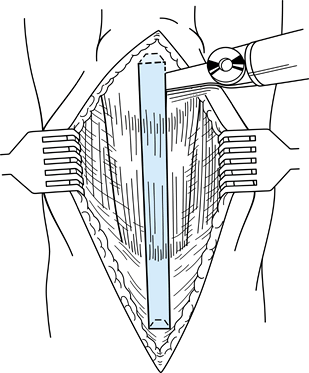 Figure 89.6.
This illustration depicts the geometric configuration of the
trapezoidal patellar and triangular tibial bone plugs. (Redrawn from
Hardin GT, Bach BR Jr, Bush-Joseph CA, Farr J. Endoscopic
Single-Incision Anterior Cruciate Ligament Reconstruction Using
Patellar Tendon Autograft. Surgical Technique. Am J Knee Surg 1992;5:144.) -
Make the distal cross-cut with the saw
blade held 45° oblique to the cortex, with the corner of the blade used
to cut the bone on each side of the tibial plug. Before lifting out the
tibial bone plug, create the patellar bone plug with the saw. Make a
trapezoidal graft on profile to avoid penetrating the articular
cartilage; the depth of the cut should not exceed 6 to 7 mm. -
Make the proximal cross-cut holding the
saw blade at a 45° angle and then place the blade parallel to the
medial and lateral bone cuts to complete the cross-cut. -
Use ½-in. and ¼-in. curved osteotomes to gently lift the tibial plug out of its bed without levering. With
P.2361
soft tissue remaining on the patellar tendon, the patellar plug can be
gently lifted out of its bed. Grasp the tibial plug with a laparotomy
sponge, apply tension, and remove the fat pad from the tendon with
Metzenbaum scissors. Release soft tissue attachments and take the graft
to the back table for preparation.
-
First measure the length of the graft’s
bone blocks, tendinous portion, and total length. Ideally one has
harvested 10 mm × 25 mm bone plugs. If one bone plug is longer, use it
on the femoral side to decrease length construct mismatch between the
tibial tunnel and the graft. -
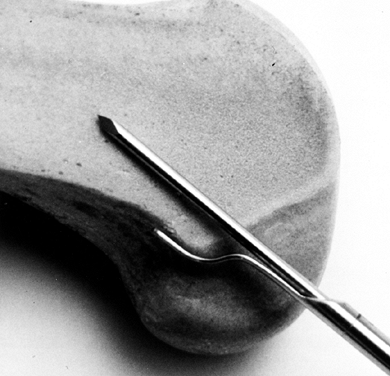
Use a small rongeur to contour the bone
plugs. Save the excess bone removed for subsequent patellar defect bone
grafting. A small spur of bone is often present proximal to the tendon
insertion into the tibial bone plug and should be removed so that the
bone edge is flush with the tendinous insertion. If one bone block is
11 mm wide, use it for the tibial tunnel side. -
Use a 0.062-in. Kirschner (K-) wire to
make two drill holes in the tibial bone plug, placed parallel to the
cortical surface through the cancellous portion of the graft. Place a
#5 Ticron suture in each hole (Fig. 89.7).![]() Figure 89.7.
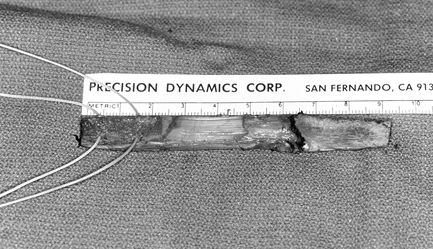
Figure 89.7.
Photograph of the harvested tendon. Place two #5 Ticron sutures in the
tibial bone plug and mark the distal cortical surface of the tibial
plug with the marking pen. Mark the tendo-osseous junction of the
femoral bone plug as well. Bone plugs are approximately 25 mm long,
with a tendon length of 42 mm. -
We have not had any incidences of suture
cutout through the cancellous bone using this technique in more than
700 cases of ACL reconstruction. The suture holes are placed
perpendicular to the cortex because of the risk of lacerating the
sutures, as we place our interference screws on the cortical surface of
the bone plugs. Alternatively, a 22-gauge wire can be placed rather
than suture to preclude the potential for suture laceration. Because we
use a “push-up” rather than “pull-through” technique in placing our
graft intraarticularly, we do not need to place sutures in the femoral
bone plug. If a “pull-through” technique using a passing pin is used,
sutures may be placed in the femoral plug in an identical manner. -
After the graft is prepared, wrap it in a
moist lap pad and place it in a kidney basin in the middle of the main
instrument table. It is not immersed in water, as this will cause the
graft to become edematous.
-
Intercondylar notch preparation is
performed while the graft is being prepared at the back table. While
evaluating the notch configuration, note the presence of tibial
eminence and notch wall osteophytes. Although significant notch width
variability may be encountered, 20 to 22 mm is required to avoid graft
impingement. Removal of the ligamentum mucosum from the notch apex
facilitates visualization, and it is occasionally necessary to debride
some fat pad. -
Remove the remaining ACL tissue with the
combination of arthroscopic scissors, arthroscopic osteotome, and
motorized 5.5 mm full-radius resector and remove all soft tissue from
the lateral wall of the notch. Synovium overlying the PCL laterally may
be removed to help
P.2362
visualize the posterior notch. This can often create bleeding that requires electrocauterization, however. -
The notchplasty is performed for two
purposes. First, it promotes visualization of the “over-the-top”
position and accurate placement of the femoral tunnel. Second, it helps
prevent impingement of the graft with the knee in full extension. -
Initiate the notchplasty with a ¼-in.
osteotome placed through the inferomedial portal. This allows for a
more expeditious notchplasty, and the osteocartilaginous fragments can
be removed with a grasper, the cartilaginous portion removed, and the
remaining bone used to graft the patellar and tibial defects. Complete
the notchplasty with a motorized 5.5 mm round burr, moving from
anterior to posterior and from apex to inferior, with care taken to
avoid misinterpreting a vertical ridge two thirds posteriorly as the
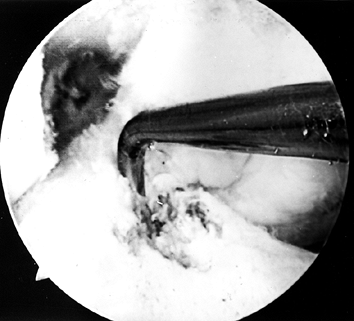
true posterior outlet (Fig. 89.8).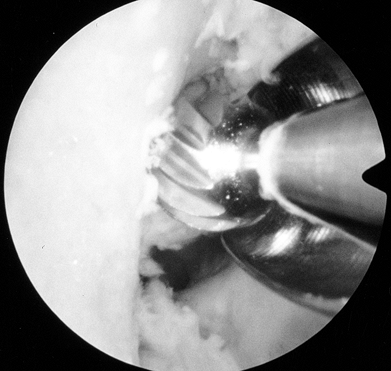 Figure 89.8.
Arthroscopic view of a right knee. The 5.5 mm round burr is just
posterior to a vertical ridge that is two-thirds posterior to the
entrance to the notch. Take this down to fully visualize the
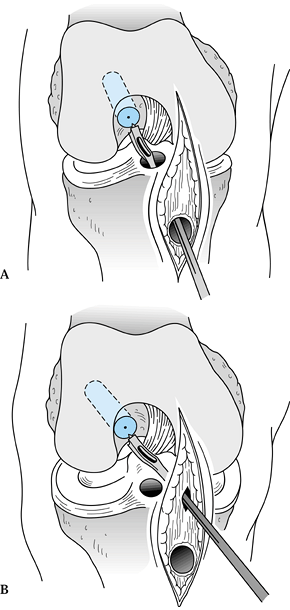
“over-the-top” position. -
When the ridge is identified, place the
burr posterior to the ridge and move it from a posterior to anterior
direction to smooth the ridge. Use a curet to remove soft tissue from
the posterior outlet, and then hook a probe over the posterior edge to
confirm proper “over-the-top” positioning (Fig. 89.9).
Remove minimal bone from the femoral ACL insertion to avoid
lateralizing the isometric point. Proper perpendicular camera
orientation is crucial in avoiding excessive removal of lateral femoral
condyle bone in the midportion of the notch and insufficient bone from
the inferior portion of the notch.![]() Figure 89.9.
Figure 89.9.
Arthroscopic view of a right knee. All soft tissue has been cleared out
to ensure visualization of the posterior edge of the notch. A probe is
placed over the posterior edge of the femur in the “over-the-top”
position.

-
After completion of the notchplasty,
prepare the tibial tunnel. Make a medially based rectangular periosteal
flap just medial to the tibial tubercle graft harvest site. The tibial
tunnel entrance is generally 1.5 cm medial to the tubercle, 1 cm
proximal to the pes anserine tendons, and in line with the middle of
the tibial graft site. -
Take care to avoid injuring the
superficial medial collateral ligament, the pes anserine tendons, or
the medial aspect of the patellar tendon as well. A more posteromedial
starting point is desirable in the endoscopic technique to allow
straighter access to the correct femoral tunnel position. The tibial
tunnel’s position will dictate to a certain extent the position of the
femoral tunnel, as the femoral tunnel guide is placed through the
tibial tunnel, unlike the two-incision technique (Fig. 89.10).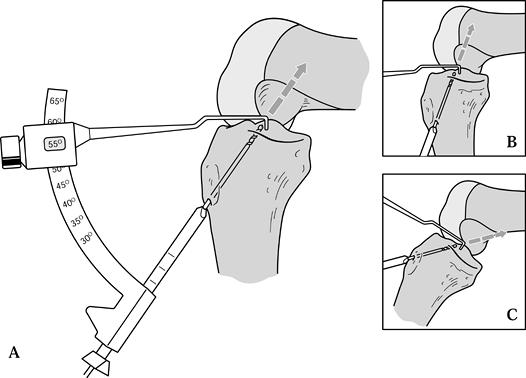 Figure 89.10. Illustration of proper placement of the tibial tunnel. A:In general we tend to use steeper angles, such as 55° (as determined by the “n + 7” rule). A well-placed tunnel will allow for proper endoscopic placement of the femoral tunnel. A tunnel that is too steep (inset B) will preferentially place the femoral tunnel too far anteriorly, whereas a tibial tunnel that is flat (inset C)
will tend to place the femoral tunnel too posterior, risking posterior
cortical violation. Minor variances may be treated with appropriate
flexion of the knee before placement of the “over-the-top” guide and
femoral guide pin. (Redrawn from Hardin GT, Bach BR Jr, Bush-Joseph CA,
Farr J. Endoscopic Single-Incision Anterior Cruciate Ligament
Reconstruction Using Patellar Tendon Autograft. Surgical Technique. Am J Knee Surg 1992;5:144.) -
Several commercially available tibial
tunnel guide systems are available for use in drilling the tibial
tunnel. Attempt to optimize the match of the graft and tunnel length.
The “n + 7” rule is helpful (but not
absolute), whereby 7° is added to the length of the tendinous portion
of the graft, producing the setting for the guide (73,87). For instance, if the tendon measures 48 mm in length, 7 is added to make 55, and the guide is set at 55°. -
We use several parameters to determine
guide pin placement. By using the tibial ACL insertion footprint,
ideally the guide pin should pierce the tibial cortex in the middle of
the footprint. This also should be keyed off the posterior edge of the
anterior horn of the lateral meniscus by following the contour of the
posterior edge
P.2363
to
the midpoint of the notch. This is just lateral to the medial tibial
spine. Last, the guide pin should enter the joint 7 mm anterior to the
PCL (65,76).
It should be kept in mind that because of soft tissue overlying the
tibial plateau, where one sees the pin enter the joint is not
necessarily where it exits the plateau surface. For this reason, erring
more posteriorly prevents unwanted anterior tunnel placement. This,
along with prevention of intercondylar notch “cyclops lesions,” is the
purpose of debriding the ACL stump. In the coronal plane the tunnel
should be midline in the notch. Erring slightly medially helps prevent
impingement from the lateral femoral condyle. -
Each commercially available tibial tunnel
guide system has inherent peculiarities. Place the tibial guide aimer
through the inferomedial portal and use the anatomic guides discussed
above to appropriately place the stylet of the guide (Fig. 89.11).
The guide pin of the Acufex Protrac aimer (Smith & Nephew
Endoscopy, Mansfield, MA) contacts the elbow of the aimer above the
surface of the plateau, so we place the point of the aimer more
posteriorly to prevent anterior tunnel placement. The arm of the aimer
should be parallel to the articular surface. In cases of patella alta,
when the anteroinferior portals are high relative to the articular
surface, parallel placement of the point arm may be impeded by the soft
tissues. It may be necessary to make an accessory inferomedial portal
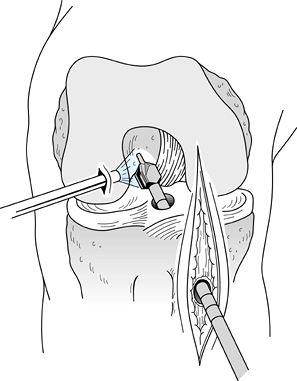
to ensure parallel placement.![]() Figure 89.11.
Figure 89.11.
Arthroscopic view of a right knee. Position the stylet tip of the arm
of the aiming guide so that the guide pin enters the joint in the
center of the ACL’s tibial footprint, 7 mm anterior to the PCL. Use the
posterior edge of the anterior horn of the lateral meniscus as a guide
to judge anterior–posterior positioning. -
Retract the distal soft tissues and slide
the cannulated guide arm of the aimer up to the tibial cortex, 1.5 cm
medial to the tibial bone plug site, 1 cm above the pes anserine
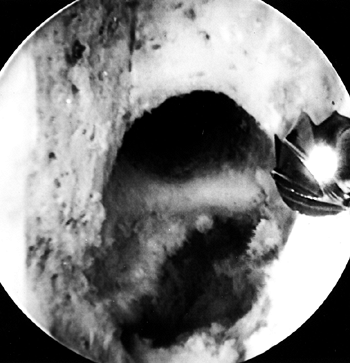
tendons (65). Drill a guide pin through the guide arm and into the joint (Fig. 89.12).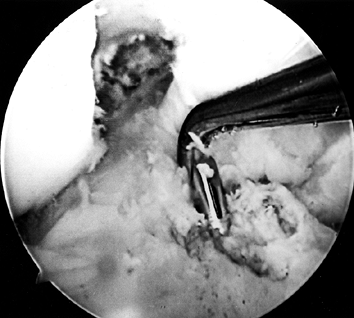 Figure 89.12.
Arthroscopic view of a right knee. The guide pin has entered the joint
and engaged the elbow of the aiming guide’s arm. At the level of the
tibial plateau it is in the center of the tibial footprint of the ACL,
7 mm anterior to the PCL. -
After the pin penetrates the joint,
remove the guide, check the pin placement, and extend the leg to ensure
impingement-free extension (55,56).
Slight alterations in pin placement may be done by free-hand drilling
of another guide pin held tightly with Kocher clamps against the first
pin, with appropriate adjustments made in the AP and medial–lateral
planes. -
Depending on graft size, ream with a 10-
or 11-mm cannulated headed reamer placed over the guide pin. Before
entering the joint, turn off the arthroscopic pump. -
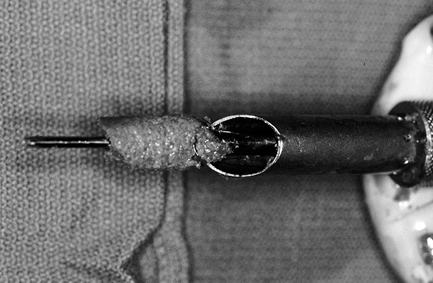
Collect all bone reamings with a
cannulated bone chip harvester (Linvatec, Largo, FL) and use them for
grafting the patellar and tibial bone plug defects (33,39) (Fig. 89.13).
After the reamer and guide pin are removed, inspect the tip of the
guide pin. Wash cancellous reamings out the tunnel and collect them
onto an Owens gauze, which makes removal of the graft easier than from
a standard laparotomy sponge. Plug the tunnel and turn the pump back on.![]() Figure 89.13.
Figure 89.13.
Photograph of cannulated bone collector and reamer after reaming of the
tibial tunnel. An abundance of bone can be collected and used to graft
the patellar and tibial graft defects. (From Ferrari JD, Bach BR.
Technical Note: Bone Graft Procurement for Patellar Defect Grafting in
Anterior Cruciate Ligament Reconstruction. Arthroscopy 1998;14:543.) -
Remove loose bone and cartilage around
the tunnel entrance with the shaver, and smooth posterior ridges of the
tunnel with a motorized chamfer reamer and an arthroscopic hand rasp (Fig. 89.14).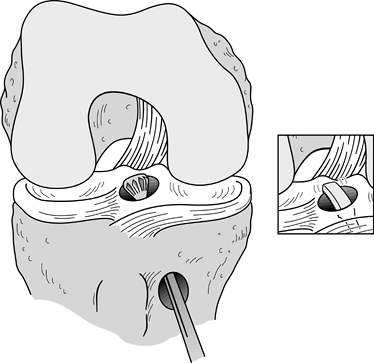 Figure 89.14.
Illustration of a right knee. After the tibial tunnel has been created,
a posterior cortical lip is often present. This is smoothed down with
the aid of a chamfer reamer and curved rasp (inset).
Left alone and not smoothed, this edge could abnormally anteriorize the
graft, cause chafing and possible rupture at the posterior aspect of
the graft, and create difficulty in passing the graft into the femoral
tunnel.
tunnel that originates at the 1 o’clock position in the left knee and
11 o’clock position in the right knee and has a 1- to 2-mm posterior
cortical shell (Fig. 89.15). This provides for
an anatomic and near-isometric position of the graft. Avoidance of
posterior cortical “blow out” is minimized by meticulously clearing the
soft tissue surrounding the “over-the-top” position and confirming the
position with a probe. Use a retrograde femoral offset guide placed
through the tibial tunnel that positions the guide pin 7 mm anterior to
the posterior cortex. This leaves a 2-mm bone shell when a 10-mm reamer
is used to make the tunnel (Fig. 89.16A). Alternatively, one could create an accessory inferomedial portal, place the femoral aimer
through the portal, hyperflex the knee, and drill the femoral socket (Fig. 89.16B).
 |
|
Figure 89.15.
Sagittal cross section of a femur showing a 7-mm “over-the-top” guide placed over the posterior edge of the notch and a guide pin placed through the guide and into the femur. Overreaming with a 10-mm reamer will leave a 2-mm posterior wall in the femoral socket. (From Hardin GT, Bach BR Jr, Bush-Joseph CA, Farr J. Endoscopic Single-Incision Anterior Cruciate Ligament Reconstruction Using Patellar Tendon Autograft. Surgical Technique. Am J Knee Surg 1992;5:144.) |
 |
|
Figure 89.16. A: Illustration of a right knee with the “over-the-top” guide placed through the tibial tunnel. B:
Alternatively, place the guide through a low inferomedial portal and, with hyperflexion of the knee, position the guide and drill the pin. This method creates a femoral socket that is not dependent on the position of the tibial tunnel. |
-
With the pump turned off and the knee
“dry,” place the offset guide through the tibial tunnel and in its
“over-the-top” position. If necessary, place a probe in the
inferomedial portal to retract the PCL. -
As mentioned above, we use a “push-in”
rather than a “pull-through” technique, which doesn’t require a passing
pin. Drill the guide pin through the guide and to a depth of 2.5 to 3.5
cm, essentially the length that one plans on reaming, into the femur. -
Remove the guide and probe the pin for
correct placement. Ream with a 10-mm reamer 1 cm into the femur,
creating an “endoscopic footprint.” Back it out and probe for posterior
cortical integrity and proper tunnel orientation. When this is
confirmed, ream to a depth 5 to 7 mm greater than the length of the
femoral bone plug (Fig. 89.17). This is done so
that the femoral plug can be recessed to minimize graft–tunnel mismatch
if needed. Furthermore, because the tunnel is drilled at an angle, the
anterior aspect of the tunnel is not colinear with the posterior
aspect. If one leaves the femoral plug flush with the anterior aspect
of the tunnel, the graft will be anteriorized, which increases graft
strain in flexion. Furthermore, if the bone plug protrudes below the
posterior wall, it may be at risk for fracture. Hence, the graft must
be recessed a few millimeters with respect to the anterior aspect of
its tunnel regardless of graft–tunnel mismatch.![]() Figure 89.17.
Figure 89.17.
Illustration of a right knee. Place the 10-mm reamer over the guide
wire and drill to desired depth. (Redrawn from Hardin GT, Bach BR Jr,
Bush-Joseph CA, Farr J. Endoscopic Single-Incision Anterior Cruciate
Ligament Reconstruction Using Patellar Tendon Autograft. Surgical
Technique. Am J Knee Surg 1992;5:144.) -
After the reamer is removed, flush loose
bone from the knee with the aid of the pump and collect these reamings
with the Owens gauze. Again, check tunnel integrity definitively by
placing the arthroscope retrograde through the tibial tunnel into the
femoral tunnel (Fig. 89.18).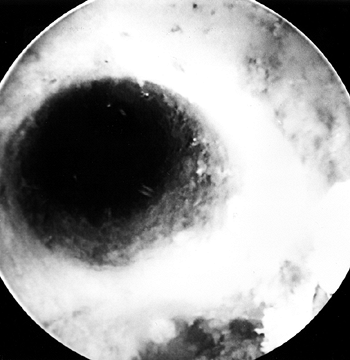 Figure 89.18.
Arthroscopic view of the right knee. The femoral socket’s integrity is
checked by placing the arthroscope up through the tibial tunnel. -
Perform a “phase II” notchplasty (Fig. 89.19).
During the process of femoral tunnel reaming, if the reamer engages the
lateral wall, use this observation to assist in fine-tuning the amount
of lateral wall expansion. The femoral tunnel entrance should appear
circular. If there is an oval appearance laterally, abrade the opening
to produce a circular configuration. “Ellipticize” (i.e., eccentrically
abrade) the anterolateral quadrant to aid in screw placement and
chamfer the anterior ridge with a shaver to facilitate guide-pin
placement.![]() Figure 89.19.
Figure 89.19.
Arthroscopic view of the right knee. “Phase II notchplasty” is
performed with a 5.5-mm round burr. Smoothe the lateral wall of the
notch at the entrance to the femoral socket with the burr.
-
After removing the graft from its gauze, place a two-pronged pusher at the base of the femoral bone plug (Fig. 89.20) and position a curved hemostat through
P.2367
the inferomedial portal with its tips pointed up. Then “push up” the
graft through the tibial tunnel and grasp it with the hemostat at the
junction of the proximal and middle third of the bone plug (Fig. 89.21A). Remove the pusher and guide the graft up into the femoral socket (Fig. 89.21B). Orient the cortical surface of the femoral plug posteriorly and in the coronal plane.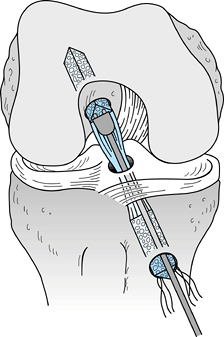 Figure 89.20.
Illustration of a right knee. Use a two-pronged pusher to guide the
graft up the tibial tunnel. Remove the pusher from the tunnel before
the tibial bone plug enters its tunnel, however, or the pusher will be
difficult to remove. (Redrawn from Hardin GT, Bach BR Jr, Bush-Joseph
CA, Farr J. Endoscopic Single-Incision Anterior Cruciate Ligament
Reconstruction Using Patellar Tendon Autograft. Surgical Technique. Am J Knee Surg 1992;5:144.)![]() Figure 89.21. Arthroscopic views of the right knee. A: Grasp the femoral bone plug with a curved hemostat placed through the inferomedial portal with tip pointed up. B: Then guide the graft up into the femoral socket. C:
Figure 89.21. Arthroscopic views of the right knee. A: Grasp the femoral bone plug with a curved hemostat placed through the inferomedial portal with tip pointed up. B: Then guide the graft up into the femoral socket. C:
Once the plug is seated roughly 85% into its socket, place a Nitenol
Hyperflex guide pin at the 11 o’clock position of the graft. Hyperflex
the knee and gently push the pin to the back of the socket. D: Place the satellite pusher at the inferior edge of the femoral bone plug and tap the plug to seat it fully in its socket. -
Before fully seating the femoral plug
into its socket, place the Nitenol hyperflex guide pin (Linvatec,
Largo, FL) into the femoral socket at the 11 o’clock position of the
graft. If difficulty is encountered in placing it in the tunnel, use
the hemostat to create a small opening to guide it into the tunnel.
Once the pin is initially positioned within the tunnel, flex the knee
100° to 120° and fully seat the guide pin within the tunnel (Fig. 89.21C).
The pin should not be forced and should slide easily. It potentially
could be placed through the bone plug or posterior cortex. If the guide
pin appears too divergent from the graft, as often can be seen if
patella alta is present, the accessory inferomedial portal is helpful
in placing the guide pin more parallel with the graft and reducing
screw divergence. As the knee is flexed, adjust the camera to visualize
the “gap space interval” anteriorly between the femoral socket and the
bone plug. Then use a satellite pusher to fully seat the bone plug in
its socket (Fig. 89.21D). -
Check the tibial plug to make sure it is
not protruding excessively from its tunnel. If there is marked
graft–tunnel mismatch at this time, remove the graft and deepen the
femoral socket. -
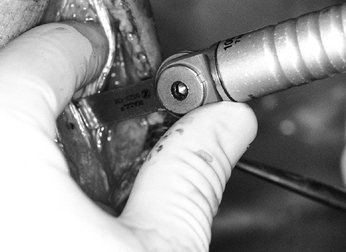
Use a 7 × 25 mm titanium fully threaded
cannulated interference screw on the femoral side, as biomechanical
studies indicate no significant difference between 7-mm and 9-mm
interference screws for femoral fixation (67).
We prefer interference screw fixation with nonheaded Kurosaka screws
(Linvatec, Largo, FL), and we generally use a screw that matches the
length of our graft. Apply maximum tension to the sutures as the screws
are placed to avoid graft advancement. Place the femoral screw against
the cancellous surface, thus reducing the potential for soft tissue
injury or laceration; the tibial screw is placed against the cortical
surface. Use cannulated screws to help prevent divergence. -
Place the screw over the guide wire and push it into the joint (Fig. 89.22).
To maximize the potential for parallel placement of the femoral
interference screw, hyperflex the knee 100° to 110°. This additional
knee flexion will “compensate” for the difference created between the
tibial tunnel angle and the angle created by the flexible Nitenol pin
placed through the inferomedial portal. As the screw is being placed,
apply light tension to the tibial plug’s sutures, which helps prevent
the graft from being lacerated by the screw. Pay careful attention to
the tendinous portion of the graft just inferior to the femoral plug.
If this tissue begins to rotate, the screw may be wrapping up or
beginning to lacerate the tendon. When the screw is halfway positioned,
remove the guide pin, or it may be difficult to remove the wire when
the screw is fully seated. The screw is fully seated when its base is
flush with or slightly above the base of the femoral plug; if it is
not, fraying and graft disruption can occur with motion. Commercially
available graft protection sleeves are available to reduce the
potential for soft tissue laceration. If we decide to recess the
femoral bone plug more than 5 mm, we will routinely use a protection
sleeve.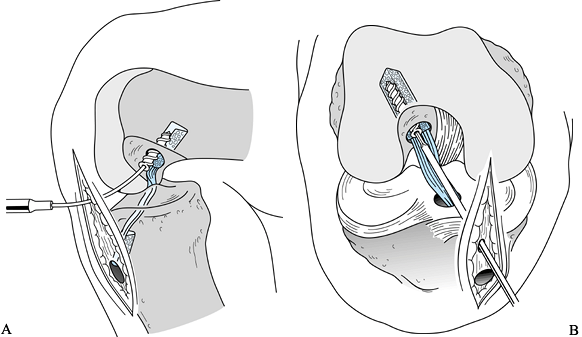 Figure 89.22. Illustrations of a right knee. A:
Lateral view depicting the interference screw being placed over the
guide wire. The tibial plug has been externally rotated 180° so that
the cortical surface is facing anteriorly. B:
Anteroposterior view of the screw being placed. An accessory
inferomedial portal facilitates parallel screw placement. (Redrawn from
Hardin GT, Bach BR Jr, Bush-Joseph CA, Farr J. Endoscopic
Single-Incision Anterior Cruciate Ligament Reconstruction Using
Patellar Tendon Autograft. Surgical Technique. Am J Knee Surg 1992;5:144.) -
Check the graft for “gross isometry.”
Hold the sutures in the tibial plug tightly and place an index finger
at the extraosseous entrance of the tibial tunnel. Flex the knee from
100° to complete extension or hyperextension. As the knee moves from
30° to complete extension, 1 to 2 mm of motion is generally noted.
Cycle the knee several times with tension placed on the graft. Last,
view the graft arthroscopically to ensure that it is impingement-free
in extension and does not abrade along the lateral wall with knee
motion. -
An alternative means of graft passage is the use of a passing pin, which has an open slot at its base for placing
P.2368
suture. When using this technique, place two #5 Ticron sutures through
both bone plugs. Place the pin through the “over-the-top” guide and
drill through the femur. Tap the pin with a mallet through the
anterolateral thigh and out the skin. Overdrill with the 10-mm reamer
and pass the sutures through the bottom slot of the pin. Pull the pin
out of the anterolateral thigh and securely grasp the sutures
protruding out the pin hole. With a hand on each group of sutures,
bring the graft into the knee joint. A probe in the inferomedial portal
can facilitate placement of the femoral bone plug into its socket.
After placing the femoral interference screw, remove the two #5 Ticron
sutures from the anterolateral thigh. -
We prefer the “push-in” technique over
the “pull-through” method because it avoids placing a pin through the
thigh and possible complications such as a break in sterility, pin
breakage, and creation of a stress riser in the femur (28).
The “phase II” notchplasty and visualization of the femoral socket are
also easier because the passing pin is not present, and no sutures need
be placed through the femoral bone plug. Before tibial
P.2369
fixation, we externally rotate (i.e., toward the lateral side) the graft (100).
This allows an anatomic rotation of the graft, can reduce graft–tunnel
mismatch by shortening the graft construct, and allows the tibial screw
to be placed against the cortical surface of the tibial plug, anterior
to the graft. We do this for four reasons. First, with the screw placed
anteriorly, when the knee flexes, there is no abrasion of the screw
against the graft. If the screw is placed posteriorly and the screw tip
extends beyond the tendo-osseous interval, knee flexion may result in
abrasion of the graft. Second, the screw is more likely to diverge if
placed posteriorly along the cancellous portion of the graft. Third, a
screw placed posteriorly will anteriorize the graft, adversely affect
isometricity, and possibly create impingement of the graft. Last,
fixation is greater when placed along the cortical surface. -
One must ensure that the tibial plug is
moving freely within the tibial tunnel before distal fixation is done.
Occasionally the distal tip of the plug can get caught inside the
tunnel on the inferior edge. If the plug is fixed in this position,
graft tension will be lax. For fixation on the tibial side, position
the knee in full extension and firmly tense the tibial plug sutures.
Place a Nitenol hyperflex pin anterior to the tibial plug and secure
the graft with a 9 × 20 mm screw. Recess the head of the screw just
below the cortical surface of the tibia so that it is less likely to
become symptomatic but is not difficult to remove should the situation
arise. If the tibial plug has been recessed in its tunnel as a result
of mismatch, choose a longer screw (Fig. 89.23).![]() Figure 89.23. Anteroposterior (A) and lateral (B)
Figure 89.23. Anteroposterior (A) and lateral (B)
views of a right knee after ACL reconstruction with an endoscopic
technique. The lateral view demonstrates proper posterior placement of
the femoral tunnel with parallel screw placement. The tibial tunnel
enters the joint in the midpoint of the tibial plateau, and the tibial
screw is parallel to its bone plug. The AP view confirms parallel screw
placement and placement of the femoral socket at the 11 o’clock
position. -
Place the arthroscope back inside the
knee for a final check of the graft’s orientation and to ensure that
proper graft tension is present at 20° to 30° of knee flexion. A
Lachman and pivot-shift exam can be done at this time as well.
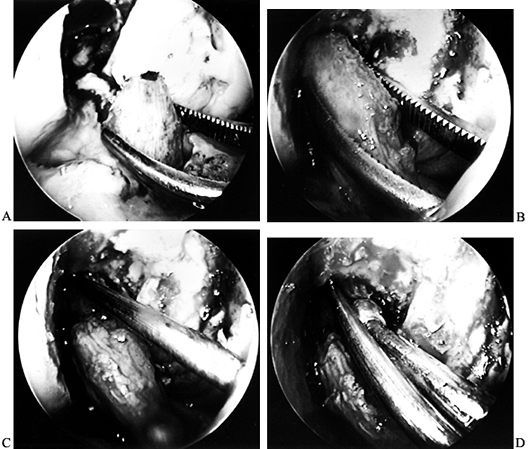
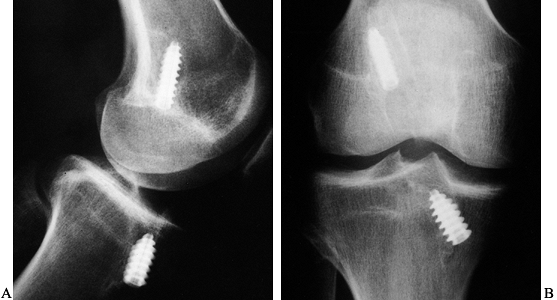
our largest mismatches occur in using BTB allografts, when the
allografts are derived from a cadaver of significantly larger size than
the patient. Several methods are available to address mismatch
problems. As mentioned above, small mismatches may be reduced by
recessing the femoral bone plug deeper within its socket. If one is
going to recess the femoral bone block, parallel placement of the
interference screw is essential, as the potential for graft injury
increases. Commercially available graft protectors can be used to
further protect the soft tissue component of the graft. An accessory
inferomedial portal should also be considered for screw placement.
graft 180° or, if more shortening is needed, one additional revolution
(180° + 360°). If 15 mm of tibial bone is within the tibial tunnel, our
choice is to use an interference screw. Alternatives to interference
screw fixation include tying the sutures over a bicortical screw and
washer or recessing the tibial tunnel’s bed so that the tibial plug can
be placed within it and be fixed with either two 7/16-in.
barbed staples or a bicortical 3.5-mm screw placed in a lag fashion.
Last, should the entire bone plug be protruding, we remove the tibial
bone block, place two #5 Ticron sutures in the tendon, perpendicular to
one another in a Krackow fashion (see Fig. 89.44),
for traction, and then place the free tibial bone block into the
tunnel. We secure this entire construct with a 9 × 20 mm interference
screw placed over a guide wire. This construct has been found to be
significantly stronger and stiffer than fixation with the bone block
sutures tied over a post (78).
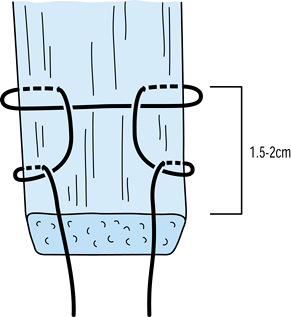 |
|
Figure 89.44.
The modified Krackow suture placed on the tendinous portion of the QT graft, begun 1.5 to 2 cm from the end of the tendon. See text for details. A second suture is placed in an identical fashion on the opposite side of the tendon. |
three or four interrupted #1 Vicryl sutures while the knee is flexed,
avoiding excessive shortening of the tendon. The osteoperiosteal flap
overlying the tibial drill hole is also closed with #1 Vicryl. We graft
the patellar bone defect with the collected bone reamings, and any
remaining bone is used to graft the tibial donor site. We close the
peritenon with a running 2-0 Vicryl suture, the subcutaneous layer with
interrupted 2-0 Vicryl, and the skin with a running 3-0 Prolene. We
inject 0.5% bupivacaine (Marcaine) with epinepherine into the
periosteal region, deep surgical wound region, portals, skin, and
intraarticularly. We do
not
use hemovac drains. Steri-Strip the wounds, then apply dry sterile
gauze, Kerlex roll, an ice cryotherapy pad, and ace wrap. The
cryotherapy pad must not contact the skin, or a superficial frostbite
can occur. Last, place the leg in a hinged knee brace, which can be
locked in extension.
that of BTB autograft. Other than arthroscopic portals, the only
incision is a 1.5- to 2.0-cm incision made in line with the
inferomedial portal, 1 cm above the pes anserine tendons and 1.5 cm
medial to the tibial tubercle. A medially based periosteal flap is
raised as previously described for placement of the tibial tunnel. We
prepare the graft in a fashion identical to that of autogenous BTB,
with the only exception being using a 1- to 2-mm-wider tendinous
portion.
critical. We use frozen, nonirradiated allograft prepared at a tissue
bank certified by the American Association of Tissue Banks. The length
of the patellar tendon should be known, as allografts with tendon
lengths over 50 mm are too long for almost all women and smaller men,
and this will create a graft–tunnel mismatch with an endoscopic
technique. The tibial bone plug will thus protrude out of its tunnel,
requiring alternative means of fixing the tibial side of the graft.
portal, an accessory inferomedial portal is almost always required for
placement of the femoral interference screw. This diminishes divergence
between the femoral bone plug and the screw’s guide pin.
two-incision ACL reconstruction using BTB autograft is the creation of
the femoral tunnel. The orientation of the two-incision femoral tunnel
differs from that of the endoscopic femoral tunnel, although the actual
intraarticular placement should be identical. This is an important
concept to recognize, particularly in revision situations. Graft
harvest and tibial tunnel preparation are identical, but it is not
critical that the tibial tunnel be placed as steep and in a distal
anteromedial to proximal posterolateral direction, as the creation of
the femoral tunnel is not dependent on the tibial tunnel’s orientation.
Graft preparation differs, as it includes placing sutures through both
bone plugs for control of the graft during passage into the knee.
endoscopic technique are that graft construct mismatches rarely occur,
and complications of creation of the femoral socket such as posterior
wall “blow out” are avoided. Disadvantages obviously include the extra
lateral skin incision and morbidity of dissecting down to the
“over-the-top” position. Femoral graft fixation necessitates a 9-mm
screw for strength comparable to that of a 7-mm screw placed
endoscopically, and because the femoral bone plug is not flush with the
posterior wall of the femoral socket, stresses are placed on the
tendinous portion of the graft.
It is a technique that all ACL surgeons should have in their
armamentarium, as it is especially useful in the revision of endoscopic
reconstructions and in the unfortunate circumstance of posterior wall
“blow out” (24,99). One
of us (B. R. B.) performed two-incision ACL reconstructions from 1987
to 1991 before converting to an endoscopic technique.
place our tibial guide pin, (b) perform the lateral approach for
femoral tunnel placement and place the femoral guide pin, (c) drill the
femoral tunnel, and (d) drill the tibial tunnel. We preferred to
prepare the femoral tunnel before the tibial tunnel in order to better
maintain knee joint distention, allowing improved visualization of the
femoral socket’s integrity. If we were performing a two-incision
technique today, however, we would most probably create our tibial
tunnel initially and use the femoral endoscopic aimer to create a pilot
hole on the femur. This would allow us to more easily and accurately
create the femoral tunnel.
-
To begin femoral tunnel placement, make a
lateral skin incision over the midportion of the iliotibial band (ITB),
from the lateral femoral epicondyle extending 4 cm proximally (Fig. 89.24).![]() Figure 89.24.
Figure 89.24.
Photograph of a right knee depicting the lateral incision for placement
of the femoral tunnel. The iliotibial band is exposed. (From Bach BR
Jr. Arthroscopy-Assisted Patellar Tendon Substitution for Anterior
Cruciate Ligament Insufficiency. Am J Knee Surg 1989;2:3.) -
Split the ITB in line with its fibers 2
cm anterior to its posterior edge. Elevate the vastus lateralis from
posterior to anterior off the lateral intermuscular septum and femur
and place a Chandler or Z retractor over the anterior femur to retract
the extensor mechanism. Take care to avoid injury to the lateral
collateral ligament origin at the flare of the metaphysis. The entry
point should always be proximal to the origin of the ligament (Fig. 89.25).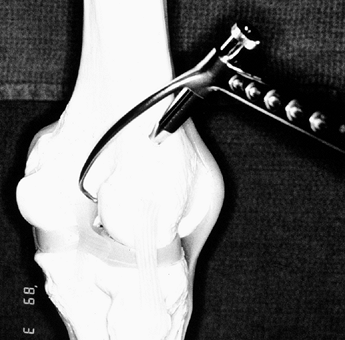 Figure 89.25.
Bone model of a right knee. Place the bullet tip of the femoral drill
guide at the flare of the metaphysis. This point is always proximal to
the lateral collateral ligament. -
The superior lateral geniculate vessels
require electrocauterization, as they may be a source of postoperative
bleeding or hematoma. Bluntly dissect with a finger and use a 0.75-in.
Cobb elevator subperiosteally to facilitate palpation of the posterior
intercondylar notch (Fig. 89.26).![]() Figure 89.26.
Figure 89.26.
Photo of a right knee. Use a Cobb elevator to reflect the vastus
lateralis from posterior to anterior to expose the lateral condyle.
(From Bach BR Jr. Arthroscopy-Assisted Patellar Tendon Substitution for
Anterior Cruciate Ligament Insufficiency. Am J Knee Surg 1989;2:3.) -
Place a J-passer through the inferomedial portal or midpatellar
P.2372
rent to the “over-the-top” position and out the posterior capsule (Fig. 89.27A). A pistoning motion will dilate the capsule slightly, allowing for easier entrance intraarticularly. Figure 89.27. A,B:
Photographs of the right knee. Bring the J-shaped passer out of the
incision from within the knee and grasp the stylet of the aiming guide.
Pass the stylet into the joint with the passer and position the bullet
tip of the aiming guide down on the femoral cortex (B). (From Bach BR Jr. Arthroscopy-Assisted Patellar Tendon Substitution for Anterior Cruciate Ligament Insufficiency. Am J Knee Surg 1989;2:3.) -
Attach the side-specific rear-entry guide
to the J-passer and bring the guide into the joint via the
“over-the-top” position. Once this is in place intraarticularly, push
the bullet tip of the guide flush against the lateral femoral condyle (Fig. 89.27B).
Reconfirm the position of the stylet arthroscopically with a probe. The
goal is to achieve a tunnel with an intact posterior cortex 1 to 2 mm
thick placed at the 11:00 to 11:15 position for a right knee or the
12:45 to 1:00 position for a left knee. Drill the guide pin from
outside in, proximal to the lateral epicondyle and slightly posterior
to the midline of the femoral metaphysis. Entry point of the femoral
tunnel should be at or just proximal to the flare of the metaphysis. If
it is placed any further distally, the angle into the intercondylar
notch is too acute, placing bending stresses on the tendon as it enters
the notch. If the entry is too proximal and the femoral cortex is
violated, a stress riser could predispose to femoral fracture (Fig. 89.28).![]() Figure 89.28.
Figure 89.28.
Illustration of a right knee. With the aiming guide’s stylet in the
“over-the-top” position, drill a guide pin antegrade through the
lateral femoral cortex into the knee joint. (Redrawn from Bach BR Jr.
Arthroscopy-Assisted Patellar Tendon Substitution for Anterior Cruciate
Ligament Insufficiency. Am J Knee Surg 1989;2:3.) -
Confirm pin position arthroscopically and remove the guide system (Fig. 89.29). Overream the pin with the
P.2373P.2374
appropriate-sized reamer (Fig. 89.30).
A burr or shaver can then contour the superolateral aspect of the notch
at the femoral tunnel entrance to prevent graft impingement.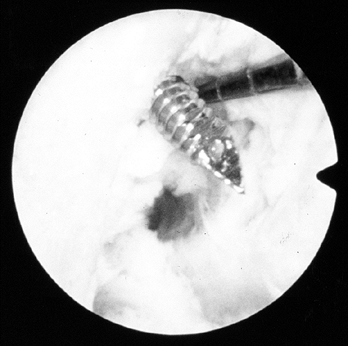 Figure 89.29.
Arthroscopic view of a right knee. The guide pin has entered the joint
and a probe is placed in the “over-the-top” position, confirming
correct anterior-to-posterior placement.![]() Figure 89.30.
Figure 89.30.
Illustration of a right knee depicting the cannulated reamer being
placed over the guide pin to create the femoral tunnel. (Redrawn from
Bach BR Jr. Arthroscopy-Assisted Patellar Tendon Substitution for
Anterior Cruciate Ligament Insufficiency. Am J Knee Surg 1989;2:3.) -
Commercially available tunnel guides
exist that allow the stylet to be placed through the inferomedial
portal rather than through the “over-the-top” position (Arthrex, Inc.,
Naples, FL). Though this still requires a lateral incision to place the
guide pin and drill the femoral tunnel, an “over-the-top” dissection is
not needed, and the incision can be much smaller.
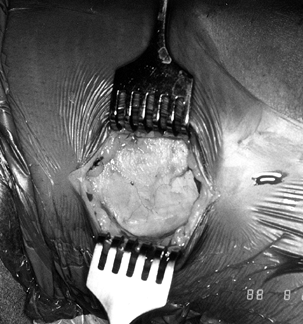
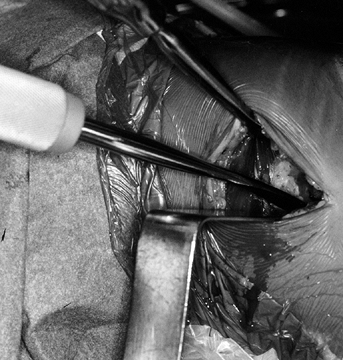
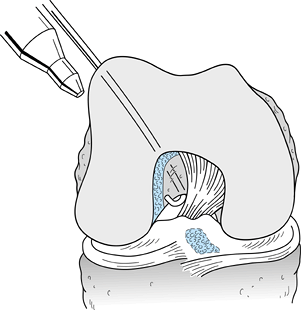
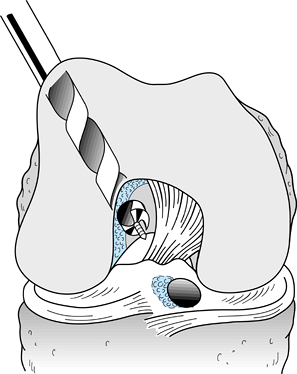
-
Prepare the tibial tunnel as described above for the endoscopic technique (Fig. 89.31).
Flex the knee 60° for graft passage. Place a Yankauer suction tube
retrograde through the tibial tunnel and into the femoral tunnel, and
then place two 22-gauge wire loops retrograde through the suction tube
and clamp them before removing the tube. Alternatively, commercially
available silastic tube graft passers may be used.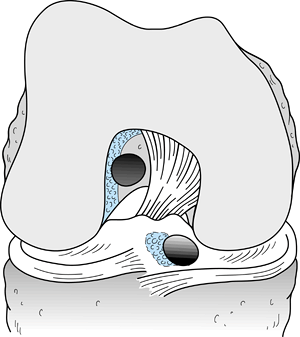 Figure 89.31.
Illustration of a right knee depicting placement of the femoral and
tibial tunnels. (Redrawn from Hardin GT, Bach BR Jr, Bush-Joseph CA,
Farr J. Endoscopic Single-Incision Anterior Cruciate Ligament
Reconstruction Using Patellar Tendon Autograft. Surgical Technique. Am J Knee Surg 1992;5:144.) -
Loop the sutures from the tibial bone
block separately through the wire loops and withdraw the wires out the
tibial tunnel. Clamp the sutures outside the tibial tunnel and pull the
graft into the femoral tunnel (Fig. 89.32).![]() Figure 89.32.
Figure 89.32.
Illustration of a right knee. Pass the graft antegrade through the
femoral tunnel into the joint and out the tibial tunnel. A probe is
often needed to guide the tibial bone plug into its tunnel. (Redrawn
from Nogalski MP, Bach BR Jr. Acute Anterior Cruciate Ligament
Injuries. In: Fu FH, Harner CD, Vince KG, eds. Knee Surgery. Baltimore: Williams & Wilkins, 1994;679.) -
Under arthroscopic visualization, bring
the tibial plug into the tibial tunnel, using a probe or hemostat to
manipulate the plug into place. Potential obstructions include the PCL,
lateral femoral wall, and intercondylar eminence. -
When the tibial plug is in place and the
femoral plug is within its tunnel, place tension on both sets of
sutures to assess for graft laxity. If laxity is present, either plug
may be incarcerated within its tunnel, preventing the graft from being
fully tensioned. If this is the case, tunnel expansion may be needed.
Then assess the graft for impingement along the lateral femoral wall
and anterior notch. If impingement is present, appropriate lateral or
anterior notchplasty is required to prevent fraying of the graft. -
Secure the femoral side first. We prefer
interference screw fixation with cannulated interference screws
(Linvatec, Largo, FL). A screw that matches the length of our graft is
generally used. One must apply maximum tension to the sutures as the
screws are placed to avoid graft advancement. Direct the femoral plug’s
cortex laterally, and place a 9-mm screw against the cortex. If the
graft is recessed within the tunnel, use a longer screw so that it can
be more readily identified and removed in the future if need be. -
Rotate the tibial plug 90° externally to
place the plug’s cortex anterior, and place a 9-mm screw anterior while
the knee is in full extension without a posterior Lachman, placing
maximum tension on the tibial plug’s sutures (Fig. 89.33). Fixation in extension avoids overconstraining
P.2375P.2376
the knee. One should avoid burying the interference screw
intraosseously, as screw removal may be quite difficult in revision
cases or if subsequent high tibial osteotomy is required (Fig. 89.34).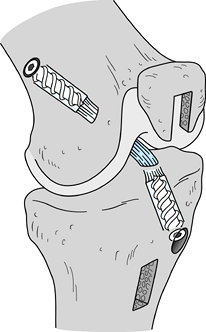 Figure 89.33.
Illustration of a right knee with the graft in place and secured with
interference screws. Both screws lie against the cortex of their
respective bone plugs. (Redrawn from Nogalski MP, Bach BR, Jr. Acute
Anterior Cruciate Ligament Injuries. In: Fu FH, Harner CD, Vince KG,
eds. Knee Surgery. Baltimore: Williams & Wilkins, 1994;679.)![]() Figure 89.34. Anteroposterior (A) and lateral (B)
Figure 89.34. Anteroposterior (A) and lateral (B)
views of a right knee after ACL reconstruction using a two-incision
technique. Screws are parallel to their respective bone plugs. The
lateral view demonstrates proper posterior placement of the femoral
tunnel, and the tibial tunnel enters the joint in the midpoint of the
tibial plateau. The AP view confirms placement of the femoral socket at
the 11 o’clock position. -
Close the lateral wound with interrupted
#1 Vicryl suture in the ITB, 2-0 Vicryl suture in the subcutaneous
tissue, and a running 3-0 Prolene suture in the subcuticular skin.
Cover the incision with Steri-Strips and a dry gauze dressing.
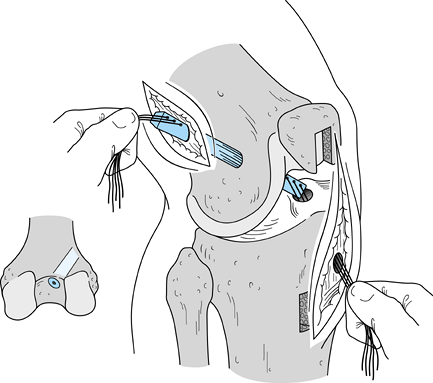

effectively in ACL reconstruction for many years. Numerous methods can
be used to reconstruct the ACL, and the tendons can be folded to
produce double-, triple-, or quadruple-stranded graft constructs.
Various means of fixation are available, such as suture–post fixation,
screws with spiked washers, barbed staple, soft tissue interference
screws (both titanium and bioabsorbable), endoscopically placed
buttons, and cross-pin fixation. Combinations of these techniques are
generally used. Despite the numerous biomechanical studies that have
evaluated these techniques, few studies clinically evaluating these
newer methods exist in the literature. Our current method of hamstring
reconstruction utilizes both semitendinosus and gracilis tendons looped
over a femoral cross-pin (TransFix, Arthrex, Inc., Naples, FL). This
results in four strands of tendon that can be fixed to the tibia with a
combination of sutures tied over a post and a bioabsorbable
interference screw. If sufficient tendon length is present, directly
fix the tendons to the tibia with a screw and spiked washer, and a
bioabsorbable interference screw can be added to provide increased
strength to the construct.
-
In most patients the pes anserine tendons
are palpable over the proximal medial tibial crest. Center a
longitudinal 3- to 4-cm incision three fingerbreadths below the medial
joint line and two fingerbreadths medial to the tibial tubercle. After
incising the skin and gently spreading through the subcutaneous
tissues, bluntly dissect the subcutaneous tissue off the sartorial
fascia as far back as the popliteal space. Identify the gracilis and
semitendinosus tendons as they lie beneath the sartorial fascia. At
their lateral tibial insertions, the two tendons coalesce. Three to
four centimeters medial to the insertion, the tendons are distinct (Fig. 89.35).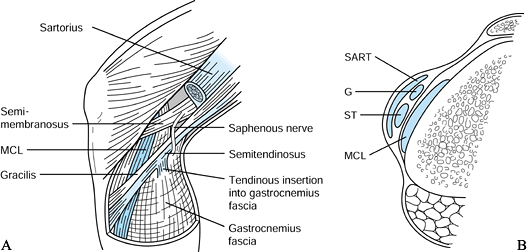 Figure 89.35. A:
The semitendinosus and gracilis tendons lie deep to the sartorial
fascia. The tendons coalesce at their insertions distally and are more
distinct as one palpates posteromedially. The gracilis is proximal to
the semitendinosus, and the saphenous nerve crosses the gracilis at the
posteromedial joint line. A consistent semitendinosus fascial band
arises 7 to 9 cm proximal to the tendon’s tibial insertion and inserts
into the medial gastrocnemius fascia. B: Cross-sectional illustration revealing the relationships of the pes anserine tendons to the medial collateral ligament (MCL). ST, semitendinosus; SART, sartorius; G, gracilis. -
With a #15 scalpel blade, incise the
sartorial fascia overlying the superior and inferior borders of the
gracilis, parallel to the tendon, being careful not to incise too
deeply, or the MCL fibers may be damaged. With a curved or right-angled
clamp, free up the gracilis tendon from the underlying MCL and tibia.
Do the same with the semitendinosus. Passing a Penrose drain around the
tendons often helps with mobilization and retraction. -
Sharply detach the periosteal insertion
of the gracilis from the tibia, taking care to gain the additional 2 cm
the insertion provides. Grasp the end of the tendon with an Allis
clamp. With a #2 Ethibond suture, run a baseball stitch from distal to
proximal for 5 cm up one side of the tendon and then proximal to distal
down the other side of the tendon. Clamp the two suture ends with a
straight clamp. Perform the identical steps for the semitendinosus
tendon, but clamp the sutures with a curved clamp. -
Harvest the gracilis tendon first because
it is easier. With the leg in a figure-4 position, place traction on
the gracilis sutures and palpate around the tendon for fascial slips to
other structures. These need to be removed before tendon stripping.
After this is done, place a closed-ended tendon stripper (Arthrex,
Inc., Naples, FL) around the gracilis and gently advance the stripper
up the leg, parallel to the path of the gracilis. The leg should be in
the figure-4 position to reduce the risk of injury to the saphenous
nerve, which crosses the gracilis at the posteromedial joint line. With
gentle tension on the sutures, advance the stripper up the leg; when it
is fully advanced, slowly increase the tension on the sutures until the
graft releases. Note that the gracilis has muscle on both sides of the
proximal tendon, whereas the semitendinosus has muscle on one side only. -
The semitendinosus has up to four fascial
bands arising from its main tendon, and a consistent slip exists 7 mm
proximal to the tibial insertion, inserting into the medial
gastrocnemius fascia (38,90) (Fig. 89.35A).
By gently tugging on the sutures, one can observe the skin overlying
the popliteal fossa dimpling, indicating that tendinous slips are still
present. The tendon should move freely out of the wound when tugged on
and rebound when tension is released. All slips must be released before
stripping. Place a finger around the tendon and palpate deeply for any
remaining slips. Pass the tendon stripper over the tendon and advance
it proximally and parallel to the tendon’s course. The semimembranosus
fascia envelops the semitendinosus 12 to 15 cm proximal to its
insertion. Take care to advance the stripper into the sling rather than
outside of it, or premature cutting of the tendon will occur (38) (Fig. 89.36).
With the leg in the figure-4 position, gently advance the stripper with
light tension on the sutures to maintain a parallel course. One should
be able to harvest more than 20 cm of tendon, and the stripper should
be advanced as far as possible. When this has been done, stabilize the
stripper and place traction on the sutures, releasing the tendon.![]() Figure 89.36.
Figure 89.36.
Careful attention is essential when passing the tendon stripper over
the semitendinosus tendon. The head of the stripper must pass beneath a
fascial sling of the semimembranosus muscle or premature cutting of the
semitendinosus will occur.

-
At a back table, remove all muscle tissue
from both tendons and trim any fascial slips. Place identical baseball
stitches on the proximal ends of the tendons. Because 20 cm is usually
more than enough tendon length, the thin proximal ends of the tendons
may be trimmed accordingly. Place different clamp types on each
tendon’s sutures to identify later when the tibial side is fixed. Use
an umbilical tape to form a loop around both tendons and pass it
through graft sizers. -
Choose a reamer diameter that is
equivalent to the smallest sizing sleeve that passes over the
four-stranded graft with minimal friction. Make circular marks on the
proximal end of tendons 25 and 30 mm distal to the proximal end of the
loop. A 40-mm-deep femoral socket will be drilled to accommodate the
TransFix tunnel hook, and this line will be viewed arthroscopically.
-
A minimal notchplasty should be used for
visualization purposes only. Steps to prepare the tibial tunnel and
femoral socket are identical to those of the BTB reconstructive
technique described above. -
Ream the tibial tunnel with the
appropriate-sized reamer, and place a diameter-specific over-the-top
drill guide for the femoral socket guide pin placement. The femoral
socket should be reamed to a depth of 40 mm. -
If desired on the tibial side, initial
reaming may be done with a smaller reamer and cannulated dilators used
to expand the size of the tunnels, compressing the cancellous bone to
increase the density. If this is done, the outer cortex must be reamed
with a reamer 1 mm larger than the final tunnel size to prevent dilator
binding.
-
Fit the size-specific tunnel hook onto
the drill guide C-ring at the 90° position and place the hook through
the tibial tunnel into the femoral socket (Fig. 89.37).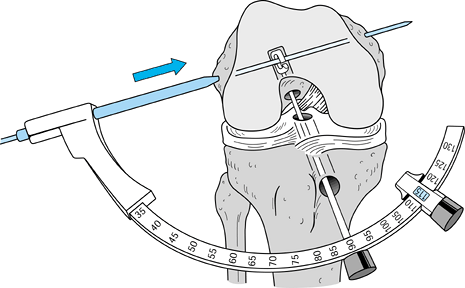 Figure 89.37.
With the drill guide C-ring set at 90° and the tunnel hook placed flush
up the femoral socket, drill a 2.0-mm drill pin through the femoral
condyles. -
Move the guide-pin sleeve down to mark
the skin over the lateral femoral condyle and make an 8-mm incision in
the skin and iliotibial band. -
While maintaining a constant knee flexion
angle, place the guide-pin sleeve against the lateral femoral condyle,
and drill a 2.0-mm guide pin through the femoral condyles and out the
medial skin. -
Remove the C-ring but keep the tunnel
hook up the femoral socket. Overdrill the pin with the 5-mm drill until
the depth stop reaches the lateral femoral cortex, remove the drill,
and place the TransFix dilator over the pin; tamp it down to the cortex
and remove it (Fig. 89.38).![]() Figure 89.38. After drilling the outer femoral cortex with the 5.0 mm drill, dilate the channel for the TransFix implant with the dilator.
Figure 89.38. After drilling the outer femoral cortex with the 5.0 mm drill, dilate the channel for the TransFix implant with the dilator. -
Place the wire loop of the Nitenol
graft-passing wire into the slot on the lateral end of the guide pin
and pull the graft-passing wire through the condyles from lateral to
medial (Fig. 89.39). Equal lengths of wire
should be protruding out both condyles, and both ends should be clamped
with needle holders. The passing wire is now beneath the tunnel hook,
which can be withdrawn out the tibial tunnel.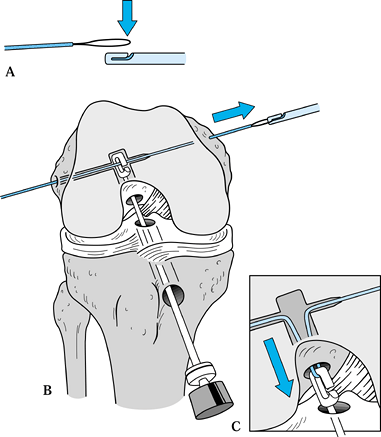 Figure 89.39. Place the looped end of the Nitenol passing wire (A)
into the lateral notched end of the drill pin and pull the passing wire
through the femoral condyles. Withdraw the Nitenol passing wire into
the femoral and tibial tunnels (B) with the tunnel hook to form a loop exiting the tibial tunnel (inset C). -
Disengage the tunnel hook from the
Nitenol graft-passing wire, leaving a wire loop. Be careful not to form
a twist in the wire, or difficulty can be encountered in passing the
graft. -
Pass the tendons through the wire loop so that equal tendon lengths are present distally (Fig. 89.40).
By pulling equal tension on both sides of the graft-passing pin with
the needle holders, pass the graft through the tibial tunnel into the
femoral socket. To ensure that the graft is fully seated in the femoral
socket and that no bends in the wire are present, which could prevent
wire removal after the TransFix implant is placed, slide the passing
wire medially and laterally.![]() Figure 89.40.
Figure 89.40.
Evenly loop the STG tendons around the loop of the passing wire and
slide the tendons into their tunnels by pulling evenly on the medial
and lateral ends of the passing wire. -
Place the implant over the wire until the
lateral threaded head contacts the femoral cortex. Do not apply tension
to the graft sutures. Tamp the implant’s head flush to the cortex with
the impactor (Fig. 89.41).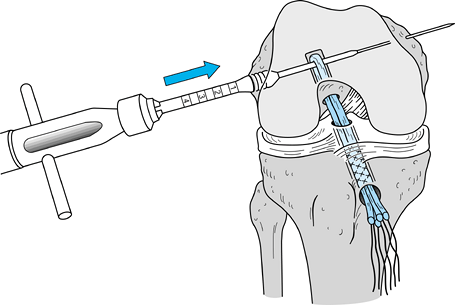 Figure 89.41.
Insert the TransFix implant into its channel over the guide wire and
tamp the implant into place until the depth stop on the impactor
contacts the lateral femoral cortex. -
Confirm proper location of the implant by
firmly pulling on the graft’s sutures, then remove the Nitenol passing
wire. Check for “gross isometry” and cycle the knee several times to
remove creep from the graft construct.

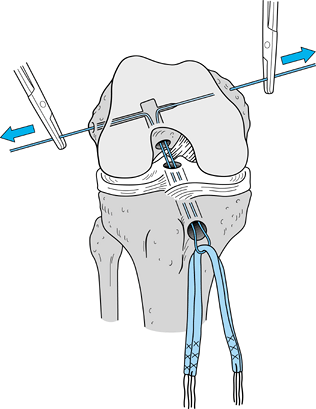
-
If adequate tendon length protrudes out
of the tibial tunnel, we prefer to fix the tibial side with a screw and
spiked washer (Linvatec, Inc., Largo, FL). Prepare a bone bed beneath
the fixation point by roughening the tibial cortex. Drill bicortically
and measure and tap. Add the width of the tendons and 2 mm for the
washer to the measured depth. -
We find placing the screw bicortically
and then backing it out is helpful to ensure both proper length and
accurate screw passage. With the knee in full extension, grasp the
gracilis sutures and semitendinosus sutures separately and place one
end of each tendon around each side of the screw. With firm tension on
all sutures, secure the screw bicortically. -
Should insufficient tendon length
preclude using a screw and spiked washer, we choose to tie the graft’s
sutures over a bicortical post. Tension each tendon separately rather
than as one large group. Because a one-handed
P.2380P.2381
knot-tying
technique is used, make sure to change suture posts while tying to
avoid creating a long slip knot. Secure the screw with a smooth washer
bicortically. Another alternative is to secure the tendons with two
barbed staples in a belt-buckle fashion (Fig. 89.42).![]() Figure 89.42. Anteroposterior (A) and lateral (B)
Figure 89.42. Anteroposterior (A) and lateral (B)
postoperative radiographs of a patient with the TransFix device in
place. The tibial side was fixed with two barbed staples in a
belt-buckle fashion. A bioabsorbable interference screw was also placed
on the tibial side for increased stiffness and less potential creep of
the graft construct. -
Concerns regarding the effect of the fixation point on isometry of grafts and pullout strengths (61,77)
have caused us to supplement the tibial fixation with a bioabsorbable
interference screw made of polylactic acid. Choose a screw diameter
identical to the size of the tibial tunnel and a length that places the
tip of the screw short of the tibial plateau. Fixation closer to the
joint results in a graft construct that is stiffer with less potential
for adverse creep. -
Close the portals and lateral stab wound
with 3-0 Prolene suture. Secure the periosteal flap over the tibial
tunnel with #1 Vicryl suture, and close the skin with 2-0 Vicryl in the
subcutaneous tissue and a running 3-0 Prolene suture subcuticularly.
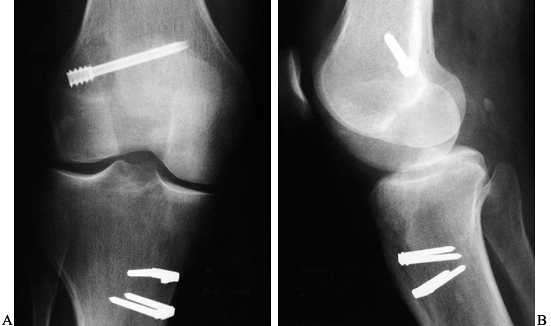
the quadriceps tendon for ACL reconstruction appear in the English
literature, the technique is gaining acceptance as an alternative graft
source (43,113). Its primary benefit is its thickness and subsequent strength (43,51).
its insertion on the patella are worth noting. Unlike the distal pole
of the patella, the proximal pole has a curve in the sagittal plane,
and a central ridge is readily palpable. The cortical bone is thicker
proximally as well. From a point approximately 3 cm proximal to the
patellar insertion, the quadriceps tendon’s rectus femoris and vastus
intermedius portions are inseparable, but farther proximally they can
be parted. The tendon is also not perfectly centered with respect to
the patella. Because the vastus medialis musculature curves laterally,
it is best to harvest the graft slightly to the lateral aspect of the
center of the patella, or deficient tendon may be left medially.
-
Make the incision beginning 4 to 5 cm
proximal to the tip of the patella and end at the proximal pole. Raise
deep flaps to expose the proximal half of the patella and the
quadriceps tendon and note the medial and lateral edges of the tendon. -
Plan for a bone plug that is 10 mm wide
by 20 to 25 mm in length. This length is usually half the total length
of the patella. With a #10 blade, outline the bone block and then make
the medial cut in the quadriceps tendon. The desired depth is 7 mm,
which is conveniently also the width of the #10 blade. -
Because of the central ridge in the
patella, one must be cognizant of underestimating tendon depth where
the tendon inserts. An assistant can spread a curved hemostat between
the edges of the graft and remaining tendon for improved visualization
of graft depth, as one also does not want to penetrate into the
suprapatellar pouch. Should this occur, repair the pouch with 2-0
absorbable suture, or fluid distention will be lost in the knee. Seven
to 9 centimeters of graft length can be harvested. Make a parallel cut
in the lateral side of the
P.2382
tendon of the same length as the medial side for a tendon width of 9 to 10 mm (Fig. 89.43).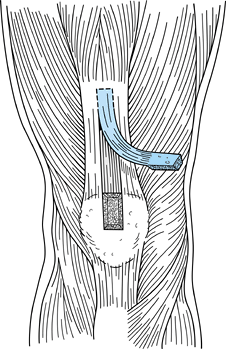 Figure 89.43.
Harvest the central quadriceps tendon graft slightly lateral to the
midline, as the vastus medialis musculature curves laterally. Produce a
bone block 20 to 25 mm in length, 10 mm in width, and 8 mm in depth and
a tendon 7 mm thick, 10 mm wide, and at least 7 cm in length. -
With a #238 oscillating saw blade,
harvest the bone plug, which should be trapezoidal in profile.
Initially score the cortical bone by holding the saw perpendicular to
the patella, then angle in slightly to form the trapezoid. The
cross-cut can be made holding the saw at a 45° angle to the patella
both medially and laterally, and both sides can be completed by placing
the saw blade into both sides, proximal to distal, parallel to the cut
edge. -
Place a ¼-in. osteotome at the proximal
aspect of the bone block, deep to the tendon. Gently tap the osteotome
from proximal to distal to make the floor of the bone plug. Use ½-in.
and ¼-in. curved osteotomes to lift the bone block out gently. The bone
block can then be grasped with a laparotomy sponge, and traction placed
distally to bring the proximal aspect of the graft into the wound. At
least 7 cm of tendon length is desired, and this should be measured
from the proximal edge of the bone block. -
Place distal and anterior traction on the
bone block to separate the graft from the posterior 1 to 2 mm of vastus
intermedius tendon that remains behind. Place the curved hemostat from
lateral to medial between the graft and the underlying vastus
intermedius to facilitate separation of the graft. Use a scalpel or
curved Mayo scissors to divide tendon fibers. Once adequate length is
obtained, place firm traction on the bone block and cut the proximal
end of the graft with curved Mayo scissors.
-
If a “pull-through” technique is being
used, place two drill holes parallel to the cortical surface of the
bone block using a 0.062-in. K-wire. Thread a #5 Ethibond suture into
each hole and secure the ends with a hemostat. -
If a “push-up” technique is used, no
sutures are needed. On the tendon side at a point 1.5 to 2 cm from the
end of the graft, place a #5 Ethibond suture in parallel columns of
Krackow locking whip stitches. -
This is most easily accomplished by doing the following (Fig. 89.44):
Take the midpoint of the suture and place it over the graft, 1.5 to 2
cm from the end of the graft. Bring the needle end through the tendon
from posterior to anterior, proximal (toward the bone block) to the
suture overlying the tendon. Using a free Mayo needle, perform the
identical step with the free end of the suture on the other side of the
graft. Next, bring the needle through the tendon from posterior to
anterior, distal to the first locking stitch, and lock this stitch as
well. Do the same with the free end of suture. Clamp the suture ends
together with a hemostat. Flip the graft over and perform the same
steps with another suture, which results in two #5 Ethibond sutures
with two parallel rows of double Krackow locking sutures, 180° to one
another. One must avoid piercing the first stitch with the second, and
the sutures must be tensioned without any slack.
-
One benefit to the quadriceps tendon is
that notchplasty can be performed while graft harvest takes place.
Perform a notchplasty as outlined above and make a second incision over
the proximal tibia for the tibial tunnel, as is done for the BTB
allograft technique. Both tunnels may be 10 mm in diameter. -
Using either a “push-up” or
“pull-through” technique, seat the bone plug in the femoral socket and
fix the graft with a titanium interference screw 7 mm in diameter and
with a length matching that of the bone plug. -
After cycling the graft several times,
fix the tibial side with the sutures tied over a 4.5-mm bicortical
screw post with a washer, with the knee in full extension. Tie the two
ends of one suture to those of the other suture, ensuring equal tension
on the graft. If desired, the graft construct can be theoretically
strengthened and stiffened by placing a bioabsorbable interference
screw up the tibial tunnel (61). We prefer a
screw made of polylactic acid, 9 mm in diameter and with a 20 to 25 mm
length. The tip of the screw can be placed just below the articular
surface. -
Alternatively, place the tendinous
portion of the graft in the femoral socket and secure it with a
bioabsorbable interference screw. Secure the bony portion of the graft
in the tibial tunnel with a 9 × 20 mm interference screw in a fashion
identical to that described for a bone–patellar tendon–bone graft (see
above).
-
Place bone graft collected during tunnel
preparation in the patellar defect. The remaining tendon edges are not
reapproximated. Palpation of this defect postoperatively reveals that
it “fills in” within 6 weeks. Minimal tenderness is present at the
donor site. -
Close the portals and tibial incision as
described above and reapproximate the proximal wound with interrupted
2-0 Vicryl in the subcutaneous layer and a running subcuticular 3-0
Prolene. Cover with Steri-Strips.
reconstruction coincide with the phases of graft healing and
ligamentization. With a properly placed anatomic graft that employs
modern fixation techniques, the graft–fixation construct is able to
withstand the stresses placed on it by the tailored accelerated
rehabilitation program. The program is not altered if meniscal repair
has been performed, but a period of 3 to 4 weeks of protected
weightbearing is instituted if microfracture arthroplasty or
osteochondral autograft transfer has been done concurrently. We break
down our ACL rehabilitation program into phases, each of which has its
own set of goals, activities, and time course (Table 89.3) (118).
Undoubtedly the most important goal to reach is obtaining full knee
hyperextension, as this may diminish patellofemoral symptoms in the
long term (102,108,109).
Obtaining full flexion, normal patellar mobility, and a normal gait are
other goals that are best achieved within the first few weeks. We
utilize closed kinetic chain knee extension exercises and prone open
kinetic chain knee flexion exercises. When the patient regains
strength, endurance, agility, and confidence in the reconstructed knee,
return to sport can occur. This is generally somewhere between 4 and 6
months.
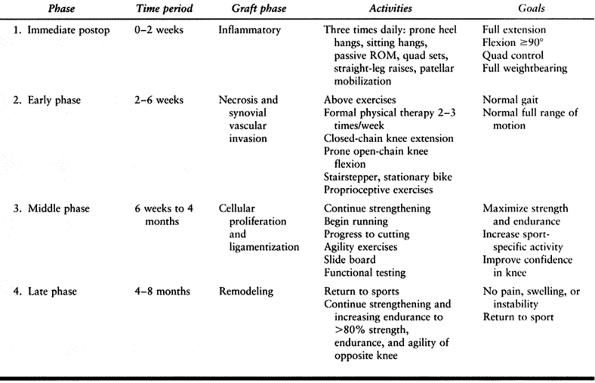 |
|
Table 89.3. Outpatient ACL Surgical Rehabilitation Activities and Goals
|
and third-party payers often do not reimburse for their use, we forgo
the use of continuous passive motion (CPM) machines. Electrical
stimulation is not used either. We do place patients in a postoperative
rehabilitation brace. Patients wear this for 6 weeks and lock it in
extension at night to minimize flexion contracture from intercondylar
notch scar formation. It is taken off for range-of-motion exercises,
and its use during ambulation is to protect the donor site from damage
should a fall occur. When patients have rehabilitated their quadriceps
to the point that it is within 1 cm of the opposite side’s
circumference, they are fitted for a functional brace, which is worn
for a period of 1 year during athletic activities. This is not a
requirement to return to sports, however.
has a prone heel-height difference of 5 cm or greater, an aggressive
program is instituted, which includes the use of an extension board
(Instrument Makar, Inc., Okemos, MI). Problems with flexion may be
aided by a slide board. If the flexion contracture has not been
relieved in 6 weeks, some authors recommend arthroscopic debridement of
intercondylar notch scar formation (63).
neurovascular injury, and thromboembolic disease are extremely rare.
The rate of deep infection is reported at 0.3% (119).
Suspected infections should be treated aggressively with repeated
arthroscopic debridement and irrigation with intravenous antibiotics
for 4 to 6 weeks. If infection cannot be brought under control, the
graft must be removed. Patients can expect loss of motion, but the
exact amount will vary and usually involves loss of flexion.
patient has regained full range of motion before the reconstruction.
Should motion difficulties arise postoperatively, they must be
recognized early and treated aggressively, as described above. One
other area where motion problems may arise is if the graft has not been
placed anatomically. Proper placement of the graft’s tunnels is crucial
to obtaining a successful result and cannot be overemphasized. A tibial
tunnel placed too far anteriorly will restrict extension as it becomes
impinged on by the intercondylar notch. Either the extension loss
persists, causing anterior knee symptoms, or the graft attenuates and
fails (56). A femoral tunnel placed too far anteriorly will also be tight in extension and lead to failure.
an exacting technical procedure such as ACL reconstruction, and most
can be avoided by strict attention to detail and adequate visualization
during the arthroscopic portion of the procedure. Specific pitfalls,
their causes, and methods of correcting the problems are listed in Table 89.4.
 |
|
Table 89.4. Complications and Pitfalls of ACL Reconstruction and Their Solutions
|
One hundred three patients were evaluated. Seventy-four percent had
negative Lachman exams, 24% had grade 1 exams with firm endpoints, and
two patients had grade 2 exams. Ninety percent had negative anterior
drawer exams, with the remainder having grade 1 exams. Ninety-one
percent had negative pivot-shift testing, and 9% had grade 1 pivot
“slides.” The overall mean manual maximum side-to-side difference on
KT-1000 testing was 1.1 mm. Eighty-six patients (83%) had side-to-side
differences less than 3 mm, 14 (14%) had differences between 3 and 5
mm, and only three (3%) patients had differences greater than 5 mm. The
mean Hospital for Special Surgery (HSS) knee score was 90, and the mean
Lysholm score was 89. Preinjury and postoperative Tegner activity
levels were not significantly different. Ninety-five percent indicated
that they would undergo the same procedure if the contralateral knee
were injured similarly. Ninety-three percent were completely or mostly
satisfied with the procedure, 7% were somewhat satisfied, and only one
patient was dissatisfied with the procedure. Five patients (5%)
required reoperation for debridement of fibroproliferative “cyclops”
lesions. A 14% incidence of patellofemoral complaints was present, with
nearly all having minimal or mild complaints.
operated on at our institution with the two-incision BTB technique has
revealed excellent long-term results (11).
Eighty-three percent of the 97 patients had a negative pivot-shift
exam, with the remaining 17% having a grade 1 + “slip.” Seventy percent
had less than 3 mm side-to-side difference on KT-1000 manual maximum
side-to-side testing, and functional testing averaged less than 2%
asymmetry for vertical jump, single-legged hop, and timed 6-m hop.
Tegner activity levels were similar to preinjury levels, the mean
Lysholm score was 87, and the Noyes sports functional score was 89. A
low incidence of patellar pain (13%) on stair climbing was noted, and
no patients exhibited any long-term patellar tendinitis symptoms.
Ninety-seven percent of patients were satisfied with the results
of
the surgical procedure and would have the operation performed if they
tore their contralateral ACL. Most importantly, when compared to an
earlier 2- to 4-year follow-up study in the same cohort of patients,
the results did not deteriorate with time (10).
arthroscopically assisted ACL reconstruction have not demonstrated any
significant differences between the two techniques (49,70,101).
The endoscopic technique is technically more difficult but does result
in less early perioperative morbidity. The two-incision technique,
however, is one with which surgeons who perform ACL surgery should be
familiar, as it is often employed in revision situations and is
invaluable when posterior cortical “blow out” occurs during endoscopic
reaming of the femoral socket.
Differences between the two groups with regard to graft donor site
morbidity become less apparent with longer follow-up, and significant
differences with regard to subjective and objective stability are
rarely found.
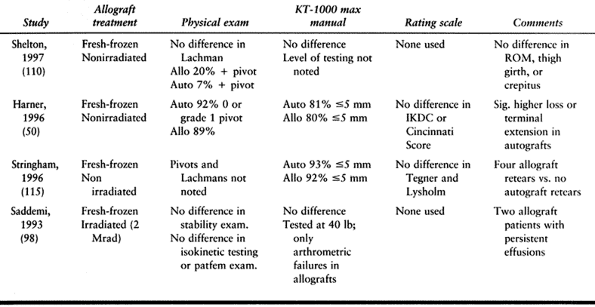 |
|
Table 89.5. Studies with Direct Comparison of BTB Autograft and Allograft
|
similar results in comparison to the BTB technique. Howell et al.
evaluated their results using double-looped STG grafts and found that
10% had positive pivot shifts and that 89% had KT-1000 manual maximum
differences of less than 3 mm (57).
Marder et al. prospectively compared BTB and double-looped STG and
found no significant differences with regard to KT-1000 testing, laxity
examination, subjective complaints, quadriceps strength, or
patellofemoral symptoms (71). The STG patients did have significantly weaker hamstring strength, however.
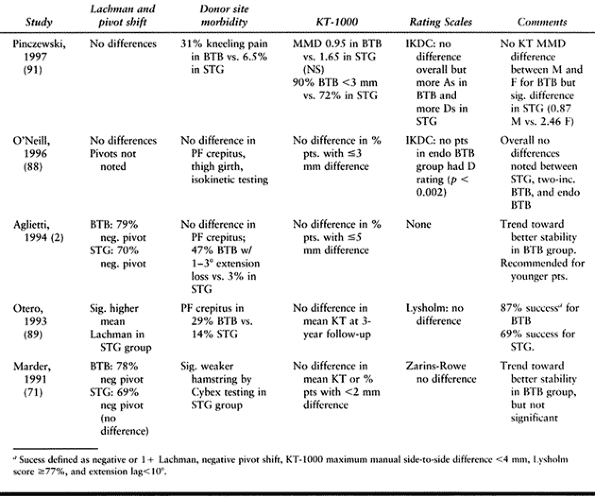 |
|
Table 89.6. Studies with Direct Comparison of BTB and Hamstring Reconstruction
|
No significant differences were noted in arthrometric measurements,
pivot-shift testing, or patellofemoral crepitation. Significantly more
patients returned to sport in the BTB group. More patients in the BTB
group also had minor (<3°) extension loss. The authors concluded
that routine use of BTB as a graft source was justified but that STG is
preferable in older patients, patients with preexisting patellofemoral
disease, and previous BTB harvest.
two-incision BTB and quadruple-stranded STG and also found no
differences in arthrometric measurements or IKDC evaluation (88).
Quadriceps and hamstring strength testing results were similar as well.
No advantages were noted for any of the three reconstructive
techniques. Pivot-shift results were not reported.
improvements in clinical follow-up studies have led to advances in the
treatment of the ACL-deficient patient. Anterior cruciate ligament
reconstruction is effective in restoring anterior stability of the knee
and subsequently protecting the menisci. Studies with longer follow-up
are needed to determine if ACL reconstruction will halt progression to
osteoarthritis in the ACL-deficient patient. Numerous effective methods
are now available for reconstruction. Though each method possesses
inherent strengths and weaknesses, all follow the principles of
anatomic placement of the graft with a fixation construct that can
withstand the stresses of accelerated rehabilitation. This
rehabilitation program is essential in restoring full range of motion
and physiologic hyperextension and in diminishing postoperative
patellofemoral complaints.
scheme: *, classic article; #, review article; !, basic research
article; and +, clinical results/outcome study.
T, Roos H, Lauren M, et al. Magnetic Resonance Imaging, Scintigraphy,
and Arthroscopic Evaluation of Traumatic Hemarthrosis of the Knee. Am J Sports Med 1997;25:231.
P, Buzzi R, Zaccherotti G, DeBiase P. Patellar Tendon versus Doubled
Semitendinosus and Gracilis Tendons for Anterior Cruciate Ligament
Reconstruction. Am J Sports Med 1994;22:211.
C, Odensten M, Gillquist J. Knee Function after Surgical or
Non-surgical Treatment of Acute ACL Tears. A Randomized Study with a
Long-term Follow-up Period. Clin Orthop 1991;264:255.
E, Dick R. Knee Injury Patterns among Men and Women in Collegiate
Basketball and Soccer. NCAA Data and Review of Literature. Am J Sports Med 1995;23:694.
MA, Caspari RB, Bottenfield S. A Review of Allograft Processing and
Sterilization Techniques and Their Role in Transmission of the Human
Immunodeficiency Virus. Am J Sports Med 1993;21:170.
BR, Warren RF, Wickiewicz TL. The Pivot-Shift Phenomenon: Results and
Description of a Modified Clinical Test for Anterior Cruciate Ligament
Insufficiency. Am J Sports Med 1988;16:571.
BR, Jones GT, Sweet FA, et al. Arthroscopy-Assisted Anterior Cruciate
Ligament Reconstruction Using Patellar Tendon Substitution. Two- to
Four-Year Follow-up Results. Am J Sports Med 1994;22:758.
BR, Tradonsky S, Bojchuk J, et al. Arthroscopically Assisted Anterior
Cruciate Ligament Reconstruction Using Patellar Tendon Autograft. Five-
to Nine-Year Follow-up Evaluation. Am J Sports Med 1998;26:20.
BR, Levy ME, Bojchuk J, et al. Single-Incision Endoscopic Anterior
Cruciate Ligament Reconstruction Using Patellar Tendon Autograft.
Minimum Two-Year Follow-up Evaluation. Am J Sports Med 1998;26:30.
RL, Bruckner JD, Kneisl J, et al. The Outcome of Nonoperatively Treated
Complete Tears of the Anterior Cruciate Ligament in Active Young
Adults. Clin Orthop 1990;259:192.
BJ, Cohen SC, Bowen M, et al. Patella Fracture after Anterior Cruciate
Ligament Reconstruction Using Bone Patella Bone Autogenous Grafts. Orthop Trans 1996;20:9.
EE. Technical Note—Management of Patella Fractures Associated with
Central Third Bone–Patella Tendon–Bone Autograft ACL Reconstructions. Arthroscopy 1996;12:756.
JJ, Krinick RM, Sporn AA. Rupture of the Patellar Ligament after Use of
Its Central Third for Anterior Cruciate Ligament Reconstruction. J Bone Joint Surg 1984;66A:1294.
CH, Hecker AT, Hipp JA, et al. The Biomechanics of Interference Screw
Fixation of Patellar Tendon Anterior Cruciate Ligament Grafts. Am J Sports Med 1993;21:880.
CA, Bach BR Jr, Bryan J. Posterior Cortical Violation of the Femoral
Tunnel During Endoscopic Anterior Cruciate Ligament Reconstruction. Am J Knee Surg 1995;8:130.
DNM, Coen M, Neef R, et al. Quadrupled Semitendinosus–Gracilis
Autograft Fixation in the Femoral Tunnel: A Comparison between a Metal
and a Bioabsorbable Interference Screw. Arthroscopy 1998;14:241.
WD Jr, Vittori JM. The Incidence of Healing in Arthroscopic Meniscal
Repairs in Anterior Cruciate Ligament-Reconstructed Knees versus Stable
Knees. Am J Sports Med 1992;20:176.
R, Olsen RE, Larson BJ, et al. Cross-Pin Femoral Fixation: A New
Technique for Hamstring Anterior Cruciate Ligament Reconstruction of
the Knee. Arthroscopy 1998;14:258.
AJ, Sebastianelli WJ, DeHaven KE. Prevention of Arthrofibrosis after
Anterior Cruciate Ligament Reconstruction Using the Central Third
Patellar Tendon Autograft. Am J Sports Med 1995;23:87.
MJ, Roger G, Kujawa P, Anderson I. Regeneration of the Tendons of the
Semitendinosus and Gracilis Following Their Transection for Repair of
the Anterior Cruciate Ligament. Am J Sports Med 1992;20:221.
L, Benum P, Fasting O, et al. A Prospective, Randomized Study of Three
Surgical Techniques for Treatment of Acute Ruptures of the Anterior
Cruciate Ligament. Am J Sports Med 1990;18:585.
JD, Bach BR. Technical Note: Bone Graft Procurement for Patellar Defect
Grafting in Anterior Cruciate Ligament Reconstruction. Arthroscopy 1998;14:543.
BM, Vangsness CT Jr, Lu B, et al. Gamma Irradiation: Effects on
Biomechanical Properties of Human Bone–Patellar Tendon–Bone Allografts.
Am J Sports Med 1995;23:643.
JL, Katz R, Schneider M, et al. Double-Blind Assessment of the Value of
Magnetic Resonance Imaging in the Diagnosis of Anterior Cruciate and
Meniscal Lesions. J Bone Joint Surg 1989;71A:113.
GT, Bach BR Jr. Distal Rupture of the Infrapatellar Tendon after Use of
Its Central Third for Anterior Cruciate Ligament Reconstruction. Case
Report. Am J Knee Surg 1992;5:140.
CD, Olson E, Irrgang J, et al. Allograft versus Autograft Anterior
Cruciate Ligament Reconstruction: 3- to 5-Year Outcome. Clin Orthop 1996;324:134.
NL, Smith DAB, Lamoreaux L, Purnell M. Central Quadriceps Tendon for
Anterior Cruciate Ligament Reconstruction. Part I: Morphometric and
biomechanical evaluation. Am J Sports Med 1997;25:23.
Comparison of Intra-articular Anterior Cruciate Ligament Reconstruction
Using Autogenous Semitendinosus Tendon in Males versus Females. Paper Presented at the Annual Meeting of the American Orthopaedic Society for Sports Medicine, Sun Valley, ID, 1997.
SM, Taylor MA. Brace-free Rehabilitation, with Early Return to
Activities, in Knees Reconstructed with a Double-Looped, Semitendinosus
and Gracilis Graft. J Bone Joint Surg 1996;78A:814.
RE, Mastrangelo J, Freeman JR, et al. The Impact of Surgical Timing on
Postoperative Motion and Stability Following Anterior Cruciate Ligament
Reconstruction. Arthroscopy 1996;12:667.
PA, Linton RC, Huegel M. The Results of Fresh-Frozen Patellar Tendon
Allografts for Chronic Anterior Cruciate Ligament Deficiency of the
Knee. Am J Sports Med 1992;20:118.
Y, Rudy TW, Livesay GA, et al. The Effect of Anterior Cruciate Ligament
Graft Fixation Site at the Tibia on Knee Stability: Evaluation Using a
Robotic Testing System. Arthroscopy 1997;13:177.
DW, Windler GE, Simon TM. Intraarticular Reaction Associated with the
Use of Freeze-Dried Ethylene Oxide-Sterilized Bone–Patellar Tendon–Bone
Allografts in the Reconstruction of the Anterior Cruciate Ligament. Am J Sports Med 1990;18:1.
DW, Schaefer RK. Cyclops Syndrome. Loss of Extension Following
Intra-articular Anterior Cruciate Ligament Reconstruction. Arthroscopy 1990;6:171.
DW, Grood ES, Goldstein JD, et al. A Comparison of Patellar Tendon
Autograft and Allograft Used for Anterior Cruciate Ligament
Reconstruction in the Goat Model. Am J Sports Med 1993;21:176.
GCR, Bickerstaff D, Rae PJ, Paterson RS. The Natural History of
Meniscal Tears in Anterior Cruciate Ligament Insufficiency. Am J Sports Med 1993;21:672.
M, Yoshiya S, Andrish JT. A Biomechanical Comparison of Different
Surgical Techniques of Graft Fixation in Anterior Cruciate Ligament
Reconstruction. Am J Sports Med 1987;15:225.
AB, Johnston RK, Snyder RB, et al. Evaluation of Hamstring Strength
Following Use of Semitendinosus and Gracilis Tendons to Reconstruct the
Anterior Cruciate Ligament. Am J Sports Med 1982;10:340.
RA, Raskind JR, Carrol M. Prospective Evaluation of Arthroscopically
Assisted Anterior Cruciate Ligament Reconstruction. Patellar Tendon
versus Semitendinosus and Gracilis Tendons. Am J Sports Med 1991;19:478.
NG, Webster-Bogaert S, Fowler PJ. Limitation of Motion Following
Anterior Cruciate Ligament Reconstruction: A Case-Control Study. Am J Sports Med 1991;19:620.
CD, Kalman VR, Grawl DM. Definitive Landmarks for Reproducible Tibial
Tunnel Placement in Anterior Cruciate Ligament Reconstruction. Arthroscopy 1995;11:275.
PJ, Wexler GM, Williams JS Jr, et al. Comparison of Screw Post Fixation
and Free Bone Block Interference Fixation for Anterior Cruciate
Ligament Soft Tissue Grafts: Biomechanical Considerations. Arthroscopy 1996;12:470.
FR, Bassett RW, Grood, et al. Arthroscopy in Acute Traumatic
Hemarthrosis of the Knee. Incidence of Anterior Cruciate Ligament Tears
and Other Injuries. J Bone Joint Surg 1980;62A:687.
FR, Mooar PA, Matthews DS, Butler DL. The Symptomatic Anterior
Cruciate-Deficient Knee. Part I: The Long-Term Functional Disability in
Athletically Active Individuals. J Bone Joint Surg 1983;65A:154.
FR, Matthews DS, Mooar PA, Butler DL. The Symptomatic Anterior
Cruciate-Deficient Knee. Part II: The Results of Rehabilitation,
Activity Modification, and Counseling on Functional Disability. J Bone Joint Surg 1983;65A:163.
FR, Butler DL, Grood ES, et al. Biomechanical Analysis of Human
Ligament Grafts Used in Knee-Ligament Repairs and Reconstructions. J Bone Joint Surg 1984;66A:344.
FR, Barber SD. The Effect of an Extra-articular Procedure on Allograft
Reconstructions for Chronic Ruptures of the Anterior Cruciate Ligament.
J Bone Joint Surg 1991;73A:882.
FR, Barber-Westin SD. Anterior Cruciate Ligament Reconstruction with
Autogenous Patellar Tendon Graft in Patients with Articular Cartilage
Damage. Am J Sports Med 1997;25:626.
SJ, Warren RF, Pavlov H, et al. Reconstruction of the Chronically
Insufficient Anterior Cruciate Ligament with the Central Third of the
Patellar Ligament. J Bone Joint Surg 1991;73A:278.
DH, Frank GR, Jeter GL, et al. Repair and Reconstruction of the
Anterior Cruciate Ligament in Dogs. Factors Influencing Long-Term
Results. J Bone Joint Surg 1970;53A:710.
DB. Arthroscopically Assisted Reconstruction of the Anterior Cruciate
Ligament. A Prospective Randomized Analysis of Three Techniques. J Bone Joint Surg 1996;78A:808.
AL, Hutcheson L. A Comparison of the Doubled Semitendinosus/Gracilis
and Central Third of the Patellar Tendon Autografts in Arthroscopic
Anterior Cruciate Ligament Reconstruction. Arthroscopy 1993;9:143.
MJ, Warner JJP, O’Brien SJ, Warren RF. Anatomic Considerations in
Harvesting the Semitendinosus and Gracilis Tendons and a Technique of
Harvest. Am J Sports Med 1993;21:565.
KD, Steadman JR, Briggs KK, Hutton KS. Reconstruction of the Anterior
Cruciate Ligament in Patients Who Are at Least Forty Years Old. A
Long-Term Follow-up and Outcome Study. J Bone Joint Surg 1998;80A:184.
TJ, Feder SM, Butler DL, et al. The Effects of 4 Mrad of Gamma
Irradiation on the Initial Mechanical Properties of Bone–Patellar
Tendon–Bone Grafts. Arthroscopy 1994;10:188.
TD, Franklin JL, Baldwin GN, Nelson KA. Extensor Mechanism Function
after Patellar Tendon Graft Harvest for ACL Reconstruction. Am J Sports Med 1992;20:519.
NJ, Sher D, Rogers GJ, Schindhelm K. Anterior Cruciate Ligament Graft
Fixation. Initial Comparison of Patellar Tendon and Semitendinosus
Autografts in Young Fresh Cadavers. Am J Sports Med 1997;25:472.
SR, Frogameni AD, Fenton PJ, et al. Comparison of Perioperative
Morbidity of Anterior Cruciate Ligament Autografts versus Allografts. Arthroscopy 1993;9:519.
NA, Schwartz RE. Arthroscopically Assisted Reconstruction of the
Anterior Cruciate Ligament: Initial Clinical Experience and Minimal
2-Year Follow-up Comparing Endoscopic Transtibial and Two-Incision
Techniques. Arthroscopy 1997;13:156.
KD, Wilckens JH, Mollabashy A, DeCarlo M. Arthrofibrosis in Acute
Anterior Cruciate Ligament Reconstruction. The Effect of Timing of
Reconstruction and Rehabilitation. Am J Sports Med 1991;19:332.
KD, Nitz PA. The O’Donoghue Triad Revisited. Combined Knee Injuries
Involving Anterior Cruciate and Medial Collateral Ligament Tears. Am J Sports Med 1991;19:474.
KD, Martini DJ, McCarroll JR, VanMeter CD. Correlation of Joint Line
Tenderness and Meniscal Lesions in Patients with Acute Anterior
Cruciate Ligament Tears. Am J Sports Med 1995;23:166.
KD, Klootwyk TE, Wilckens JH, et al. Ligament Stability Two to Six
Years after Anterior Cruciate Ligament Reconstruction with Autogenous
Patellar Tendon Graft and Participation in Accelerated Rehabilitaion
Program. Am J Sports Med 1995;23:575.
KD, Patel DV. Prevention of Complications after Autogenous
Bone–Patellar Tendon–Bone ACL Reconstruction. In: Pritchard DJ, ed. Instructional Course Lectures, Vol. 45. Rosemont, IL: American Academy of Orthopaedic Surgeons, 1996;253.
K, Nakata K, Horibe S, et al. Quantitative Evaluation after
Arthroscopic Anterior Cruciate Ligament Reconstruction. Allograft
versus Autograft. Am J Sports Med 1993;21:609.
ME, Hecker AT, Brown CH, Hayes WC. Anterior Cruciate Ligament Graft
Fixation: Comparison of Hamstring and Patellar Tendon Grafts. Am J Sports Med 1994;22:240.
DR, Pelmas CJ, Burks RT, et al. Comparison of Anterior Cruciate
Ligament Reconstructions Using Patellar Tendon Autograft or Allograft. Arthroscopy 1996;12:414.
SL-Y, Hollis JM, Adams DJ, et al. Tensile Properties of the Human
Femur–Anterior Cruciate Ligament–Tibia Complex. The Effects of Specimen
Age and Orientation. Am J Sports Med 1991;19:217.