
Cole & Sekiya: Surgical Techniques of the Shoulder, Elbow and Knee in Sports Medicine, 1st ed.
Copyright ©
2008 Saunders, An Imprint of Elsevier
CHAPTER 64 – Revision Anterior Cruciate Ligament Reconstruction
Reconstruction of the anterior cruciate ligament (ACL) is one of the most common surgical procedures performed by orthopedic surgeons. More than 100,000 ACL reconstructions are performed annually. Despite its overwhelming success, 10% to 15% of patients may experience a failure of their reconstruction. In the majority of such failures, technical errors can be identified, most frequently femoral tunnel malposition. Some of these patients may require revision surgery for restoration of knee stability.
This chapter discusses the surgical planning and technique of revision ACL reconstruction.
Classification of ACL Failures
Although results of ACL surgery are clearly adversely affected by pain, extensor mechanism dysfunction, and arthrofibrosis, graft failure is the most obvious complication with a negative impact on clinical outcomes. This chapter focuses on graft failure with recurrent symptomatic instability. The mechanism of failure can be difficult to determine. If the failure occurs in the first 6 months, it is most likely due to a technical error, although failure of graft incorporation (especially with allografts), excessive rehabilitation, and premature return to full activities also play a role. On the other hand, failures occurring after 1 year are most likely due to a traumatic event.
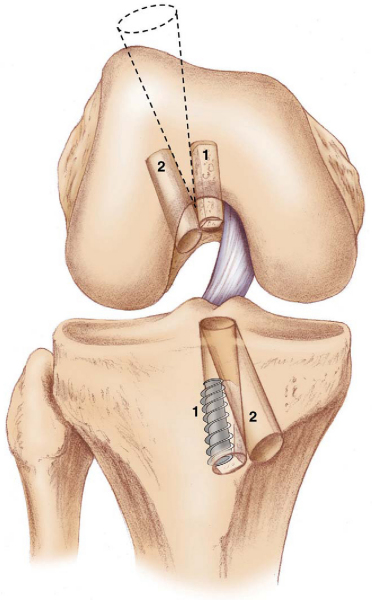
Errors in surgical technique, especially with tunnel positioning, are considered the most common causes of recurrent instability. The typical mistakes seen with tunnel malpositioning have evolved during the early years. The early two-incision arthroscopic procedures were commonly associated with anteriorly placed femoral or tibial tunnels (
Fig. 64-1
); the single-incision endoscopic technique, at least in its early years, was associated mainly with anteriorly placed femoral tunnels. During the past 5 years, the most common patterns of tunnel malpositioning have been a combination of vertically oriented femoral tunnels and posteriorly positioned tibial tunnels (
Fig. 64-2
). Although commercially available femoral aiming devices have resulted in more accurately positioned femoral tunnels in the anteroposterior plane, these tools do not protect against a vertical orientation, which does not adequately restore rotational stability. On clinical examination, patients may demonstrate a normal Lachman test result but have a demonstrable pivot shift phenomenon. This problem of improper femoral tunnel position has led some surgeons to contend either that primary ACL surgery should be performed with a two-incision technique or, more recently, that double-bundle femoral and tibial tunnels be used.
Patients who experience recurrent instability may benefit from a revision reconstruction to stabilize the knee and to restore function. Preoperative data collection and planning are important to ensure the success of the reconstruction. If they are available, previous operative notes, arthroscopic images, and radiographs are reviewed to determine previous surgical tunnels and graft location. In the setting of a previous meniscectomy, staged or concomitant meniscal transplantation may be required.
A thorough physical examination is performed to assess the stability of the knee not only anteriorly but also posteriorly, medially, and laterally. It is critical to exclude a subtle posterolateral or posteromedial laxity that may be contributing to graft attenuation. All test results should be compared with the opposite knee. The affected knee’s range of motion should be recorded. Patellofemoral crepitation and mobility should be assessed. If it is available, a KT-1000 measurement should be performed on both knees.
A staged procedure should be considered in the following circumstances:
| • | Tunnel expansion of more than 1.5 cm | |
| • | Loss of extension of more than 5 degrees | |
| • | Loss of flexion of more than 20 degrees | |
| • | Significant varus or valgus malalignment requiring an osteotomy |
If no previous radiographs are available, we recommend obtaining at least two views to determine tunnel orientation and to help decide whether hardware will need to be removed during revision surgery. Standing radiographs including 45-degree posterior-to-anterior views may also provide important information about tibiofemoral arthrosis. Magnetic resonance imaging can help evaluate concomitant pathologic changes, such as meniscal tears and posterior cruciate ligament (PCL) or posterolateral corner injuries. If there is any suggestion of tunnel widening on conventional radiographs, we routinely obtain a computed tomographic scan to better delineate tunnel expansion.
Several graft options are available for revision ACL reconstruction. Autografts include iliotibial band, hamstring tendon, quadriceps tendon, and patellar tendon from the ipsilateral or contralateral knee. Allograft options include Achilles tendon graft in addition to these grafts. Our preference is to use allograft tissue if a patellar tendon autograft has been harvested previously. Although some surgeons prefer the use of a contralateral patellar tendon graft, we have noted that most patients do not want to have their “normal” knee surgically violated. Although biomechanical characteristics of quadrupled hamstring grafts are more than adequate for revision reconstruction, secure fixation in the often expanded tunnels can be difficult, especially when soft tissue grafts had been used primarily. Patellar tendon allograft provides bone for supplemental grafting, and extra-large bone blocks can be customized to provide improved tunnel fill for primary interference fixation. In our institution, we have historically used nonirradiated patellar tendon allograft for revision cases, with excellent results. In a study by Harner,[4] patients who received allograft tissue had better knee scores as compared with the patients who received autograft tissue. Moreover, Noyes[6] reported 89% good to excellent results with use of allograft tissue.
Indications and Contraindications
Revision ACL reconstruction is indicated after a failed primary reconstruction, defined as a symptomatic, unstable knee that interferes with the activity level desired by the individual patient. Contraindications include significant medical comorbidities and current or recent infection. Uncorrected malalignment, decreased range of motion, and degenerative changes are relative contraindications that can frequently be addressed in staged or concomitant procedures.
Most patients undergo general anesthesia. If the patient’s medical condition does not allow general anesthesia, regional spinal anesthesia can be performed instead. In some cases, a femoral nerve block can be useful in controlling postoperative pain.
Patients are positioned supine on the operating room table. The foot of the bed is flexed all the way down; a tourniquet is applied to the operative leg, which is then secured in a thigh holder. We routinely use the tourniquet only if intraoperative bleeding interferes with visualization. The contralateral leg rests in a leg holder with both hip and knee flexed no more than approximately 60 degrees to prevent traction on the femoral or peroneal nerves. To prevent lumbar spine extension and traction on the femoral nerve, we reflex the operating bed slightly and place it in Trendelenburg position. It is important to be able to position the operative knee in approximately 110 degrees of flexion to allow proper placement of the femoral tunnel and screw if a single-incision endoscopic technique is to be used.
Surgical Landmarks, Incisions, and Portals
| • | Patella | |
| • | Patellar tendon | |
| • | Tibial plateau | |
| • | Fibular head |
| • | Inferomedial portal | |
| • | Inferolateral portal | |
| • | Superomedial outflow portal | |
| • | Accessory portal distal to the standard inferomedial portal for improved placement of the tibial aiming device |
Examination Under Anesthesia and Diagnostic Arthroscopy
A thorough examination under anesthesia is performed to reassess ACL incompetency as well as to rule out any other injuries to the PCL, medial collateral ligament, and posterolateral corner complex.
Subsequently, a systematic diagnostic inspection of the knee is performed. The patellofemoral joint, the medial and lateral compartments and gutters, and the menisci are carefully evaluated. All necessary repairs or débridement is performed before the ACL revision. One should be particularly attentive of partial-thickness meniscal tears, which appear more commonly on the undersurface medially and on the superior surface laterally. Any arthritic changes or articular surface wear should be well documented.
Specific Steps (
Box 64-1
)
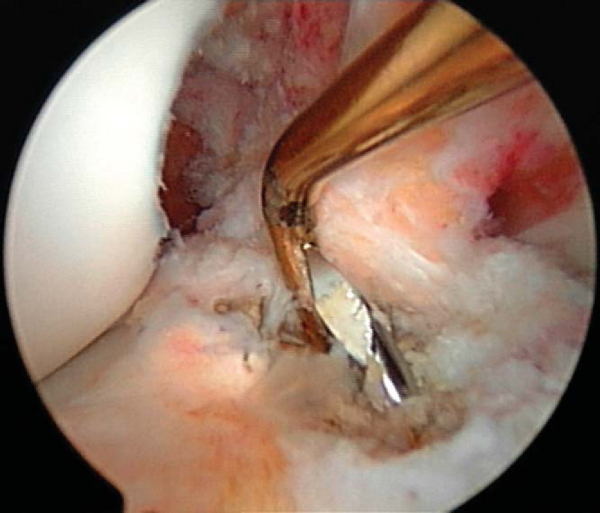
The general principles of ACL reconstruction apply to revision surgery. Before removal of the ACL remnant, inspect the footprints of the torn ACL on both the tibia and femur and mark their location with an arthroscopic electrocautery. With use of a combination of electrocautery, an arthroscopic curet, and a full-radius shaver, the remnant of the ACL is removed from the lateral wall of the notch all the way back to the over-the-top position and from the tibial insertion. If bleeding is encountered, it can be controlled by electrocautery, increase of the inflow pressure, reduction of the systolic pressure, or inflation of the tourniquet.
Intercondylar notch impingement and roof impingement are two common causes of ACL failure. At least 20 mm of notch width is necessary in the midtunnel region to avoid graft impingement. If a notchplasty is necessary, it can be performed with either a quarter-inch osteotome or a spherical bur. Alternatively, a curet can also be used. The notchplasty is performed from anterior to posterior and from apex to inferior. One should avoid elevating the apex of the notch (except if there are apical notch osteophytes) as the patella contacts this region in the extremes of flexion. A rasp can be used to smooth the wall of the intercondylar notch. After the notchplasty is performed, a probe is placed to palpate the over-the-top position. One should be able to hook this area easily with a probe; if the probe slides off the back edge, it is advisable to re-evaluate and to débride this area further.
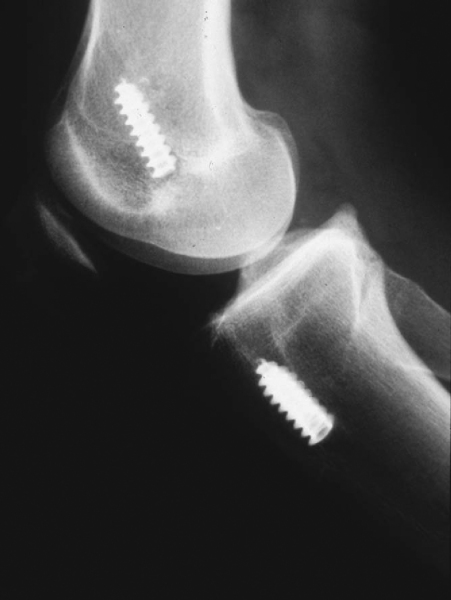
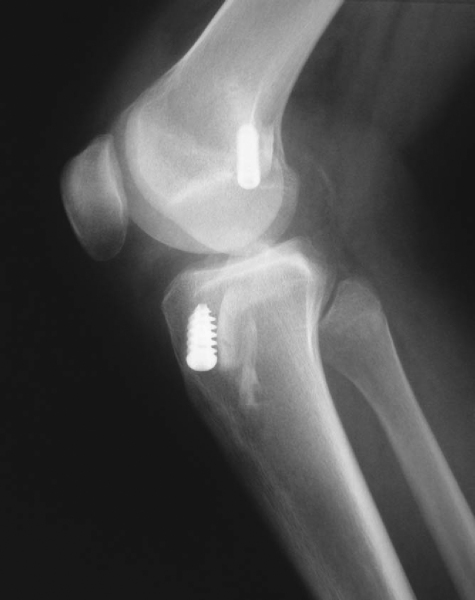
It is critical to consider whether former hardware will require removal or whether it may be bypassed at revision surgery. A variety of interference screws are commercially available with differing morphologic appearances radiographically. Most can be removed with a standard 3.5-mm screwdriver, although a screw manufactured by Instrument Makar (Okemos, Mich) requires a threaded extractor. If previous tunnels are nonanatomic and nonoverlapping, the hardware can generally be left in place (Figs. 64-3 and 64-4 [3] [4]). If the tunnels will overlap, the hardware may require initial removal for the new tunnel to be made, but it may have to be subsequently reinserted to provide construct fixation stability. In our experience, bioabsorbable screws are generally not resorbed at the time of revision surgery and frequently fracture on attempted removal secondary to softening. The surgeon may therefore have to ream through these screws to properly position the new tunnel.
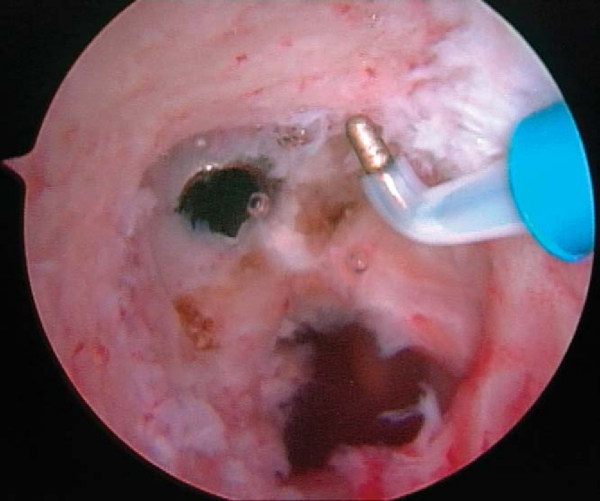
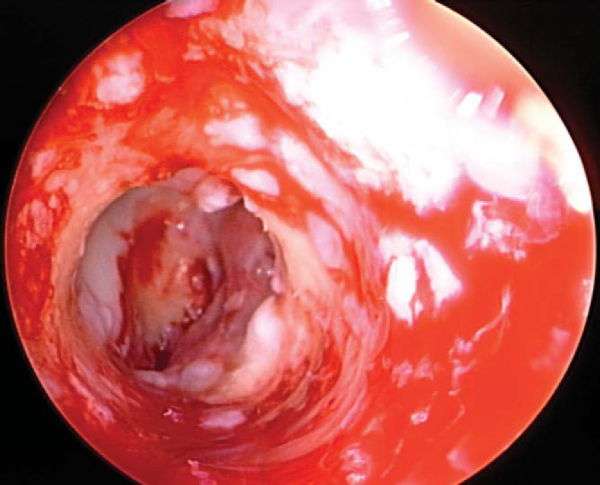
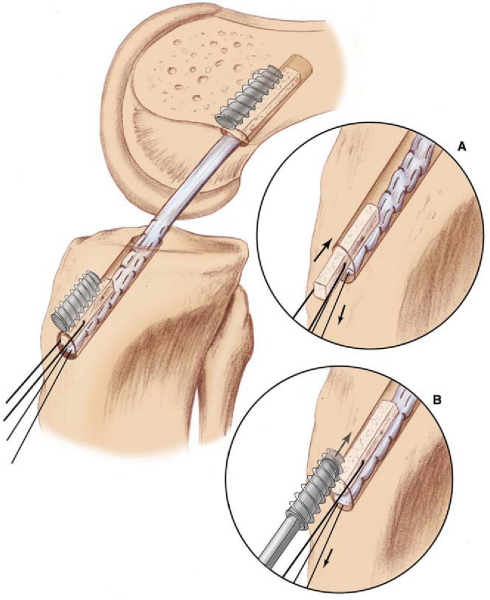
If a metallic screw was used previously for femoral fixation, it may require removal. The surgeon may consider deferment of femoral screw removal until after the new tibial tunnel is made. The bone overgrowth around the screw along with any remaining soft tissue (
Fig. 64-5
) has to be débrided to prevent stripping of the screw. A flexible nitinol pin is placed through the screw, and an appropriate screwdriver is used to remove the old screw. This “technical pearl” may facilitate alignment of the screwdriver more easily within the femoral screw hexagonal recess and reduce the possibility of stripping the screw. If the screw is stripped, commercially available screw extractors may need to be used. Alternatively, when the femoral tunnel is placed too vertically, the screw can be advanced forward and not removed, which creates a medial wall support for the new graft.
If the tibial tunnel is in an acceptable position and a metallic screw was used, it needs to be removed as well. On the other hand, the old screw can be left in place if it is bioabsorbable or if it does not interfere with the new tunnel. It is critical to identify the location of the screw before a cortical window is made. If the screw edge is not easily detectable, the surgeon should consider use of radiographic imaging to minimize cortical violation, which could subsequently compromise tibial bone plug fixation if it is improperly positioned. One technical pearl that we routinely use during primary ACL reconstruction is to cut the tibial bone plug sutures long, leaving a tail that facilitates location of the screw for later removal if it is needed. Because we routinely place our screw on the cortical surface of the bone plug and anterior to the bone plug, these sutures will lead us to the tunnel, which frequently has been covered with new bone formation.
There are several commercially available revision screwdriver sets. They generally include reverse extractors and a variety of different-sized screwdrivers. It is critically important to be prepared for unforeseen events regarding hardware removal.
The previous tibial incision is used when possible, and it can be extended proximally or distally if necessary. A medially based rectangular periosteal flap is developed medial to the tibial tubercle and proximal to the pes. A tibial aiming device is placed through an accessory inferomedial or transpatellar portal with the angle set between 50 and 55 degrees. The higher the angle, the longer the tibial tunnel. The entry point of the guide pin should be at least 25 mm below the joint line. We choose the angle of entry by the N + 10 rule, where N is the length of the soft tissue component of the graft. For example, if the length of the soft tissue of the graft is 40 mm, the angle of entry should be 40 + 10 = 50 degrees. A technical pearl is to establish an accessory inferomedial portal or transpatellar portal that facilitates proper orientation of the tibial aiming device. In the endoscopic technique, the position of the femoral tunnel is affected by the orientation of the tibial tunnel if it is drilled in a transtibial fashion. If this tunnel is angled too close to the sagittal plane, the resultant femoral tunnel is likely to be positioned too vertically (
Fig. 64-6
). An entrance point on the tibial cortex midway between the tibial tubercle and the posteromedial border of the tibia will allow proper tunnel orientation.
Intra-articularly, tibial tunnel orientation aims to avoid intercondylar notch impingement. In general, two types of aiming devices are available. One device creates a “point-to-point” placement of the preliminary drill pin; the other type of aimer drills the pin to the “elbow” of the aiming device (
Fig. 64-7
). As a general reference point, the pin entry should be at the level of the posterior edge of the anterior horn of the lateral meniscus. Alternatively, some surgeons advocate an entrance point 7 mm anterior to the PCL. In the coronal plane, the device is placed in a central location to allow clearance of the graft between the PCL and notch wall. The knee should be extended to visualize the placement of the tibial pin, which should not impinge on the apex of the intercondylar notch with the knee in full extension. The pin will frequently be unstable and visibly mobile within the previous tibial tunnel and will therefore need to be stabilized before overreaming. After correct pin placement has been verified, the guide pin is tapped into the femoral roof to improve stability during reaming. It can also be further secured with a hemostat or Kocher clamp (
Fig. 64-8
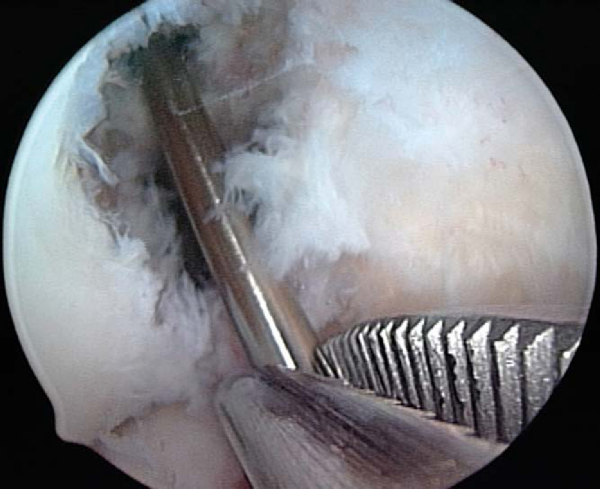
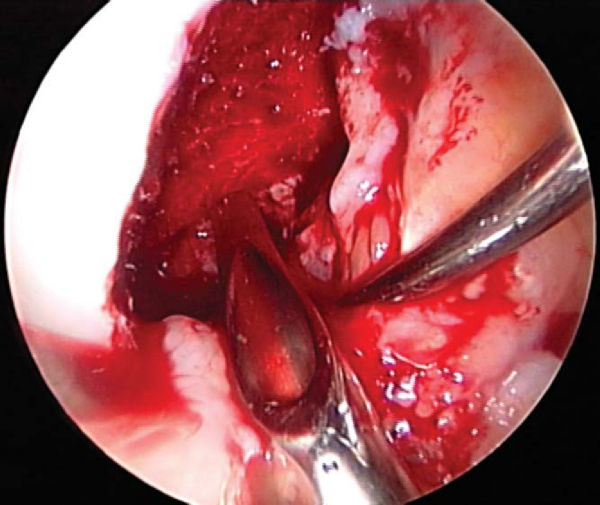
). A cannulated acorn or solid fluted reamer is used to make the new tibial tunnel. A 10- or 11-mm reamer is generally used. If tunnel widening is suspected, some surgeons recommend use of a smaller reamer first, then placement of the arthroscope through the tunnel to examine the quality of the tunnel before it is sequentially enlarged to the desired width. Once the tunnel is made, the arthroscope can be passed up the tibial tunnel to assess for residual soft tissue (
Fig. 64-9
), which can then be débrided with a shaver or rasp.
|
|
|
|
Figure 64-7 |
|
|
|
|
Figure 64-8 |
The ideal location for the femoral tunnel is in the 1-o’clock (left knees) or 11-o’clock (right knees) position with 1 to 2 mm of intact posterior wall. Careful inspection of the previous tunnel is performed; if it is in the correct location, it can be reused. However, if it is positioned too anterior, a new tunnel is drilled behind it (see
Fig. 64-3A
). In this case, we recommend keeping the old hardware in place to act as an anterior buttress. On occasion, a deficient posterior wall precludes interference screw fixation with the endoscopic technique, in which case a two-incision technique can be used to secure the ACL on the anterior femur instead.
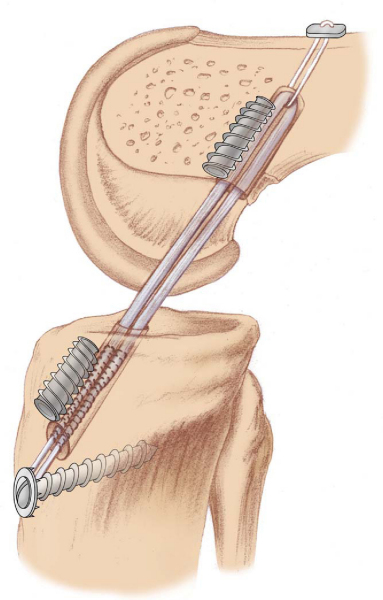
We generally use a 7-mm offset guide, which is placed transtibially and therefore is sensitive to correct tibial tunnel orientation (
Fig. 64-10
). If an ideal femoral starting point cannot be achieved with this technique, the femoral tunnel should instead be drilled by use of an accessory inferomedial portal and hyperflexion of the knee to 130 degrees. A provisional guide pin is then drilled to a depth of approximately 3 to 4 cm. The surgeon may feel more resistance as this pin is drilled if it contacts the cortical bone plug from the previous reconstruction.
With a probe used to retract and to protect the PCL, reaming is performed initially to a depth of 6 to 8 mm to make the footprint. The reamer is withdrawn to allow visualization of the preliminary starting point, and a probe is used to verify the integrity of the posterior wall. A 10-mm reamer is routinely used, although one could begin with a smaller-diameter reamer (e.g., 8 mm) and then convert to the 10-mm reamer. The reamer is usually advanced to a 35-mm depth as a 25-mm bone plug is generally prepared on the graft. This allows for some space to potentially recess the graft if there is a graft-tunnel mismatch. As the reamer is advanced, the surgeon may feel more resistance than in a primary procedure in case of a previously placed cortical bone plug. Once reaming is completed, cancellous bone debris is removed with the shaver. A rasp or a shaver is used to smooth the anterior ledge of the femoral tunnel. The arthroscope is placed transtibially to inspect the femoral tunnel and to rule out posterior wall insufficiency or intratunnel “blowout.” An intratunnel blowout could occur if the knee is extended too much during femoral reaming. In general, the knee should be in 70 to 80 degrees of knee flexion to position the femoral aimer. If the knee has to be extended farther to position the femoral aimer, the tibial tunnel may have been placed too far anteriorly, or a posterior ledge at the tibial tunnel entrance may be pushing the aimer anteriorly.
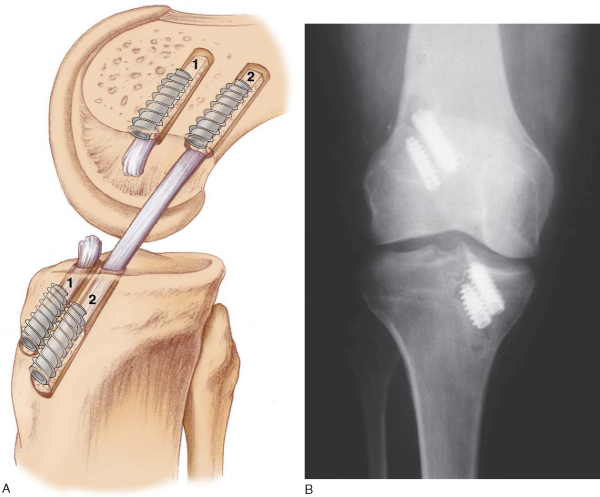
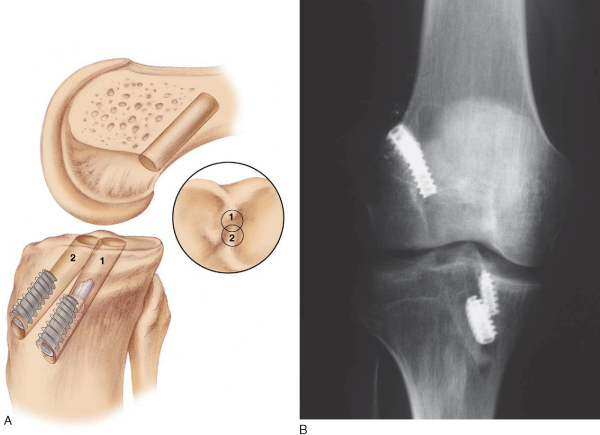
6. Bone Grafting Procedures for Tunnel Widening
After preparation of both tibial and femoral tunnels, bone grafting may be performed in either a concomitant or staged fashion to address overlapping or widened tunnels (
Fig. 64-11
). Graft choices include autograft and, more commonly, allograft to avoid the morbidity associated with iliac crest graft harvesting. Allograft bone chips or struts and bone left over from preparation of the tendon graft are commonly used. In the case of overlapping tibial tunnels, either bone graft or a larger tibial bone plug can be used to fill the defect and still allow interference screw fixation. Similarly, if the old and new femoral tunnels overlap, bone graft can be used to fill the defect left by the previous tunnel. To minimize extravasation of bone graft material into the joint, we found it helpful to use a clear shoulder-arthroscopy cannula or, alternatively, a 3-mL syringe with the front end cut off. The syringe is filled with morcellized bone graft, introduced through a slightly enlarged arthroscopy portal, and directed into the defect, and the bone graft is delivered by advancing the plunger. Other options include placing cortical allograft “matchsticks” into the defect and leaving the graft bone plugs sufficiently large to fill the tunnel defects. Alternatively, screws may be “stacked” to enhance bone plug fixation in overlapping or widened tunnels. Supplemental fixation (EndoButton, staples, post, suture button) on both the femoral and tibial sides should be strongly considered whenever secure graft fixation may be compromised by enlarged or bone grafted tunnels.
|
|
|
|
Figure 64-11 |
If bone stock is severely compromised because of extensive tunnel widening, primary bone grafting is advisable. All hardware is removed, and both tibial and femoral tunnels are filled with morcellized bone graft. After 4 months, the patient returns for staged ligament reconstruction.
7. Graft Preparation and Placement
In revision cases, it may be advisable to defer graft preparation until the tunnels are made. This optimizes the potential of making custom-sized bone plugs if needed in situations in which there may be tunnel expansion or overlap. However, if one makes tunnels without knowing the length of the soft tissue construct, the likelihood of graft-construct mismatch may be increased. As a generalization, if the osseous tunnels do not appear expanded, we will make our tunnels while the graft is being prepared. An advantage of a patellar tendon allograft is that there is additional bone that can be used for grafting if necessary.
The bone plugs are shaped, contoured, and sized to fit 10-mm sizing tubes. The femoral plug bone-tendon interface is marked with a sterile marking pen. This helps determine the depth of entry of the plug in the femoral tunnel. Two or three 2-mm holes are drilled through the tibial plug, and No. 5 braided sutures are placed through them. Some surgeons prefer to do the same for the femoral plug; however, we prefer the “push-in” technique instead. In this method, the femoral bone plug is initially oriented with the cancellous bone facing anteriorly and the tendon facing posteriorly. The plug is pushed through the tibial tunnel by a two-pronged pusher (
Fig. 64-12
). Once it is inside the joint, a small curved hemostat is used to grasp the bone plug in its midportion and to guide the plug into the femoral tunnel. Once the plug is almost seated, the tibial plug is inspected with respect to the tibial tunnel to assess for graft-tunnel mismatch. Before seating of the bone plug is completed, a 14-inch hyperflex nitinol pin is inserted at the 11- to 12-o’clock position of the femoral tunnel, the knee is further flexed, and the pin is advanced until it meets resistance within the depth of the socket. At this point, the bone plug can be advanced until it is flush with the articular margin, and the construct is assessed again for mismatch. If the tibial bone plug resides within the tibial tunnel, one can continue with standard femoral and tibial fixation.
However, if the graft protrudes significantly because of graft-tunnel mismatch, potentially compromising tibial fixation, several treatment options exist: further recessing of the graft into the femoral tunnel; use of staple fixation or screw-post fixation on the tibial side; rotation of the graft up to 540 degrees, which can shorten the graft by up to 6 mm; performance of a free bone block modification (
Fig. 64-13
); and combination of these modifications (e.g., recession of the femoral bone plug and rotation of the graft). The disadvantage of recessing the graft is that there is an increased chance of tendon laceration during femoral bone plug fixation; staple or screw-post fixation has a lower strength of fixation and increased likelihood of painful hardware. Graft rotation is controversial; although the ultimate failure strength in vitro is similar to that of a nonrotated graft, cyclic loading studies suggest that the graft may be negatively affected with hyperrotation. Our general preference with more than 50% bone plug extrusion on the tibia is to remove the graft, to excise the tibial bone plug (thus making a “pseudo–quad tendon” graft), and to reinsert the graft with standard femoral fixation followed by tibial fixation by insertion of the “free” bone block into the tibial tunnel and sandwiching the plug with an interference screw. This can be supplemented by a whipstitch through the tendinous portion of the graft, which is then tied over a tibial staple or post.
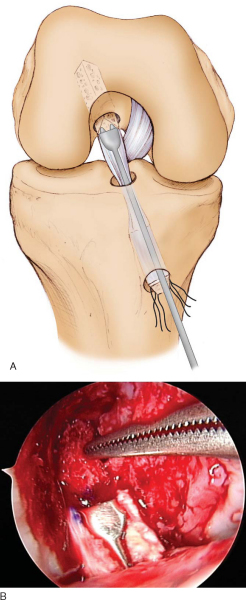
Once the femoral bone plug has been positioned and the hyperflex nitinol pin inserted, a 7- × 25-mm metallic cannulated interference screw is placed over the wire and advanced into the femoral tunnel. It is critical to flex the knee at least 100 degrees to ensure parallel screw placement. One should carefully inspect the graft as the screw is inserted to avoid graft laceration. Ideally, we attempt to place the screw anterior on the plug; the plug can effectively function as a skid, allowing parallel placement of the screw. If the screw is placed on the side of the plug, the likelihood of screw divergence is increased.
The knee is cycled several times and isometry is inspected. In general, the graft should shorten only 1 to 2 mm in the terminal 30 degrees of extension. The graft is rotated 180 degrees so that the screw is placed against cortical rather than cancellous bone, since cortical fixation is preferable to cancellous apposition of the interference screw.[9] The interference screw is placed anterior to the graft with a cannulated metallic screw (9 × 20 mm). In addition, the screw pushes the graft farther posterior so that it is less likely to impinge in extension. Posteriorly placed screws carry a higher risk of screw divergence. Finally, if the screw is placed anteriorly, one can extend beyond the tendo-osseous junction without the screw’s violating the soft tissue aspect of the graft, whereas if the screw is placed posteriorly, the screw tip could abrade the soft tissue. If the bone is osteopenic, one should consider supplemental fixation (
Fig. 64-14
). If any excess bone is protruding after placement of the tibial screw, it is cut flush with the tibia by use of a bur or a saw. In situations in which the bone plug is recessed within the tibia, we will use a longer interference screw to avoid burying the screw intraosseously. If a soft tissue graft, such as an Achilles allograft, is used on the tibial side, the size of the screw should be equal to or slightly larger than the tunnel width. Alternatively, other devices, such as a Richards staple, can be used to secure the soft tissue graft.
Once the graft is secured, it is critical to confirm the integrity of the construct fixation. The knee is multiply cycled and serially examined to confirm that Lachman and pivot shift test results are normal.
The portal sites along with the joint are injected with 0.5% bupivacaine (Marcaine). The portal sites are closed with simple 3-0 Prolene sutures. The periosteal flap is approximated with No. 1 Vicryl sutures. The subcutaneous layer is closed with 2-0 Vicryl, and the skin is closed with a running 3-0 Prolene suture.
| PEARLS AND PITFALLS | ||||||||||||||||||||||||||||||||||||
|
In most cases, the patients are allowed to progress to full weight bearing with the knee locked in extension in the brace. If secure fixation is achieved on both sides of the graft, rehabilitation follows the same protocol as for a primary ACL reconstruction.
Straight-leg raises and quadriceps sets are initiated immediately after surgery. Crutches are generally used for the first 2 weeks, and physical therapy initially concentrates on achievement of full extension and progressive flexion. Full flexion should be reached within 6 weeks. Bicycling (stationary) can be started 1 week after surgery, StairMaster-type exercises at 4 to 6 weeks, and light jogging without cutting or pivoting in 12 weeks. Gradual return to full activities is achieved 6 months after surgery.
Complications of revision ACL surgery are similar to those seen in primary ACL reconstruction. They include infection, arthrofibrosis, neurovascular injury, and failure of the revision graft to be incorporated or macrotraumatic retear.
Most studies have demonstrated good results with revision ACL reconstruction, which, however, are inferior to those of primary reconstructions (
Table 64-1
). These findings stress that revision ACL reconstruction should be considered a salvage procedure, and patients should be carefully counseled about their expectations before the revision is performed.
| Author | Followup | Outcome | Notes |
|---|---|---|---|
| Fox et al[3] (2004) | 32 patients for 4.8 years | 87% had grade 0/1+ Lachman and 0/1+ pivot shift test results | With nonirradiated fresh-frozen bone–patellar tendon–bone allograft |
| 84% of patients had side-to-side difference of 3 mm or less on KT-1000 testing | |||
| 87% of patients were satisfied with their surgery | |||
| O’Neill[8] (2004) | 48 patients for 90 months | 73% of patients had normal or nearly normal evaluation by IKDC scale | With previously unharvested autograft |
| 67% of patients had KT-2000 side-to-side difference of 3 mm or less | |||
| 21% of patients had KT-2000 side-to-side difference of 3 to 5 mm | |||
| 6% failure | |||
| Siebold et al[10] (2002) | 38 months | 67% normal IKDC score | With allograft |
| 2.3-mm side-to-side difference on KT-1000 testing | |||
| 15% failure | |||
| Labs et al[5] (2002) | 82 patients for 35 months | Tegner score improved from 2.4 to 4.6 | |
| Lysholm score improved from 54 to 76 | |||
| Texier et al[11] (2001) | 32 patients for 48 months | 18 of 23 athletes returned to their sports | |
| Residual laxity in 3 of 32 patients | |||
| Colosimo et al[1] (2001) | 13 patients for 39 months | 11 of 13 had good to excellent results | With reharvested ipsilateral patellar tendon |
| 1.9-mm side-to-side difference on KT-1000 testing | |||
| No patients had loss of range of motion | |||
| One patient with moderate patellofemoral problems | |||
| Noyes and Barber-Westin[7] (2001) | 54 patients for at least 24 months | Significant improvement in pain, activities of daily living, sports participation, satisfaction | With bone–patellar tendon–bone autograft |
| 60% of revisions were fully functional, 16% were partially functional, and 24% failed | |||
| Woods et al[12] (2001) | 10 patients for 42.9 months | 2.4-mm side-to-side difference on KT-1000 testing | With lateral third of ipsilateral patellar tendon after failure of central third |
| All had a negative pivot shift result | |||
| All returned to previous activities | |||
| Extension within 5 degrees and flexion within 15 degrees of contralateral side | |||
| Eberhardt et al[2] (2000) | 44 patients for 41.2 months | 3.5-mm side-to-side difference on KT-1000 testing | With bone–patellar tendon–bone autograft |
| 75% rated knee as normal or nearly normal |
1.
Colosimo AJ, Heidt Jr RS, Traub JA, Carlonas RL: Revision anterior cruciate ligament reconstruction with a reharvested ipsilateral patellar tendon.
Am J Sports Med 2001; 29:746-750.
2.
Eberhardt C, Kurth AH, Hailer N, Jager A: Revision ACL reconstruction using autogenous patellar tendon graft.
Knee Surg Sports Traumatol Arthrosc 2000; 8:290-295.
3.
Fox JA, Pierce M, Bojchuk J, et al: Revision anterior cruciate ligament reconstruction with nonirradiated fresh-frozen patellar tendon allograft.
Arthroscopy 2004; 20:787-794.
4.
Harner CD, Olson E, Irrgang JJ, et al: Allograft versus autograft anterior cruciate ligament reconstruction: 3- to 5-year outcome.
Clin Orthop 1996; 324:134-144.
5.
Labs K, Hasart O, Perka C: Results after anterior cruciate ligament revision surgery.
Zentralbl Chir 2002; 127:861-867.
6.
Noyes FR, Barber-Westin SD, Butler DL, Wilkins RM: The role of allografts in repair and reconstruction of knee joint ligaments and menisci.
Instr Course Lect 1998; 47:379-396.
7.
Noyes FR, Barber-Westin SD: Revision anterior cruciate surgery with use of bone–patellar tendon–bone autogenous grafts.
J Bone Joint Surg Am 2001; 83:1131-1143.
8.
O’Neill DB: Revision arthroscopically assisted anterior cruciate ligament reconstruction with previously unharvested ipsilateral autografts.
Am J Sports Med 2004; 32:1833-1841.
9.
Rupp S, Seil R, Krauss PW, Kohn DM: Cortical versus cancellous interference fixation for bone–patellar tendon–bone grafts.
Arthroscopy 1998; 14:484-488.
10.
Siebold R, Buelow JU, Boes L, Ellermann A: Primary and revision reconstruction of the anterior cruciate ligament with allografts: a retrospective study including 325 patients.
Zentralbl Chir 2002; 127:850-854.
11.
Texier A, Hulet C, Acquitter Y, et al: Arthroscopy-assisted revision in failed reconstruction of anterior cruciate ligament: 32 cases.
Rev Chir Orthop Reparatrice Appar Mot 2001; 87:653-660.
12.
Woods GW, Fincher AL, O’Connor DP, Bacon SA: Revision anterior cruciate ligament reconstruction using the lateral third of the ipsilateral patellar tendon after failure of a central third graft: a preliminary report on 10 patients.
Am J Knee Surg 2001; 14:23-31.