
Cole & Sekiya: Surgical Techniques of the Shoulder, Elbow and Knee in Sports Medicine, 1st ed.
Copyright ©
2008 Saunders, An Imprint of Elsevier
CHAPTER 28 – Anatomic Acromioclavicular Joint Reconstruction
Augustus D. Mazzocca, MS, MD
Acromioclavicular joint separation represents one of the most common shoulder injuries in general orthopedic practice. The most common mechanism of this injury is a fall with a direct force to the lateral aspect of the shoulder and with the arm in an abducted position. Depending on the magnitude of injury to the acromioclavicular joint capsule and ligaments as well as to the coracoclavicular ligaments, these injuries can be classified by increasing severity as type I through type VI. Typically, the first- and second-degree sprains of the acromioclavicular joint, otherwise known as type I and type II injuries, are treated conservatively; most return to preinjury status. Whereas the treatment of type III dislocations remains controversial, high-grade injuries—typically types IV, V, and VI—with greater than 100% displacement in either a posterior or inferior direction are typically treated surgically.
The literature is replete with surgical techniques to address complete acromioclavicular dislocations, including primary repair of the coracoclavicular ligaments, augmentation with autogenous tissue (coracoacromial ligament), augmentation with absorbable and nonabsorbable suture as well as with prosthetic material, and coracoclavicular stabilization with metallic screws. The Weaver-Dunn technique with transfer of the coracoacromial ligament has been the most popular procedure in the acute and chronic injury. Several more recent reports have described good results with modifications of the Weaver-Dunn technique. However, studies observed compromised results in patients who had residual subluxation or dislocation after surgery.
From a biomechanical perspective, the importance of the coracoclavicular ligaments and acromioclavicular ligaments in controlling superior and horizontal translation of the distal clavicle has been elucidated. In fact, failure to surgically reproduce the conoid, trapezoid, and acromioclavicular ligament function with current techniques may explain the observed incidence of recurrent instability and pain.
I advocate use of a separate, more robust graft source, rather than the coracoacromial ligament, to improve surgical results. The use of a free autogenous or allograft tendon has been further supported in our biomechanics laboratory.
The pain associated with acromioclavicular joint injury may be difficult to localize because of the complex sensory innervation of the joint. An acute injury as described before is an important indicator in the diagnosis. Conversely, the lack of a discrete injury with acromioclavicular joint pain and joint separation is more consistent with a degenerative condition. Given an acute injury, it is important to obtain the level of perceived pain, its location, and any history of previous shoulder injuries. During examination, the patient should be upright so that the weight of the arm helps exaggerate any deformities.
Acromioclavicular joint examination
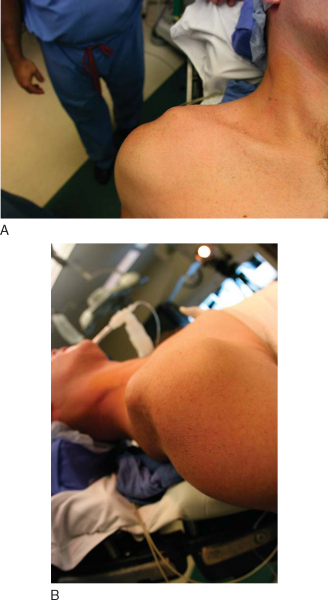
| • | Inspection ( Fig. 28-1 ) |
|
| • | Tenderness to palpation | |
| • | Anterior-posterior translation or mobility | |
| • | Superior-inferior translation or mobility | |
| • | Reduction of the distal clavicle with shoulder shrug differentiates type III from type V (distal clavicle buttonhole through deltotrapezial fascia) |
| • | Arm positioning limitation | |
| • | Inability to lift arm | |
| • | Pain with forward elevation and wing out |
Strength testing
Other causes of pain must be ruled out:
| • | Cervical spine disease: trapezial spasm | |
| • | Thoracic outlet syndrome | |
| • | Scapular dyskinesis | |
| • | Hyperlaxity | |
| • | Coracoid fracture |
Factors Affecting Surgical Planning
| • | Prior surgeries, incisions |
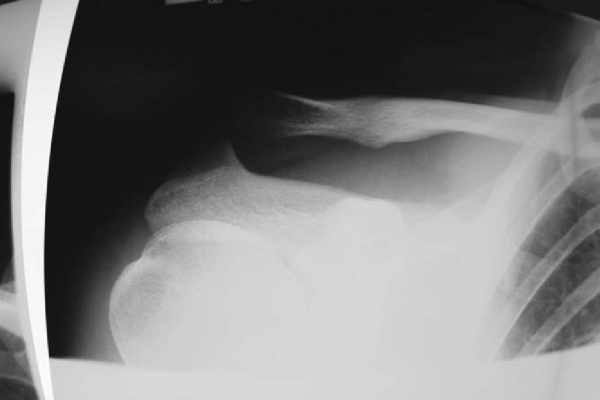
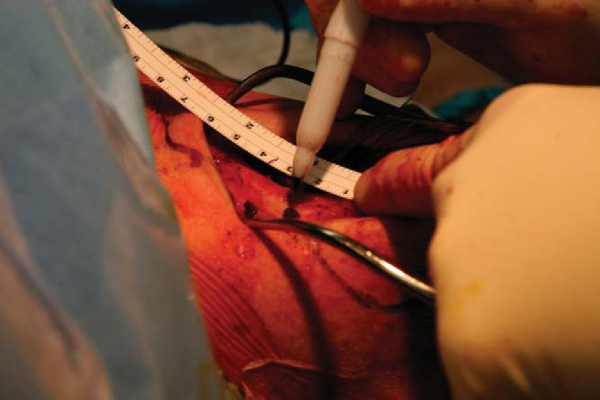
| • | Zanca view: 10- to 15-degree cephalad tilt ( Fig. 28-2 ) |
|
| • | Axillary, outlet, and anteroposterior views of the shoulder in the scapular plane | |
| • | Cross-arm adduction view: anteroposterior shoulder—measure clavicle override | |
| • | Magnetic resonance imaging: labral injury masquerading as acromioclavicular joint pain | |
| • | Computed tomographic scan: nondisplaced lateral clavicle or acromion fracture |
| • | Advocate reconstruction even for symptomatic type III injuries in laborers, throwers, and overhead athletes | |
| • | Instability after distal clavicle excision | |
| • | No absolute indications |
Reconstruction is contraindicated in painless, functional grade III separation and with regional pain syndrome, unclear diagnosis, adhesive capsulitis, and other shoulder problems.
| • | Semitendinosus allograft or autograft | |
| • | Reasonable expectations of the patient and compliance with postoperative regimen | |
| • | Postoperative sling immobilization for 6 weeks |
The patient is placed in the beach chair position after induction of general anesthesia. Be sure the head is mobile for possible repositioning. A small towel bump is placed on the medial scapular edge to elevate the coracoid anterior. Drape wide to expose the sternoclavicular joint and posterior clavicle. The arm is draped free.
Surgical Landmarks and Portals
| • | Clavicle | |
| • | Acromion | |
| • | Coracoid process |
| • | Scope first | |
| • | Standard posterior arthroscopy port | |
| • | Anterior rotator interval port |
| • | Evaluate anterior-posterior translation as well as superior-inferior translation of the distal clavicle. | |
| • | Evaluate glenohumeral range of motion and stability. |
Specific Steps (
Box 28-1
)
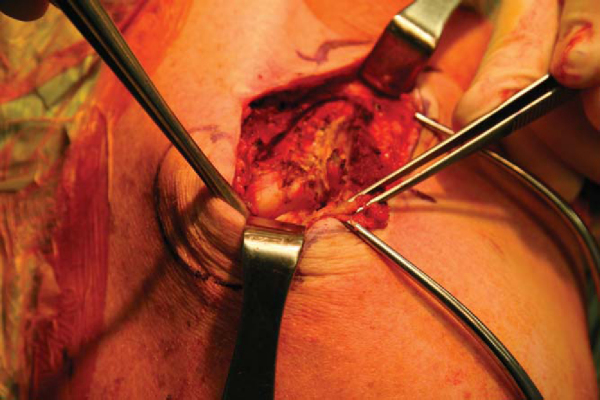
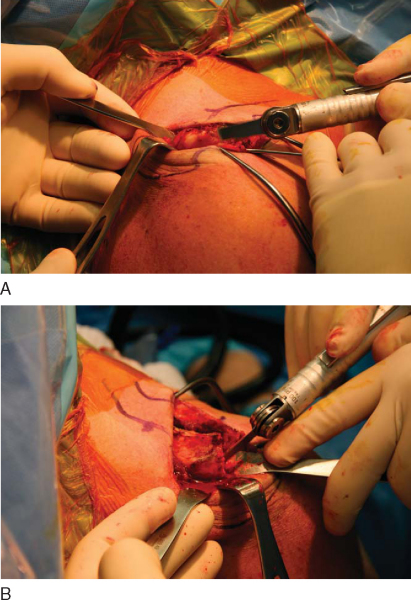
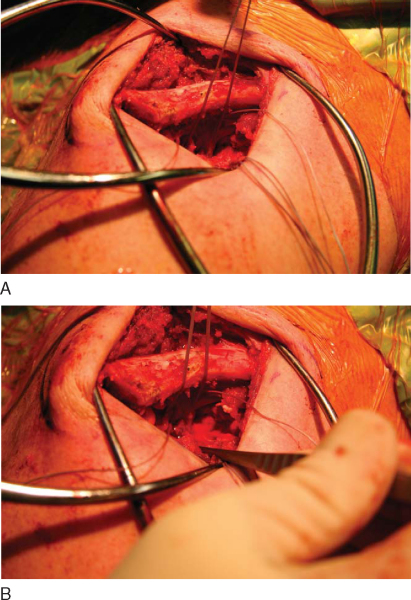
A No. 10 blade scalpel is used to make a 6-cm longitudinal incision, centered over or slightly medial to the coracoid. Medial and lateral skin flaps are elevated with a needle-tipped bovie. Gelpi retractors assist with exposure. A transverse incision is made along the midaxis of the clavicle extending into the acromioclavicular joint. Full-thickness flaps of the superior acromioclavicular joint capsule are elevated superiorly and inferiorly with a needle-tipped bovie. The anterior and posterior portion of the distal clavicle is completely exposed (
Fig. 28-3
). If acromioclavicular joint arthrosis is present, 5 mm of distal clavicle is resected. Many surgeons perform a distal clavicle resection (
Fig. 28-4
). However, there is tremendous variability in the acromioclavicular joint, and there seems to be tremendous stability from an intact acromioclavicular joint. For that reason, I believe that it may be advantageous to preserve the distal clavicle and have done so in select patients.
|
|
|
|
Figure 28-4 |
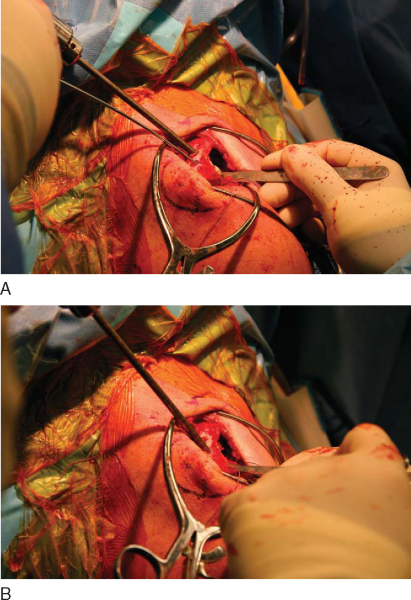
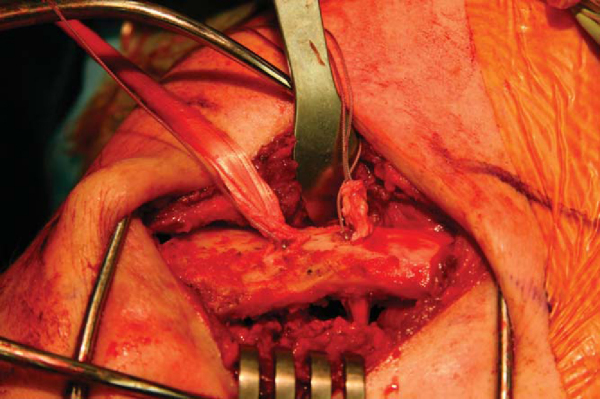
The medial and lateral coracoid base is exposed with a Cobb elevator. A headlight may be useful for this portion of the procedure. Care is taken to avoid excessive medial dissection to prevent musculocutaneous nerve injury.
A specially designed cannulated passing device (Arthrex, Inc., Naples, Fla) is passed medial to lateral around the coracoid. A FiberWire or FiberStick (Arthrex, Inc., Naples, Fla) is then shuttled through the cannulated handle and retrieved laterally at the tip. This passing stitch is later used for graft passage around the coracoid (
Fig. 28-5
).
An alternative means of coracoid graft fixation is biotenodesis screw fixation of the looped end of the semitendinosus graft in a coracoid base bone tunnel. This is best achieved by positioning the 7-mm offset ACL guide on the medial coracoid base and reaming an 8- or 9-mm bone tunnel.
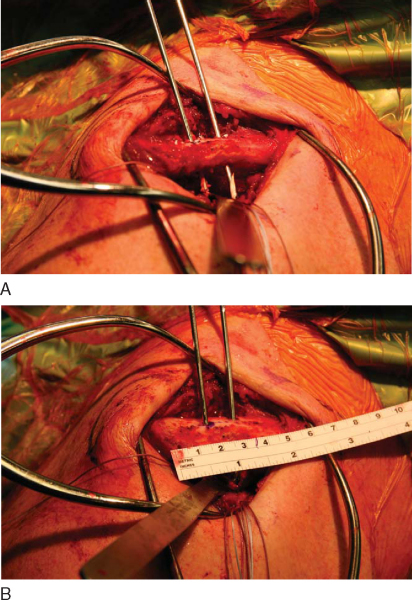
The conoid ligament tunnel is established with a guide pin drilled 4.5 cm medial from the intact lateral distal clavicle edge. This is positioned along the posterior superior cortex and is marked before distal clavicle resection. The pin is directed at 30 degrees anterior, aiming toward the coracoid. A second guide pin from the Arthrex biotenodesis set is drilled central on the clavicle’s anteroposterior dimension and 1.5 cm lateral to the medial pin. This tunnel will be used to reconstruct the trapezoid ligament and is again directed 30 degrees anterior toward the coracoid (Figs. 28-6 and 28-7 [6] [7]). A 5.5-mm reamer is used to ream both tunnels (
Fig. 28-8
). The reamer is removed by hand twisting after penetration of the far cortex to avoid tunnel widening.
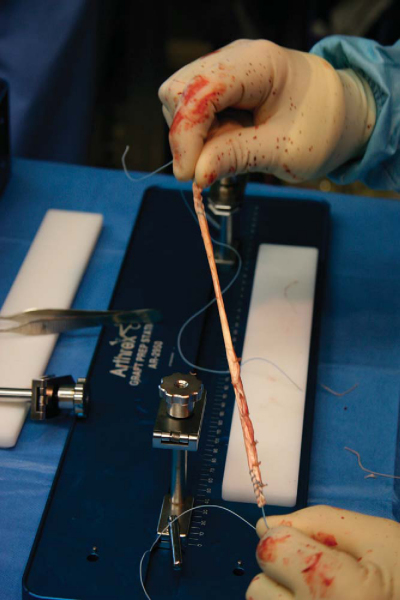
An allograft semitendinosus graft is contoured to fit through a 5.5-mm tunnel. No. 2 FiberWire is used to place baseball stitches at each end of the graft (
Fig. 28-9
).
The initially passed FiberWire or FiberStick is used to shuttle the prepared semitendinosus graft along with an additional No. 2 FiberWire around the coracoid process. The accessory FiberWire will provide secondary fixation. The free ends of the semitendinosus graft along with the free No. 2 FiberWire are shuttled into the respective clavicular bone tunnels by use of a suture-passing device (
Fig. 28-10
).
A 5.5 × 8-mm PEEK (polyetheretherketone) tenodesis screw is then loaded onto the biotenodesis screwdriver (Arthrex, Inc., Naples, Fla). The nitinol loop retriever is used to pass the FiberWire through the cannulated screwdriver system. With countertension on the opposite graft end, the PEEK screw is inserted flush to the cortical surface. The clavicle is then overreduced with downward pressure from a Cobb elevator. A superiorly directed force on the humerus will also assist in reducing the clavicle. If the distal clavicle is preserved, I avoid overreducing the acromioclavicular joint.
A second PEEK tenodesis screw is inserted into the second clavicular tunnel through the FiberWire suture. The graft is tensioned as the screw is inserted. The order of tunnel fixation does not matter. The FiberWire is tensioned and tied with surgeon knots. The graft ends are then sutured to one another, and the excess graft is excised.
7. Superior Acromioclavicular Joint Capsular Ligament Repair
No. 2 FiberWire stitches are used to imbricate the superior acromioclavicular joint capsular ligaments in a pants-over-vest configuration. This will offer additional anteroposterior stability to the reconstruction. The deltotrapezial fascia is also repaired in this step if full-thickness flaps of fascia and acromioclavicular joint capsular ligament were elevated in a single layer.
After copious wound irrigation, the subcutaneous tissues are closed with 2-0 Vicryl sutures. A 3-0 Monocryl is used to perform a subcutaneous skin closure. The wound is injected with bupivacaine (Marcaine).
| • | Sutures are removed at 1 week. | |
| • | Patients are seen at 1, 2, 3, and 6 months and then annually. | |
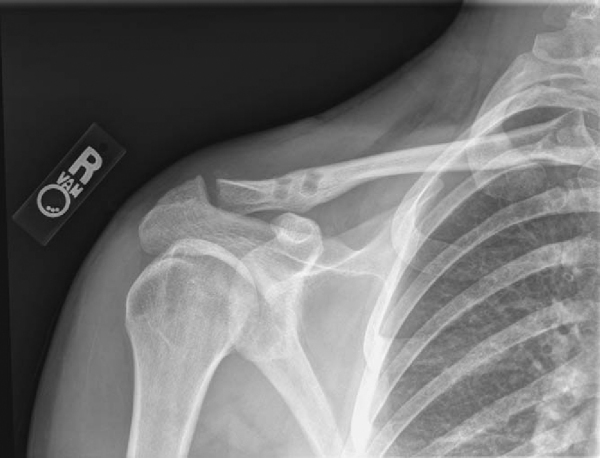
| • | Postoperative radiographs include bilateral Zanca views to measure coracoid-clavicular distance ( Fig. 28-11 ). |
| • | A platform brace (Lehrman) is worn for 6 weeks. | |
| • | Immediate pendulum exercises are begun, with limitation of passive external rotation to 30 degrees and passive forward flexion to 90 degrees. | |
| • | Active range of motion is started at 8 weeks. | |
| • | Strengthening is started at 12 to 16 weeks. | |
| • | Sports-specific activities and return to full athletics are allowed at 16 to 24 weeks. | |
| • | Return to heavy labor is allowed at 6 months. |
| • | Infection | |
| • | Sterile abscess from FiberWire or PEEK screw reaction | |
| • | Potential clavicle fracture from stress riser effect on bone tunnels. Unpublished three- and four-point load data revealed diminished stress riser effect when clavicular tunnels are filled with tenodesis screws. | |
| • | Construct failure | |
| • | Potential musculocutaneous nerve injury | |
| • | Persistent pain |
| PEARLS | |||||||||||||||||||||||||||||||||||||||||||||||||||
|
Results of studies of acromioclavicular joint reconstruction are shown in
Table 28-1
.
| Author | Study | Native Coracoclavicular Ligament | Anatomic Coracoclavicular Ligament Reconstruction | Coracoacromial Transfer |
|---|---|---|---|---|
| Lee et al[6] (2003) | Cadaver | 650 N (load to failure) | 700 N (load to failure) | 150 N (load to failure) |
| Semitendinosus | ||||
| Costic et al[1] (2004) | Cadaver | 60.8 ± 5.2 N/mm (stiffness) | 23.4 ± 5.2 N/mm (stiffness) | |
| 560 ± 206 N (load to failure) | 406 ± 60 N (load to failure) | |||
| Semitendinosus | ||||
| Grutter and Petersen[3] (2005) | Cadaver | 815 N | 774 N | 483 N |
| Flexor carpi radialis | ||||
| Mazzocca et al[7] (2006) | Cadaver | 396.4 ± 136.42 N | 354.3 ± 100.26 N |
1.
Costic RS, Labriola JE, Rodosky ME, Debski RE: Biomechanical rationale for development of anatomical reconstruction of coracoclavicular ligaments after complete acromioclavicular joint dislocations.
Am J Sports Med 2004; 32:1929-1936.
2.
Debski RE, Parson IM, Woo S, Fu FH: Effect of capsular injury on acromioclavicular joint mechanics.
J Bone Joint Surg Am 2001; 83:1344-1351.
3.
Grutter PW, Petersen SA: Anatomical acromioclavicular ligament reconstruction.
Am J Sports Med 2005; 31:1-6.
4.
Jari R, Costic RS, Rodosky MW, Debski RE: Biomechanical function of surgical procedures for acromioclavicular joint dislocations.
J Arthroscopy 2004; 20:237-245.
5.
Jones HP, Lemos MJ, Schepsis AA: Salvage of failed acromioclavicular joint reconstruction using autogenous semitendinosus tendon from the knee.
Am J Sports Med 2001; 29:234-237.
6.
Lee SJ, Nicholas SJ, Akizuki KH, et al: Reconstruction of the coracoclavicular ligaments with tendon grafts.
Am J Sports Med 2003; 31:648-654.
7.
Mazzocca AD, Santangelo SA, Johnson ST, et al: A biomechanical evaluation of an anatomical coracoclavicular ligament reconstruction.
Am J Sports Med 2006; 34:236-246.