
Cole & Sekiya: Surgical Techniques of the Shoulder, Elbow and Knee in Sports Medicine, 1st ed.
Copyright ©
2008 Saunders, An Imprint of Elsevier
CHAPTER 41 – Distal Biceps Repair
Nikhil N. Verma, MD
Rupture of the distal insertion of the biceps tendon is a relatively rare injury. The majority of ruptures occur proximally; distal ruptures represent only 3% of all biceps tendon ruptures, with an incidence of 1.2 of 100,000 persons per year. Despite being rare, this is an injury that usually occurs in highly functioning middle-aged men, often laborers; left untreated, it is associated with a significant functional and, often, financial loss. In contrast to proximal ruptures, untreated distal rupture more often results in chronic arm pain and weakness in elbow flexion and forearm supination.
Direct anatomic repair of the biceps to its insertion on the radial tuberosity has been shown to restore flexion and supination strength and lead to excellent functional outcomes. [3] [13] Numerous repair techniques have been described for acute rupture, including the classic two-incision technique with transosseous suture fixation of Boyd and Anderson. This technique was introduced in an attempt to decrease the incidence of radial nerve injury seen with a similar procedure performed through a single anterior incision.[6] However, because of reports of radioulnar synostosis after the two-incision technique, [11] [13] a muscle-splitting posterior approach[5] as well as anterior single-incision techniques with use of suture anchors[4] and more recently the EndoButton [2] [9] (Acufex; Smith & Nephew, Inc., Andover, Mass) have been developed. Delayed operative treatment of chronic ruptures may require supplemental soft tissue tendon grafts for restoration of length to the retracted and scarred biceps tendon.[10]
Rupture of the distal biceps tendon is most common in the dominant extremity in middle-aged men. The mechanism of injury is an eccentric load with a sudden extension force being applied to the flexed arm. Often, the patient may report a painful tearing sensation or a “pop” in the antecubital fossa that progresses to a dull ache during a few hours. Variable swelling and ecchymosis may be present, although the lack of these findings does not rule out complete rupture. Chronically, this injury may manifest as activity-related pain and subjective weakness in flexion and supination.[14]
Partial rupture of the distal biceps has been reported.[5] Partial ruptures may present with mild antecubital swelling, decreased range of motion in flexion and supination, and more poorly defined time of onset. In patients without a palpable defect, alternative diagnoses such as cubital bursitis and bicipital tendinosis without rupture must be considered. In general, the diagnosis of partial rupture requires specific imaging modalities (i.e., magnetic resonance imaging).
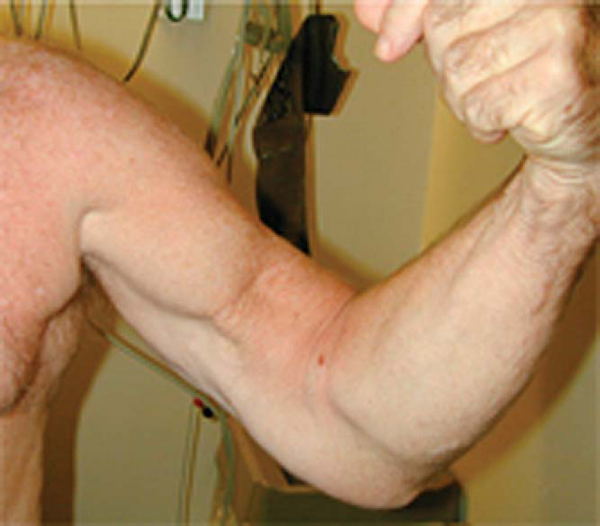
Physical examination may demonstrate swelling and ecchymosis in the antecubital fossa as well as loss of the normal contour of the arm with retraction of the biceps muscle belly (
Fig. 41-1
). In the case of a complete rupture, a defect may be palpable in the antecubital fossa, which is more difficult to appreciate if the bicipital aponeurosis is intact.[14] The defect may also be the only initial clinical sign as to whether a rupture is complete or partial[5]; objective weakness in flexion and supination is common with both and may be exaggerated by pain in the acute setting.
|
|
|
|
Figure 41-1 |
A squeeze test similar to the Thompson test for Achilles tendon rupture has been described[15] and has been shown to be highly effective in diagnosis of biceps rupture. With the patient’s forearm rested on the lap, the elbow is held at 60 to 80 degrees to relax the brachialis and in slight pronation to tension the biceps. The examiner firmly squeezes with one hand at the myotendinous junction and the other hand over the biceps muscle belly. An intact biceps should elicit supination of the forearm, and lack of supination is a positive test result.
Similarly, passive forearm supination and pronation should result in myotendinous junction motion with an intact tendon. To test this, the elbow is placed in a 90-degree flexed position. The examiner’s fingers are placed over the musculotendinous junction of the biceps, and the forearm is passively rotated. Lack of palpable motion at the musculotendinous junction indicates distal rupture.
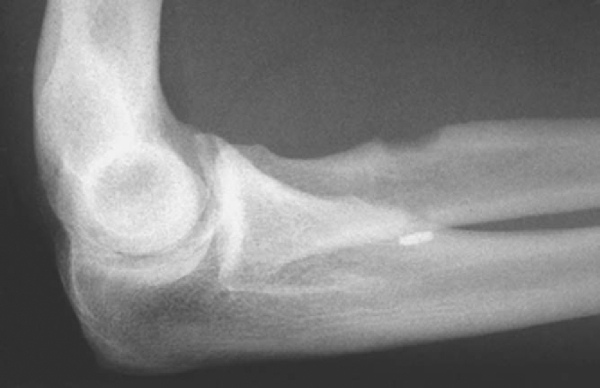
Although radiographs are typically normal, an anteroposterior, a lateral, and two oblique views are obtained. On occasion, avulsions of the tuberosity have been demonstrated in the acute setting. In the chronic setting, hypertrophic changes of the tuberosity may be noted.[14]
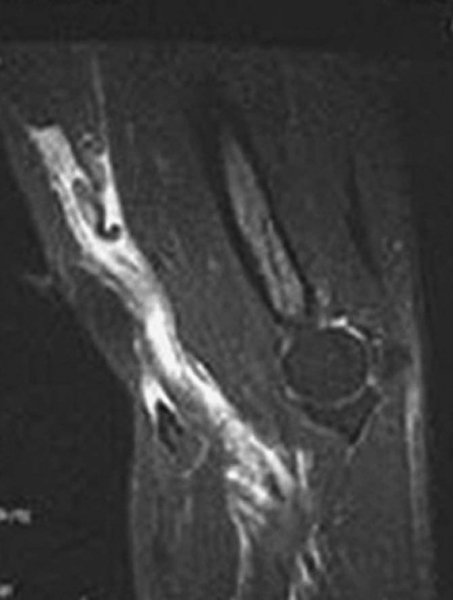
If the physical examination is conclusive, further imaging is not required; but magnetic resonance imaging can help confirm the diagnosis if the physical examination findings are unclear. Magnetic resonance imaging may also help identify the extent and location of injury, which may aid in surgical planning. For example, rupture at the myotendinous junction, although rare, can present difficulty when a standard surgical technique is attempted. In complete ruptures, findings include absence of the tendon distally, fluid-filled tendon sheath, muscle edema, and atrophy (
Fig. 41-2
).[8] For partial rupture, magnetic resonance imaging can reveal high signal and fluid within the tendon or surrounding the tendon as it approaches the tuberosity, but one should be able to appreciate tendon all the way to the insertion on the tuberosity.
|
|
|
|
Figure 41-2 |
Other possible diagnoses, including cubital bursitis, biceps tendinosis, biceps hematoma, and brachialis contusion, can also be evaluated and differentiated on magnetic resonance imaging.[8] Ultrasonography has also been shown to be an inexpensive and reliable method to confirm diagnosis of biceps rupture, although this technique requires a skilled ultrasonographer for accurate interpretation.
Indications and Contraindications
Long-term functional deficits with loss of both supination and flexion strength after complete rupture have been clearly demonstrated.[13] Therefore, most healthy, active individuals should be strongly considered for operative repair. Nonoperative management should be considered ideally for elderly or sedentary patients with relatively low functional demand or those with comorbidities resulting in considerable increased risk with surgery.
In preoperative planning, it is important to identify the chronicity of the injury as well as whether the bicipital aponeurosis is intact. Delayed presentation secondary to missed diagnosis, the patient’s neglect, or failure of conservative treatment is not uncommon. Because of poor tissue quality, altered anatomy, and retraction of the tendon with scarring of the biceps to the brachialis, delayed surgery is often difficult and may require allograft or autograft tendon reconstruction, especially if the bicipital aponeurosis is not intact.[14]
Treatment of partial ruptures initially consists of a trial of nonoperative management. Treatment modalities include anti-inflammatories, splinting, and physical therapy. Although formal outcomes of nonoperative management have not been reported, our experience with conservative management of partial tears is associated with limited improvement. If it is indicated, surgical management should include tendon release and reattachment to the radial tuberosity, yielding primarily excellent results.[5]
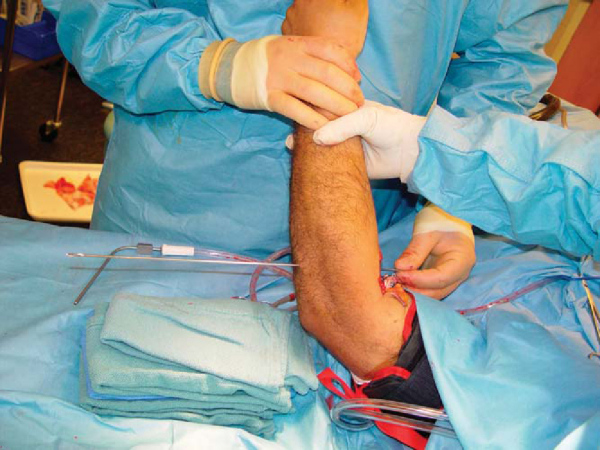
Our preferred anesthesia is a regional block, most commonly axillary or supraclavicular, which may minimize anesthetic morbidity and provide improved postoperative pain control. The patient is positioned supine with the arm on an arm board.
Surgical Landmarks, Incisions, and Portals
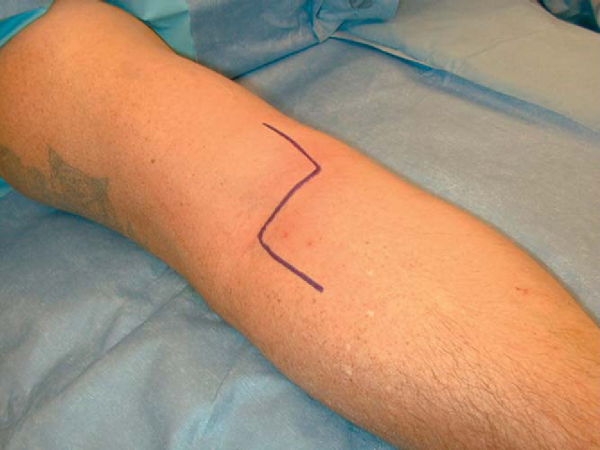
Our preferred incision for the EndoButton technique described below is a hockey stick–type incision along the medial border of the brachioradialis curving medially over the antecubital fossa in the elbow crease (
Fig. 41-3
). Alternative incisions are a transverse skin incision just distal to the elbow skin crease and a longitudinal incision as in a standard anterior Henry approach.
|
|
|
|
Figure 41-3 |
Specific Steps (
Box 41-1
)
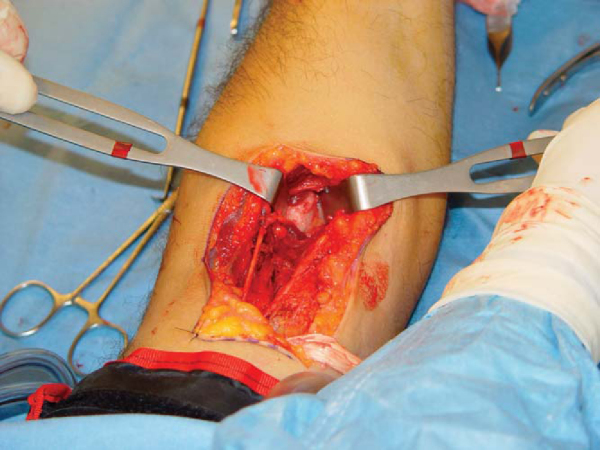
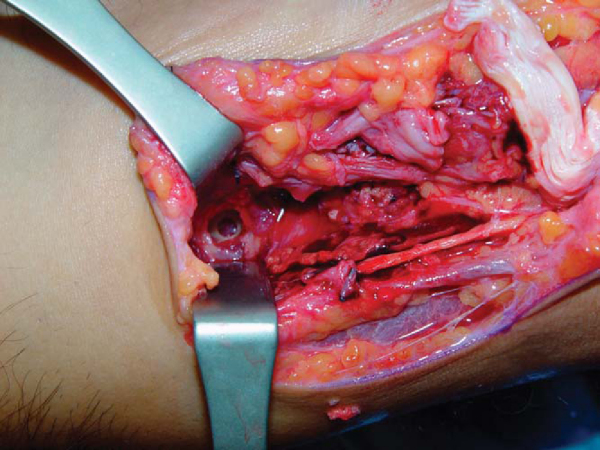
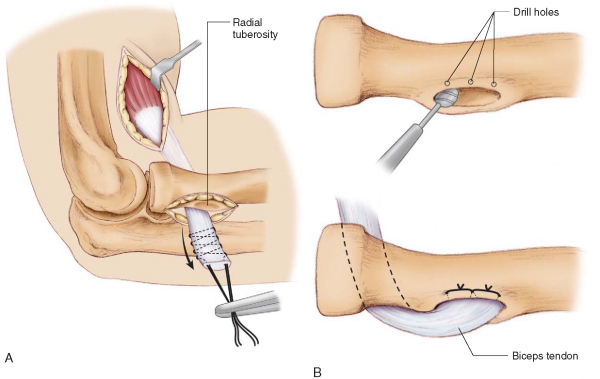
The lateral antebrachial cutaneous nerve is identified and protected, and dissection is carried down toward the radial tuberosity (
Fig. 41-4
). The brachioradialis is retracted laterally, and the biceps tendon sheath is identified. Multiple recurrent branches of the radial artery may be encountered and should be ligated with endovascular clips. An inflammatory bursa at the former site of the tendon attachment may be encountered. Division of the lacertus fibrosus may be necessary for full access to the retracted biceps tendon.
| Surgical Steps | |||||||||||||||
|
During dissection, the elbow should be maintained in a supinated position. This allows improved access to the bicipital tuberosity and moves the posterior interosseus nerve laterally to improve the margin of safety. Care must be taken to avoid vigorous retraction on the lateral side because the radial nerve is at risk. The tuberosity may be partially covered by the superior aspect of the supinator muscle, which can be retracted distally by blunt dissection.
Once the tuberosity is sufficiently exposed, the tunnel for the EndoButton-tendon construct is prepared (
Fig. 41-5
). The tunnel should be located as medially in the radial tuberosity as possible with the forearm supinated to re-create the most anatomic location for the tendon. Our preferred technique is to establish a cortical window for the tendon on the anterior surface of the tuberosity by use of a high-speed bur. Next, a guide pin for the EndoButton cannulated drill is placed through the anterior tunnel through the posterior cortex to exit the skin posteriorly. This is then overdrilled with the EndoButton drill. Alternatively, the guide wire can be placed first and the anterior cortical tunnel made with a 6- or 7-mm cannulated acorn reamer.
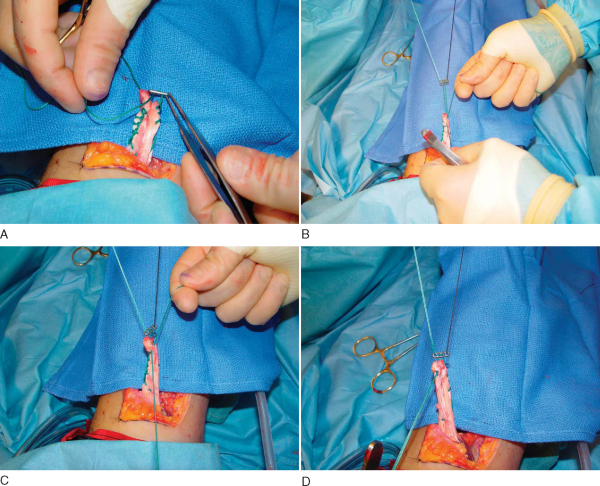
Next, the tendon stump is prepared. After the distal end of the biceps tendon is completely freed and the degenerated or necrotic portion is resected, a running locking type of suture is placed with a strong, braided No. 2 or No. 5 equivalent nonabsorbable suture. The starting point, and thus the location of the knot, should be about 2 to 3 cm proximal to the distal end of the tendon, allowing for adjustment of the knot later if needed (
Fig. 41-6
). Each suture passage must be tensioned in the tendon to prevent later elongation. The suture is advanced proximally on the tendon for about 2 cm and then distally exits the tendon end. The suture limb is then passed through the button before reentering the tendon to complete the loop. The knot should be tied leaving a maximum 2- to 3-mm gap between the button and the free tendon end to allow the button to be manipulated and “flipped” over the dorsal cortex.
|
|
|
|
Figure 41-6 |
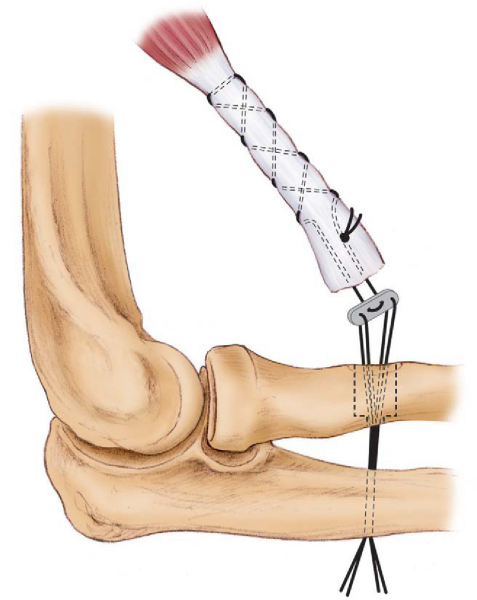
The two outer holes of the EndoButton are then each threaded with a different color suture to identify the sutures as they draw the EndoButton into the socket and onto the posterior cortex (
Fig. 41-7
). A Beath pin is advanced through the hole at the base of the tuberosity socket from anterior to posterior; the four suture ends (two ends of two sutures of different colors) are threaded through the eyelet, and the pin is withdrawn out the skin of the posterior forearm with the elbow in 90 degrees of flexion (
Fig. 41-8
). The two sutures are separated (with two strands each), and one is used to pull the EndoButton into and through the socket and drill hole in the posterior cortex (
Fig. 41-9
). Once the button clears the posterior cortex, the other suture is tensioned to flip the button onto the posterior cortex (
Fig. 41-10
). This process of button passage can be facilitated with fluoroscopic guidance. The sutures are carefully removed by pulling them out through the posterior stab wound.
|
|
|
|
Figure 41-7 (Redrawn with permission from Greenberg JA, Fernandez JJ, Wang T, Turner C. EndoButton-assisted repair of distal biceps tendon ruptures. J Shoulder Elbow Surg 2003;12:484-490.) |
|
|
|
|
Figure 41-8 |
|
|
|
|
Figure 41-9 |

|
|
|
|
Figure 41-10 (Reproduced with permission from Greenberg JA, Fernandez JJ, Wang T, Turner C. EndoButton-assisted repair of distal biceps tendon ruptures. J Shoulder Elbow Surg 2003;12:484-490.) |
After thorough irrigation, the skin is closed with interrupted 2-0 absorbable subcutaneous sutures and a running 3-0 absorbable subcuticular stitch. The arm is placed in a posterior splint with the elbow in 90 degrees of flexion and neutral rotation.
Patients are seen in the office between 7 and 10 days postoperatively for suture removal.
| • | Splint in 90 degrees of flexion and neutral rotation until first postoperative visit at 7 to 10 days. | |
| • | A hinged elbow brace or removable posterior mold at 90 degrees of flexion is placed at the first postoperative visit. | |
| • | Initiate passive and active-assisted range of motion from 30 degrees to full flexion and increase to full extension by 6 weeks postoperatively. | |
| • | Unrestricted motion is permitted and strengthening is initiated at 6 weeks postoperatively. | |
| • | Return to unrestricted activities is allowed at 16 to 20 weeks postoperatively. |
Modified Two-Incision Technique
The original Boyd-Anderson technique describes a primary incision in the antecubital fossa and a secondary incision in the posterolateral forearm.[6] This technique, although effective, was found to be complicated by radioulnar synostosis attributed to aggressive elevation of the anconeus off the proximal ulna, with damage to the proximal interosseous membrane. [11] [13] Agins[1] modified the original procedure first by a smaller anterior transverse incision and use of a small osteotome through a small posterior incision rather than a bur to form a trough for reattachment of the biceps tendon.
Bourne and Morrey[5] suggested passing a blunt hemostat through the usual path of the biceps tendon until it is palpable on the posterior skin, then making the posterior incision over the instrument’s tip. Rather than taking the supinator off the ulna, this technique allows the radial tuberosity to be exposed from the posterior incision by splitting the supinator and common extensor, requiring no muscle to be taken off the ulna and theoretically decreasing the risk of radioulnar synostosis (
Fig. 41-11
). During this posterior approach, the forearm is pronated to bring the tuberosity into view and to protect the posterior interosseous nerve.
|
|
|
|
Figure 41-11 (Redrawn with permission from Morrey BF, Askew LJ, An KN, Dobyns JH. Rupture of the distal tendon of the biceps brachii. A biomechanical study. J Bone Joint Surg Am 1985;67:418-421.) |
Currently the most common technique is either a transverse or longitudinal (Henry) 3- to 5-cm incision anteriorly over the antecubital fossa to retrieve and débride the biceps tendon. As mentioned before, Bunnell-type or other running grasping sutures are used to secure the distal end of the tendon. With the forearm supinated, a hemostat is advanced along the medial border of the radial tuberosity to the dorsolateral forearm as described by Bourne and Morrey,[5] and an incision is made over the instrument’s tip. One must be careful not to violate the periosteum of the ulna. With the forearm in maximal pronation, this posterior incision is carried down to the radial tuberosity by splitting the extensor muscle mass and supinator in line with their fibers. A bur or osteotome is then used to make a cavitary opening in the tuberosity large enough to pass the tendon through. Small drill holes are then made along the margin of the cavitary opening unicortically, one for each Bunnell strand. Once the biceps tendon is passed into the tunnel, the suture ends are passed back up through the drill holes and tied over a bone bridge. Rehabilitation is similar to that for the single-incision technique.
Delayed Treatment with Hamstring Allograft
Delayed treatment of distal biceps rupture is not uncommon and is complicated by tendon retraction, scarring to the brachialis, distorted anatomy, and poor-quality tissue. Especially in cases in which the bicipital aponeurosis is torn, the tendon may be retracted to the degree that a primary repair to the radial tuberosity either is impossible or would leave the patient with an unacceptable flexion contracture. In these cases, supplementary grafts are often needed, and grafting with fascia lata, palmaris longus, Achilles tendon, and flexor carpi radialis has been described.
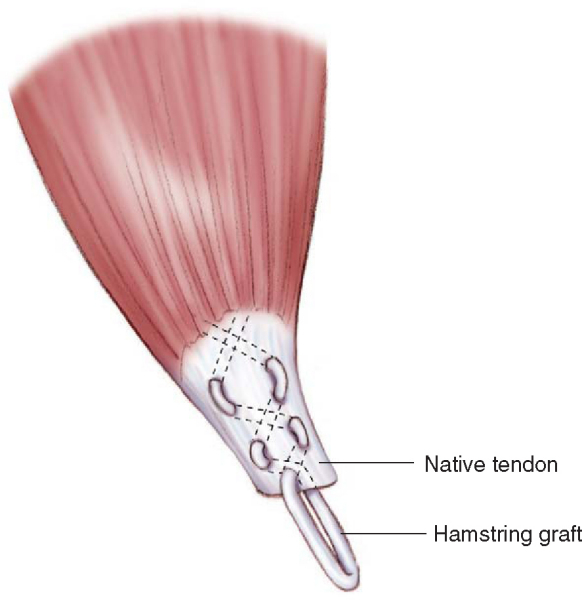
Our preferred grafting technique uses either allograft or autologous semitendinosus tendon for reconstruction. This technique combines the EndoButton principle with hamstring allograft for late reconstruction.[10] The initial stages are as described earlier for the EndoButton technique to prepare the tuberosity. The autograft tendon is then weaved through the distal biceps tendon (
Fig. 41-12
) with the free ends proximal so that they can be tensioned and shortened for appropriate graft length. Once the appropriate length is confirmed, the free ends are sutured together with nonabsorbable braided suture. Similar suture is passed through the two center holes of the EndoButton and sutured in a running fashion to the medial and lateral arms of the graft to provide fixation of the biceps-graft complex to the button. As previously described for acute rupture, the graft complex with the EndoButton is then passed through the radial tuberosity and flipped over the posterior cortex.
|
|
|
|
Figure 41-12 (Redrawn with permission from Hallam P, Bain GI. Repair of chronic distal biceps tendon ruptures using autologous hamstring graft and the Endobutton. J Shoulder Elbow Surg 2004;13:648-651.) |
Good to excellent results with regard to both elimination of pain and recovery of strength and function have been reported after single-incision and two-incision techniques for distal biceps tendon repair (
Table 41-1
). Potential complications include radioulnar synostosis with the two-incision technique and injury to the lateral antebrachial cutaneous nerve or radial nerve with the single-incision techniques. With either technique, repeated rupture is a rare but possible occurrence.
| Author | Methodology | Results | |||||||||||||||
|---|---|---|---|---|---|---|---|---|---|---|---|---|---|---|---|---|---|
| Bain et al[2] (2000) |
|
All patients satisfied with result, returned to normal activities of daily living, and had subjective 5/5 strength when rehabilitated | |||||||||||||||
| Baker and Bierwagen[3] (1985) |
|
|
|||||||||||||||
| El-Hawary et al[7] (2003) | Direct comparison of 9 one-incision repairs with two suture anchors vs. 10 modified two-incision repairs | Strength: no difference at 1 year, but slower recovery in one-incision group | |||||||||||||||
| Range of motion: greater flexion in one-incision group at 1 year | |||||||||||||||||
| SF-36 scores: no difference | |||||||||||||||||
| Complications: more with one incision, especially lateral antebrachial cutaneous nerve injury | |||||||||||||||||
| Greenberg et al[9] (2003) | 14 patients, EndoButton, 20-month followup | 97% flexion and 82% supination strength compared with uninjured arm | |||||||||||||||
| Cadaveric pullout strength in Boyd bone tunnel vs. one suture anchor vs. EndoButton | EndoButton pullout strength 3 times greater than Boyd, 2 times greater than single suture anchor | ||||||||||||||||
| Karunakar et al[11] (1999) | 21 patients, average 44-month followup | 100% good–excellent results | |||||||||||||||
| Two-incision technique | 48% had supination weakness, 14% had flexion weakness | ||||||||||||||||
| Endurance decreased 38% in supination, 33% in flexion compared with uninjured arm | |||||||||||||||||
| Complications: 15% heterotopic ossification, one radioulnar synostosis | |||||||||||||||||
| McKee et al[12] (2005) | 53 patients | DASH questionnaire: no difference from control in functional scores | |||||||||||||||
| One-incision technique with two suture anchors | Strength: 96% flexion, 93% supination compared with uninjured side | ||||||||||||||||
| No repeated rupture, synostosis, or difference in range of motion |
1.
Agins HJ, Chess JL, Hoekstra DV, Teitge RA: Rupture of the distal insertion of the biceps brachii tendon.
Clin Orthop 1988; 234:34-38.
2.
Bain GI, Prem H, Heptinstall RJ, et al: Repair of distal biceps tendon rupture: a new technique using the Endobutton.
J Shoulder Elbow Surg 2000; 9:120-126.
3.
Baker BE, Bierwagen D: Rupture of the distal tendon of the biceps brachii. Operative versus nonoperative treatment.
J Bone Joint Surg Am 1985; 67:414-417.
4.
Barnes SJ, Coleman SG, Gilpin D: Repair of avulsed insertion of biceps. A new technique in four cases.
J Bone Joint Surg Br 1993; 75:938-939.
5.
Bourne MH, Morrey BF: Partial rupture of the distal biceps tendon.
Clin Orthop 1991; 271:143-148.
6.
Boyd HB, Anderson LD: A method for reinsertion of the distal biceps brachii tendon.
J Bone Joint Surg Am 1961; 43:1041-1043.
7.
El-Hawary R, Macdermid JC, Faber KJ, et al: Distal biceps tendon repair: comparison of surgical techniques.
J Hand Surg Am 2003; 28:496-502.
8.
Falchook FS, Zlatkin MB, Erbacher GE, et al: Rupture of the distal biceps tendon: evaluation with MR imaging.
Radiology 1994; 190:659-663.
9.
Greenberg JA, Fernandez JJ, Wang T, Turner C: EndoButton-assisted repair of distal biceps tendon ruptures.
J Shoulder Elbow Surg 2003; 12:484-490.
10.
Hallam P, Bain GI: Repair of chronic distal biceps tendon ruptures using autologous hamstring graft and the Endobutton.
J Shoulder Elbow Surg 2004; 13:648-651.
11.
Karunakar MA, Cha P, Stern PJ: Distal biceps ruptures. A followup of Boyd and Anderson repair.
Clin Orthop 1999; 363:100-107.
12.
McKee MD, Hirji R, Schemitsch EH, et al: Patient-oriented functional outcome after repair of distal biceps tendon ruptures using a single-incision technique.
J Shoulder Elbow Surg 2005; 14:302-306.
13.
Morrey BF, Askew LJ, An KN, Dobyns JH: Rupture of the distal tendon of the biceps brachii. A biomechanical study.
J Bone Joint Surg Am 1985; 67:418-421.
14.
Ramsey ML: Distal biceps tendon injuries: diagnosis and management.
J Am Acad Orthop Surg 1999; 7:199-207.
15.
Ruland RT, Dunbar SR, Bowen JD: The biceps squeeze test for diagnosis of distal biceps tendon ruptures.
Clin Orthop 2005; 437:128-131.