
Kenji Takagi used a cystoscope to examine the intra-articular
structures of the knee (65). Michael Burman, at
the Hospital for Joint Diseases in New York, reported on his
arthroscopic study of cadaveric joints, including the knee, in 1931 (4).
He concluded that arthroscopy should be used for purposes of diagnosis
rather than traditional open exploratory surgery. His report was met
with little enthusiasm by his medical colleagues.
years. The first arthroscopic knee surgery was performed by Masaki
Watanabe in 1955. The procedure involved a partial excision of
pigmented villonodular synovitis. Watanabe performed the first
arthroscopic meniscectomy in 1962 (69). In
1964, Robert Jackson visited Watanabe in Japan and brought the
technique back to North America. Arthroscopic techniques were pioneered
by Jackson (30), Robert Metcalf (41), Lanny Johnson (31), Ward Cassells (6), John McGinty (38,39), Richard O’Conner (50),
and others. Over the past 25 years, the arthroscope has revolutionized
the diagnosis and surgical treatment of disorders of the knee. The
future holds nothing but promise for further advancements in treatment
of the knee, as well as other joints.
magnetic resonance imaging (MRI) or arthroscopy cannot replace them. A
systematic format allows an accurate examination to be undertaken. This
chapter provides general guidelines for the key components of the knee
examination. Other chapters deal with each specific area of the knee.
in specific age groups. Patellofemoral disorders, osteochondritis
dissecans (OCD), Osgood-Schlatter disease, and rarely, tumors are seen
in adolescents who complain of knee pain with no history of trauma. In
patients between 20 and 50 years of age, trauma often leads to meniscus
tears or ligament injuries. In patients over age 50 years, it is
typical to see degenerative meniscus tears or degenerative arthritis in
the absence of a specific history of trauma. Awareness of these
age-related problems permits better focus in taking the history.
-
Determine the mechanism of history. Was the injury due to a twisting or turning mechanism or a direct blow?
-
Did the pain come on gradually or immediately following an injury?
-
Was the patient able to continue the activity or forced to stop because of the injury?
-
Tears of the anterior cruciate ligament
are frequently due to a noncontact, twisting or turning injury, which
is often associated with immediate severe pain lasting approximately 5
to 10 minutes. A pop is often heard as the injury occurs, and the
patient cannot continue with the activity. Swelling occurs within 24
hours, accompanied by the loss of full knee extension (19). -
Cumulative minor trauma can lead to a
degenerative meniscus tear and articular cartilage injury with no
specific history of trauma. -
Is the pain diffuse or localized? Can the
patient point with one finger to the locus of the pain? Such
specificity may not be possible, because often the entire knee may
injured. Patients with medial meniscus tears, in the absence of
degenerative joint disease (DJD) often point to the medial joint line
as the site of the problem. -
A history of activities that aggravate or alleviate the symptoms aids in diagnosis.
-
Patellofemoral disorders are typically
aggravated by bent-knee activities such as ascending or descending
stairs, squatting, kneeling, riding in a car, or sitting in a theater. -
Meniscus tears are aggravated by twisting and turning maneuvers.
-
Determine what activity limitations are present because of the knee problem.
-
The presence of knee effusion reflects an intra-articular problem in the knee.
-
Patients with a true knee effusion often
feel that the knee is tight or stiff. When they are asked where the
knee swelling occurs, these patients will sense their swelling to be in
the lateral parapatellar or suprapatellar regions. -
With a communicating popliteal cyst, there is a sense of fullness in the posterior aspect of the knee as well as discomfort.
-
Patients without a significant
intra-articular knee effusion localize their sense of swelling in the
inferior parapatellar region. -
Locking of the knee can occur when the
normal movement of the knee is impaired; locking is associated with
meniscus tears in the younger patient and loose bodies in the older
patient. -
Beware of the acutely injured knee that
feels “locked” and will not extend fully. Frequently, with acute
ligament injuries, there is concomitant splinting or spasm of the
hamstring musculature that impedes full extension of the knee and can
be mistaken for mechanical locking. It is important to differentiate
mechanical locking from pseudolocking. -
Complaints of buckling, giving way, and
feelings of instability may be caused by quadriceps muscle weakness or
inhibition, in which the knee can flex uncontrollably at times. This
type of buckling is rarely disabling. -
A feeling that “the kneecap is going out” may be associated with patellofemoral instability.
-
With anterior cruciate ligament instability, the individual may say, “The knee is going out of joint.”
-
Some degree of disability is often
associated with episodes of instability due to patellofemoral or
anterior cruciate ligament disorders. -
Patients may describe snapping, grinding, popping, or clicking.
-
In patellofemoral disorders, the patient frequently notes a grinding sensation, especially when walking up stairs.
-
Establish whether the knee noise is
associated with pain; many knees have nonpainful popping or clicking
noises that are not pathologic. Painful pops or clicks are of more
concern. Meniscus tears or plicas may be associated with painful
popping or clicking. -
Has there been a previous problem with
the knee? If so, has that problem been similar to or different from the
present knee complaints? -
Has there been any previous attempt at
treatment (nonsteroidal anti-inflammatory drugs, physical therapy,
injections), and if so, what has been the response? -
Are there any other joints involved with a similar or different problem?
-
Is there a family member with a history of orthopaedic problems?
-
A reproducible, systematic approach to the physical examination of the knee is important for accurate diagnosis.
-
Examine the ipsilateral hip and ankle,
because some knee complaints are due to referred pain or reflect a
disorder of the hip or ankle. -
Always compare the examination to the normal knee (if possible).
-
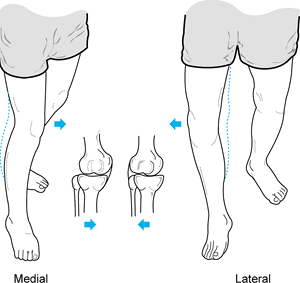
Observe the patient standing and assess alignment, noting excess varus or valgus (Fig. 84.1).
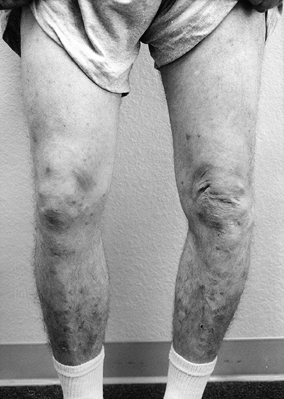 Figure 84.1.
While the patient is standing, evaluate varus or valgus alignment. Note
the increased varus alignment in the left lower extremity. -
Have the patient walk, and note any abnormality such as a limp or a varus or valgus thrust (Fig. 84.2).
![]() Figure 84.2. A medial or lateral thrust is noted during the stance phase in gait. (Redrawn from Tria AJ, Klein KS. An Illustrated Guide to the Knee. New York: Churchill Livingstone, 1992, with permission.)
Figure 84.2. A medial or lateral thrust is noted during the stance phase in gait. (Redrawn from Tria AJ, Klein KS. An Illustrated Guide to the Knee. New York: Churchill Livingstone, 1992, with permission.) -
Observe younger patients attempting to squat.
-
Observe older patients getting into and out of a chair.
-
Inspect the knee and lower extremity for previous incisions, scars, swelling, or ecchymosis.
-
Place the patient in the supine position on an examination table (Fig. 84.3).
Place a pillow beneath the knee to allow some flexion, because many
knee disorders are painful in full extension. The extended position can
cause the patient to splint and make the examination difficult.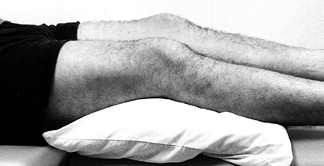 Figure 84.3.
Examine the patient with a pillow under the injured knee to allow the
knee to flex slightly. The fully extended position is often
uncomfortable and may cause the patient to splint, making the
examination difficult. -
Examine the uninvolved knee first for
comparison (right-to-left knee variability is minimal). In the general
population, there is a significant variability between different
individuals. -
Assess the knee for quadriceps atrophy
and tone by grasping the anterior aspects of both thighs and asking the
patient to tighten up the muscles in both lower extremities
simultaneously. Compare the two sides for tone and size differences. -
Measure the thigh circumference at a
standard position above the patella (i.e., 10 cm) with the thigh
muscles tensed. Measuring allows for comparison to past and future
examinations. -
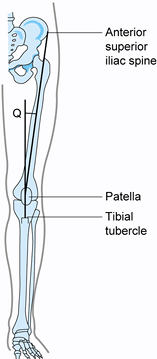
With the knee in near-full extension,
estimate the quadriceps angle (Q angle) by drawing a line from the
anterior superior iliac spine to the patella, and from the tibial
tubercle to the patella (Fig. 84.4) (22).
The acute angle formed by these two lines is the Q angle. In men, the Q
angle is approximately 10°, and in women, it is 15°. Alternatively, the
Q angle can be measured with the knee flexed to 90° (tubercle–sulcus
angle). In this position, the normal Q angle is up to 8° (Fig. 84.5). An increase in the Q angle by either measurement is associated with patellofemoral disorders.![]() Figure 84.4.
Figure 84.4.
Q angle measured in full extension. In men, Q angles greater than 10
degrees and, in women, Q angles greater than 15 degrees are associated
with patellofemoral disorders.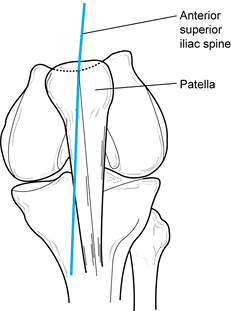 Figure 84.5. Q angle measured at 90° of flexion. Values greater than 8° are associated with patellofemoral disorders.
 -
Document the range of motion in degrees, using a goniometer. There is significant variability among individuals.
-
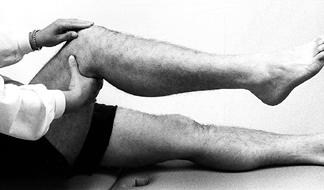
To demonstrate loss of extension
reproducibly, examine the knee with the patient prone and estimate the
heel height difference in cm (Fig. 84.6). Each 1 cm of heel height difference represents 1° loss of extension.![]() Figure 84.6.
Figure 84.6.
With the patient prone, measure the heel height difference to
demonstrate loss of knee extension objectively. Each 1 cm of heel
height difference reflects a loss of extension of 1°. -
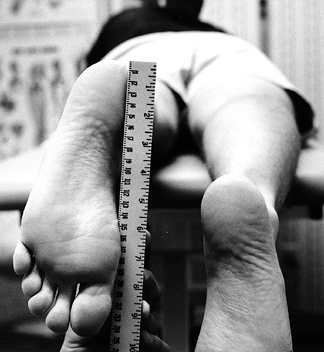
To document differences in flexion, measure the distance from the heel to the thigh in cm with the patient supine (Fig. 84.7).
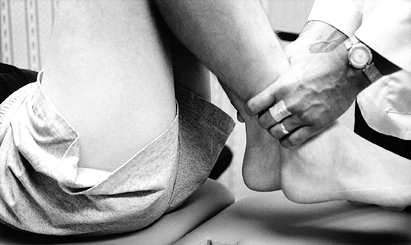 Figure 84.7. With the patient supine, measure the heel-to-thigh difference in centimeters to reflect loss of knee flexion accurately.
 -
Prone heel height difference and supine
heel-to-thigh distance are measurements that are reproducible and more
accurately reflect loss of extension or flexion. -
With the hip flexed to 90°, have the patient actively flex and extend the knee (Fig. 84.8).
Note patellofemoral crepitus and other knee noise (90–90 testing).
Attempt to palpate the anatomic location of the crepitus.
Patellofemoral
P.2273
joint
crepitus usually reflects articular cartilage damage on the patella or
in the trochlear groove of the femur. Determine whether the patella is
tracking centrally or laterally.![]() Figure 84.8.
Figure 84.8.
With the patient supine and the hip flexed 90°, have the patient
actively flex and extend the knee. Palpate the patella to demonstrate
crepitus. -
With the knee in full extension, document patellar mobility and tilt.
-
Palpate the knee to elicit areas of
tenderness. It is beneficial to ask the patient whether palpation
reproduces the pain. The diagnosis is enhanced if the pain can be
reproduced; inability to reproduce the symptoms is an inconclusive
finding. -
Palpate the entire knee including the
medial and lateral patellar facets, inferior and superior poles of the
patella, anterior patella, medial and lateral joint lines, the course
of the medial and lateral collateral ligaments, the tibial tubercle,
and all bursal locations. -
A systematic examination for ligament
laxity of the knee permits diagnosis of most knee ligament injuries.
Compare the examination with that of the normal knee. Test for varus or
valgus laxity at 0° and 30° of knee flexion (Fig. 84.9).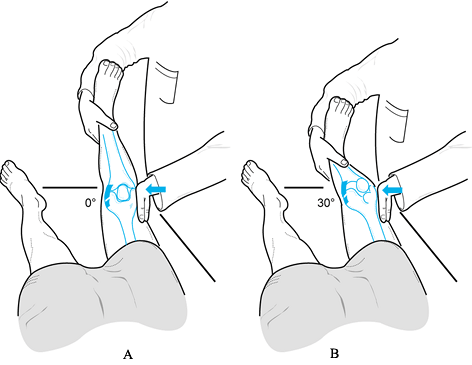 Figure 84.9. Test for varus and valgus laxity at 0° and 30° of knee flexion. (Redrawn from Tria AJ, Klein KS. An Illustrated Guide to the Knee. New York: Churchill Livingstone, 1992, with permission.)
 -
In full extension, varus or valgus stress
can be used to assess the collateral ligaments as well as the
posteromedial and posterolateral capsular structures, posterior
cruciate ligament, and anterior cruciate ligament. Examination at 30°
of knee flexion isolates the collateral ligaments; increased laxity
only at 30° suggests an isolated collateral ligament injury. Increased
laxity at both 0° and 30° of flexion represents an injury to the
collateral ligament as well as to the posterior ligament restraints
and, less commonly, the anterior cruciate ligament. -
Estimate in millimeters (mm) the ligament laxity of the injured knee compared with that of the normal knee (27). Rate varus or valgus laxity as follows:
Grade Amount of Opening Associated Tear I 0 to 5 mm minimal or first degree II 5 to 10 mm moderate or second degree III > than 10 mm complete or third degree -
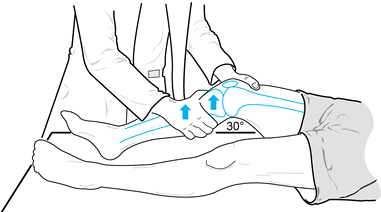
Examine the anterior cruciate ligament (ACL) and posterior cruciate ligament (PCL) at 30° and 90° of flexion.
-
Perform the Lachman test at approximately 30° of knee flexion. It is the most sensitive for detecting a tear of the ACL (Fig. 84.10).
Check for the “end point”—a sensation analogous to a rope being pulled
taut. In comparison to the normal knee, note the quality of the end
point (same, soft, or absent). Document the change in the anterior
excursion of the tibia. If the right and left difference is greater
than 3 mm, it is likely (95% confidence level) that the ACL has been
disrupted (10).![]() Figure 84.10.
Figure 84.10.
The Lachman test, performed at 30° of knee flexion, is the most
sensitive test for integrity of the ACL. (Redrawn from Tria AJ, Klein
KS. An Illustrated Guide to the Knee. New York: Churchill Livingstone, 1992, with permission.) -
Several clinical tests have been
developed to document ACL instability, including the pivot shift and
flexion rotation drawer tests (Fig. 84.11) (10). These tests reduplicate clinical instability if it is due to the ACL.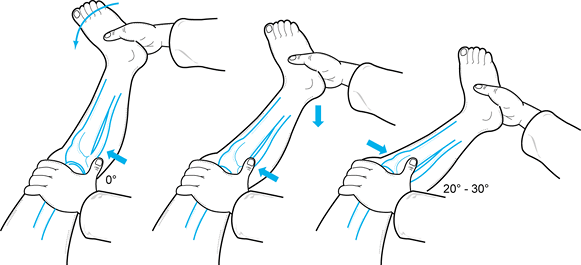 Figure 84.11.
The pivot shift test is useful in documenting the degree of instability
in acute and chronic ACL injuries. The tibia is subluxed in extension
and reduces as the knee is brought into extension. (Redrawn from Tria
AJ, Klein KS. An Illustrated Guide to the Knee. New York: Churchill Livingstone, 1992, with permission.) -
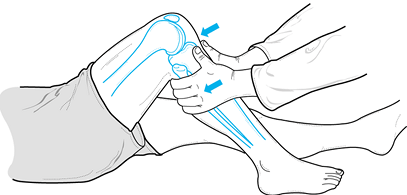
The PCL can be tested at 30° of flexion but is easiest to test at 90° of flexion (18).
With the hip flexed 45° and the knee at 90°, perform a posterior drawer
test. Palpate the stepoff between the medial and lateral femoral
condyles and tibial plateau (Fig. 84.12).
Normally, the tibia sits 5 mm anterior to the femoral condyles,
producing a stepoff. Loss of this normal stepoff is due to posterior
displacement of the tibia on the femur, which is caused by laxity in
the posterior ligamentous restraints. Estimate the tibial stepoff as
follows:![]() Figure 84.12.
Figure 84.12.
Palpate the stepoff between the medial and lateral femoral condyles and
the tibial plateaus to document PCL injury. Normally there is a 5 mm
stepoff. (Redrawn from Tria AJ, Klein KS. An Illustrated Guide to the Knee. New York: Churchill Livingstone, 1992, with permission.)Grade Decrease in Tibial Stepoff I 0–5 mm (tibial stepoff is still palpable) II 6–10 mm (tibia is equal to the femoral condyle) III >10 mm (tibia is posterior to the femoral condyle) -
If the Lachman test is normal, an
increase in the side-to-side anterior or posterior laxity at 90° of
flexion represents an injury to the posterior ligamentous restraints. -
There are numerous specific tests that
have been described to examine the knee ligaments. Try to isolate and
assess the integrity of the four major ligaments of the knee. Recognize
that most knee ligament injuries are not truly isolated but are more
complex.
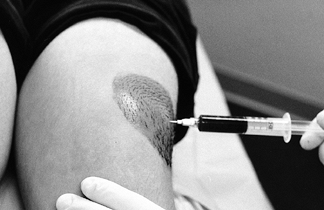
remove a hemarthrosis, to look for fat droplets (lipohemarthrosis) that
might suggest a fracture or osteochondral injury, or to perform
synovial fluid analysis (Fig. 84.13). Aspiration aids in diagnosis and has therapeutic benefit as well.
 |
|
Figure 84.13. With the patient supine and pillow under the knee, aspirate knee effusions through a superolateral approach.
|
-
Observe the fluid aspirated and determine if it is clear, cloudy, or bloody. Note the viscosity of the fluid.
-
Clear fluid can be discarded. Send cloudy or bloody fluid for a cell count and differential, crystal analysis, and culture.
-
Patients with crystal deposition disorders can have meniscus-like symptoms. Look for crystals on a polarized light microscope.
-
Intra-articular disorders such as a meniscus tear or a loose body typically cause overproduction of normal clear synovial fluid.
-
Gout or other crystal deposition
disorders causes an inflammatory synovial fluid with a white blood cell
count (WBC) of 5,000 to 20,000. -
Intra-articular infections typically have a WBC greater than 50,000.
-
The presence of a hemarthrosis in a “stable” knee suggests an anterior cruciate injury or peripheral meniscus tear (11,47).
-
Fat present in the hemarthrosis represents an osteochondral injury or fracture.
-
A large effusion restricts knee range of motion. Aspiration improves motion and facilitates rehabilitation.
-
Intra-articular injections with lidocaine
help differentiate intra-articular from extra-articular knee disorders.
An intra-articular injection with lidocaine temporarily relieves knee
pain due to intra-articular knee disorders. Although this test is not
100% accurate, it appears in clinical practice to be at least 95%
specific and sensitive. -
In patients with DJD, failure to relieve
pain with an injection suggests that in addition to arthritis, there
may be an extra-articular component of the knee pain that requires
diagnosis.
(AP), lateral, notch, and patellofemoral views. The posteroanterior
(PA) weight-bearing view of both knees at 45° of flexion is substituted
for the notch view in individuals over age 40 years, those with
previous knee surgery, or those with systemic arthritis. Evaluate the
radiographs for abnormalities of the soft tissues, as well as for bone
density. Extension weight-bearing views of both knees are useful in
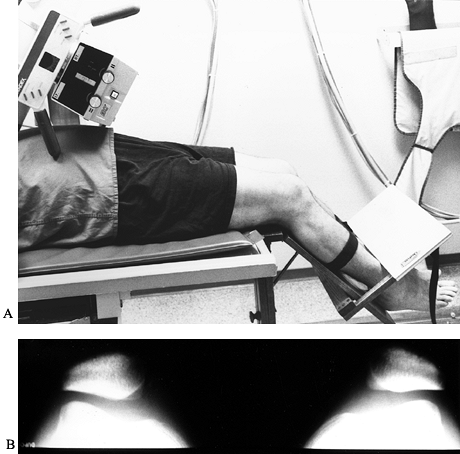
documenting degenerative changes (17); however, joint space narrowing is best noted on the PA 45° flexion weight-bearing view (Fig. 84.14) (56). A true lateral view taken at 30° of knee flexion allows for assessment
of patellar height as well as osteophytes and loose bodies. The notch
view and 45° flexion weight-bearing view are useful for demonstration
of loose bodies, OCD, and narrowing of the intercondylar notch. The
Merchant view (40) at 45° of flexion or Lauren view (36)
at 20° of flexion demonstrates abnormalities of the patellofemoral
joint, including joint space narrowing, patellar tilt, and patellar
subluxation (Fig. 84.15).
 |
|
Figure 84.14. A: Technique for the 45° PA flexion weight-bearing x-ray study of the knee. B: Demonstrating medial compartment joint space loss in flexion. C: Demonstrating lateral compartment joint space loss in flexion.
|
 |
|
Figure 84.15. A: Patient position for the Merchant view. B: Merchant view of both patellofemoral joints.
|
subtle tibial plateau fractures, or loose bodies. A cross-table lateral
view can be used to demonstrate a lipohemarthrosis that suggests the
presence of an intra-articular fracture (24). Use stress radiographs for patients with open growth plates to differentiate between a ligament and epiphyseal injury (42).
In skeletally mature patients, use stress radiographs to document
medial, lateral, anterior, or posterior instability objectively.
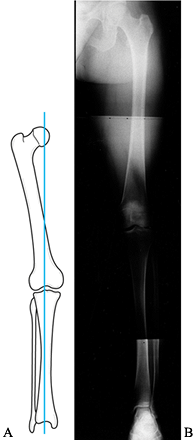
is useful for assessing the mechanical axis of the limb. The mechanical
axis normally falls through the medial tibial spine (Fig. 84.16).
Shift of the weight-bearing axis into either compartment leads to
relative joint overload, as well as a change in the tension
relationship of the collateral ligaments (Fig. 84.17). This view is essential for preoperative planning in patients undergoing total knee replacement,
osteotomy, ligament reconstruction, meniscus reconstruction with an
allograft, or chondrocyte autograft. Without proper attention to the
mechanical axis before surgery, the outcome of these procedures may be
compromised.
 |
|
Figure 84.16.
The mechanical axis measured on a 51-inch weight-bearing AP is sensitive to demonstrating shift of the weight-bearing axis into the medial or lateral compartment. |
 |
|
Figure 84.17. Fifty-one-inch standing AP weight-bearing view demonstrating shift of the weight-bearing axis into the medial compartment.
|
intra-articularly, and then obtaining radiographs in multiple
projections, both with and without stress applied to the knee (Fig. 84.18).
Although arthrography has been largely replaced by MRI, the former
technique may be indicated in patients with contraindications to MRI.
The primary reason for obtaining a knee arthrogram is for assessment of
the menisci (2).
 |
|
Figure 84.18. Arthrogram demonstrating a tear of the posterior horn of the medial meniscus.
|
collateral ligament injuries, OCD, chondral defects, plica, and
popliteal cysts. The accuracy of arthrograms for the diagnosis of
meniscal tears has been reported to be between 76% and 96% (13,28). In comparison to MRI, there are more false-negative results associated with the use of arthrography.
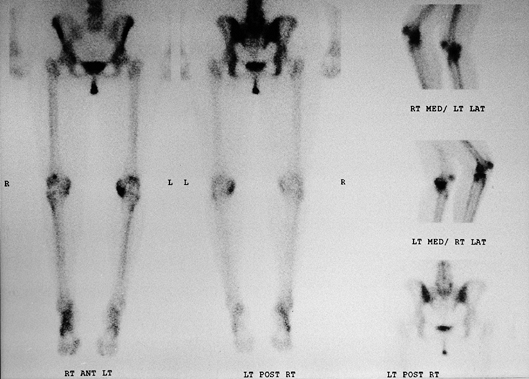
technetium 99m/methylene diphosphonate, a compound that is readily
absorbed by metabolically active bone (Fig. 84.19).
The primary advantages of bone scanning are its high sensitivity in
detecting early osseous disease and the ease of surveying the entire
skeleton. Bone scans have been used in the diagnosis of primary and
metastatic neoplasms, implant loosening, infection, reflex sympathetic
dystrophy, osteonecrosis, occult fractures, stress fractures, and
arthritis (16). When considering a
valgus-producing osteotomy of the knee for genu varum, a bone scan is a
more sensitive indicator of arthritis in the lateral compartment than
plain radiographs (9). The disadvantages
of bone scintigraphy are the radiation exposure, the length of time to
perform the exam, and most important, the lack of diagnostic
specificity. Despite the high sensitivity of bone scans, false-negative
results may occur with certain neoplasms (multiple myeloma) and in
elderly patients within 3 days after sustaining radiographically occult
fractures.
 |
|
Figure 84.19. Technetium 99m bone scan of the lower extremities demonstrating increased uptake in the medial compartment of the left knee.
|
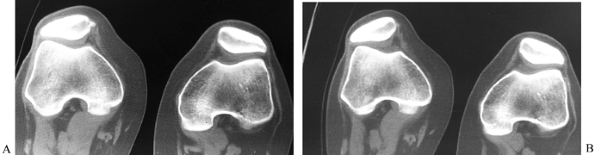
has declined with the advent of MRI, but it remains useful in the
diagnosis of osteonecrosis, OCD, tibial plateau fractures, and tumors,
as well as for evaluation of patellar tracking, patellar tilt, and
patellar subluxation (Fig. 84.20).
 |
|
Figure 84.20. CT image of the patellofemoral joint at 30° (A) with quad tightening and (B) without quad tightening.
|
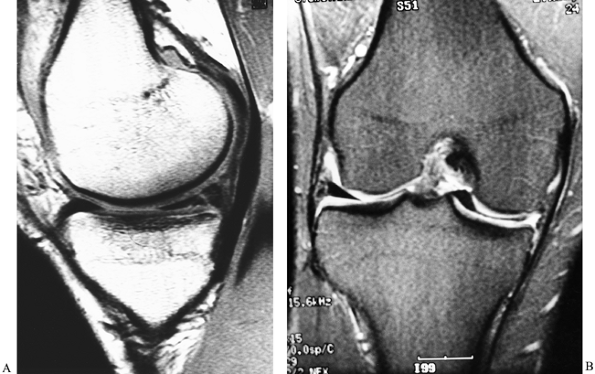
After plain radiography, MRI is the imaging test of choice for
evaluating internal derangements of the knee. The frequency with which
this test should be used, however, is the subject of substantial
controversy.
MRI routinely generates high-resolution images in 3 mm to 5 mm sections
of the knee in multiple anatomic planes. The advantages of MRI are that
it is noninvasive and safe. However, the most significant advantage of
MRI is the capability of generating high-contrast soft-tissue imaging
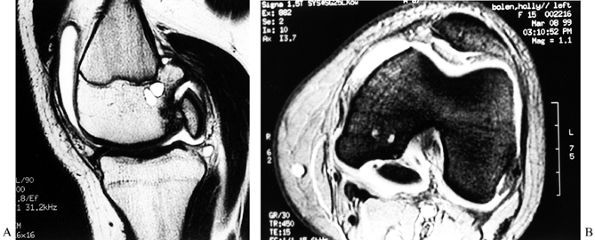
that is not possible with other imaging techniques (Fig. 84.21).
 |
|
Figure 84.21. MRI of the knee. A: A vertical tear of the posterior horn of the medial meniscus. B: A tear of the medial meniscus with displacement into the intercondylar notch.
|
cost and the fact that not all patients can fit into the scanner
because of a weight and size limitation with standard closed MRI. There
is also a subset of patients who cannot tolerate MRI because they are
claustrophobic. MRI is contraindicated in patients with pacemakers,
ferromagnetic intracranial aneurysm clips, cochlear implants, and
intraocular metal fragments. Pregnancy is a relative contraindication.
Open MRI can accommodate patients with claustrophobia or a size
limitation. There is, however, an associated loss of image contrast
owing to the need for a smaller magnet.
has been previous injury or surgery. Retained ferromagnetic hardware
creates artifacts, which may obscure adjacent abnormalities. After
partial meniscectomy or meniscus repair, the accuracy of conventional
MRI for detecting new meniscal abnormality decreases significantly. In
order to optimize the imaging of patients suspected of having recurrent
meniscal tears, MR arthrography is useful (2).
would be useful in nearly all patients with knee problems. The cost and
the time involved in performing the procedure prohibit its widescale
use (23). MRI needs to be used selectively as a
diagnostic tool for evaluating disorders of the knee. Before ordering
MRI, it should be clear that the information obtained would impact or
change the treatment program. Indications for MRI are determined
individually. MRI of the knee may be used to diagnose the presence of
meniscus tears, ligaments and tendon injuries, and osseous,
osteochondral, and chondral lesions.
When comparing the accuracy rates of MRI versus knee arthroscopy,
meniscus tears are identified with a 90% to 95% accuracy with MRI. ACL
and PCL tears are identified with over 95% accuracy. Bone contusions,
radiographically occult fractures, and spontaneous osteonecrosis of the
knee are diagnosed with almost 100% accuracy on MRI. Equally important,
negative findings on MRI of the knee is 95% accurate for the prediction
of normal intra-articular structures. With an experienced evaluator,
there are relatively few false-positive and false-negative results. MRI
has rapidly evolved into a comprehensive and versatile tool for the
evaluation of knee disorders.
diagnosis or therapeutic treatment. Always take a complete history, do
a physical examination, and obtain radiographs before proceeding with
an arthroscopic evaluation of the knee. Other diagnostic studies are
used as necessary for purposes of establishing a diagnosis. Arthroscopy
is not meant to be used for every patient with knee pain. The
Arthroscopy Association of North America has suggested the following
guidelines for arthroscopy (64):
-
The arthroscopist should perform an
adequate history and physical examination, as well as obtain
radiographs or other pertinent laboratory evaluations of the patient if
they have not already been performed. -
The risks, benefits, alternatives of
treatment, and potential complications should be carefully explained to
each patient before an arthroscopic evaluation is performed. -
The arthroscopist should exercise due consideration in selecting the correct arthroscopic procedure for a particular condition.
-
A detailed report of the procedure should be prepared, including the arthroscopic findings and description of the operation.
disorders of the knee with few exceptions such as intra-articular
fractures, intra-articular infections, and true mechanical locking.
Conservative measures for the management of knee disorders include a
range-of-motion and muscle-strengthening program.
injuries and timing of surgery have similar application to most other
knee disorders. Under ideal circumstances, range of motion and muscle
strengthening should be optimized before surgery. Postoperative
rehabilitation is facilitated by a preoperative program of exercise. If
surgery is undertaken before the patient regains range of motion, there
is an increased risk of postoperative stiffness (29).
management of knee disorders. Minimizing or avoiding the activities
that aggravate the knee will often reduce knee symptoms. Crutches or
other ambulatory aids are recommended for individuals who have an
antalgic gait following injury or onset of symptoms. Ice, elevation,
and a compression dressing may aid in controlling intra-articular and
extra-articular swelling. Immobilization may be useful to control pain
and allow some injuries to heal, but its use should be carefully
weighed against the joint
stiffness
that can occur with immobilization. Nonsteroidal anti-inflammatory
drugs (NSAIDs) can be used to help reduce swelling and inflammation,
but their use must be carefully balanced against the risk of
gastrointestinal irritation and bleeding.
corticosteroid can be beneficial for both diagnosis and treatment.
Suspected intra-articular disorders should have at least temporary
improvement with an intra-articular lidocaine injection. Concomitant
use of corticosteroids may provide a long-term therapeutic benefit for
the individual. The use of intra-articular injections must be carefully
individualized. A 70-year-old patient with DJD may be injected multiple
times. An 18-year-old with an ACL injury and meniscus tear will not
benefit by intra-articular injections.
over a reasonable period of time and the individual remains disabled,
consideration for an arthroscopic evaluation of the knee is warranted
for purposes of diagnosis and treatment (52). A thorough preoperative medical evaluation is necessary to minimize operative complications.
of arthroscopic surgery. Preoperatively, have a thorough discussion
with the patient of the risks, benefits, alternatives of treatment, and
postoperative rehabilitation. It is imperative to define clearly for
the patient what to expect from surgery. The importance of
postoperative rehabilitation for the success of the procedure should be
emphasized. Written guidelines, illustrations, and videotapes
facilitate the education process.
anesthesia. The choice of anesthetic is determined by the patient’s
medical history and the procedure being performed, as well as the
preference of the patient, surgeon, and anesthesiologist. Local
anesthesia has gained popularity with the advent of office arthroscopy.
-
Procedures that require less time and are
not dependent on joint exposure (such as diagnostic arthroscopy, loose
body removal, and lateral release) can be performed with local
anesthesia and intravenous (IV) sedation. -
Local anesthesia is not adequate in
procedures requiring use of a tourniquet for more than 20 minutes or in
procedures requiring significant exposure of the joint such as
meniscectomy or meniscus repair and procedures requiring bone drilling (58). -
Regional anesthesia is indicated in
patients in whom general anesthesia is believed to be medically
contraindicated. Additionally, there are patients who prefer regional
anesthetics, including those with the desire to watch the procedure on
the video monitor. -
General anesthesia is the preferred
anesthesia for most arthroscopic procedures of the knee. It allows for
complete muscle relaxation and facilitates adequate joint exposure.
-
Position the patient supine. Place the
operative knee in full extension or at 90° of flexion with the end of
the table flexed. Position a tourniquet on the proximal thigh. It can
be used at the discretion of the surgeon. Adequate exposure is
facilitated by use of a leg-holding device or post. The nonoperative
leg needs to be well padded and supported (Fig. 84.22).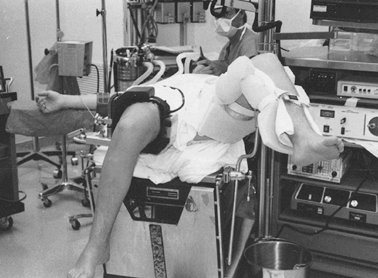 Figure 84.22.
Patient positioning for knee arthroscopy. A thigh holder is secured
over or distal to the tourniquet. The nonoperative limb is placed in a
well-padded leg support. This leg position insures easy access to the
posteromedial compartment. -
Diagnostic arthroscopy is the initial
phase of all procedures. Use a standardized and systematic approach to
achieve a thorough and efficient evaluation of the entire knee joint
before performing any type of surgical treatment. Avoid the temptation
to focus on a specific problem and not complete the diagnostic
arthroscopy. The only exceptions to this would be if a loose body were
encountered or the knee was mechanically locked (due to a loose body or
displaced meniscus fragment). Rather than lose the loose body within
the joint, remove it first and then complete the diagnostic
arthroscopy. A displaced meniscus tear should be reduced into its
normal anatomic position before resuming the diagnostic arthroscopy.
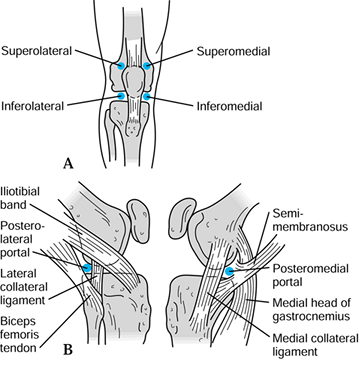
the success of the procedure. The standard arthroscopic portals are
anterolateral, anteromedial, superolateral, superomedial,
posterolateral, and posteromedial (Fig. 84.23).
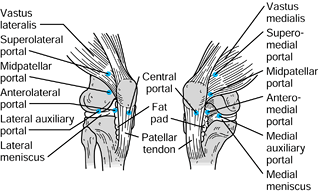
The accessory portals include the midpatellar, transpatellar, accessory
medial and lateral, and accessory posteromedial and posterolateral
portals (Fig. 84.24). Knowledge of the surface
and deep anatomy of the knee is a prerequisite for establishing portals
safely and effectively. An accurately placed portal will allow
instruments to be used effectively. An improperly placed portal can
cause damage to the knee as well as hamper the surgical procedure.
 |
|
Figure 84.23. Anatomic location of arthroscopic portals.
|
 |
|
Figure 84.24.
Accessory arthroscopic portals. (Redrawn from Scott, WN, Insall JN, Kelly MA. Arthroscopy and Meniscectomy: Surgical Approaches, Anatomy and Techniques. In: Insall JN, ed. Surgery of the Knee, 2nd ed. New York, Churchill Livingstone, 1993, with permission.) |
for knee arthroscopy. Establish it with the knee in 90° of flexion and
distended with fluid. The landmarks for portal placement are the
inferior pole of the patella and lateral joint line. There is a soft
spot that can be palpated adjacent to the patellar tendon. Vertical
incisions are extensile and facilitate portal adjustment if necessary.
-
Direct a #11 blade toward the
intercondylar notch, with the sharp edge of the blade facing superiorly
to avoid any damage to the underlying meniscus or transverse meniscal
ligament. Do not penetrate so deep that the articular cartilage or the
ACL is injured. -
Pass a 5 mm blunt trocar through the
portal to ensure ease of passage. Advance the blunt trocar to all
desired areas of visualization to ensure that the arthroscope will be
advanced easily into these areas. -
After the anterolateral arthroscopy
portal has been established, all remaining portals can be made under
arthroscopic control. Use the arthroscope to transilluminate the
proposed portal site to document any vascular structures. Use an
18-gauge needle to predetermine the accuracy of the portal placement.
Then use a #11 blade to establish the arthroscopic portal.
-
Locate the anteromedial arthroscopy
portal 1 cm above the joint line and approximately 5 mm from the medial
border of the patellar tendon, to minimize the impingement of the fat
pad. -
Use the arthroscope to transilluminate
the area to avoid vascular structures and insert an 18-gauge needle at
the portal site to ensure proper placement. Direct a #11 blade into the
joint, aiming for the intercondylar notch. Place a blunt trocar through
the portal to ensure ease of instrument passage into the joint.
-
Visualize the posterior compartments of
the knee using the anteromedial and anterolateral arthroscopy portals,
and passing the instruments posteriorly through the intercondylar notch
(45). -
Smaller diameter obturators facilitate passage into the posterior compartments.
-
Pass the blunt obturator or sleeve along
the intercondylar notch wall by touch. Flexing and extending the knee
between 45° and 90° degrees often relaxes the soft tissues and allows
the obturator or sleeve to pass into the posterior compartment. -
Establish the posteromedial portal with
the knee flexed 90° and the joint distended with fluid. Pass the
arthroscopic obturator or sleeve from the anterolateral arthroscopy
portal along the medial intercondylar wall into the posteromedial
compartment. -
Visualize the posteromedial compartment with a 30° or 70° arthroscope.
-
Transilluminate the posteromedial skin area to identify the saphenous vein and other vascular structures.
-
Palpate the posteromedial skin to determine the location of the arthroscopy portal.
-
Pass an 18-gauge needle to ensure proper
anatomic placement of the portal 1 cm posterior to the medial femoral
condyle and 1 cm above the joint line. -
Make an incision in the skin with a #11
blade. Dissect bluntly down to capsule with a hemostat to avoid injury
to the saphenous nerve. Pass the blunt obturator into the posteromedial
compartment. -
Use the posteromedial portal for visualization of the medial meniscus, PCL, and posterior capsular structures.
-
Pass instruments through this portal for loose body removal, meniscectomy, meniscus repair, PCL surgery, and synovectomy.
-
Establish the posterolateral portal with
the knee flexed 90° and the joint distended. Pass the arthroscopic
obturator or sleeve along the lateral intercondylar wall from the
anteromedial portal. -
Visualize the posterolateral compartment
with a 30° or 70° arthroscope and transilluminate the posterolateral
skin to identify any vascular structures. -
Palpate the posterolateral skin to
identify the location of the portal site, 1 cm posterior to the lateral
femoral condyle and 1 cm above the joint line. If the portal is placed
too far posteriorly, the peroneal nerve can be injured. Pass an
18-gauge spinal needle into the joint to ensure proper placement. -
The lateral meniscus and posterior compartment can be visualized from this portal.
-
Use this portal for loose body removal, meniscectomy, meniscus repair, and synovectomy.
-
Place the knee into full extension and distend the joint.
-
Pass the arthroscopic obturator or sleeve
from the anterolateral portal into the suprapatellar pouch to allow
direct visualization. Be careful to avoid injuring the articular
cartilage of the trochlear groove and patella. -
Place the portals at the superior pole of
the patella. If they are placed too distally, the portals will impinge
on the patellofemoral joint. -
Transilluminate to identify the vascular
structures. Pass an 18-gauge spinal needle to determine proper
placement. Insert the spinal needle parallel to the patellofemoral
joint axis. -
Use a #11 blade to incise the skin and
establish the portal. Pass the blunt obturator into the joint. These
portals are routinely used for inflow and outflow. -
Visualize the medial and lateral gutters,
suprapatellar pouch, and plicas. Evaluate patellofemoral tracking by
flexing the knee from 0° to 90° and observing the patella and its
relationship to the trochlear groove. -
Assess for plica impingement while
actively flexing and extending the knee and observing for plica
impingement on the medial femoral condyle.
portals can be established in almost any anatomic region to facilitate
surgery.
-
Establish an accessory portal to minimize crowding of instrumentation.
-
Use an accessory portal for better angulation for difficult meniscus tears or loose body removal.
-
Use the accessory medial and lateral portals to facilitate anterior horn meniscectomy.
-
Less commonly used portals are the
accessory midpatellar lateral and medial portals, and the accessory
posteromedial and posterolateral portals. -
Establish all accessory portals in the standard manner using transillumination and an 18-gauge spinal needle.
-
The anesthesiologist administers a
regional or spinal anesthetic. Examine the knee under anesthesia.
Document the range of motion and stability of both knees. -
Secure the tourniquet to the proximal
thigh. Place the injured leg in a leg-holding device distal to the
tourniquet. For short thighs, a tourniquet can be placed within the
thigh-holding device. There should be a minimum of 6 cm distance
between the superior pole of the patella and the lower portion of the
thigh-holding device. If the leg-holding device is applied too
distally, there is not enough space to establish and use superior
portals. -
Lower the foot of the table, allowing the
knee to flex to 90°. Place the nonoperative limb in a well-leg support,
allowing adequate access to the posteromedial compartment of the
injured knee. -
Prep and drape the operative leg. If
using a tourniquet, esmarch the leg and elevate the tourniquet. Distend
the knee by placing a 2 mm Verres needle into the suprapatellar pouch
through the superolateral or superomedial portal, with the knee in full
extension. As the needle is inserted, the surgeon usually encounters
synovial fluid as the needle enters the joint. Examine the fluid and
send it for analysis if needed. Distend the knee with irrigation fluid. -
Flex the knee 90° and establish the
anteromedial and anterolateral arthroscopy portals. Insert a blunt 5 mm
obturator to ensure ease of passage through the portals into the
compartments to be visualized. -
Place the arthroscopic sleeve or
obturator through the anterolateral portal, pass posterior to the
patella, into the suprapatellar pouch. Use a 4 or 5 mm 30° arthroscope
with inflow through the arthroscopic sleeve and outflow through the
Verres needle. Outflow through the arthroscope can allow debris to
compromise visualization. Visualize the superior plica. Assess the
synovium. -
Direct the arthroscope down the lateral
gutter. A normal transverse fold of synovium covers the femoral
attachments of the popliteus tendon and the lateral collateral
ligament. Distal to this fold, note the popliteal hiatus and lateral
meniscus. -
Bring the arthroscope back into the
suprapatellar pouch and visualize the medial gutter. Assess the medial
plica for impingement. -
Rotate the arthroscope to view superiorly
and inspect the articular cartilage surface of the patella. Withdraw
the arthroscope slowly, and inspect the articular cartilage surface of
the trochlear groove as you bring the knee into 45° of flexion. -
Inspect the intercondylar notch,
including the ACL and PCL. Palpate the ACL with a probe and determine
its integrity. A prominent inferior plica (ligamentum mucosa) may
obscure visualization. Resect the plica with a shaver if it compromises
visualization, especially when you are attempting to establish the
integrity of the ACL. -
Visualize the medial compartment, placing
a valgus load on the knee with 10° to 15° of flexion to facilitate the
process. Externally rotate the foot 15° to 20°. If the ACL is
disrupted, it is important to maintain the external rotation or a
subluxation may occur (pivot shift). If it does occur, bring the knee
back into the neutral position and re-examine the joint with the foot
externally rotated. Use a probe to document the integrity of the
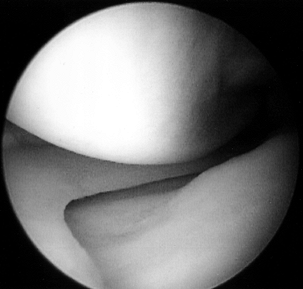
meniscus and the articular cartilage surfaces (Fig. 84.25; see also COLOR FIG. 84.25).
While applying a valgus load, slowly flex the knee maximally and
inspect the remainder of the articular cartilage surface of the medial
femoral condyle.![]() Figure 84.25. (See COLOR FIG. 84.25.) Arthroscopic view of the medial compartment.
Figure 84.25. (See COLOR FIG. 84.25.) Arthroscopic view of the medial compartment. -
Direct the arthroscope to the lateral
compartment. If an inferior plica is present, pass the arthroscope over
the plica with the knee in 45° of knee flexion, until you can see the
lateral compartment. Apply a varus load to expose the lateral
compartment. Probe the meniscus and articular cartilage surfaces (Fig. 84.26; see also COLOR FIG. 84.26).
Visualize the popliteus tendon. Flex the knee maximally with varus
stress to assess the remainder of the articular cartilage surface of
the femoral condyle.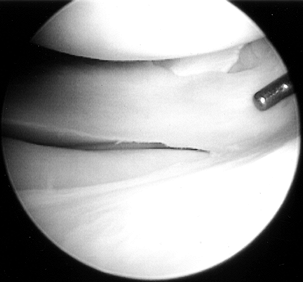 Figure 84.26. (See COLOR FIG. 84.26.) Arthroscopic view of the lateral compartment.
 -
Visualize the posteromedial compartment
by passing a blunt obturator or sleeve through the intercondylar notch
from the anterolateral arthroscopy portal. Establish a posteromedial
portal under direct visualization as necessary. A 30° arthroscope
allows visualization of a majority of the posteromedial compartment.
Occasionally, a 70° arthroscope is helpful. An anatomic communication
to a popliteal cyst is present in 50% of knees. Withdraw the
arthroscope slowly to visualize the PCL and the posterior attachment of
the medial meniscus. -
Visualize the posterolateral compartment
by passing the blunt obturator through the intercondylar notch from the
anteromedial arthroscopy portal. Establish a direct posterolateral
portal. A 30° arthroscope allows near complete visualization of the
compartment, including the popliteal hiatus. -
With the knee in full extension,
establish a superolateral portal. Insert the obturator or sleeve into
the suprapatellar pouch to allow visualization of the patellofemoral
joint. The medial and lateral gutters can be visualized from
superiorly. Flex the knee from 0° to 90° and document patellar tracking
(Fig. 84.27; see also COLOR FIG. 84.27). Probe the articular cartilage surface of the patella and trochlear groove.![]() Figure 84.27. Arthroscopic view of the patellofemoral joint from the (A) superolateral portal and (B) inferolateral portal, demonstrating an injury to the articular cartilage of the trochlear groove.
Figure 84.27. Arthroscopic view of the patellofemoral joint from the (A) superolateral portal and (B) inferolateral portal, demonstrating an injury to the articular cartilage of the trochlear groove.
diagnostic portion of the procedure. At best, clinical diagnosis is 80%
accurate (32,49,67).
At least 20% of the time, new findings are documented by the diagnostic
portion of the procedure. It is important to visualize the entire knee
joint before proceeding with the surgical portion of the procedure. The
diagnostic portion of the procedure can be completed in less than 10
minutes.
is affected in many knee conditions. Most synovitis is reactive and is
noted in association with other intra-articular disorders of the knee,
such as a meniscus tear or DJD. The synovium can become proliferative
in disorders such as rheumatoid arthritis (51), pigmented villonodular synovitis (53), hemophilia, and synovial chondromatosis (43).
In contrast to a reactive synovitis, the synovium in these entities can
invade the menisci, ligamentous structures, and articular cartilage
surfaces, causing an acceleration of the degenerative process, which
has been best documented in patients with rheumatoid arthritis (70).
A careful clinical evaluation, including knee aspiration, can usually
eliminate other etiologies for the synovitis noted, limiting the
diagnosis to a disorder of the synovium. If the diagnosis remains
unclear and symptoms persist, an arthroscopic evaluation of the knee,
to include synovial biopsy, is indicated.
recommended. Place patients on a program of strengthening, flexibility,
activity modification, NSAIDS, and intra-articular injections.
Synovectomy is indicated when the synovial disorder remains symptomatic
despite medical management for at least 6 months. Arthroscopic anterior
and posterior synovectomy can accomplish a remission or at least a
reduction of symptoms (26,51,53).
significant morbidity associated with the procedure, especially
stiffness. With open synovectomy, the posterior compartments of the
knee were usually left untreated. Technically, it was very difficult to
remove the parameniscal synovium.
evolved into a procedure in which 95% of the diseased synovium can be
removed (57). Relative contraindications to
arthroscopic synovectomy include joint space narrowing greater than 3
mm, which is best demonstrated on the flexion weight-bearing view. In
addition, local skin lesions such as rashes or infection should be
resolved before surgery. The patient must be willing to undertake
rehabilitation following surgery.
 |
|
Figure 84.28. Arthroscopic synovectomy is performed in a systematic fashion to allow for a complete anterior and posterior synovectomy.
|
-
Using a standard arthroscopy setup, position the leg-holding device to allow easy access to the suprapatellar pouch.
-
Position the nonoperative leg in a well-leg holder to facilitate access to the posteromedial compartment of the knee.
-
Perform diagnostic arthroscopy to document all abnormalities before initiating the synovectomy.
-
Begin the synovectomy in the posterior
compartments. Remove the synovium from the intercondylar notch,
especially the posterior aspect, to improve visualization significantly
and allow for ease in development of the posterior arthroscopic portals. -
Establish the posterior medial portal
under direct visualization, with the compartment distended with fluid.
Use a spinal needle to ensure proper placement of the posterior portals. -
Pass an obturator or sleeve into the
posterior compartment through the posterior portal. Insert the 4.5 and
5.5 mm full-radius synovial resectors through the sleeve into the
posterior portal and complete the synovectomy. -
Under direct visualization, insert an
obturator or sleeve through the posteromedial portal. Remove the
arthroscope from anterior and place it posteriorly through the sleeve
to visualize the intercondylar notch from posteriorly. -
Pass the 4.5 mm synovial resector from
the anterolateral portal into the posteromedial compartment, and remove
the remaining synovium from the posterior intercondylar notch. -
With the knee flexed 90°, pass a 30° or 70° arthroscope from the anteromedial portal into the posterolateral compartment (Fig. 84.19B)
-
Established the posterolateral portal
under direct visualization, with the compartment distended with fluid.
Use a spinal needle to ensure proper placement of the posterior
portals. Avoid the peroneal nerve. Pass an obturator or sleeve into the
posterior compartment through the posterior portal. Insert the 4.5 and
5.5 mm full-radius synovial resectors through the sleeve into the
posterior portal and complete the synovectomy. -
Under direct visualization, insert an
obturator or sleeve through the posterolateral portal. Remove the
arthroscope from anterior and place it posteriorly through the sleeve
to visualize the intercondylar notch from posteriorly. -
Pass the 4.5 mm synovial resector from
the anteromedial portal into the posteromedial compartment, and remove
the remaining synovium from the posterior intercondylar notch. -
Upon completion of the posterior
synovectomy, look for bleeding vessels and cauterize them with an
intra-articular cautery. This process can be enhanced by diminishing
the inflow rate and allowing a small amount of bleeding to occur. -
Place the arthroscope into the
suprapatellar pouch through the inferolateral portal with the knee in
full extension. Use inflow through the arthroscope or through a
separate inflow system. -
Insert the 4.5 and 5.5 mm synovial
resectors through the superomedial or superolateral portals. In a
systematic fashion, remove the entire synovial layer from the
suprapatellar pouch (Fig. 84.28C). -
Visualize the proximal medial and lateral gutters from the inferior portals with the knee in full extension.
-
Introduce the synovial resector through
the superior portal to allow for triangulation. Reverse the arthroscope
and synovial resector and complete the remainder of the synovectomy in
each gutter (Fig. 84.28D). -
Meticulously debride the chondrosynovial
junction, because synovial ingrowth from these areas leads to
degeneration of the articular cartilage surfaces. -
Remove diseased synovium invading the ACL
and PCL with the 4.5 and 3.5 mm synovial resectors, trying to preserve
as much ligament substance as possible (Fig. 84.28E). -
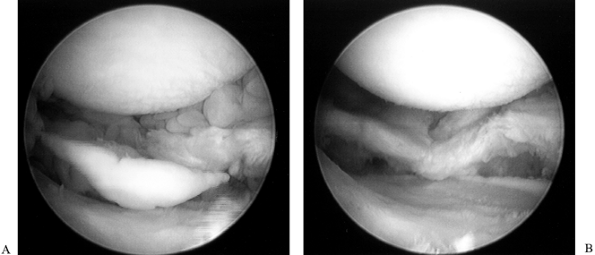
Expose the medial and lateral compartments in the routine manner (Fig. 84.28F). Excise the parameniscal synovium with the smaller synovial resectors (Fig. 84.29; see also COLOR FIG. 84.29).
![]() Figure 84.29. Arthroscopic view of the lateral compartment (A) presynovectomy and (B) postsynovectomy.
Figure 84.29. Arthroscopic view of the lateral compartment (A) presynovectomy and (B) postsynovectomy. -
Curved synovial resectors facilitate excision of the synovium inferior to the anterior horns of the menisci.
-
Perform a final diagnostic arthroscopy to identify any areas of residual synovitis.
-
Use the intra-articular cautery for
bleeding vessels. Release the tourniquet for a short period of time and
then re-elevate it when bleeding occurs. This technique allows most
significant bleeding vessels to be identified and cauterized. Use of
the electrocautery minimizes postoperative swelling. -
Insert a 1/8-inch
hemovac drain for 1 to 4 hours. Keep a compression dressing in place
for 2 days and then replace it with a thigh-high TED stocking.
emphasizing range of motion and muscle strengthening exercises (see the
section entitled Rehabilitation). Patients
will need an ambulatory aid for 1 to 2 weeks. They can expect to return
to activities in 2 to 3 months. Daily rehabilitation is critical for
success. Initiate formal physical therapy as necessary.
occasionally noted in younger patients. In this age group, OCD and
osteochondral fractures associated with ACL tears or patellar
dislocations are the usual etiologies. Loose bodies occur more
frequently in older patients, and are more often associated with the
development of DJD. Osteonecrosis can also contribute to the formation
of loose bodies. Synovial chondromatosis and synovial
osteochondromatosis can develop in all age groups (8).
Cartilaginous or osteocartilaginous loose bodies are formed by synovium
and can become free within the knee joint. Thousands of small loose
bodies can be formed in this manner.
has described a subgroup of young patients with OCD and open growth
plates, a condition he called juvenile osteochondritis dissecans
(JOCD). JOCD is typically seen in boys younger than 14 years of age and
in girls younger than 12 years of age. JOCD has a much better healing
potential and hence a better long-term prognosis. Cahill estimated that
50% of patients with JOCD heal with conservative care. In contrast, OCD
in the older age group rarely heals without surgery.
appears to be traumatic, with interruption of the blood supply to
consistent anatomic areas on the lateral femoral condyle, medial
femoral condyle, and patella (1,20).
In OCD, 80% of lesions are noted in the “classic” location: the
posterolateral region of the medial femoral condyle; 15% of lesions are
seen on the inferocentral region of the lateral femoral condyle. Less
than 5% of OCD is located on the patella or trochlear groove. The
overall incidence of OCD has been estimated to be 3:10,000 (37). Men predominate 3:1, with bilateral involvement in approximately 30% of JOCD and 5% of the older age group (46).
The goal of treatment in OCD is to allow the lesion to heal either by
conservative management or surgical intervention in an attempt to
maintain integrity of the articular cartilage joint surface. OCD can
progress to a completely detached loose body with a residual crater
lesion in the articular cartilage surface. This crater lesion can
accelerate the process of DJD.
If the OCD fragment is hinged or detached, catching or locking may be
observed. Physical examination findings vary depending on the stage of
the disease. There may be joint line tenderness and a knee effusion. If
the lesion is located in the classic position on the medial femoral
condyle, Wilson’s test may be positive (72).
Wilson’s test is performed by extending the knee from a flexed
position, with the foot internally rotated. As the knee nears full
extension, the tibial spine impinges on the intercondylar region of the
medial femoral condyle. This maneuver can be painful in the presence of
an OCD lesion located on the medial femoral condyle. There should be no
pain associated with extension of a flexed knee with the foot
externally rotated.
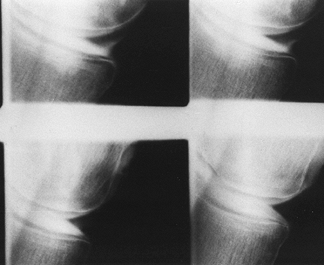
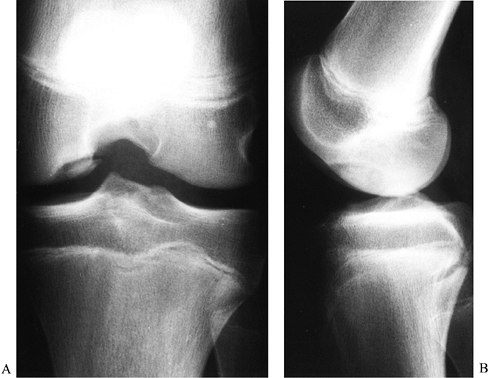
The standard AP view may not demonstrate the OCD lesion. The notch view
or flexion weight-bearing view are best for demonstration of the OCD
lesion on the femoral condyles (71). On the
lateral radiographs, 90% of the lesions of the medial femoral condyle
are located in a region defined by a line drawn through the posterior
cortex of the femur and Blumenstadt’s line. Of lesions on the lateral
femoral condyle, 75% are noted posterior to the line drawn along the
posterior cortex of the femur. In the patella, 80% of the OCD lesions
are located in the midinferior region.
 |
|
Figure 84.30. Notch (A) and lateral (B)view of osteochondritis dissecans of the medial femoral condyle.
|
largely been replaced by MRI. Bone scans may be of value to stage the
OCD lesion and evaluate the healing process. Cahill believed that bone
scans were helpful for diagnosis and monitoring the clinical course of
JOCD (5). A bone scan may be used to detect an early OCD lesion when radiographs are still normal.
MRI can accurately predict the size of the lesion. The OCD lesion can
be staged, because MRI will demonstrate whether or not a breach has
occurred in the articular cartilage surface.
 |
|
Figure 84.31. CT (A) and MRI (B) of an osteochondritis dissecans lesion of the medial femoral condyle.
|
|
||||||||||||
allows for accurate diagnosis, staging, and treatment. The entire
suspected OCD lesion must be carefully probed to identify the extent of
the lesion. Grossly, the articular cartilage of the OCD lesion may
appear to be almost normal in the early stage of OCD, but careful
probing often identifies softening or a depression around the
circumference of the OCD lesion.
|
||||||||||||
accurately with the MRI classification. The MRI findings, in
conjunction with the arthroscopic findings, are often necessary to
determine the treatment that is indicated for each individual OCD
lesion.
congruent articular cartilage surface and prevent the development of
degenerative arthritis (66).
-
Take a complete history and perform a physical examination. Obtain plain radiographs and MRI to plan treatment of OCD lesions.
-
JOCD with an intact articular cartilage surface can be treated without surgery (5).
Activity modification with use of crutches until symptoms subside is
recommended. Once the individual is symptom free, use of crutches can
be discontinued. When radiographic evidence of healing is noted,
activities can be progressed. This process can take 4 to 12 months. -
In JOCD with an intact articular
cartilage surface, 50% can be expected to heal with conservative
management. Those that do not heal successfully will require surgery. -
Nonoperative management can be attempted in JOCD with stage II patients, but the results are less predictable.
-
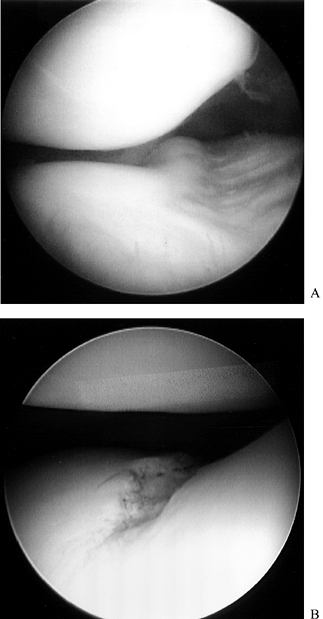
Arthroscopy is indicated for stage II, stage III, or stage IV lesions in all age groups (71). With arthroscopy, the location, size, stability, and status of the articular cartilage surface is accurately documented (Fig. 84.32; see also COLOR FIG. 84.32).
Treatment is dependent on the age of the patient and stability of the
lesion. Use arthroscopic drilling in stable OCD lesions in skeletally
immature patients (3). Drilling allows a fibrin
clot to form and stimulates a revascularization process of the
fragment. Use a smooth 0.62 Kirschner (K) wire and make multiple drill
holes at 3 mm increments (3).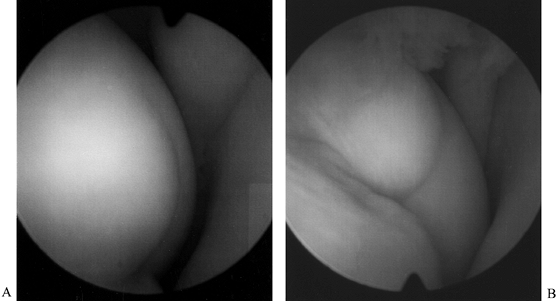 Figure 84.32. (See COLOR FIG. 84.32.) Arthroscopic view of osteochondritis dissecans lesion of the medial femoral condyle.
 -
Arthroscopic screw fixation is indicated in skeletally immature patients with unstable lesions.
-
Arthroscopic screw fixation is indicated for patients near skeletal maturity or older with stable or unstable regions.
-
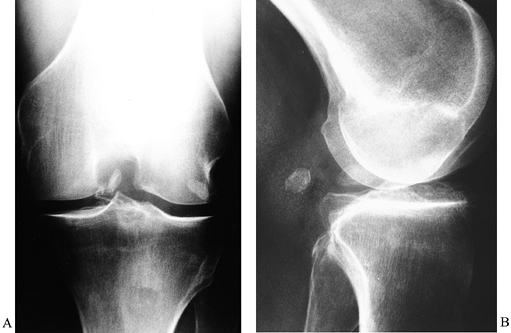
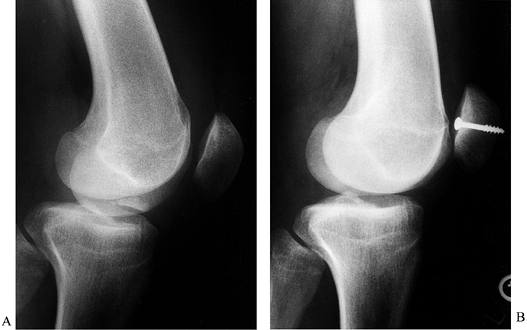
Two screws give best control of rotation and provide secure internal fixation of the OCD fragment (Fig. 84.33).
![]() Figure 84.33. Open reduction internal fixation (ORIF) of osteochondritis lesion of medial femoral condyle.
Figure 84.33. Open reduction internal fixation (ORIF) of osteochondritis lesion of medial femoral condyle. -
Use cannulated screws, noncannulated 4.0 cancellous bone screws, or Herbert screws for fixation (33).
-
In skeletally immature patients, it is important not to cross the epiphyseal line with the threaded screw.
-
Use an image intensifier to determine screw placement accurately.
-
Countersink the head of the screw just below the articular cartilage surface.
-
For some unstable lesions, bone grafting
with curettage of the base of the lesion will be necessary before screw
fixation. Undertake this procedure in selected stage III and almost all
stage IV lesions. An arthrotomy is usually required. Local cancellous
bone graft can be obtained from the femur or tibia. -
In occasional grade IV lesions, the free
fragment cannot fit easily back into its bed and may need to be
contoured to fit anatomically. -
Remove the screw or screws at a second
arthroscopic procedure 8 to 12 weeks after the initial operation. The
OCD lesions can be visualized and the extent of healing documented. -
Radiographically it takes 6 to 12 months to achieve full bony union of the OCD fragment.
-
Occasionally in some stage IV lesions,
the free fragment is compromised and cannot be placed back into the
site of origin. In these cases, remove the OCD fragment
arthroscopically and treat the crater lesion. Treatment options include
drilling, abrasion, microfracture, autogenous osteochondral grafting,
chondrocyte autograft, and osteochondral allograft. Treatment is
individualized based on the needs of the patient (see Chapter 86).
cause mechanical symptoms of catching or locking. At times, the patient
can palpate or observe larger fragments moving around in the knee. A
knee effusion is typically present. If the loose body is calcified, it
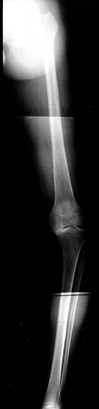
will be seen on standard radiographs (Fig. 84.34).
Noncalcified loose bodies, which are not visible on standard
radiographs, can be identified by MRI if they are large enough. The
most frequently encountered loose body is less than 5 mm in diameter
and occurs as the articular cartilage surface of the knee joint
gradually deteriorates in association with DJD (52,54).
Larger loose bodies can be formed by substantial pieces of the
articular cartilage surface breaking off or osteophytes fracturing.
Some intra-articular loose bodies grow and enlarge within the
environment of the knee joint.
 |
|
Figure 84.34. Loose body in the intercondylar notch noted on AP (A) and lateral (B) radiographs.
|
patients with suspected intra-articular loose bodies unless they have a
locked knee. Treat patients with a locked knee with urgent surgery and
removal of the loose body, which is most often found in the
intercondylar notch. All other individuals can undergo an initial
program of conservative management. Conservative measures include a
program of strengthening, flexibility, activity modification, and
NSAIDs. Use intra-articular injections as needed. For those patients
who have recurrent symptoms, arthroscopic loose body removal is
recommended.
-
Perform a thorough arthroscopic evaluation of the entire knee joint.
-
Irrigate the knee or debride small loose
bodies with a shaving tool. Frequently these small articular cartilage
loose bodies become entrapped in the parameniscal recesses, popliteal
hiatus, posterior compartments, and medial and lateral gutters. -
Introduce the shaver inferior to both
menisci to remove any small parameniscal loose bodies. Use a grasping
instrument for removal of larger loose bodies. -
Diminish the fluid inflow and outflow
when the loose body is encountered. Turbulence can quickly cause the
loose body to escape into another area of the knee. -
Establish a portal for insertion of a
grasping instrument. Loose bodies smaller than 1 cm in diameter can be
grasped and removed from the usual and customary arthroscopic portals.
Large loose bodies may require enlargement of the arthroscopic portals
for removal. -
Remove large loose bodies through the
capsule and subcutaneous tissues slowly, while rotating the grasped
loose body in a clockwise and counterclockwise fashion. Rotation
minimizes the risk of dislodging the loose body in the subcutaneous
tissues. -
A large loose body can become dislodged
in the soft tissues between the knee joint and the skin incision during
removal. If this event should occur, use a 2.75 or 4.0 mm arthroscope
to visualize the soft tissues around the arthroscopic portal and
localize the loose body. Once the loose body is identified in the soft
tissues, insert a grasper through the same portal as the arthroscope
and regrasp the loose body. If this technique fails, enlarge the
arthroscopic portal and identify and remove the loose body. -
In the posterior compartments of the knee, break the large loose bodies into smaller pieces before removing them.
-
For large loose bodies in the anterior
compartments of the knee, transport the loose body to the suprapatellar
pouch with a grasper. Establish a direct superolateral portal of
appropriate size, insert a second grasper, and remove the loose body.
There is less subcutaneous tissue present in the lateral parapatellar
region, and the risk of losing the loose body in the soft tissues is
diminished. -
Determine the site of origin of the loose
body. By finding the source of the loose body, it is frequently
possible to identify whether or not there are other associated loose
bodies remaining in the joint. The fragments removed, like the pieces
of a puzzle, should fit the chondral defect. -
Treat the remaining chondral defect
(chondroplasty, microfracture, osteochondral transfer, chondrocyte
autograft, osteochondral allograft) to diminish the risk of further
propagation, loose body formation, and acceleration of the degenerative
process. -
Acute osteochondral and chondral
fractures are associated with lateral patellar subluxation or
dislocation and ACL tears or instability. -
Osteochondral fractures with little attached subchondral bone should be removed as the predictability of healing is limited.
-
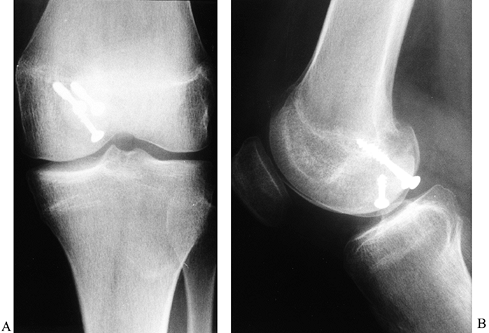
Reattach osteochondral fractures with K-wires or screws if enough bone is present with the chondral fragment (Fig. 84.35).
It appears that screw fixation alone provides the most predictable
level of healing. The procedure can be performed arthroscopically but
often requires a small arthrotomy.![]() Figure 84.35. Osteochondral fracture of the medial patella treated with internal fixation. A: Osteochondral fragment in the intercondylar notch. B: Internal fixation with a single 4.0 cancellous screw.
Figure 84.35. Osteochondral fracture of the medial patella treated with internal fixation. A: Osteochondral fragment in the intercondylar notch. B: Internal fixation with a single 4.0 cancellous screw.
tissue fills the space between the distal femoral and proximal tibial
epiphyses. During development this tissue resorbs in some areas and
becomes more dense in other areas forming the meniscus, ligaments, and
articular cartilage surfaces. This resorptive process of mesenchymal
tissue during embryologic development also leads to the development of
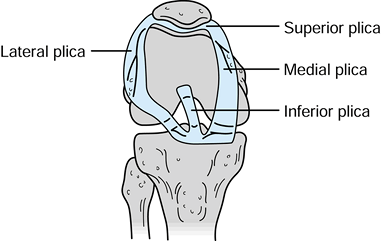
four distinct synovial plicae (Fig. 84.36). The
plicae’s anatomic description is based on their relationship to the
patella; superior, inferior, medial, and laterally based plicae can be
identified. Until the advent of arthroscopy, synovial plicae were
rarely diagnosed. As arthroscopy developed, the intra-articular
synovial plicae were described and studied.
 |
|
Figure 84.36. Synovial plicae of the knee: medial, superior, lateral, and inferior.
|
that approximately 67% of knees have an inferior plica, 55% have a
superior plica, 25% have a medial plica, and less than 1% have a true
lateral plica. A complete superior plica separating the superpatellar
pouch into two compartments occurs in up to 5% of individuals. The
incidence of pathologic plicae causing clinical symptoms remains very
controversial (15). Clinically, the medial
plica is most commonly implicated in knee disorders. Anatomically, the
medial plica extends from the medial border of the suprapatellar pouch
and attaches to the inferior fat pad, paralleling the medial border of
the patella. The free inner margin of the medial plica can impinge on
the medial trochlear groove of the patellofemoral joint. In theory,
either inflammation or trauma can lead to fibrosis or thickening of the
plica.
will report pain along the medial border of the patella that becomes
worse with activities that involve repetitive flexion and extension of
the knee. There may be an associated sense of popping, clicking, or
snapping. On physical examination, a palpable cord or band is noted 1
cm medial to the medial border of the patella. Palpation of this cord
causes pain, and this pain reproduces the symptoms the patient has been
experiencing. Medial plica are normally not visualized on plain x-ray
studies of the knee. Plicas can be noted on MRI scan, arthrograms, or
CT scans. Unfortunately, it is difficult to determine from these
studies whether a plica is clinically relevant.
nonoperative management is recommended. Rest, with avoidance of
aggravating activities, is most critical. Augment this regimen with a
strengthening and flexibility program. Soft-tissue physical therapy
modalities and anti-inflammatory medications may be useful. One or two
local injections may be helpful in diagnosis and treatment. If all
conservative measures fail, arthroscopy is indicated. (21,34,61).
removing the plica, to identify other possible intra-articular causes
for knee symptoms.
-
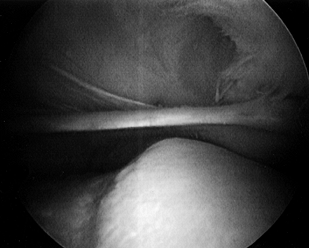
Visualize the medial plica from the superolateral arthroscopy portal (Fig. 84.37; see also COLOR FIG. 84.37). A symptomatic medial plica impinges on the medial trochlear groove between 0° and 60° of knee flexion.
P.2295
There may be an associated articular cartilage injury of the medial trochlear groove from this impingement.![]() Figure 84.37. (See COLOR FIG. 84.37.) Medial plica viewed from superolateral arthroscopic portal.
Figure 84.37. (See COLOR FIG. 84.37.) Medial plica viewed from superolateral arthroscopic portal. -
If the plica is not thickened and there
is no obvious impingement, it is unlikely that resection of the plica
will result in any clinical improvement. Leave normal plicae found
incidentally at arthroscopy alone. -
Resect a clinically significant plica back to the capsular tissues using a combination of basket forceps and a shaver.
-
Use an intra-articular cautery to prevent any postoperative hemarthrosis.
-
Following surgery, use a standard postoperative arthroscopy rehabilitation program.
treatment of disorders of the knee cannot be overstated. Shelbourne has
documented the importance of early rehabilitation for ACL injuries
before having surgery (59). His studies have
demonstrated that patients with good range of motion and strength
preoperatively were able to rehabilitate the knee more predictably
following definitive surgery. Shelbourne also pioneered the concept of
“accelerated rehabilitation” following surgery (60).
Patients who have undergone ACL surgery are immediately allowed to
initiate a range-of-motion and muscle-strengthening program and bear
weight as tolerated. This accelerated program minimizes the risk of
postoperative stiffness. These critical concepts of preoperative and
postoperative rehabilitation apply for almost all disorders of the knee.
may be initiated immediately in most disorders of the knee. Selected
knee problems do require urgent or emergent surgery, such as a locked
knee for a meniscus tear or loose body, some fractures about the knee,
and certain knee ligament injuries. All other individuals will benefit
by a preoperative program of rehabilitation. Most of this
rehabilitation can be performed at home or in a gym facility and does
not require formal physical therapy. Use formal physical therapy on a
selected basis, in addition to the home program of exercise.
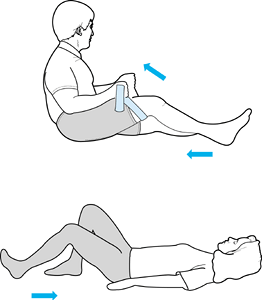
flexibility, strengthening, cardiovascular conditioning, and the
eventual return to activities. Have patients perform passive extension
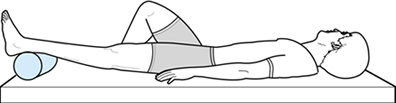
in the supine position (Fig. 84.38) to regain
flexibility. Place a roll or pillow under the ankle, with the knee left
unsupported. Gravity helps stretch the knee into an extended position.
If the patient can tolerate weights on the anterior aspect of the knee,
the process can be accelerated. Passive extension can also be
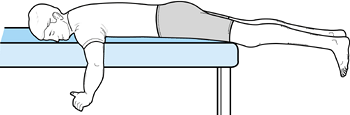
facilitated if the patient lies prone with the leg unsupported (Fig. 84.39).
Weights can be added to the ankle as tolerated. Flexion can be obtained
through an active and active-resistive program. The patient can use a
towel or belt underneath the thigh to facilitate knee flexion (Fig. 84.40).
 |
|
Figure 84.38. Supine passive knee extension exercise.
|
 |
|
Figure 84.39. Prone passive knee extension exercise.
|
 |
|
Figure 84.40. Active and assisted knee flexion exercise.
|
extension. Back and hip problems can be aggravated by SLRs; individuals
with these disorders should avoid SLRs. Have patients perform short arc
extensions in a supine or seated position. Once good muscle control has
been obtained, have the patient initiate a program of mini-squats and
calf raises. When range of motion and strength permit, begin
cardiovascular conditioning with bicycling. Swimming, Nordic Trak,
Stairmaster, and Ellipse machines
are
also useful for cardiovascular fitness in appropriately selected
patients. Instruct patients to perform their exercises using light
weights or resistance with high repetitions (25 to 50 reps) in order
not to aggravate the injured knee.
immediately. With few exceptions, most patients can be mobilized.
Formal physical therapy may be required in selected patients. Following
surgery, most patients should regain the range of motion by 2 months
after surgery. If patients are having difficulty regaining extension,
serial casting is frequently instituted, often within 1 or 2 weeks
following surgery. Consider gentle knee manipulation under anesthesia
for those patients who do not regain knee flexion by 6 to 8 weeks after
surgery. Loss of range of motion is one of the most significant
complications of knee surgery (29). A
comprehensive preoperative and postoperative program of rehabilitation
emphasizing flexibility, strength, and cardiovascular conditioning can
minimize this risk.
procedures, has a well-documented complication rate. Overall,
arthroscopic procedures have a lower complication rate in comparison to
traditional open knee surgery. In 1988, Small reported on complications
occurring in over 10,000 arthroscopic procedures performed by
experienced arthroscopic surgeons, including 8,700 procedures involving
the knee (63). In his series, the overall
complication rate was 1.68%. Knee complications included, in order of
frequency, postoperative hemarthrosis, infection, deep vein thrombosis,
anesthetic complications, instrument failure, reflex sympathetic
dystrophy, iatrogenic ligament injury or fracture, and neurologic
injury. Of note, Small did not report loss of range of motion as a
complication, but other authors have (29).
frequent complication that occurs with knee arthroscopy. Make every
attempt to avoid articular scuffing, the risk of which can be minimized
by proper portal placement, adequate exposure, and careful technique. A
knowledgeable assistant who holds the leg can aid significantly with
exposure of the compartment being visualized.
Procedures at risk include lateral retinacular release and synovectomy.
This risk can be minimized by using drains and intra-articular cautery
in such procedures. Postoperatively, most hemarthrosis can be managed
by aspiration. Rarely, patients need to have repeat arthroscopy and
intra-articular cautery of bleeding vessels.
with overzealous stress in an attempt to gain exposure of the medial
compartment (12). It is more common in patients
older than 50 years of age. Most of these injuries represent
second-degree tears that will heal uneventfully.
nausea and vomiting with general anesthetics and spinal headaches with
regional anesthetics. Adult respiratory distress syndrome requiring
hospitalization has been reported. Careful preoperative evaluation of
patients limits perioperative anesthetic complications.
This complication can be minimized by periodically observing the leg to
ensure that there is no excessive fluid in the soft tissues surrounding
the knee. Compartment syndrome has been described in association with
fluid extravasation (62).
It has been demonstrated that the incidence of deep vein thrombosis is
increased by the use of a tourniquet for longer than 50 minutes (58).
Pulmonary embolus was noted in 25% of these patients. It is important
to recognize that in older patients with postoperative calf pain,
tightness, or swelling, deep vein thrombosis is a potential
complication. In at-risk patients, it is important to minimize venous
stasis. Use elastic hose, sequential compression stockings, or Coumadin
prophylaxis in high-risk patients.
is warranted in the postoperative patient who has increasing pain and a
swollen knee. On aspiration, the WBC is greater than 25,000. The
C-reactive protein and sedimentation rate are usually elevated. Early
arthroscopic debridement and intravenous antibiotics (frequently
vancomycin) eradicates the infection. Institute rehabilitation to
prevent permanent stiffness. Routine preoperative antibiotic
prophylaxis is not recommended for most patients (70).
unusual to cause injury to sensory nerves or small vessels located in
the subcutaneous tissue. Minimize the risk of such injury by bluntly
dissecting through the soft tissues down to the capsular structure with
a hemostat when making the portal. When establishing new portals, use
transillumination to demonstrate vascular structures. Fortunately,
major neurovascular injury is rare. The popliteal artery can be
penetrated posteriorly (35). Prompt recognition is critical for successful revascularization of the leg.
complications of arthroscopic knee surgery. A thorough knowledge of
knee anatomy is a prerequisite to performing arthroscopic knee
procedures. The skill and experience of the surgeon will influence the
complication rate.
scheme: *, classic article; #, review article; !, basic research
article; and +, clinical results/outcome study.
GR, Flannigan BD, Tolin BS, et al. MR Diagnosis of Recurrent Tears in
the Knee. The Value of Intraarticular Contrast Material. AJR Am J Roentgenol 1993;161:821.
LP, King CP, Hollet MD, et al. Meniscal Tears in the Knee: Accuracy of
Detection with Fast Spin-echo MR imaging and Arthroscopic Correlation
in 293 Patients. Radiology 1997;2:508.
DM, Stone ML, Sachs R, et al. Instrumented Measurement of Anterior Knee
Laxity in Patients with Acute Anterior Cruciate Disruption. Am J Sports Med 1985;13:401.
GC, Gianotti BF, Edson CJ. Current Concepts Review. The Posterior
Cruciate Ligament: Arthroscopic Evaluation and Treatment. Arthroscopy 1994;10:673.
HJ, Glasgow SG, Sapega AA, Torg JS. Magnetic Resonance Imaging of Knee
Disorders: Clinical Value and Cost Effectiveness in a Sports Medicine
Practice. Am J Sports Med 1996;24:99.
CA, Dussalut R, Levesque HP. The Tangential X-ray Investigation of the
Patellofemoral Joint: X-ray Technique, Diagnostic Criteria and Their
Interpretation. Clin Orthop 1979;144:16.
WD, Steadman JR. Arthroscopic Assessment of the Posterior Compartments
of the Knee via the Intercondylar Notch: The Arthroscopist’s Field of
View. Arthroscopy 1993;9:284.
FR, Bassett RW, Grood ES, et al. Arthroscopy in Acute Traumatic
Hemarthrosis of the Knee: Incidence of Anterior Cruciate Tears and
Other Injuries. J Bone Joint Surg Am 1980;62:687.
FR, Spievack ES. Extra-articular Fluid Dissection in Tissues during
Arthroscopy: A Report of Clinical Cases and a Study of Intra-articular
and Thigh Pressures in Cadavers. Am J Sports Med 1982;11:346.
MA, Shalvoy RM, Hughston JC. The Accuracy of the Clinical Examination
Documented by Arthroscopy: A Prospective Study. Am J Sports Med 1993;21:773.
DJ, McLean J, Zarnett ME. PVS of the Knee: The Results of Total
Arthroscopic Synovectomy, Partial Arthroscopic Synovectomy and
Arthroscopic Local Excision. J Bone Joint Surg [Am] 1992;74:119.
AA, Heppenstall RD, Chance B, et al. Optimizing Tourniquet Application
and Release Times in Extremity Surgery: A Biomechanical and
Ultrastructural Study. J Bone Joint Surg [Am] 1985;67:303.
GC, Tagert BE, Young MJ. Reliability of the Clinical Assessment in
Predicting the Cause of Internal Derangements of the Knee. Arthroscopy 1995;11:568.